


概述
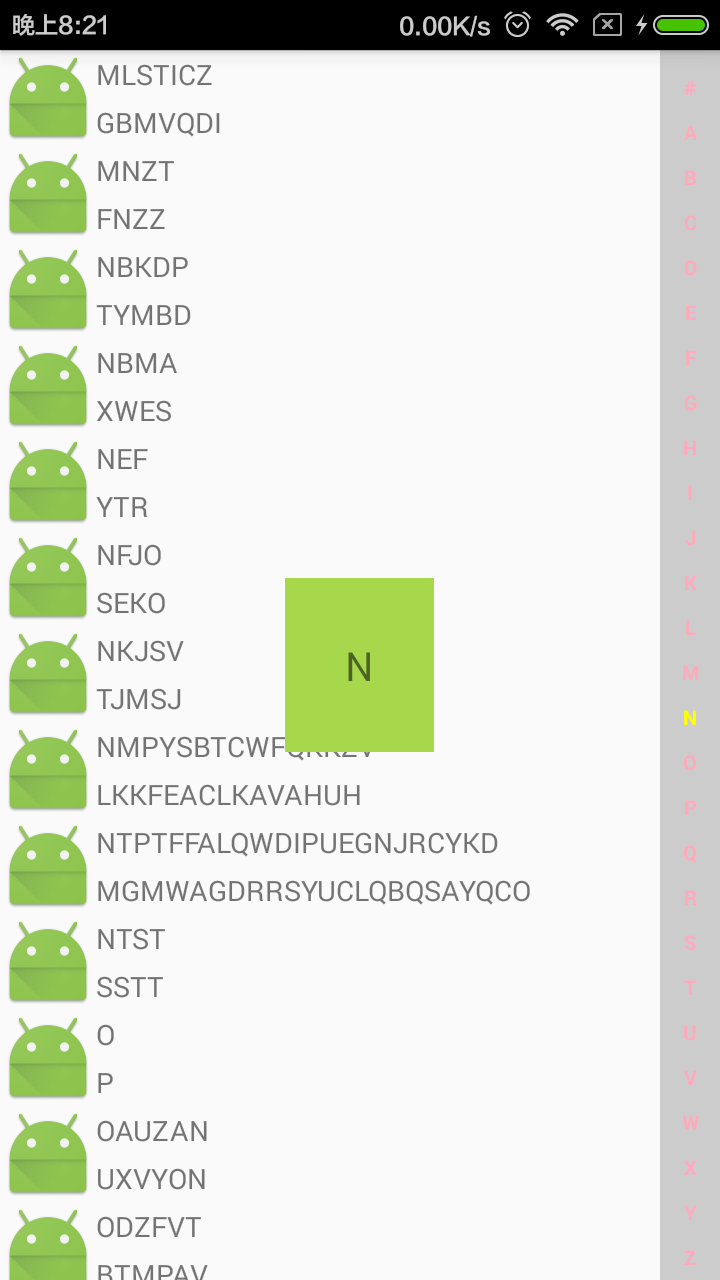
App列表快速定位和筛选,如微信联系人索引。
相关开源库:
woozzu/IndexableListView@[Github]
bhavyahmehta/ListviewFilter@[Github]
ndraskindler/quickscroll@[Github]
实现原理
woozzu/IndexableListView@[Github]:
此库利用了一个IndexScroller 和GestureDetector来对IndexableListView类中的Touch事件进行操作。
@Override
    public boolean onTouchEvent(MotionEvent ev) {
        // Intercept ListView's touch event
        if (mScroller != null && mScroller.onTouchEvent(ev))
            return true;
        //...
        return super.onTouchEvent(ev);
    }

    @Override
    public boolean onInterceptTouchEvent(MotionEvent ev) {
        if(mScroller.contains(ev.getX(), ev.getY()))
            return true;

        return super.onInterceptTouchEvent(ev);
}IndexScroller中 通过getSectionByPoint(float y)来获取当前Section,调用draw(Canvas canvas)方法绘制到屏幕上。
// 绘制背景
canvas.drawRoundRect(mIndexbarRect, 5 * mDensity, 5 * mDensity, indexbarPaint);
// 绘制字母
canvas.drawText(mSections[i], mIndexbarRect.left + paddingLeft
, mIndexbarRect.top + mIndexbarMargin + sectionHeight * i + paddingTop - indexPaint.ascent(), indexPaint);bhavyahmehta/ListviewFilter@[Github]:
此库实现了索引定位和搜索过滤,需要了解Filter接口。
其在onPostCreate方法中通过TextWatcher接口观察EditText中键入的关键字,通过Filter接口过滤,最终调用AsyncTask来设置SectionPos 和 列表数据,进而展示到界面上。
- 核心代码:
// NOT forget to sort array
                Collections.sort(items, new SortIgnoreCase());

                String prev_section = "";
                for (String current_item : items) {
                    //获取列表item数据的首字母
                    String current_section = current_item.substring(0, 1).toUpperCase(Locale.getDefault());

                    if (!prev_section.equals(current_section)) {
                    //如果首字母和上一个首字母不同,则添加到mListSectionPos中
                        mListItems.add(current_section);
                        mListItems.add(current_item);
                        // array list of section positions
                        mListSectionPos.add(mListItems.indexOf(current_section));
                        // 重置上一个首字母
                        prev_section = current_section;
                    } else {
                    //否则只添加到mListItems中
                        mListItems.add(current_item);
                    }
}IndexBarView:索引自定义View,onTouchEvent方法中不断回调自定义接口,向外公布状态。
// Gives index bar view touched Y axis value, position of section and preview text value to list view
public interface IIndexBarFilter {
    void filterList(float sideIndexY,int position,String previewText);
}PinnedHeaderListView:主类,实现了上述接口,调用setSelection(position);来设置list的滚动位置。
@Override
    public void filterList(float indexBarY, int position,String previewText) {
        this.mIndexBarY=indexBarY;
  //....
        setSelection(position);
}PinnedHeaderAdapter:实现了OnScrollListener, IPinnedHeader接口,监测滚动事件,掉用PinnedHeaderListView的configureHeaderView来设置头布局,总体设置十分精妙。
@Override
    public void onScroll(AbsListView view, int firstVisibleItem,int visibleItemCount, int totalItemCount) {
        if (view instanceof PinnedHeaderListView) {
            ((PinnedHeaderListView) view).configureHeaderView(firstVisibleItem);
        }
}ndraskindler/quickscroll@[Github]:
此库动画较多,通过传入的不同的type类型来create 不同的View,监听ListView的onScroll方法,来回调不同的selection。
- 核心代码
@SuppressLint("NewApi")
    protected void scroll(final float height) {
    //....
    scrollIndicatorTextView.setText(scrollable.getIndicatorForPosition(position, groupPosition));
        listView.setSelection(scrollable.getScrollPosition(position, groupPosition));
    }

    @SuppressLint("NewApi")
    protected void moveHandlebar(final float where) {
        float move = where;
        //....
        // handleBar.setTranslationY(move);
        ViewHelper.setTranslationY(handleBar, move);
    }
简单实现
知道了原理,那么我们就来实现一个不依赖于ListView的自定义控件,一个简单的竖直的长条自定义View,在里面绘制上我们的A~Z 字母,回调出Touch事件,可以配合RecyclerView。
- attrs.xml
<?xml version="1.0" encoding="utf-8"?>
<resources>

    <declare-styleable name="IndexView">
        <attr name="textSize" format="dimension" />
        <attr name="textColor" format="color"/>
        <attr name="selectTextColor" format="color"/>
        <attr name="selectBackGround" format="color"/>
    </declare-styleable>

</resources>
自定义属性获取,略。
测量
onMeasure
@Override
    protected void onMeasure(int widthMeasureSpec, int heightMeasureSpec) {
        super.onMeasure(widthMeasureSpec, heightMeasureSpec);
        width = getMeasuredWidth();
        height = getMeasuredHeight();
        // 单行的高度
        singleHeight = height/letters.length;
}- 绘制
onDraw
 @Override
    protected void onDraw(Canvas canvas) {
        super.onDraw(canvas);
        if (showBg) {
            // 画出背景
            canvas.drawColor(selectBackGround);
        }

        // 画字母
        for (int i = 0; i < letters.length; i++) {

            // 如果这一项被选中,则换一种颜色画
            if (i == choose) {
                paint.setColor(selectTextColor);
                paint.setFakeBoldText(true);
            }else{
                paint.setColor(textColor);
                paint.setFakeBoldText(false);
            }
            // 要画的字母的x,y坐标
            float posX = width / 2 - paint.measureText(letters[i]) / 2;
            float posY = i * singleHeight + singleHeight;
            // 画出字母
            canvas.drawText(letters[i], posX, posY, paint);
        }
}- 触摸事件分发
dispatchTouchEvent
 @Override
    public boolean dispatchTouchEvent(MotionEvent event) {
        final float y = event.getY();
        // 算出点击的字母的索引
        final int index = (int) (y / getHeight() * letters.length);
        // 保存上次点击的字母的索引到oldChoose
        final int oldChoose = choose;
        switch (event.getAction()) {
            case MotionEvent.ACTION_DOWN:
                showBg = true;
                if (oldChoose != index && listenner != null && index > 0
                        && index < letters.length) {
                    choose = index;
                    listenner.onTouchLetterChange(showBg, letters[index]);
                    invalidate();
                }
                break;

            case MotionEvent.ACTION_MOVE:
                if (oldChoose != index && listenner != null && index > 0
                        && index < letters.length) {
                    choose = index;
                    listenner.onTouchLetterChange(showBg, letters[index]);
                    invalidate();
                }
                break;
            case MotionEvent.ACTION_UP:
                showBg = false;
                choose = -1;
                if (listenner != null) {
                    if (index <= 0) {
                        listenner.onTouchLetterChange(showBg, "A");
                    } else if (index > 0 && index < letters.length) {
                        listenner.onTouchLetterChange(showBg, letters[index]);
                    } else if (index >= letters.length) {
                        listenner.onTouchLetterChange(showBg, "Z");
                    }
                }
                invalidate();
                break;
        }
        return true;
}这里通过invalidate()来使界面重绘.
测试
在activity中我们引用并设置回调,即可快速实现效果,
    indexView.setOnTouchLetterChangeListenner(new IndexView.OnTouchLetterChangeListenner() {

            @Override
            public void onTouchLetterChange(boolean isTouched, String s) {

                float_view.setText(s);
                if (isTouched) {
                    float_view.setVisibility(View.VISIBLE);
                } else {
                    float_view.postDelayed(new Runnable() {

                        @Override
                        public void run() {
                            float_view.setVisibility(View.GONE);
                        }
                    }, 100);
                }
                int position = index.indexOf(s);
                id_recyclerview.scrollToPosition(position);            }
        });
效果图:
相关源码:


 5726
5726

 被折叠的 条评论
为什么被折叠?
被折叠的 条评论
为什么被折叠?
 到【灌水乐园】发言


