


从”命令“这两个字我们就可以看出这个模式的应用场景,是一个协调 调用者和接收者关系的设计模式。
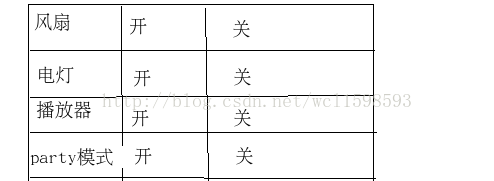
下面我们举一个具体的例子来说明一下,遥控器和各个家电。假如现在要设计一个遥控器,一共有7×3 三列按钮,最左边一列的按钮是模式按钮,中间一列的按钮是开机按
钮,最后一列的按钮是关机按钮。开机关机我就不解释了,模式按钮是什么呢?我们现在想用一个遥控器来控制所有的家电,如何来分辨我们按下去的按钮是控制风扇的还是点
灯的呢?添加一列模式按钮就好了。比如假设左列第一个是 电灯的按钮,按下去之后,我们再去操作开关的按钮,那么电灯就会亮灭,以此类推。图示大概就是这个样子:
没有学设计模式之前,我们会怎么做?
if mode == "0"  // 0 代表风扇
   if action == "开"
      // 风扇开
   else
      // 风扇关
else if mode == "2" // 2 代表电灯
....改。这样的维护是会拖垮人的。代码也不整洁。
那么现在我们试试命令模式,命令模式的精髓是 封装,降低偶尔度。降低调用者和接收者的耦合度,二者通过一个命令对象来实现解耦。
现在我们看看需要怎么设计?上图,仔细看,command接口就是我们实现解耦的关键:
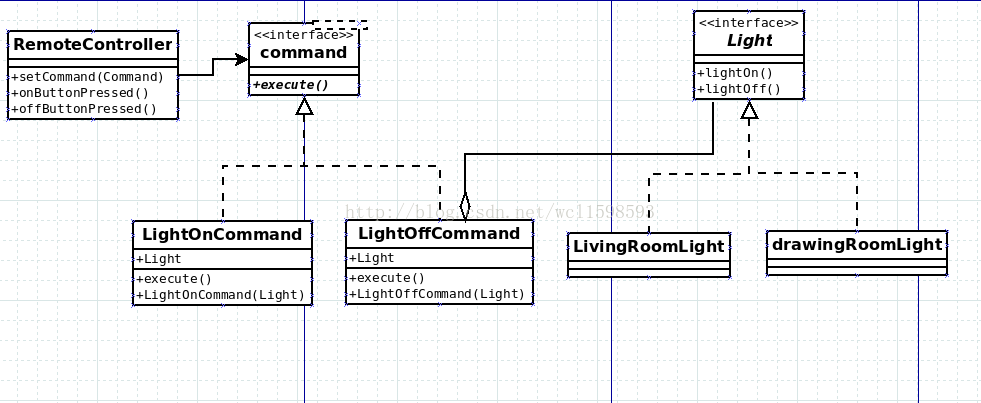
我们由下自上的提供类的支持:
/**
* @author dean
* 电灯基类
*/
public abstract class Light {
protected String name;
public Light(String name)
{
this.name = name;
}
public void on(){
System.out.println(name + "is on");
}
public void off(){
System.out.println(name + "is off");
}
}
/**
* @author dean
* 起居室灯类
*/
public class LivingroomLight extends Light
{
/**
* @param name
* 显示类名
*/
public LivingroomLight(String name)
{
super(name);
}
}
/**
* @author dean
* 休息室灯类
*/
public class DrawingroomLight extends Light
{
public DrawingroomLight(String name) {
super(name);
}
}
/**
* @author dean
* 命令接口
*/
public interface Command
{
// 执行命令的对象,由各个Command的实现类具体实现
void execute();
}
/**
* @author dean
* 开电灯的命令实现类
*/
public class LightOnCommand implements Command
{
Light light;
/**
* @param light 命令的对象,在实例化类时提供
*/
public LightOnCommand(Light light)
{
this.light = light;
}
@Override
public void execute() {
light.on();
}
}
public class LightOffCommand implements Command{
Light light;
public LightOffCommand(Light light)
{
this.light = light;
}
@Override
public void execute() {
light.off();
}
}
// 遥控器类(也即 调用者)
public class RemoteController{
private static int SLOT_NUMBERS = 7;
Command[] onCommands = new Command[SLOT_NUMBERS];
Command[] offCommands = new Command[SLOT_NUMBERS];
/**
* 将模式按钮与右侧的开/关 按钮关联
* @param slot 遥控模式
* @param onCommand 将遥控模式的右侧的开按钮关联
* @param offCommand 将遥控模式的右侧的关按钮关联
*/
public void setCommand(int slot,Command onCommand,Command offCommand)
{
this.onCommands[slot] = onCommand;
this.offCommands[slot] = offCommand;
}
public void onButtonWasPushed(int slot)
{
this.onCommands[slot].execute();
}
public void offButtonWasPushed(int slot)
{
this.offCommands[slot].execute();
}
}
/**
* @author dean
* 测试类
*/
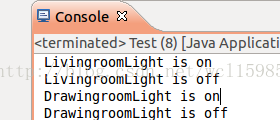
public class Test
{
public static void main(String[] args) {
RemoteController controller = new RemoteController();
Light livingroomLight = new LivingroomLight(" LivingroomLight ");
Light drawingroomLight = new DrawingroomLight(" DrawingroomLight ");
Command livingroomLightOnCommand = new LightOnCommand(livingroomLight);
Command livingroomLightOffCommand = new LightOffCommand(livingroomLight);
Command drawingroomOnCommand = new LightOnCommand(drawingroomLight);
Command drawingroomOffCommand = new LightOffCommand(drawingroomLight);
// 开,关
controller.setCommand(0,livingroomLightOnCommand,livingroomLightOffCommand);
controller.onButtonWasPushed(0);
controller.offButtonWasPushed(0);
controller.setCommand(1,drawingroomOnCommand,drawingroomOffCommand);
controller.onButtonWasPushed(1);
controller.offButtonWasPushed(1);
}
}


 475
475


 被折叠的 条评论
为什么被折叠?
被折叠的 条评论
为什么被折叠?
 到【灌水乐园】发言


