


一、在子线程中更新UI概述
和许多其他的GUI 库一样,Android 的UI 也是线程不安全的。也就是说,如果想要更新应用程序里的UI 元素,则必须在主线程中进行,否则就会出现异常。但是有些时候,我们必须在子线程里去执行一些耗时任务,然后根据任务的执行结果来更新相应的UI 控件,这该如何是好呢?对于这种情况,Android 提供了一套异步消息处理机制,完美地解决了在子线程中进行UI 操作的问题。
二、Handler与Message的基本用法
Handler主要接收子线程发送的数据, 并用此数据配合主线程更新UI,用来跟UI主线程交互用。比如可以用handler发送一个message,然后在handler的线程中来接收、处理该消息,以避免直接在UI主线程中处理事务导致影响UI主线程的其他处理工作,Android提供了Handler作为主线程和子线程的纽带;也可以将handler对象传给其他进程,以便在其他进程中通过handler给你发送事件;还可以通过handler的延时发送message,可以延时处理一些事务的处理。
我们对上一篇Android之AsyncTask详解中的案例稍作修改:
public class MainActivity extends AppCompatActivity {
private ProgressDialog progressDialog;//下载进度条
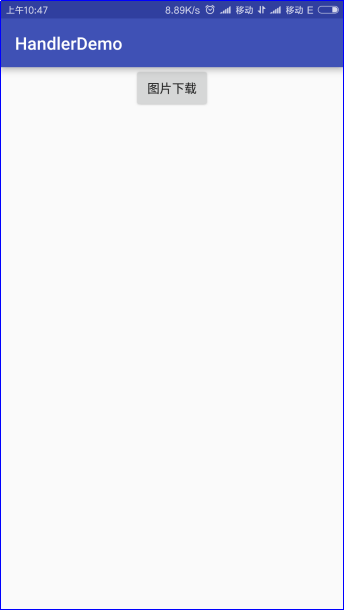
private Button button;
private ImageView imageView;
//图片下载地址
private final String IMAGE_URL = "http://img5q.duitang.com/uploads/item/201504/07/20150407H0747_rPsRA.thumb.700_0.jpeg";
private final int IS_DOWNING = 0;
private final int IS_FINISH = 1;
private Handler myHandler = new Handler(){
@Override
public void handleMessage(Message msg) {
if(msg.what == IS_FINISH){
Bitmap bitmap = (Bitmap)msg.obj;
imageView.setImageBitmap(bitmap);
progressDialog.dismiss();
}else if(msg.what == IS_DOWNING ){
int value = (int)msg.obj;
progressDialog.setProgress(value);
}
}
};
@Override
protected void onCreate(Bundle savedInstanceState) {
super.onCreate(savedInstanceState);
setContentView(R.layout.activity_main);
button = (Button) findViewById(R.id.button);
button.setOnClickListener(new View.OnClickListener() {
@Override
public void onClick(View v) {
new Thread(new MyThread()).start();
progressDialog.show();
}
});
imageView = (ImageView) findViewById(R.id.imageView);
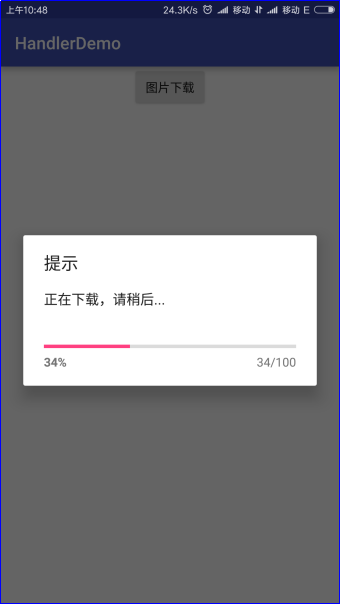
progressDialog = new ProgressDialog(this);
progressDialog.setTitle("提示");
progressDialog.setMessage("正在下载,请稍后...");
progressDialog.setProgressStyle(ProgressDialog.STYLE_HORIZONTAL);
}
public class MyThread implements Runnable{
@Override
public void run() {
Bitmap bitmap = downBitmap(IMAGE_URL);
Message message = Message.obtain();
message.obj = bitmap;
message.what = IS_FINISH;
myHandler.sendMessage(message);
}
}
/**
* 下载图片 ,并保持为Bitmap
* @param url
* @return
*/
private Bitmap downBitmap(String url){
Bitmap bitmap = null;
ByteArrayOutputStream outputStream = new ByteArrayOutputStream();
InputStream inputStream = null;
try {
/*
*2016-11-01注释:在Android 5.0之后,HttpClient被HttpURLConnecetion替代,后来在Android 6.0完全被舍弃,
*如需要HttpURLConnecetion的实现方式,移步
*到http://blog.csdn.net/wei_zhi/article/details/52997246
*/
HttpClient httpClient = new DefaultHttpClient();
HttpGet httpGet = new HttpGet(url);
HttpResponse httpResponse = httpClient.execute(httpGet);
if (httpResponse.getStatusLine().getStatusCode() == 200) {
inputStream = httpResponse.getEntity().getContent();
long file_len = httpResponse.getEntity().getContentLength();
int len = 0;
byte[] data = new byte[1024];
int total_len = 0;
while ((len = inputStream.read(data)) != -1) {
total_len += len;
int value = (int) ((total_len / (float) file_len) * 100);
//publishProgress(value);
Message message = Message.obtain();
message.obj = value;
message.what = IS_DOWNING;
myHandler.sendMessage(message);
outputStream.write(data, 0, len);
}
byte[] result = outputStream.toByteArray();
bitmap = BitmapFactory.decodeByteArray(result, 0, result.length);
}
} catch (Exception e) {
e.printStackTrace();
} finally {
if (inputStream != null) {
try {
inputStream.close();
} catch (IOException e) {
e.printStackTrace();
}
}
}
return bitmap;
}
}运行结果:

三、解析异步消息处理机制
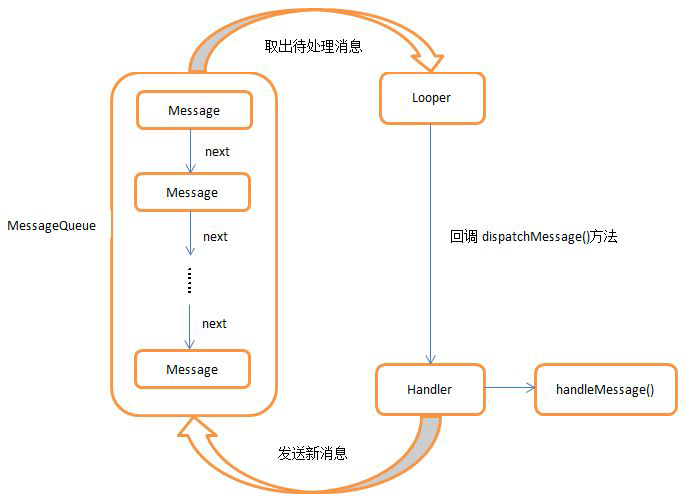
Android 中的异步消息处理主要由四个部分组成,Message、Handler、MessageQueue 和Looper。下面对这四个部分进行一下简要的介绍:
(1)Message
Message 是在线程之间传递的消息,它可以在内部携带少量的信息,用于在不同线程之间交换数据。上一小节中我们使用到了Message 的what 字段,除此之外还可以使用arg1 和arg2 字段来携带一些整型数据,使用obj 字段携带一个Object 对象。
(2)Handler
Handler 顾名思义也就是处理者的意思,它主要是用于发送和处理消息的。发送消息一般是使用Handler 的sendMessage()方法,而发出的消息经过一系列地辗转处理后,最终会传递到Handler 的handleMessage()方法中。
在使用Handler之前,我们都是初始化一个实例,比如用于更新UI线程,我们会在声明的时候直接初始化,或者在onCreate中初始化Handler实例:
private Handler mHandler = new Handler()
    {
        public void handleMessage(android.os.Message msg)
        {
            switch (msg.what)
            {
            case value:

                break;

            default:
                break;
            }
        };
    };
(3)MessageQueue
MessageQueue 是消息队列的意思,它主要用于存放所有通过Handler 发送的消息。这部分消息会一直存在于消息队列中,等待被处理。每个线程中只会有一个MessageQueue对象。
(4)Looper
Looper 是每个线程中的MessageQueue 的管家,调用Looper 的loop()方法后,就会进入到一个无限循环当中,然后每当发现MessageQueue 中存在一条消息,就会将它取出,并传递到Handler 的handleMessage()方法中。每个线程中也只会有一个Looper 对象。
对于Looper主要是prepare()和loop()两个方法:
public static final void prepare() {
        if (sThreadLocal.get() != null) {
            throw new RuntimeException("Only one Looper may be created per thread");
        }
        sThreadLocal.set(new Looper(true));
}
sThreadLocal是一个ThreadLocal对象,可以在一个线程中存储变量。Looper 就是存储在sThreadLocal里面。这个方法被调用后,首先会判断当前线程里面有没有 Looper对象,如果没有就会创建一个 Looper 对象,如果存在则会抛出异常。可见,prepare()方法,不能被调用两次。这就保证了一个线程只有一个Looper对象。
然后我们看看 loop() 方法:
    /**
     * Run the message queue in this thread. Be sure to call
     * {@link #quit()} to end the loop.
     */
    public static void loop() {
        final Looper me = myLooper();
        if (me == null) {
            throw new RuntimeException("No Looper; Looper.prepare() wasn't called on this thread.");
        }
        final MessageQueue queue = me.mQueue;

        // Make sure the identity of this thread is that of the local process,
        // and keep track of what that identity token actually is.
        Binder.clearCallingIdentity();
        final long ident = Binder.clearCallingIdentity();

        for (;;) {
            Message msg = queue.next(); // might block
            if (msg == null) {
                // No message indicates that the message queue is quitting.
                return;
            }

            // This must be in a local variable, in case a UI event sets the logger
            Printer logging = me.mLogging;
            if (logging != null) {
                logging.println(">>>>> Dispatching to " + msg.target + " " +
                        msg.callback + ": " + msg.what);
            }

            msg.target.dispatchMessage(msg);

            if (logging != null) {
                logging.println("<<<<< Finished to " + msg.target + " " + msg.callback);
            }

            // Make sure that during the course of dispatching the
            // identity of the thread wasn't corrupted.
            final long newIdent = Binder.clearCallingIdentity();
            if (ident != newIdent) {
                Log.wtf(TAG, "Thread identity changed from 0x"
                        + Long.toHexString(ident) + " to 0x"
                        + Long.toHexString(newIdent) + " while dispatching to "
                        + msg.target.getClass().getName() + " "
                        + msg.callback + " what=" + msg.what);
            }

            msg.recycleUnchecked();
        }
    }
这个方法先调用 myLooper() 方法,得到 sThreadLocal 中保存的 Looper 对象,并得到 looper 对象对应的 MessageQueue 对象,然后就进入无限循环。该循环主要包括:取出一条消息,如果没有消息则阻塞; 调用 msg.target.dispatchMessage(msg);把消息交给msg的target的dispatchMessage方法去处理。
Looper主要作用:
(1)与当前线程绑定,保证一个线程只会有一个Looper实例,同时一个Looper实例也只有一个MessageQueue。
(2)loop()方法,不断从MessageQueue中去取消息,交给消息的target属性的dispatchMessage去处理。
了解了Message、Handler、MessageQueue 以及Looper 的基本概念后,我们再来对异步消息处理的整个流程梳理一遍。首先需要在主线程当中创建一个Handler 对象,并重写handleMessage()方法。然后当子线程中需要进行UI 操作时,就创建一个Message 对象,并通过Handler 将这条消息发送出去。之后这条消息会被添加到MessageQueue 的队列中等待被处理,而Looper 则会一直尝试从MessageQueue 中取出待处理消息,最后分发回Handler的handleMessage()方法中。由于Handler 是在主线程中创建的,所以此时handleMessage()方法中的代码也会在主线程中运行,于是我们在这里就可以安心地进行UI 操作了。整个异步消息处理机制的流程示意图如图所示。
总结:
(1)首先Looper.prepare()在本线程中保存一个Looper实例,然后该实例中保存一个MessageQueue对象,因为Looper.prepare()在一个线程中只能调用一次,所以MessageQueue在一个线程中只会存在一个。
(2)Looper.loop()会让当前线程进入一个无限循环,不断从MessageQueue的实例中读取消息,然后回调msg.target.dispatchMessage(msg)方法。
(3)Handler的构造方法,会首先得到当前线程中保存的Looper实例,进而与Looper实例中的MessageQueue想关联。
(4)Handler的sendMessage方法,会给msg的target赋值为handler自身,然后加入MessageQueue中。
(5)在构造Handler实例时,我们会重写handleMessage方法,也就是msg.target.dispatchMessage(msg)最终调用的方法。
参考:
http://blog.csdn.net/guolin_blog/article/details/9991569


 被折叠的 条评论
为什么被折叠?
被折叠的 条评论
为什么被折叠?
 到【灌水乐园】发言


