


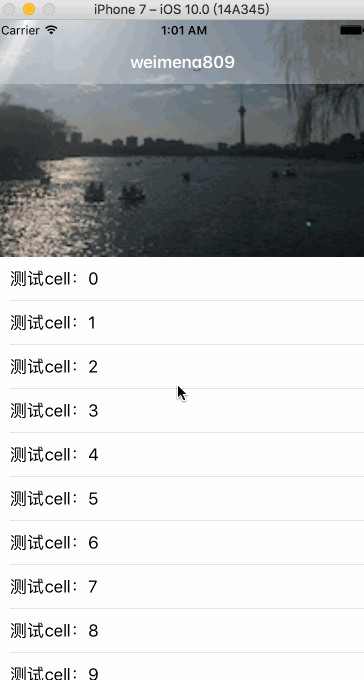
1、实现的效果图
2、实现原理
1) 在导航栏UINavigationBar中添加了两个自定义的UIView,其中下层的view用来设置导航栏的背景色渐变,上层的view中添加一个UILabel用来设置导航的标题,此UILabel的文字位置和导航栏的标题文字重合。
2) tableView滚动时,根据contentOffset的y值,设置导航栏颜色的渐变。
3)tableView滚动时,根据contentOffset的y值,计算滚动的距离,设置上层view的layer的mask属性,就能实现上图的效果。
layer的mask属性决定了当前view的可显示区域,所以可以模拟出这个效果。此外导航栏背景颜色渐变和标题文字的渐变是两个独立的功能。
3、主要实现文件的代码
UINavigationBar+BackgroundView.h文件
#import <UIKit/UIKit.h>

@interface UINavigationBar (BackgroundView)

@property (nonatomic, retain) UIView *overlayView;
@property (nonatomic, retain) UIView *overlayMaskView;
- (void)yc_setNavigationBarBackground:(UIColor *)backgroundColor;
- (void)yc_resetNavigationBarBackground;
- (void)yc_setNavigationBarMask:(CGFloat)visibleHeight;
@end
UINavigationBar+BackgroundView.m 文件
#import "UINavigationBar+BackgroundView.h"
#import <objc/runtime.h>
#import "ViewController.h"

#define titleLableColor [UIColor colorWithRed:98/255.0 green:98/255.0 blue:98/255.0 alpha:1]
@implementation UINavigationBar (BackgroundView)
static void *YCNavigationBarKey = "YCNavigationBarKey";
static void *YCNavigationBarMaskViewKey = "YCNavigationBarMaskViewKey";
const CGFloat kStateBarHeight = 20.f;

- (UIView *)overlayView {
    return objc_getAssociatedObject(self, YCNavigationBarKey);
}

- (UIView *)overlayMaskView {
    return objc_getAssociatedObject(self, YCNavigationBarMaskViewKey);
}

- (void)setOverlayView:(UIView *)overLayView {
    objc_setAssociatedObject(self, YCNavigationBarKey, overLayView, OBJC_ASSOCIATION_RETAIN_NONATOMIC);
}

- (void)setOverlayMaskView:(UIView *)overlayMaskView {
    objc_setAssociatedObject(self, YCNavigationBarMaskViewKey, overlayMaskView, OBJC_ASSOCIATION_RETAIN_NONATOMIC);
}

- (void)yc_setNavigationBarBackground:(UIColor *)backgroundColor {
    if (!self.overlayView) {
        [self setBackgroundImage:[UIImage new] forBarMetrics:UIBarMetricsDefault];
        self.overlayView = [[UIView alloc] initWithFrame:CGRectMake(0, -kStateBarHeight, [UIScreen mainScreen].bounds.size.width, CGRectGetHeight(self.bounds) + kStateBarHeight)];
        self.overlayView.autoresizingMask = UIViewAutoresizingFlexibleWidth|UIViewAutoresizingFlexibleHeight;
        [self insertSubview:self.overlayView atIndex:0];
    }
    self.overlayView.backgroundColor = backgroundColor;
}

- (void)yc_setNavigationBarMask:(CGFloat)visibleHeight {
    if (!self.overlayMaskView) {
        self.overlayMaskView = [[UIView alloc] initWithFrame:CGRectMake(0, -kStateBarHeight, [UIScreen mainScreen].bounds.size.width, CGRectGetHeight(self.bounds) + kStateBarHeight)];

        self.overlayMaskView.autoresizingMask = UIViewAutoresizingFlexibleWidth | UIViewAutoresizingFlexibleHeight;
        [self addSubview:self.overlayMaskView];

        UILabel *label = [[UILabel alloc] initWithFrame:CGRectMake(0, 10, [UIScreen mainScreen].bounds.size.width, CGRectGetHeight(self.bounds) + kStateBarHeight)];
        label.textAlignment = NSTextAlignmentCenter;
        label.text = NavigationBarTitle;

        label.textColor = titleLableColor;
        label.font = [UIFont boldSystemFontOfSize:17];
        [self.overlayMaskView addSubview:label];
        self.overlayMaskView.layer.mask = [[CAShapeLayer alloc] init];
        self.overlayMaskView.layer.mask.frame = CGRectMake(0, NavigationBarHeight - visibleHeight, self.bounds.size.width, visibleHeight);
        self.overlayMaskView.layer.mask.backgroundColor = [UIColor redColor].CGColor;
    }
    self.overlayMaskView.layer.mask.frame = CGRectMake(0, NavigationBarHeight - visibleHeight, self.bounds.size.width, visibleHeight);
}

- (void)yc_resetNavigationBarBackground {
    [self setBackgroundImage:nil forBarMetrics:UIBarMetricsDefault];
    [self.overlayView removeFromSuperview];
    self.overlayView = nil;
}
@end
ViewController.m文件
#import "ViewController.h"
#import "UINavigationBar+BackgroundView.h"

#define kScreenHeight CGRectGetHeight([UIScreen mainScreen].bounds)
#define kNavigationBarColor [UIColor colorWithRed:245/255.0 green:245/255.0 blue:245/255.0 alpha:1]

static NSString * const cellIdentifier = @"CustomCell";
NSString *const NavigationBarTitle = @"weimeng809";

const CGFloat NavigationBarHeight = 64.f;
const CGFloat kTableViewHeaderViewHeight = 320.f;
const CGFloat kTableViewHeaderViewWidth = 100.f;

@interface ViewController ()<UITableViewDelegate, UITableViewDataSource>
@property (nonatomic, strong) UITableView *tableView;
@end

@implementation ViewController

- (void)viewDidLoad {
    [super viewDidLoad];
    self.navigationItem.title = NavigationBarTitle;
    [self setupTableView];
}

- (void)viewWillAppear:(BOOL)animated {
    [super viewWillAppear:animated];
    [self scrollViewDidScroll:self.tableView];
    [self.navigationController.navigationBar setTitleTextAttributes:[NSDictionary dictionaryWithObjectsAndKeys:[UIColor whiteColor],NSForegroundColorAttributeName,nil]];
    [self.navigationController.navigationBar setShadowImage:[UIImage new]];
}

- (void)viewWillDisappear:(BOOL)animated
{
    [super viewWillDisappear:animated];
    self.tableView.delegate = nil;
    [self.navigationController.navigationBar yc_resetNavigationBarBackground];
}

- (void)setupTableView {
    self.tableView = [[UITableView alloc] initWithFrame:CGRectMake(0, -NavigationBarHeight, self.view.bounds.size.width, self.view.bounds.size.height + NavigationBarHeight) style:UITableViewStylePlain];
    self.tableView.delegate = self;
    self.tableView.dataSource = self;
    [self.tableView registerClass:[UITableViewCell class] forCellReuseIdentifier:cellIdentifier];
    [self.view addSubview:self.tableView];
    self.tableView.backgroundColor = [UIColor lightGrayColor];

    UIImageView *imageView = [[UIImageView alloc] initWithImage:[UIImage imageNamed:@"IMG_0193.JPG"]];
    imageView.bounds = CGRectMake(0, 0, kTableViewHeaderViewWidth , kTableViewHeaderViewHeight);
    imageView.contentMode = UIViewContentModeScaleAspectFill;

    self.tableView.tableHeaderView = imageView;
    self.tableView.tableHeaderView.frame = CGRectMake(0, 0, kTableViewHeaderViewWidth, kTableViewHeaderViewHeight);
    self.tableView.tableHeaderView.clipsToBounds = YES;
}

- (UITableViewCell *)tableView:(UITableView *)tableView cellForRowAtIndexPath:(NSIndexPath *)indexPath {

    UITableViewCell *cell = [tableView dequeueReusableCellWithIdentifier:cellIdentifier];
    cell.textLabel.text = [NSString stringWithFormat:@"测试cell:%ld", (long)indexPath.row];
    return cell;
}

- (NSInteger)tableView:(UITableView *)tableView numberOfRowsInSection:(NSInteger)section {
    return 30;
}

- (void)scrollViewDidScroll:(UIScrollView *)scrollView {
    CGFloat offsetY = scrollView.contentOffset.y;
    CGFloat alpha = MIN(1, (offsetY + NavigationBarHeight) / (kTableViewHeaderViewHeight - NavigationBarHeight));
    [self.navigationController.navigationBar yc_setNavigationBarBackground:[kNavigationBarColor colorWithAlphaComponent:alpha]];
    CGFloat visibleHeiht = alpha * NavigationBarHeight;
    [self.navigationController.navigationBar yc_setNavigationBarMask:visibleHeiht];

}

@end实现导航栏的titile颜色渐变应该还有其他的解决方案,希望知道的朋友多指点。


 2120
2120


 被折叠的 条评论
为什么被折叠?
被折叠的 条评论
为什么被折叠?
 到【灌水乐园】发言


