


首先,让我们直接上效果图
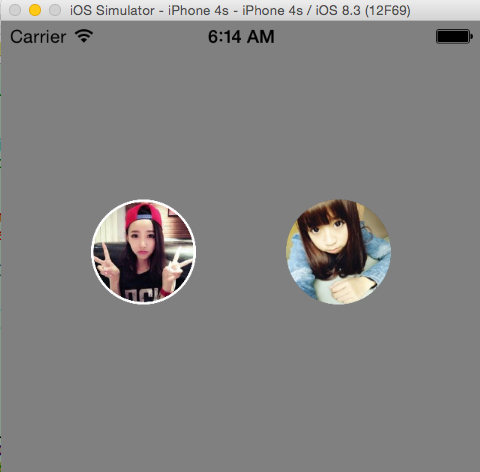
这种效果在项目还是很常见的,第一张圆形图带白色边框,第二张是单纯的圆形图片,那要如何实现呢?
直接上代码:
/* 根据传进来的图片名,并制定生成圆形图片的边框,以及颜色返回所需的圆形图片 */
// 参数说明:
// name : 图片名称
// borderWidth : 边框大小
// borderColor : 边框颜色
+ (instancetype)circleImageWithName:(NSString *)name borderWidth:(CGFloat)borderWidth borderColor:(UIColor *)borderColor
{
    // 加载原图
    UIImage *oldImg     = [UIImage imageNamed:name];

    // 开启上下文
    CGFloat imgW        = oldImg.size.width + 2 * borderWidth;
    CGFloat imgH        = oldImg.size.height + 2 * borderWidth;
    CGSize imgSize      = CGSizeMake(imgW, imgH);
    UIGraphicsBeginImageContextWithOptions(imgSize, NO, 0.0);

    // 取得当前上下文
    CGContextRef ctx    = UIGraphicsGetCurrentContext();

    // 画边框
    [borderColor set];
    CGFloat bigRadius   = imgW * 0.5;
    CGFloat centerX     = bigRadius;
    CGFloat centerY     = bigRadius;
    CGContextAddArc(ctx, centerX, centerY, bigRadius, 0, M_PI * 2, 0);
    CGContextFillPath(ctx);

    // 小圆
    CGFloat smallRadius = bigRadius - borderWidth;
    CGContextAddArc(ctx, centerX, centerY, smallRadius, 0, M_PI * 2, 0);
    CGContextClip(ctx);

    // 画图
    [oldImg drawInRect:CGRectMake(borderWidth, borderWidth, oldImg.size.width, oldImg.size.height)];

    // 取图
    UIImage *newImg = UIGraphicsGetImageFromCurrentImageContext();

    // 结束上下文
    UIGraphicsEndImageContext();

    return newImg;
}
总结:我们完全可以自定义一个UIImage的category,将这个方法封装进去,这样就可以运用到我们的项目中去了,:-D


 173
173


 被折叠的 条评论
为什么被折叠?
被折叠的 条评论
为什么被折叠?
 到【灌水乐园】发言


