


webservice作为较早的不同程序访问技术,已经有一段时间了,它基于xml数据通信,在最新的rpc远程调用技术是json,并且这个也会成为主流,但是最为最早的rpc技术webservice,还是有很多用处的,一般政府系统常常采用webservice。
在webservice里有许多实现服务端和客户端技术,如cxfire,xfire,axis,axis2,现在基本是cxfire和axis2这两个成为主流了。
下面介绍用axis2发布webservices服务端几种方式。
首先需要从http://axis.apache.org/axis2/java/core/download.html下载axis2的项目这里我下载得为
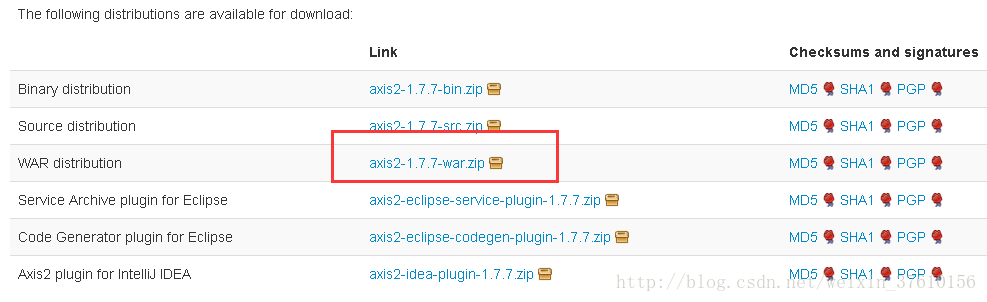
下载完毕以后直接解压到tomcat服务器目录

里然后,启动tomcat服务器会自动把war包解压为
在这里首先第一种webservice发布方式是用axis2的管理发布的
public class User {
private int id;
private String name;
private String address;
public User(int id, String name, String address) {
super();
this.id = id;
this.name = name;
this.address = address;
}
public int getId() {
return id;
}
public void setId(int id) {
this.id = id;
}
public String getName() {
return name;
}
public void setName(String name) {
this.name = name;
}
public String getAddress() {
return address;
}
public void setAddress(String address) {
this.address = address;
}
}
import java.util.ArrayList;
import java.util.List;
public class UserService {
public List<User> getUserList()
{
List<User> userList = new ArrayList<User>();
User user1 = new User(1,"小刘","内蒙古");
User user2 = new User(2,"小王","内蒙古");
User user3 = new User(3,"小张","内蒙古");
userList.add(user1);userList.add(user2);userList.add(user3);
return userList;
}
public User getUser(String id)
{
User user1 = new User(1,"小刘","内蒙古");
User user2 = new User(2,"小王","内蒙古");
User user3 = new User(3,"小张","内蒙古");
switch(id)
{
case "1":return user1;
case "2":return user2;
case "3":return user3;
}
return null;
}
}
这里需要在
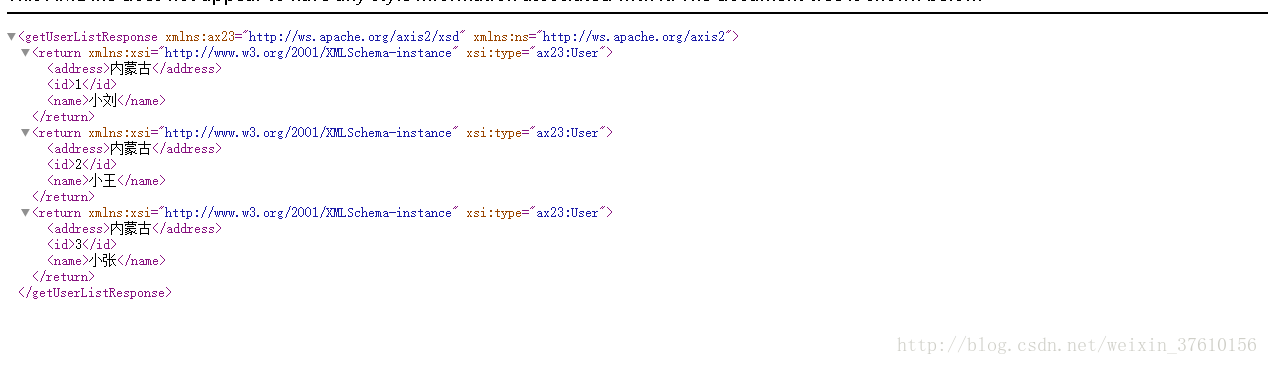
访问http://localhost:8080/axis2/services/UserService/getUser?id=3

访问http://localhost:8080/axis2/services/UserService/getUserList
这里需要说明一下,在类里不能出现package关键字,还有
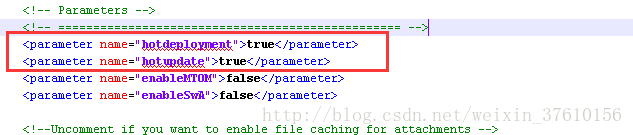
上面两个代表热部署和热修改如果为true则是无需启动tomcat然后放入class文件这里放入以后访问测试地址为:http://localhost:8080/axis2/services/+类名+方法名
第二种方式web工程集成axis2
首先看一下我的项目具体目录
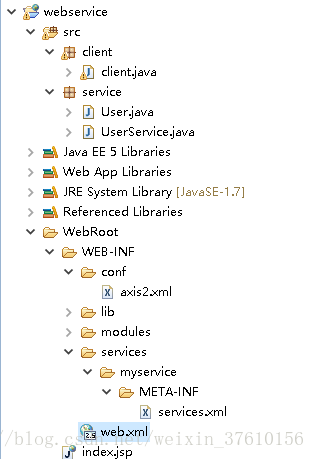
其中web-inf下面conf和lib和modules模块直接从之前的axis2包里直接拷贝然后下面具体介绍各个配置文件的写法
首先在web.xml里配置axis的servlet
<servlet>
<servlet-name>AxisServlet</servlet-name>
<servlet-class>org.apache.axis2.transport.http.AxisServlet</servlet-class>
<load-on-startup>1</load-on-startup>
</servlet>
<servlet-mapping>
<servlet-name>AxisServlet</servlet-name>
<url-pattern>/services/*</url-pattern>
</servlet-mapping>
把以下代码粘贴到web.xml里
然后是service.xml
<?xml version="1.0" encoding="UTF-8"?>
<service name="HttxService">
<description>
提醒接口调用服务(多种方式循环提醒)
</description>
<parameter name="ServiceClass">
service.UserService
</parameter>
<operation name="getUserList">
<messageReceiver class="org.apache.axis2.rpc.receivers.RPCMessageReceiver" />
</operation>
<operation name="getUser"> --接口里面方法,
<messageReceiver class="org.apache.axis2.rpc.receivers.RPCMessageReceiver" />
</operation>
</service>
这里重要一点是services name="" 这个是代表访问webservice的url地址,然后 class 代表webservice要去访问的类,operation代表类里的方法。可以有多个方法,要想配置多个service 可以 <services></services>在里面写入如上配置。
然后配置webserivce的访问类了
这里我把最上面的user和userservice放入工程目录里。
然后访问项目地址http://localhost:8080/webservice/services/HttxService?wsdl
出现
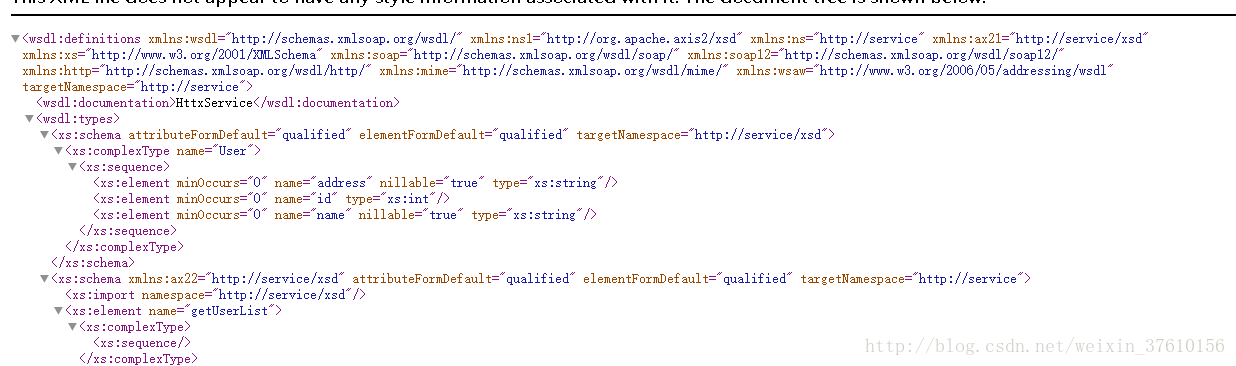
恭喜你成功部署了,然后接下来写下客户端访问的几种方式这里我写了两种,在我所做的项目当中用的是axis的jar有于版本冲突这里写了两种。
package client;
import java.net.URL;
import javax.xml.namespace.QName;
import javax.xml.rpc.ParameterMode;
import javax.xml.rpc.encoding.XMLType;
import org.apache.axiom.om.OMAbstractFactory;
import org.apache.axiom.om.OMElement;
import org.apache.axiom.om.OMFactory;
import org.apache.axiom.om.OMNamespace;
import org.apache.axis2.AxisFault;
import org.apache.axis2.addressing.EndpointReference;
import org.apache.axis2.client.Options;
import org.apache.axis2.client.ServiceClient;
import org.apache.axis2.rpc.client.RPCServiceClient;
public class client {
public static void main(String args[])
{
//第一中rpc调用方式调用webservice
testRpcClient();
//第二中
testDocumentService();
//还有一种方法是由于我用的是axis的jar由于和最新的jar有冲突,那种实现方式没有写如果想知道请联系我qq:961482945
}
public static void testRpcClient()
{
try{
String url = "http://localhost:8080/webservice/services/HttxService?wsdl";
RPCServiceClient serviceClient = new RPCServiceClient();
// 指定调用WebService的URL
EndpointReference targetEPR = new EndpointReference(url);
Options options = serviceClient.getOptions();
//确定目标服务地址
options.setTo(targetEPR);
//确定调用方法
options.setAction("getUserList");
QName qname = new QName("http://service", "getUserList");
// 指定getPrice方法的参数值
Object[] parameters = new Object[] { null };
// 调用方法一 传递参数,调用服务,获取服务返回结果集
OMElement element = serviceClient.invokeBlocking(qname, parameters);
//值得注意的是,返回结果就是一段由OMElement对象封装的xml字符串。
System.out.println("返回的string的xml"+element.toString());
//有参数的的webservice调用
options.setAction("getUser");
Object[] parameters2 = new Object[] {"1"};
OMElement element1 = serviceClient.invokeBlocking(qname, parameters2);
System.out.println("返回的string的xml数据:"+element1.toString());
} catch (AxisFault e) {
e.printStackTrace();
}
}
public static void testDocumentService()
{
try{
String url = "http://localhost:8080/webservice/services/HttxService?wsdl";
Options options = new Options();
// 指定调用WebService的URL
EndpointReference targetEPR = new EndpointReference(url);
options.setTo(targetEPR);
ServiceClient sender = new ServiceClient();
sender.setOptions(options);
OMFactory fac = OMAbstractFactory.getOMFactory();
String tns = "http://service";
// 命名空间,有时命名空间不增加没事,不过最好加上,因为有时有事,你懂的
OMNamespace omNs = fac.createOMNamespace(tns, "");
OMElement method = fac.createOMElement("getUserList", omNs);
OMElement symbol = fac.createOMElement("symbol", omNs);
// symbol.setText("1");
symbol.addChild(fac.createOMText(symbol, "Axis2 Echo String "));
method.addChild(symbol);
method.build();
OMElement result = sender.sendReceive(method);
System.out.println(result);
} catch (AxisFault axisFault) {
axisFault.printStackTrace();
}
}
}
你执行然后出现xml的字符串恭喜你客户端和服务端通了。在实际运用中第二种切入到项目中方式比较用的多。


 266
266


 被折叠的 条评论
为什么被折叠?
被折叠的 条评论
为什么被折叠?
 到【灌水乐园】发言


