


spark的参数与提交的流程
前言:个人读源码的一次记录
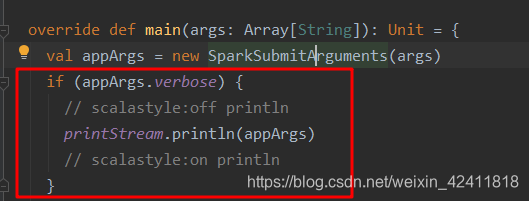
首先,SparkSubmit的入口在:org.apache.spark.deploy.SparkSubmit,下面会有一个main方法

点进SparkSubmitArguments(封装命令行参数):
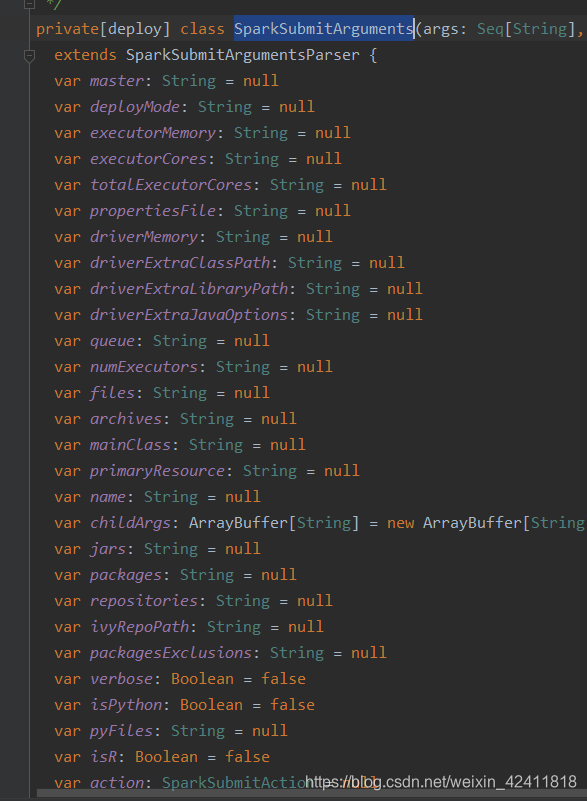
是否很熟悉?接着往下看,解析,参数是先将scala的数组转成java的数组,然后往下传
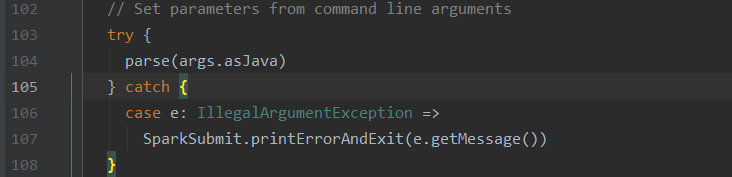
点进parse,会有一个handle方法,在SparkSubmitArguments这个类的文件中搜索handle
这一步是在处理参数
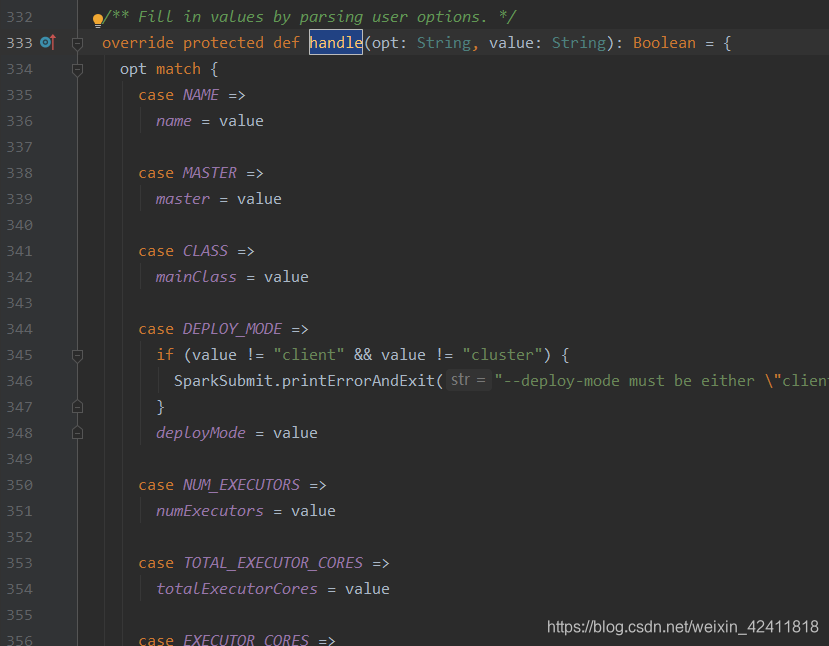
随意点一个模式匹配进去
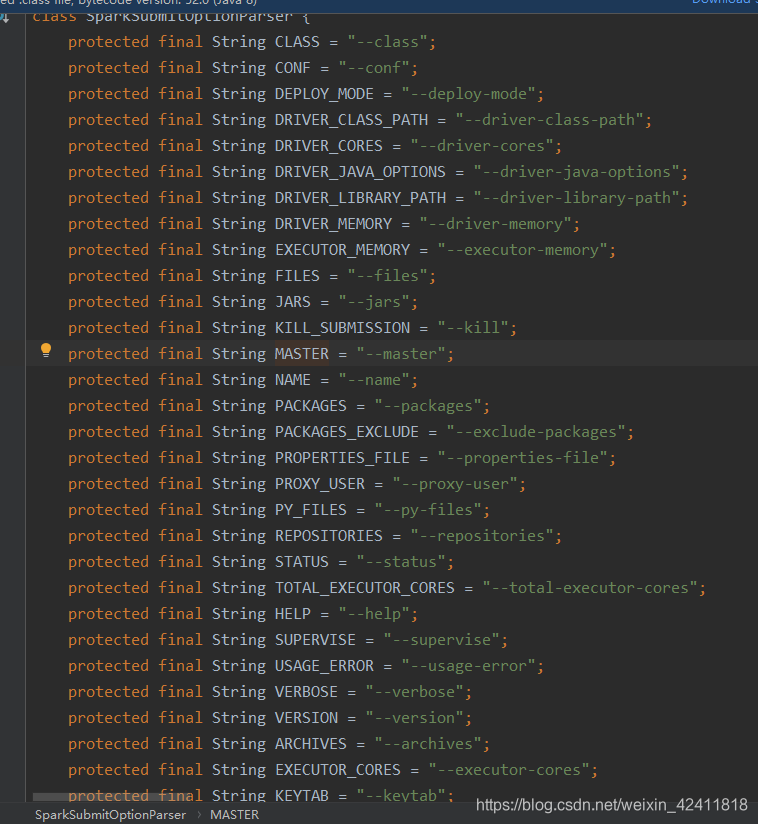
如图,这就是我们传参的时候写的参数名,这些都是我们可以在命令行中传的参数
在往下看,这一步是:是否打印我们的详细信息
在往下,点击action:
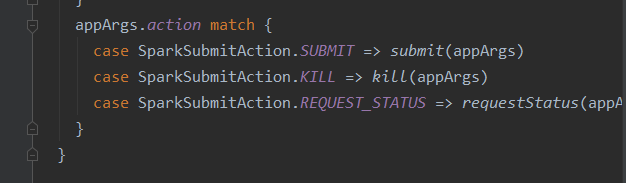

到达上图后,在这个scala文件中搜索action,看其是在哪里赋值的

意思就是:把当前的action放到option中,如果没值,那么就把submit给它
所以回去,马上就会去匹配到
点进submit方法中

如图,进来之后是先准备我们的提交环境,紧接着的doRunMain先别看,只有在调用的时候才会执行方法,所以在后面的调用的时候再去看这个方法,接着往下

这行代码的意思是:当前是否是独立集群的方式部署的,因为我不是,所以先不看(就算是,也只是打印一句话,然后执行doRunMain),直接看
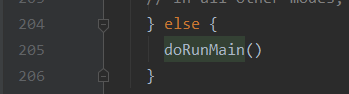
顾名思义:执行当前的主程序

这句话的意思是,代理用户,也就是我们spark提交的服务器用户
private def submit(args: SparkSubmitArguments): Unit = {
// 准备提交环境
val (childArgs, childClasspath, sysProps, childMainClass) = prepareSubmitEnvironment(args)
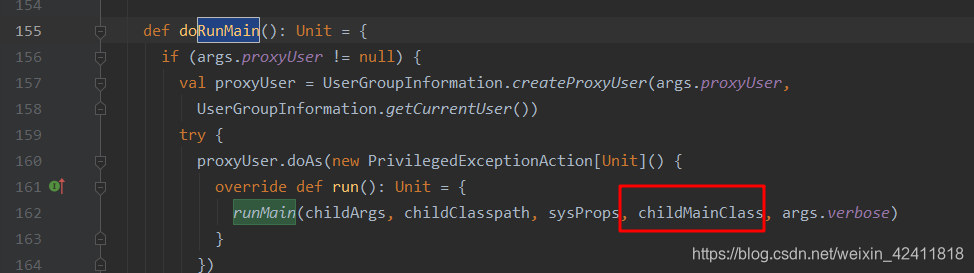
def doRunMain(): Unit = {
// 代理用户,也就是我们spark提交的服务器用户
if (args.proxyUser != null) {
val proxyUser = UserGroupInformation.createProxyUser(args.proxyUser,
UserGroupInformation.getCurrentUser())
try {
proxyUser.doAs(new PrivilegedExceptionAction[Unit]() {
override def run(): Unit = {
runMain(childArgs, childClasspath, sysProps, childMainClass, args.verbose)
}
})
} catch {
case e: Exception =>
// Hadoop's AuthorizationException suppresses the exception's stack trace, which
// makes the message printed to the output by the JVM not very helpful. Instead,
// detect exceptions with empty stack traces here, and treat them differently.
if (e.getStackTrace().length == 0) {
// scalastyle:off println
printStream.println(s"ERROR: ${e.getClass().getName()}: ${e.getMessage()}")
// scalastyle:on println
exitFn(1)
} else {
throw e
}
}
} else {
runMain(childArgs, childClasspath, sysProps, childMainClass, args.verbose)
}
}
// 当前是否是独立集群的方式部署的
if (args.isStandaloneCluster && args.useRest) {
try {
// scalastyle:off println
printStream.println("Running Spark using the REST application submission protocol.")
// scalastyle:on println
doRunMain()
} catch {
// Fail over to use the legacy submission gateway
case e: SubmitRestConnectionException =>
printWarning(s"Master endpoint ${args.master} was not a REST server. " +
"Falling back to legacy submission gateway instead.")
args.useRest = false
submit(args)
}
// In all other modes, just run the main class as prepared
} else {
doRunMain()
}
}
可以看出,我们最终到了runMain这个方法去了,传递的值不就是
准备提交环境的返回值吗,接着往下看
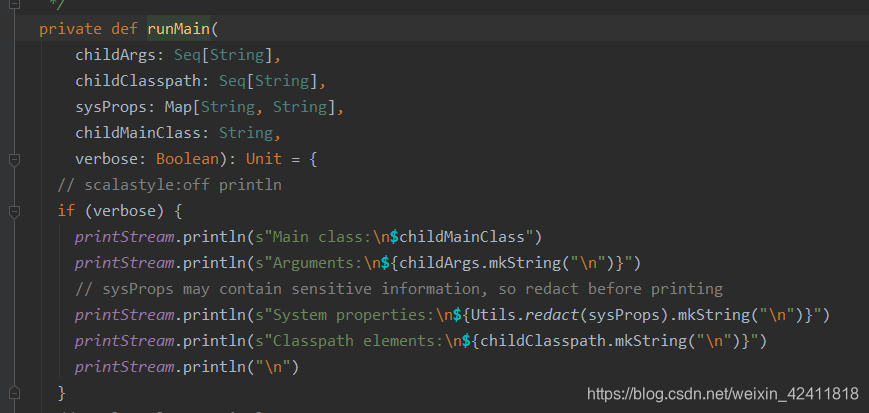
前面这都是在打印一些信息,接着看
// 类加载器
val loader =
      if (sysProps.getOrElse("spark.driver.userClassPathFirst", "false").toBoolean) {
        new ChildFirstURLClassLoader(new Array[URL](0),
          Thread.currentThread.getContextClassLoader)
      } else {
        new MutableURLClassLoader(new Array[URL](0),
          Thread.currentThread.getContextClassLoader)
      }
      // 默认采用当前线程的类加载器
    Thread.currentThread.setContextClassLoader(loader)
    // 然后从类加载器中去读取jar包等
 for (jar <- childClasspath) {
      addJarToClasspath(jar, loader)
    }
	// 设定一些参数
    for ((key, value) <- sysProps) {
      System.setProperty(key, value)
    }

 var mainClass: Class[_] = null

    try {
    // 通过反射,得到我们类的信息
      mainClass = Utils.classForName(childMainClass)
    } catch {
      case e: ClassNotFoundException =>
        e.printStackTrace(printStream)
        if (childMainClass.contains("thriftserver")) {
          // scalastyle:off println
          printStream.println(s"Failed to load main class $childMainClass.")
          printStream.println("You need to build Spark with -Phive and -Phive-thriftserver.")
          // scalastyle:on println
        }
        System.exit(CLASS_NOT_FOUND_EXIT_STATUS)
      case e: NoClassDefFoundError =>
        e.printStackTrace(printStream)
        if (e.getMessage.contains("org/apache/hadoop/hive")) {
          // scalastyle:off println
          printStream.println(s"Failed to load hive class.")
          printStream.println("You need to build Spark with -Phive and -Phive-thriftserver.")
          // scalastyle:on println
        }
        System.exit(CLASS_NOT_FOUND_EXIT_STATUS)
    }
......
// 下面两步其实就是在找类里的main方法
// 看一下类里面有没有main方法
 val mainMethod = mainClass.getMethod("main", new Array[String](0).getClass)
 // 如果不是静态的方法,直接报错
if (!Modifier.isStatic(mainMethod.getModifiers)) {
      throw new IllegalStateException("The main method in the given main class must be static")
    }

.....
// 如果找到了就调用这个main方法
try {
      mainMethod.invoke(null, childArgs.toArray)
    } catch {
      case t: Throwable =>
        findCause(t) match {
          case SparkUserAppException(exitCode) =>
            System.exit(exitCode)

          case t: Throwable =>
            throw t
        }
    }
看明白上面的操作后,返回去看一下childMainClass是什么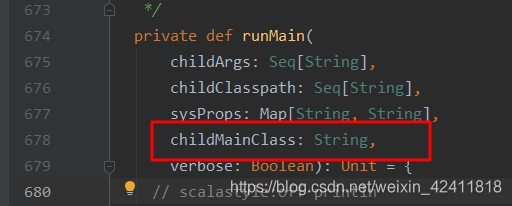
这个childMainClass其实就是在我们准备环境的时候得到的

然后去看一下prepareSubmitEnvironment的具体实现,代码太多,直接看其返回结果

直接看其实怎么赋值的
// 下面这些其实就是在判断我们的集群模式是什么,然后决定是哪一个类

// 这里其实就是yarn的CLIENT 模式
 if (deployMode == CLIENT || isYarnCluster) {
      childMainClass = args.mainClass   // 这里其实就是,你给的是哪个类,就是哪个类
      if (isUserJar(args.primaryResource)) {
        childClasspath += args.primaryResource
      }
      if (args.jars != null) { childClasspath ++= args.jars.split(",") }
    }

if (args.isStandaloneCluster) {
      if (args.useRest) {
        childMainClass = "org.apache.spark.deploy.rest.RestSubmissionClient"
        childArgs += (args.primaryResource, args.mainClass)
      } else {
        // In legacy standalone cluster mode, use Client as a wrapper around the user class
        childMainClass = "org.apache.spark.deploy.Client"
        if (args.supervise) { childArgs += "--supervise" }
        Option(args.driverMemory).foreach { m => childArgs += ("--memory", m) }
        Option(args.driverCores).foreach { c => childArgs += ("--cores", c) }
        childArgs += "launch"
        childArgs += (args.master, args.primaryResource, args.mainClass)
      }
      if (args.childArgs != null) {
        childArgs ++= args.childArgs
      }
    }

// In yarn-cluster mode, use yarn.Client as a wrapper around the user class
    if (isYarnCluster) {
      childMainClass = "org.apache.spark.deploy.yarn.Client"
      if (args.isPython) {
        childArgs += ("--primary-py-file", args.primaryResource)
        childArgs += ("--class", "org.apache.spark.deploy.PythonRunner")
      } else if (args.isR) {
        val mainFile = new Path(args.primaryResource).getName
        childArgs += ("--primary-r-file", mainFile)
        childArgs += ("--class", "org.apache.spark.deploy.RRunner")
      } else {
        if (args.primaryResource != SparkLauncher.NO_RESOURCE) {
          childArgs += ("--jar", args.primaryResource)
        }
        childArgs += ("--class", args.mainClass)
      }
      if (args.childArgs != null) {
        args.childArgs.foreach { arg => childArgs += ("--arg", arg) }
      }
    }

if (isMesosCluster) {
      assert(args.useRest, "Mesos cluster mode is only supported through the REST submission API")
      childMainClass = "org.apache.spark.deploy.rest.RestSubmissionClient"
      if (args.isPython) {
        // Second argument is main class
        childArgs += (args.primaryResource, "")
        if (args.pyFiles != null) {
          sysProps("spark.submit.pyFiles") = args.pyFiles
        }
      } else if (args.isR) {
        // Second argument is main class
        childArgs += (args.primaryResource, "")
      } else {
        childArgs += (args.primaryResource, args.mainClass)
      }
      if (args.childArgs != null) {
        childArgs ++= args.childArgs
      }
    }
因为我们生产环境都是yarnCluster,所以我只看这个模式是怎么样的
去搜索org.apache.spark.deploy.yarn.Client这个类,发现不存在,查找资料后发现,需要一个依赖才行
		<dependency>
            <groupId>org.apache.spark</groupId>
            <artifactId>spark-yarn_2.11</artifactId>
            <version>2.2.0</version>
        </dependency>
然后再去搜索org.apache.spark.deploy.yarn.Client就可以找到了
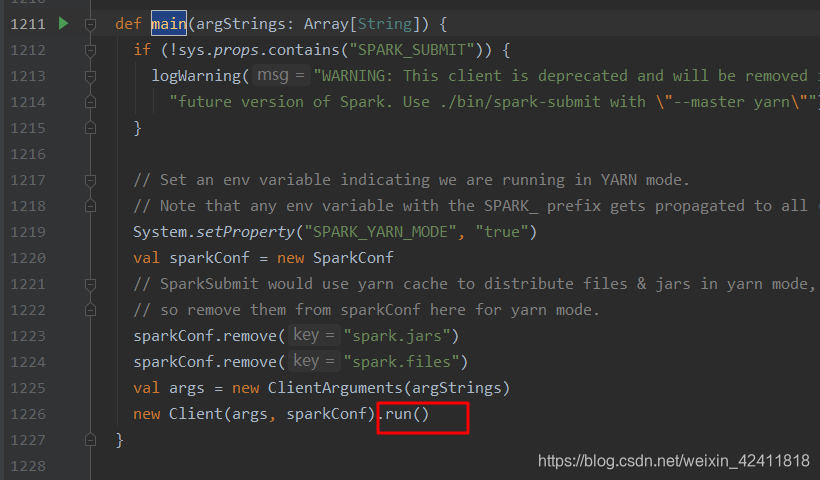
直接看main方法吧
def main(argStrings: Array[String]) {
  // 判断一些参数
    if (!sys.props.contains("SPARK_SUBMIT")) {
      logWarning("WARNING: This client is deprecated and will be removed in a " +
        "future version of Spark. Use ./bin/spark-submit with \"--master yarn\"")
    }

    // Set an env variable indicating we are running in YARN mode.
    // Note that any env variable with the SPARK_ prefix gets propagated to all (remote) processes
    System.setProperty("SPARK_YARN_MODE", "true")
    val sparkConf = new SparkConf
    // SparkSubmit would use yarn cache to distribute files & jars in yarn mode,
    // so remove them from sparkConf here for yarn mode.
    sparkConf.remove("spark.jars")
    sparkConf.remove("spark.files")
    // 封装命令行参数
    val args = new ClientArguments(argStrings)
    // 创建之后马上就运行了
    new Client(args, sparkConf).run()
  }
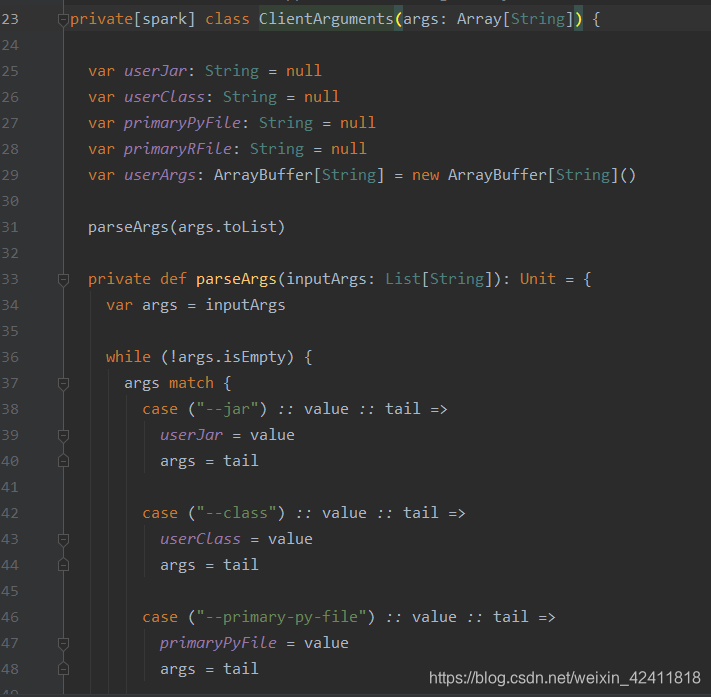
点击ClientArguments进去看下,是一些参数
看Client类
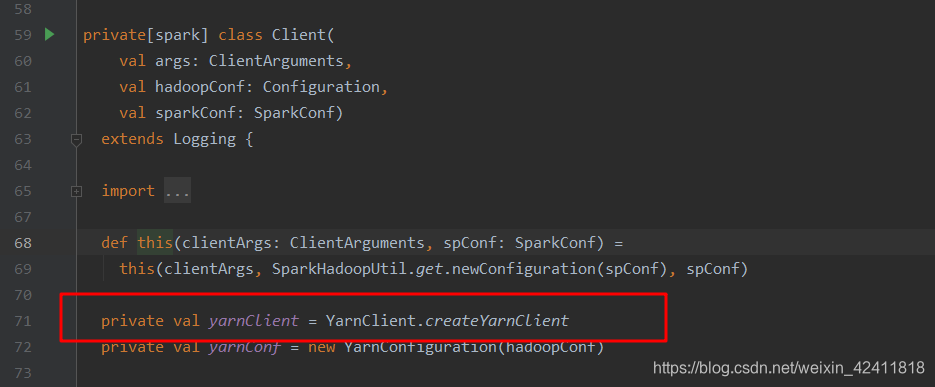
见名思意,看上面的图,代码意思就是,提交到yarn执行
点击createYarnClient

在点击YarnClientImpl

往上看,其实就是RM的地址,在上面是RM的客户端,需要去连接RM,所以,提交的话,其实就是靠yarnClient,yarnClient去连RM
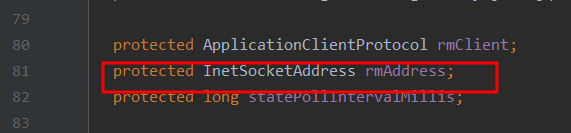
 private val yarnClient = YarnClient.createYarnClient
  private val yarnConf = new YarnConfiguration(hadoopConf)

  private val isClusterMode = sparkConf.get("spark.submit.deployMode", "client") == "cluster"

  // AM related configurations    amMemory ApplicationMaster
  private val amMemory = if (isClusterMode) {
    sparkConf.get(DRIVER_MEMORY).toInt
  } else {
    sparkConf.get(AM_MEMORY).toInt
  }
  private val amMemoryOverhead = {
    val amMemoryOverheadEntry = if (isClusterMode) DRIVER_MEMORY_OVERHEAD else AM_MEMORY_OVERHEAD
    sparkConf.get(amMemoryOverheadEntry).getOrElse(
      math.max((MEMORY_OVERHEAD_FACTOR * amMemory).toLong, MEMORY_OVERHEAD_MIN)).toInt
  }
  private val amCores = if (isClusterMode) {
    sparkConf.get(DRIVER_CORES)
  } else {
    sparkConf.get(AM_CORES)
  }
再往下全是一些属性和变量了,其实看名字也能看出一些含义
看其运行方法
  def run(): Unit = {
  // 全局应用ID(整个yarn中具有唯一性的一个ID,UI界面其实就靠这个ID来进行关联)
    this.appId = submitApplication()
    if (!launcherBackend.isConnected() && fireAndForget) {
      val report = getApplicationReport(appId)
      val state = report.getYarnApplicationState
      logInfo(s"Application report for $appId (state: $state)")
      logInfo(formatReportDetails(report))
      // 一些状态
      if (state == YarnApplicationState.FAILED || state == YarnApplicationState.KILLED) {
        throw new SparkException(s"Application $appId finished with status: $state")
      }
    } else {
      val (yarnApplicationState, finalApplicationStatus) = monitorApplication(appId)
      if (yarnApplicationState == YarnApplicationState.FAILED ||
        finalApplicationStatus == FinalApplicationStatus.FAILED) {
        throw new SparkException(s"Application $appId finished with failed status")
      }
      if (yarnApplicationState == YarnApplicationState.KILLED ||
        finalApplicationStatus == FinalApplicationStatus.KILLED) {
        throw new SparkException(s"Application $appId is killed")
      }
      if (finalApplicationStatus == FinalApplicationStatus.UNDEFINED) {
        throw new SparkException(s"The final status of application $appId is undefined")
      }
    }
  }
看其submitApplication提交代码
def submitApplication(): ApplicationId = {
    var appId: ApplicationId = null
    try {
    // launcherBackend的连接
      launcherBackend.connect()
      // Setup the credentials before doing anything else,
      // so we have don't have issues at any point.
      setupCredentials()
      // yarn初始化
      yarnClient.init(yarnConf)
      // yarn启动
      yarnClient.start()

      logInfo("Requesting a new application from cluster with %d NodeManagers"
        .format(yarnClient.getYarnClusterMetrics.getNumNodeManagers))

      // Get a new application from our RM
      // 创建我们的应用
      val newApp = yarnClient.createApplication()
      // 得到响应
      val newAppResponse = newApp.getNewApplicationResponse()
      // 得到我们的ID
      appId = newAppResponse.getApplicationId()
      reportLauncherState(SparkAppHandle.State.SUBMITTED)
      launcherBackend.setAppId(appId.toString)

      new CallerContext("CLIENT", Option(appId.toString)).setCurrentContext()

      // Verify whether the cluster has enough resources for our AM
      verifyClusterResources(newAppResponse)

      // Set up the appropriate contexts to launch our AM
      //
      val containerContext = createContainerLaunchContext(newAppResponse)
      // 这个是我们真正提交的应用
      val appContext = createApplicationSubmissionContext(newApp, containerContext)

      // Finally, submit and monitor the application
      logInfo(s"Submitting application $appId to ResourceManager")
      // 向yarn提交我们的应用(yarnClient向RM)
      yarnClient.submitApplication(appContext)
      appId
    } catch {
      case e: Throwable =>
        if (appId != null) {
          cleanupStagingDir(appId)
        }
        throw e
    }
  }
看一下上面的createContainerLaunchContext
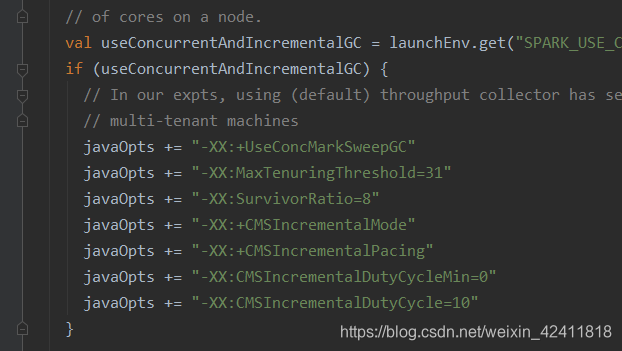
类似于上图这种(CMS等)就不写了
// 判断是否是集群模式
  val amClass =
      if (isClusterMode) {
      // 获取类名,在后面的指令拼接上去   集群模式
        Utils.classForName("org.apache.spark.deploy.yarn.ApplicationMaster").getName
      } else {
        Utils.classForName("org.apache.spark.deploy.yarn.ExecutorLauncher").getName
      }

 val amArgs =
      Seq(amClass) ++ userClass ++ userJar ++ primaryPyFile ++ primaryRFile ++
        userArgs ++ Seq(
          "--properties-file", buildPath(YarnSparkHadoopUtil.expandEnvironment(Environment.PWD),
            LOCALIZED_CONF_DIR, SPARK_CONF_FILE))

// 封装指令
 val commands = prefixEnv ++ Seq(
 // 这其实就是重要的指令,这意味着我们在提交的时候,其实提交的是指令,不是应用
        YarnSparkHadoopUtil.expandEnvironment(Environment.JAVA_HOME) + "/bin/java", "-server"
      ) ++
      // 这两个参数都是在前面有的
      javaOpts ++ amArgs ++
      Seq(
        "1>", ApplicationConstants.LOG_DIR_EXPANSION_VAR + "/stdout",
        "2>", ApplicationConstants.LOG_DIR_EXPANSION_VAR + "/stderr")

val printableCommands = commands.map(s => if (s == null) "null" else s).toList
 amContainer.setCommands(printableCommands.asJava)
.....
val securityManager = new SecurityManager(sparkConf)
    amContainer.setApplicationACLs(
      YarnSparkHadoopUtil.getApplicationAclsForYarn(securityManager).asJava)
    setupSecurityToken(amContainer)
    amContainer
从上可以得到结论:
1.applicationmaster是一个进程(但是JPS看不到,但是你如果用spark-shell --master yarn就可以看到一个进程:ExecutorLauncher,如有兴趣,请在本博客页面搜索:org.apache.spark.deploy.yarn.ExecutorLauncher,看源码(默认的话就是client模式))
2.客户端向RM发指令,指令由RM执行,然后再某个节点中启动applicationmaster
这个时候客户端的提交已经提交了,那么这个时候去看一下org.apache.spark.deploy.yarn.ApplicationMaster这个类
object ApplicationMaster extends Logging {

  // exit codes for different causes, no reason behind the values
  private val EXIT_SUCCESS = 0
  private val EXIT_UNCAUGHT_EXCEPTION = 10
  private val EXIT_MAX_EXECUTOR_FAILURES = 11
  private val EXIT_REPORTER_FAILURE = 12
  private val EXIT_SC_NOT_INITED = 13
  private val EXIT_SECURITY = 14
  private val EXIT_EXCEPTION_USER_CLASS = 15
  private val EXIT_EARLY = 16

  private var master: ApplicationMaster = _

  def main(args: Array[String]): Unit = {
    SignalUtils.registerLogger(log)
    // 参数对象的封装
    val amArgs = new ApplicationMasterArguments(args)

    // Load the properties file with the Spark configuration and set entries as system properties,
    // so that user code run inside the AM also has access to them.
    // Note: we must do this before SparkHadoopUtil instantiated
    if (amArgs.propertiesFile != null) {
      Utils.getPropertiesFromFile(amArgs.propertiesFile).foreach { case (k, v) =>
        sys.props(k) = v
      }
    }
    SparkHadoopUtil.get.runAsSparkUser { () =>
    // 创建一个ApplicationMaster  YarnRMClient专门个RM交互的对象
      master = new ApplicationMaster(amArgs, new YarnRMClient)
      // 直接运行了
      System.exit(master.run())
    }
  }

  private[spark] def sparkContextInitialized(sc: SparkContext): Unit = {
    master.sparkContextInitialized(sc)
  }

  private[spark] def getAttemptId(): ApplicationAttemptId = {
    master.getAttemptId
  }

}
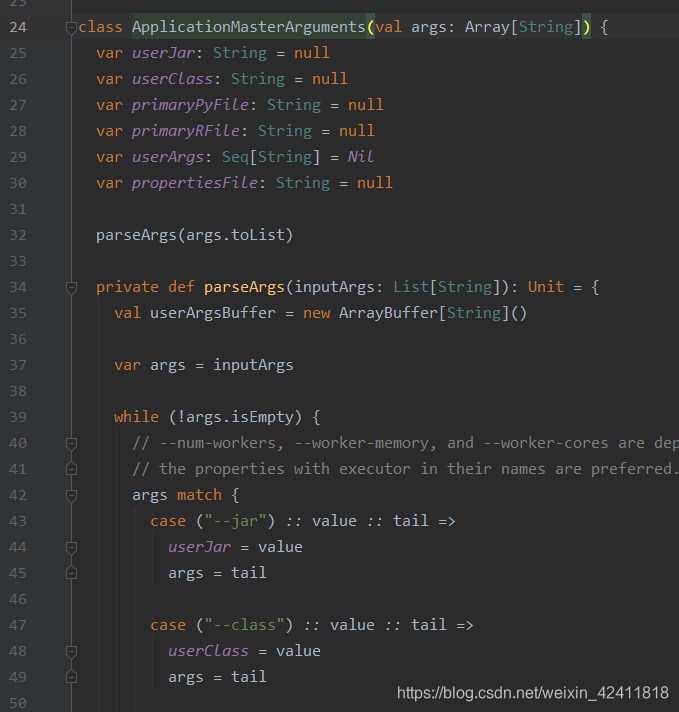
看一下上上面的参数封装
看一下上面的master = new ApplicationMaster(amArgs, new YarnRMClient),这里是一些spark和yarn的一些配置
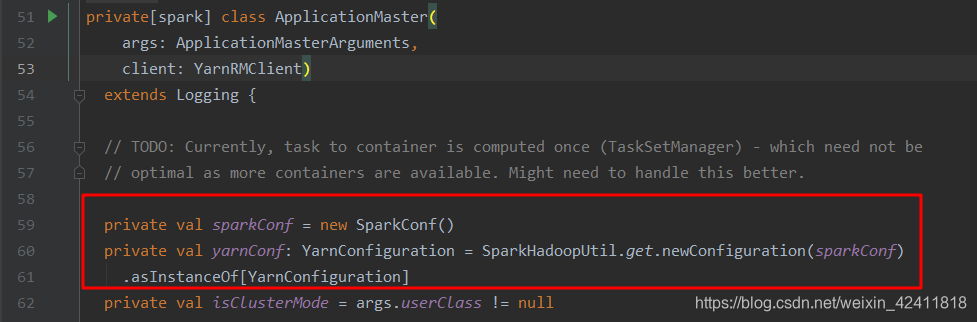
这些都是一些属性,heartbeatInterval是心跳的周期
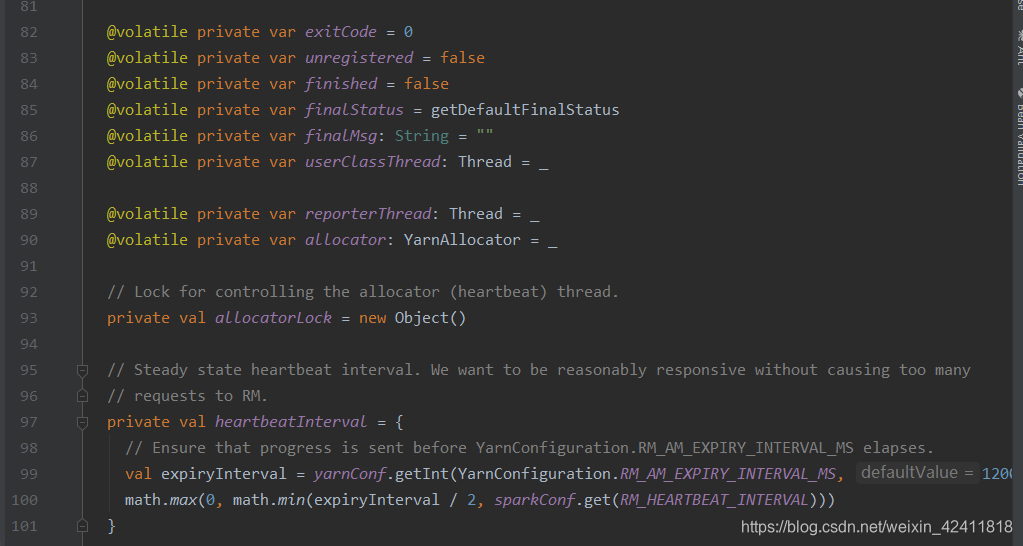
这个是RPC:进程之间的交互规则(多台机器之间相互调用进程),其实早期是一个IPC(进程调用进程,不懂可以搜一下)
这里其实就是在构建一个进程之间交互的环境

这个其实就是:AM的终端

看一下它的run方法
 final def run(): Int = {
    try {
    // 先拿到我们的ID
      val appAttemptId = client.getAttemptId()

      var attemptID: Option[String] = None

		// 判断是否是我们的集群模式,是的话,设置一些参数
      if (isClusterMode) {
        // Set the web ui port to be ephemeral for yarn so we don't conflict with
        // other spark processes running on the same box
        System.setProperty("spark.ui.port", "0")

        // Set the master and deploy mode property to match the requested mode.
        System.setProperty("spark.master", "yarn")
        System.setProperty("spark.submit.deployMode", "cluster")

        // Set this internal configuration if it is running on cluster mode, this
        // configuration will be checked in SparkContext to avoid misuse of yarn cluster mode.
        System.setProperty("spark.yarn.app.id", appAttemptId.getApplicationId().toString())

        attemptID = Option(appAttemptId.getAttemptId.toString)
      }
.....
	// 判断集群模式
      if (isClusterMode) {
        runDriver(securityMgr)
      } else {
        runExecutorLauncher(securityMgr)
      }
    } catch {
      case e: Exception =>
        // catch everything else if not specifically handled
        logError("Uncaught exception: ", e)
        finish(FinalApplicationStatus.FAILED,
          ApplicationMaster.EXIT_UNCAUGHT_EXCEPTION,
          "Uncaught exception: " + e)
    }
    exitCode
  }
看一下上面的runDriver这个方法
  private def runDriver(securityMgr: SecurityManager): Unit = {
    addAmIpFilter()
    // 启动用户的应用   走这里往下看,那么请看下面的代码解释
    userClassThread = startUserApplication()
	......
	// This a bit hacky, but we need to wait until the spark.driver.port property has
    // been set by the Thread executing the user class.
    logInfo("Waiting for spark context initialization...")
    val totalWaitTime = sparkConf.get(AM_MAX_WAIT_TIME)
    try {
      val sc = ThreadUtils.awaitResult(sparkContextPromise.future,
        Duration(totalWaitTime, TimeUnit.MILLISECONDS))
      if (sc != null) {
        rpcEnv = sc.env.rpcEnv
        val driverRef = runAMEndpoint(
          sc.getConf.get("spark.driver.host"),
          sc.getConf.get("spark.driver.port"),
          isClusterMode = true)
          // 向yarnRM注册applicationMaster  进程和进程之间交互,所以需要rpcEnv   往下找,看其逻辑,见博客下面
        registerAM(sc.getConf, rpcEnv, driverRef, sc.ui.map(_.appUIAddress).getOrElse(""),
          securityMgr)
      } else {
        // Sanity check; should never happen in normal operation, since sc should only be null
        // if the user app did not create a SparkContext.
        if (!finished) {
          throw new IllegalStateException("SparkContext is null but app is still running!")
        }
      }
      // 等待userClassThread执行完成,然后再往下走
      userClassThread.join()
    } catch {
      case e: SparkException if e.getCause().isInstanceOf[TimeoutException] =>
        logError(
          s"SparkContext did not initialize after waiting for $totalWaitTime ms. " +
           "Please check earlier log output for errors. Failing the application.")
        finish(FinalApplicationStatus.FAILED,
          ApplicationMaster.EXIT_SC_NOT_INITED,
          "Timed out waiting for SparkContext.")
    }
    }
接着看startUserApplication
 private def startUserApplication(): Thread = {
    logInfo("Starting the user application in a separate Thread")
	// 从环境变量中取出classpath
    val classpath = Client.getUserClasspath(sparkConf)
    val urls = classpath.map { entry =>
      new URL("file:" + new File(entry.getPath()).getAbsolutePath())
    }
    // 获取类加载器
    val userClassLoader =
      if (Client.isUserClassPathFirst(sparkConf, isDriver = true)) {
        new ChildFirstURLClassLoader(urls, Utils.getContextOrSparkClassLoader)
      } else {
        new MutableURLClassLoader(urls, Utils.getContextOrSparkClassLoader)
      }

    var userArgs = args.userArgs
    // 获取用户的参数
    if (args.primaryPyFile != null && args.primaryPyFile.endsWith(".py")) {
      // When running pyspark, the app is run using PythonRunner. The second argument is the list
      // of files to add to PYTHONPATH, which Client.scala already handles, so it's empty.
      userArgs = Seq(args.primaryPyFile, "") ++ userArgs
    }
    if (args.primaryRFile != null && args.primaryRFile.endsWith(".R")) {
      // TODO(davies): add R dependencies here
    }
    // 从配置中取出用户的类,然后去加载这个类,然后去拿到main方法,userClass是在前面参数的时候就赋值了的
    val mainMethod = userClassLoader.loadClass(args.userClass)
      .getMethod("main", classOf[Array[String]])

	// 构建一个线程
    val userThread = new Thread {
      override def run() {
        try {
        // 执行刚刚得到的main(用户类)方法
          mainMethod.invoke(null, userArgs.toArray)
          finish(FinalApplicationStatus.SUCCEEDED, ApplicationMaster.EXIT_SUCCESS)
          logDebug("Done running users class")
        } catch {
          case e: InvocationTargetException =>
            e.getCause match {
              case _: InterruptedException =>
                // Reporter thread can interrupt to stop user class
              case SparkUserAppException(exitCode) =>
                val msg = s"User application exited with status $exitCode"
                logError(msg)
                finish(FinalApplicationStatus.FAILED, exitCode, msg)
              case cause: Throwable =>
                logError("User class threw exception: " + cause, cause)
                finish(FinalApplicationStatus.FAILED,
                  ApplicationMaster.EXIT_EXCEPTION_USER_CLASS,
                  "User class threw exception: " + cause)
            }
            sparkContextPromise.tryFailure(e.getCause())
        } finally {
          // Notify the thread waiting for the SparkContext, in case the application did not
          // instantiate one. This will do nothing when the user code instantiates a SparkContext
          // (with the correct master), or when the user code throws an exception (due to the
          // tryFailure above).
          sparkContextPromise.trySuccess(null)
        }
      }
    }
    // 启动线程
    userThread.setContextClassLoader(userClassLoader)
    userThread.setName("Driver")  // 线程名
    userThread.start()
    userThread
    // 启动以后,我们写的代码才开始正式的去执行
  }
所以像spark的Driver它只是一个线程名字,所以我们用jps是看不到Driver的,因为它是一个线程,所以Driver在applicationmaster中的
registerAM
  private def registerAM(
      _sparkConf: SparkConf,
      _rpcEnv: RpcEnv,
      driverRef: RpcEndpointRef,
      uiAddress: String,
      securityMgr: SecurityManager) = {
    val appId = client.getAttemptId().getApplicationId().toString()
    val attemptId = client.getAttemptId().getAttemptId().toString()
    val historyAddress =
      _sparkConf.get(HISTORY_SERVER_ADDRESS)
        .map { text => SparkHadoopUtil.get.substituteHadoopVariables(text, yarnConf) }
        .map { address => s"${address}${HistoryServer.UI_PATH_PREFIX}/${appId}/${attemptId}" }
        .getOrElse("")
	// 终端地址
    val driverUrl = RpcEndpointAddress(
      _sparkConf.get("spark.driver.host"),
      _sparkConf.get("spark.driver.port").toInt,
      CoarseGrainedSchedulerBackend.ENDPOINT_NAME).toString

    // Before we initialize the allocator, let's log the information about how executors will
    // be run up front, to avoid printing this out for every single executor being launched.
    // Use placeholders for information that changes such as executor IDs.
    logInfo {
      val executorMemory = sparkConf.get(EXECUTOR_MEMORY).toInt
      val executorCores = sparkConf.get(EXECUTOR_CORES)
      val dummyRunner = new ExecutorRunnable(None, yarnConf, sparkConf, driverUrl, "<executorId>",
        "<hostname>", executorMemory, executorCores, appId, securityMgr, localResources)
      dummyRunner.launchContextDebugInfo()
    }
	// client点进去是YarnRMClient,其实就是RM在向RM注册
    allocator = client.register(driverUrl,
      driverRef,
      yarnConf,
      _sparkConf,
      uiAddress,
      historyAddress,
      securityMgr,
      localResources)
	// 分配资源
    allocator.allocateResources()
    reporterThread = launchReporterThread()
  }
说明yarn的提交流程就是RM启动applicationMaster,然后applicationMaster向RM注册并申请资源,然后分配我们的资源
看一下分配资源allocateResources
def allocateResources(): Unit = synchronized {
    updateResourceRequests()

    val progressIndicator = 0.1f
    // Poll the ResourceManager. This doubles as a heartbeat if there are no pending container
    // requests.
    //
    val allocateResponse = amClient.allocate(progressIndicator)
	// 获取已经分配的Container
    val allocatedContainers = allocateResponse.getAllocatedContainers()
	// 判断容器的大小
    if (allocatedContainers.size > 0) {
    // 其实就是在告诉,哪些容器可以使用
      logDebug("Allocated containers: %d. Current executor count: %d. Cluster resources: %s."
        .format(
          allocatedContainers.size,
          numExecutorsRunning,
          allocateResponse.getAvailableResources))
		// 处理那些分配的资源,往下看
      handleAllocatedContainers(allocatedContainers.asScala)
    }
	// 这些就是关于状态之类的
    val completedContainers = allocateResponse.getCompletedContainersStatuses()
    if (completedContainers.size > 0) {
      logDebug("Completed %d containers".format(completedContainers.size))
      processCompletedContainers(completedContainers.asScala)
      logDebug("Finished processing %d completed containers. Current running executor count: %d."
        .format(completedContainers.size, numExecutorsRunning))
    }
  }
handleAllocatedContainers
  def handleAllocatedContainers(allocatedContainers: Seq[Container]): Unit = {
    val containersToUse = new ArrayBuffer[Container](allocatedContainers.size)

    // Match incoming requests by host
    val remainingAfterHostMatches = new ArrayBuffer[Container]
    for (allocatedContainer <- allocatedContainers) {
      matchContainerToRequest(allocatedContainer, allocatedContainer.getNodeId.getHost,
        containersToUse, remainingAfterHostMatches)
    }

    // Match remaining by rack
    val remainingAfterRackMatches = new ArrayBuffer[Container]
    for (allocatedContainer <- remainingAfterHostMatches) {
      val rack = resolver.resolve(conf, allocatedContainer.getNodeId.getHost)
      matchContainerToRequest(allocatedContainer, rack, containersToUse,
        remainingAfterRackMatches)
    }

    // Assign remaining that are neither node-local nor rack-local
    // 这里其实就是在做本地化,也就是优先位置   也就是移动数据不如移动计算 最好的是进程本地化,如果做不到的话,那么就会再节点本地化,如果还不行,那么会再机架本地化
    val remainingAfterOffRackMatches = new ArrayBuffer[Container]
    for (allocatedContainer <- remainingAfterRackMatches) {
      matchContainerToRequest(allocatedContainer, ANY_HOST, containersToUse,
        remainingAfterOffRackMatches)
    }

    if (!remainingAfterOffRackMatches.isEmpty) {
      logDebug(s"Releasing ${remainingAfterOffRackMatches.size} unneeded containers that were " +
        s"allocated to us")
      for (container <- remainingAfterOffRackMatches) {
        internalReleaseContainer(container)
      }
    }
	// 上面是在处理,这里是在运行Container
    runAllocatedContainers(containersToUse)

    logInfo("Received %d containers from YARN, launching executors on %d of them."
      .format(allocatedContainers.size, containersToUse.size))
  }
runAllocatedContainers
 private def runAllocatedContainers(containersToUse: ArrayBuffer[Container]): Unit = {
    for (container <- containersToUse) {  // 把每一个可用的容器(containersToUse)挨个遍历
      executorIdCounter += 1
      val executorHostname = container.getNodeId.getHost
      val containerId = container.getId
      val executorId = executorIdCounter.toString
      assert(container.getResource.getMemory >= resource.getMemory)
      logInfo(s"Launching container $containerId on host $executorHostname")

      def updateInternalState(): Unit = synchronized {
        numExecutorsRunning += 1
        executorIdToContainer(executorId) = container
        containerIdToExecutorId(container.getId) = executorId

        val containerSet = allocatedHostToContainersMap.getOrElseUpdate(executorHostname,
          new HashSet[ContainerId])
        containerSet += containerId
        allocatedContainerToHostMap.put(containerId, executorHostname)
      }

      if (numExecutorsRunning < targetNumExecutors) {
        if (launchContainers) {
        // launcherPool守护的线程池
          launcherPool.execute(new Runnable {
            override def run(): Unit = {
              try {
              // 运行Executor (最终的目的)  往下看
                new ExecutorRunnable(
                  Some(container),
                  conf,
                  sparkConf,
                  driverUrl,
                  executorId,
                  executorHostname,
                  executorMemory,
                  executorCores,
                  appAttemptId.getApplicationId.toString,
                  securityMgr,
                  localResources
                ).run()
                updateInternalState()
              } catch {
                case NonFatal(e) =>
                  logError(s"Failed to launch executor $executorId on container $containerId", e)
                  // Assigned container should be released immediately to avoid unnecessary resource
                  // occupation.
                  amClient.releaseAssignedContainer(containerId)
              }
            }
          })
        } else {
          // For test only
          updateInternalState()
        }
      } else {
        logInfo(("Skip launching executorRunnable as runnning Excecutors count: %d " +
          "reached target Executors count: %d.").format(numExecutorsRunning, targetNumExecutors))
      }
    }
  }
ExecutorRunnable (最终的目的)
首先这里面会有很多的配置
// 也是需要进程间的交互
  var rpc: YarnRPC = YarnRPC.create(conf)
  // 这里是NM的客户端了  所以这里需要和NM进行交互了
  var nmClient: NMClient = _

def run(): Unit = {
    logDebug("Starting Executor Container")
    // 启动我们的NM客户端,然后启动我们的Container
    nmClient = NMClient.createNMClient()
    nmClient.init(conf)
    nmClient.start()
    startContainer()
  }
startContainer
这里其实又是在准备我们的指令了,然后会发给NM,NM会去执行我们的指令,会去启动一个进程,所以我们可以再jps中看到CoarseGrainedExecutorBackend这个进程

点进去看看
 val commands = prefixEnv ++ Seq(
      YarnSparkHadoopUtil.expandEnvironment(Environment.JAVA_HOME) + "/bin/java",
      "-server") ++
      javaOpts ++
      // 后台的交互
      Seq("org.apache.spark.executor.CoarseGrainedExecutorBackend",
        "--driver-url", masterAddress,
        "--executor-id", executorId,
        "--hostname", hostname,
        "--cores", executorCores.toString,
        "--app-id", appId) ++
      userClassPath ++
      Seq(
        s"1>${ApplicationConstants.LOG_DIR_EXPANSION_VAR}/stdout",
        s"2>${ApplicationConstants.LOG_DIR_EXPANSION_VAR}/stderr")
找一下CoarseGrainedExecutorBackend
直接看它的main方法,会看到这又是一些我们的参数

然后会去运行

进去看看,它会和driver发生一些联系

// 准备Executor的环境
 val env = SparkEnv.createExecutorEnv(
        driverConf, executorId, hostname, port, cores, cfg.ioEncryptionKey, isLocal = false)
		// 在RPC中安装终端
      env.rpcEnv.setupEndpoint("Executor", new CoarseGrainedExecutorBackend(
        env.rpcEnv, driverUrl, executorId, hostname, cores, userClassPath, env))
      workerUrl.foreach { url =>
        env.rpcEnv.setupEndpoint("WorkerWatcher", new WorkerWatcher(env.rpcEnv, url))
      }
等待结束

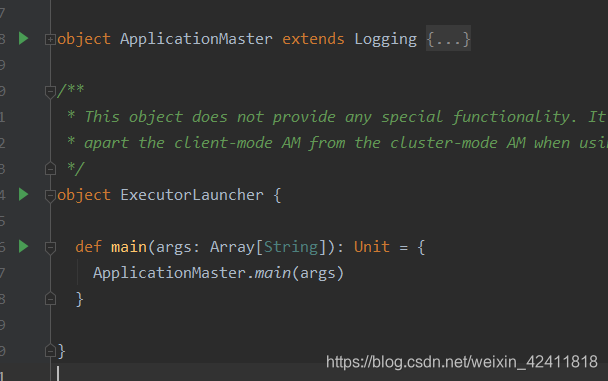
在看一下 ExecutorLauncher ,看懂了吗,其实还是调用的ApplicationMaster的main方法,其实就是没有区别的


 328
328


 被折叠的 条评论
为什么被折叠?
被折叠的 条评论
为什么被折叠?
 到【灌水乐园】发言


