


 本文深入探讨图的邻接表存储方式,包括无向图的邻接表表示、邻接表的创建、销毁、顶点数量、边数量、边存在性检查等操作,并提供STL实现简化代码。同时,介绍了使用STL中的list来构建邻接表的图,以及如何根据输入创建图。文章最后概述了图结构的关键点,强调理解存储方式对于实现创建和遍历图的重要性。
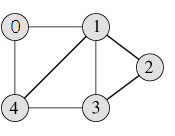
一个图 G = (V,E)由顶点(vertex)集 V 和边(edge)集 E 组成。每一条边就是一个点对(v,w),其中 v,w ∈V。
图的表示
图的存储一般有邻接表和邻接矩阵两种。若图是稠密的,则宜采用邻接矩阵;图是稀疏的,则应改用邻接表。这里我们先讨论图的邻接表存储方式。
先看下面的无向图(图片来源于网络)
邻接表形式
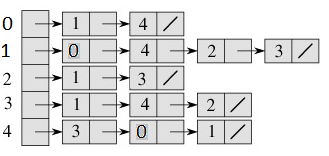
上面的边没有赋予权重,考虑边的权重,可以在邻接表后面的链表节点中添加 weight 变量表示。
邻接表前面的数组表示各个顶点,后面的链表节点分别表示与该顶点相连接的顶点。边则由两个顶点组成(最前面的顶点分别与后面对应的链表节点的顶点组合而成)。
图的数据结构
/*邻接点*/
typedef struct _AdjListNode
{
	int end;     //顶点编号,也是边的结束顶点编号
	int weight;  //权重
	struct _AdjListNode *next;//指向下一个邻接点
}AdjListNode;

typedef struct _AdjList
{
	AdjListNode *head;  //指向链表的头节点
}AdjList;

typedef struct _Graph
{
	int vertices;      //顶点数
	int edges;         //边数
	AdjList *array;
}Graph;/*创建V个顶点的图*/
Graph* CreateGraph(int V)
{
Graph *graph = new Graph;
assert(graph);
graph->vertices = V;
graph->edges = 0;
graph->array = new AdjList[V];
for (int i = 0; i < V; ++i)
{
graph->array[i].head = NULL;
}
return graph;
}/*
添加边
如果是有向图或是因边的起始顶点不同的不同权重的可基于此简单修改
*/
void AddEdge(Graph *graph, int begin, int end, int weight)
{
//边后顶点 begin --> end
AdjListNode *newNode = new AdjListNode;
assert(newNode);
newNode->end = end;
newNode->weight = weight; //begin顶点到end顶点的边的权重
newNode->next = graph->array[begin].head; //新边插入到链表前面(同Hash)
graph->array[begin].head = newNode;
//边前顶点,因为是无向图,所以类似双向链表形式 end --> begin
newNode = new AdjListNode;
newNode->end = begin;
newNode->weight = weight; //end顶点到begin顶点的边的权重
newNode->next = graph->array[end].head;
graph->array[end].head = newNode;
graph->edges++;
}/*销毁图*/
void GraphDestory(Graph *graph)
{
AdjListNode *delNode = NULL;
for (int i = 0; i < graph->vertices; ++i)
{
delNode = graph->array[i].head;
while (delNode) //删除对应链表节点
{
AdjListNode *temp = delNode;
delNode = delNode->next;
delete temp;
}
graph->array[i].head = NULL;
}
delete[] graph->array;
delete graph;
}/*返回图的顶点数*/
int GraphVerticesNum(Graph *graph)
{
return graph->vertices;
}
/*返回图的边数*/
int GraphEdgesNum(Graph *graph)
{
return graph->edges;
}/*检查两个顶点间是否有边*/
bool GraphHasEdge(Graph *graph, int begin, int end)
{
assert(begin != end);//其余各参数检查(图,顶点编号)未写出
/*因为是无向图,所以只需检查其中的一个顶点即可*/
AdjListNode *node = graph->array[begin].head;
while (node)
{
if (end == node->end)
return true;
node = node->next;
}
return false;
/*如果是有向图,则还需要检查数组中编号end的顶点*/
}图就是多个链表的聚合。
理解了图的邻接表存储,后面的代码就好实现了。
基于前面的分析上,下面给出借助STL中的list 来构建邻接表的图,前面需要自己构建链表,最终实现的图结构是一样的,但是代码的简洁度不是差了一点半点:
class graph
{
public:
	graph(int v) :vertex(v){
		adj = new list<int>[v];
	}

	void addEdge(int v, int w);

private:
	int vertex;
	list<int> *adj;
};

//v:边的首顶点;w:边的尾顶点
void graph::addEdge(int v, int w)
{
	adj[v].push_back(w);
}下面上面创建一个图过于繁琐,这里更新一下,一举根据输入创建一个图,2015.7更新
typedef int VertexType;
typedef int EdgeType;

/*下面构成一个链式哈希表结构*/
/*边表结点*/
typedef struct AdjNode
{
	int adjvex;  //边的终点
	int weight;  //边的权重
	struct AdjNode *next;  //指向下一个邻接点
}AdjNode;

/*顶点表结点*/
typedef struct VertexNode
{
	VertexType data;   //顶点信息
	AdjNode *pFfirstedge;  //边表头指针
}VertexNode;

/*图结点*/
typedef struct Graph
{
	VertexNode *AdjArray;   //指向顶点表
	int numVertexes;
	int numEdges;
}Graph;

Graph* CreateGraph()
{
	Graph *pGraph = new Graph;
	AdjNode *pNode = NULL;
	if (NULL == pGraph)
		return NULL;

	cout << "输入顶点数和边数:" << endl;
	cin >> pGraph->numVertexes >> pGraph->numEdges;

	pGraph->AdjArray = new VertexNode[pGraph->numVertexes]();//创建并初始化为0
	if (NULL == pGraph->AdjArray)
	{
		delete pGraph;
		return NULL;
	}

	/*建立顶点信息表*/
	for (int i = 0; i < pGraph->numVertexes; ++i)
	{
		/*这里默认顶点从0到pGraph->numVertexes,可根据需要修改
		如:
		cout << "输入顶点信息" << endl;
		cin >> (pGraph->AdjArray)[i].data;
		*/
		(pGraph->AdjArray)[i].data = i;
	}

	/*建立边表*/
	for (int k = 0; k < pGraph->numEdges; ++k)
	{
		int i, j, w;
		cout << "输入边<vi,vj>上的下标i,下标j和权重w:" << endl;
		cin >> i >> j >> w;

		pNode = new AdjNode;
		if (NULL == pNode)
		{
			delete[] pGraph->AdjArray;
			delete pGraph;
			return NULL;
		}
		pNode->adjvex = j;
		pNode->weight = w;
		pNode->next = (pGraph->AdjArray)[i].pFfirstedge;//类链式哈希表插入操作,新节点插入到链表头结点
		(pGraph->AdjArray)[i].pFfirstedge = pNode;

		/*如果是无向图,还需要插入反过来的边,补充代码如下*/
		AdjNode *pNode = new AdjNode;
		if (NULL == pNode)
		{
			delete[] pGraph->AdjArray;
			delete pGraph;
			return NULL;
		}
		pNode->adjvex = i;
		pNode->weight = w;
		pNode->next = (pGraph->AdjArray)[j].pFfirstedge;
		(pGraph->AdjArray)[j].pFfirstedge = pNode;
	}
	return pGraph;
}图的邻接矩阵实现见: http://blog.csdn.net/wenqian1991/article/details/47123807


 被折叠的 条评论
为什么被折叠?
被折叠的 条评论
为什么被折叠?
 到【灌水乐园】发言


