


1. Definition
var plan =
          ["############################",
           "#      #    #      o      ##",
           "#                          #",
           "#          #####           #",
           "##         #   #    ##     #",
           "###           ##     #     #",
           "#           ###      #     #",
           "#   ####                   #",
           "#   ##       o             #",
           "# o  #         o       ### #",
           "#    #                     #",
           "############################"];
构建一个虚拟的生态系统,见上图。该图代表一个小世界,是一个游戏场景。图中的 # 代表墙,o 代表生物。每个回合,生物都会随机移动一个格子,或者移动到空白处,或者撞上墙。
我们所要做的,就是用三种字符(#,o,空格)在console中打印这样的图,以模拟这个生态系统。再写一个turn函数,每调用一次,生物们移动一个回合,然后再打印整张图。
上面的plan就代表了生态系统的一个状态。
坐标
用上一章练习题的Vector来表示
function Vector(x, y) {
  this.x = x;
  this.y = y;
}
Vector.prototype.plus = function(other) {
  return new Vector(this.x + other.x, this.y + other.y);
};
地图
定义一个Grid类,该类内部用一个数组来存储每一个坐标上是什么东西(墙、生物、空白)。
从直观上来看,这个数组应该是二维的,因为,地图就是个二维空间。访问地图上某个坐标:grid[y][x] 。
存储地图的数组也可以定义为一维的,数组的长度为 width x height,访问某个坐标:grid[x+y*width] 。
这个数组是地图对象的一个属性,只有地图对象本身才会直接访问这个数组,所以,对于其他对象,选用哪种方式都无所谓。这里,我们选用一维数组,因为,创建这个数组更简单。
function Grid(width, height) {
  this.space = new Array(width * height);
  this.width = width;
  this.height = height;
}
Grid.prototype.isInside = function(vector) {
  return vector.x >= 0 && vector.x < this.width &&
         vector.y >= 0 && vector.y < this.height;
};
Grid.prototype.get = function(vector) {
  return this.space[vector.x + this.width * vector.y];
};
Grid.prototype.set = function(vector, value) {
  this.space[vector.x + this.width * vector.y] = value;
};
1. A Critter's Programming Interface
定义Critter对象的接口
Critter对象只需要一个接口 —— act,就是每个turn(回合)它执行的动作。
要想执行动作,需要了解地理信息,所以,我们定义一个导航仪(高德导航)对象:View。
我们再把 “动作” 抽象成一个对象:Action。拿到这个Action,我们就可以确定这个critter的新位置。
所以,act的定义(用法)为: var action = critter.act(view);
下面先定义View的接口:
方法 find() : 随机找一个可以移动的方向。如果找不到,则返回null。
方法 look() : 给定一个方向,返回该方向上紧邻的字符(#,或空格)。
再定义Action的接口:
属性 type:"move",现在,我们的critter只有这一种action类型。
属性 direction: 移动到哪个方向。如果我们限定critter每次只能移动一格,那direction就是critter周围的八个坐标。用 "n" (北),"ne" (东北)等字符串表示。
通过下面定义的 directions 变量,我们可以方便的把 “移动方向(direction)” 和 “地图坐标” 建立联系。
var directions = {
  "n":  new Vector( 0, -1),
  "ne": new Vector( 1, -1),
  "e":  new Vector( 1,  0),
  "se": new Vector( 1,  1),
  "s":  new Vector( 0,  1),
  "sw": new Vector(-1,  1),
  "w":  new Vector(-1,  0),
  "nw": new Vector(-1, -1)
};
好,有了上面的View、Action和direction的定义,我们可以实现Critter 了:
注意,这里实现的critter有一个默认的移动方向,而且会记录上一个回合的移动方向,也就是说,如果没有遇到障碍,它会沿着一个方向持续移动下去(一次一格)。
function randomElement(array) {
  return array[Math.floor(Math.random() * array.length)];
}

var directionNames = "n ne e se s sw w nw".split(" ");

function BouncingCritter() {
  this.direction = randomElement(directionNames);
};

BouncingCritter.prototype.act = function(view) {
  if (view.look(this.direction) != " ")
    this.direction = view.find(" ") || "s";
  return {type: "move", direction: this.direction};
};
1. The World Object
有了地图(Grid)和生物(Critter),我们可以构建一个世界(World)了。这一小节的目标就是把 plan 构建成World。
在本章最初定义的plan变量中,我们可以看到,World 中的每个格子会容纳一个element,共三种:墙,Critter, 空白。
墙:
符号:#
prototype: Wall
实现:function Wall() { } ,墙不需要有任何行为和属性,所以,定义一个空的构造函数就够了。
生物:
符号:o
prototype: BouncingCritter
实现:见上一节的代码
空白:
符号:空格
prototype:null
空白 也不需要任何行为和属性,能和墙区分开来就可以。所以,可以用null表示。
通过符号构建element
定义一个对象,容纳各种element的构造函数
var legend = {
  "#": Wall,
  "o": BouncingCritter
};
function elementFromChar(legend, ch) {
  if (ch == " ")
    return null;
  var element = new legend[ch]();
  element.originChar = ch;
  return element;
}
通过plan创建初始世界
function World(map, legend) {
  var grid = new Grid(map[0].length, map.length);
  this.grid = grid;
  this.legend = legend;

  map.forEach(function(line, y) {
    for (var x = 0; x < line.length; x++)
      grid.set(new Vector(x, y),
               elementFromChar(legend, line[x]));
  });
}
var world = new World(plan, {"#": Wall, "o": BouncingCritter});
1. 第一个参数map,是像plan那样的数组;
2. 创建grid(地图);
3. 保存legend,以备后用;
4. 根据map中的每一个符号(#,o,空白)创建相应的element,保存到Grid(地图)中。
把世界打印到console
把element转换成符号
function charFromElement(element) {
  if (element == null)
    return " ";
  else
    return element.originChar;
}
注意这个originChar,是在上面构建element时保存的。
给World添加toString方法
World.prototype.toString = function() {
  var output = "";
  for (var y = 0; y < this.grid.height; y++) {
    for (var x = 0; x < this.grid.width; x++) {
      var element = this.grid.get(new Vector(x, y));
      output += charFromElement(element);
    }
    output += "\n";
  }
  return output;
};
把上面所有的代码都保存到一个html中,在控制台输入: world.toString()

1. This and Its Scope
注意World构造函数的前两行代码
var grid = new Grid(map[0].length, map.length);
this.grid = grid;
为什么要这么写呢,不是可以写成一行吗?
注意,下面的forEach用一个function遍历map的每一行。这个function中用到了grid,注意看,grid前面没有this。this在这个function中并不是World对象,因为,这个function不是World的成员函数。
这是js的一个非常怪异的地方。只有在成员函数中,this才代表对象本身,否则,是指全局对象。而全局对象是没有grid属性的。所以,要额外定义 var grid 。
第二种模式
var self = this;
在function中使用self,self是一个普通的变量,从语义上来看更清晰一些。
第三种模式,用bind
var test = {
  prop: 10,
  addPropTo: function(array) {
    return array.map(function(elt) {
      return this.prop + elt;
    }.bind(this));
  }
};
console.log(test.addPropTo([5]));
// → [15]
还记得bind吗? 有了bind的第一个参数,function内部的this就不再是全局变量了。
第四种模式
大多数标准的高阶函数,都可以传入第二个参数,这个参数也会被当作function内部的this。
var test = {
  prop: 10,
  addPropTo: function(array) {
    return array.map(function(elt) {
      return this.prop + elt;
    }, this); // ← no bind
  }
};
console.log(test.addPropTo([5]));
// → [15]
第五种模式
参照第四种模式,我们可以给Grid类定义自己的高阶函数 forEach,注意第二个参数context就是那个this。
Grid.prototype.forEach = function(f, context) {
  for (var y = 0; y < this.height; y++) {
    for (var x = 0; x < this.width; x++) {
      var value = this.space[x + y * this.width];
      if (value != null)
        f.call(context, value, new Vector(x, y));
    }
  }
};
1. 实现导航仪 —— View
在讨论Critter对象的接口时,曾提到过View对象。每当Critter开始行动时,都需要先拿出导航仪,以确定行动路线。显而易见,导航仪需要两个数据:当前坐标、地图。看下面的构造函数,vector就是坐标,world就是地图。
function View(world, vector) {
  this.world = world;
  this.vector = vector;
}
在BouncingCritter对象中,我们看到,act方法需要使用View对象的两个方法:look 和 find。
look 用于查看某个方向上有什么东西
View.prototype.look = function(dir) {
  var target = this.vector.plus(directions[dir]);
  if (this.world.grid.isInside(target))
    return charFromElement(this.world.grid.get(target));
  else
    return "#";
};
find 方法很简单:给定一个字符,找到周围八个方格中哪个方向包含这个字符,如果找不到,返回null,找到了,随机返回一个。
View.prototype.find = function(ch) {
  var found = this.findAll(ch);
  if (found.length == 0) return null;
  return randomElement(found);
};
find中用到了findAll方法
View.prototype.findAll = function(ch) {
  var found = [];
  for (var dir in directions)
    if (this.look(dir) == ch)
      found.push(dir);
  return found;
};
1. Animating Life
给World添加turn方法
每调用一次turn(一个回合),地图上的每一个critter都有机会移动一次。World.prototype.turn = function() {
var acted = [];
this.grid.forEach(function(critter, vector) {
if (critter.act && acted.indexOf(critter) == -1) {
acted.push(critter);
this.letAct(critter, vector);
}
}, this);
};var acted = [ ]; 这是干什么呢? 我们在forEach循环中遍历地图上的每一个坐标,而该坐标上的critter有可能移动到forEach还没遍历过的坐标上。所以,要把它记下来,如果在一个turn中遇到了两次这个critter,那么,第二次就略过它,不要多次移动。
World.prototype.letAct = function(critter, vector) {
  var action = critter.act(new View(this, vector));
  if (action && action.type == "move") {
    var dest = this.checkDestination(action, vector);
    if (dest && this.grid.get(dest) == null) {
      this.grid.set(vector, null);
      this.grid.set(dest, critter);
    }
  }
};
World.prototype.checkDestination = function(action, vector) {
if (directions.hasOwnProperty(action.direction)) {
var dest = vector.plus(directions[action.direction]);
if (this.grid.isInside(dest))
return dest;
}
};1. It Moves
这个小世界终于构建完了,运行一下看看:
for (var i = 0; i < 5; i++) {
  world.turn();
  console.log(world.toString());
}
// → … five turns of moving critters
1. More Life Forms
这一小节,我们要添加新的生物种类。
对于上面构建的世界,如果我们多看一些回合,就会发现,如果两个critter相遇,它们会自动弹开。
我们可以创造一种新的Critter,它具有不同的行为,例如:顺着墙爬。想象一下,这种新的生物用一只左手(爪子?吸盘?)抓住墙,每个回合都沿着墙移动一格。
爬墙是有方向概念的,首先,需要增加一个方法,计算方向。
dir 代表一个给定的方向,则:
dir + 1 = 顺时针移动45度方向;
dir - 2 = 逆时针移动90度方向;
以此类推。
例如:dirPlus("n", 1) 返回 "ne"
function dirPlus(dir, n) {
  var index = directionNames.indexOf(dir);
  return directionNames[(index + n + 8) % 8];
}
添加一种爬墙生物
function WallFollower() {
  this.dir = "s";
}
WallFollower.prototype.act = function(view) {
var start = this.dir;
if (view.look(dirPlus(this.dir, -3)) != " ")
start = this.dir = dirPlus(this.dir, -2);
while (view.look(this.dir) != " ") {
this.dir = dirPlus(this.dir, 1);
if (this.dir == start) break;
}
return {type: "move", direction: this.dir};
};我的空间意识太差,中学几何就学的很困难,这个算法实在看不懂。
构建一个新的世界
new World(
  ["############",
   "#     #    #",
   "#   ~    ~ #",
   "#  ##      #",
   "#  ##  o####",
   "#          #",
   "############"],
  {"#": Wall,
   "~": WallFollower,
   "o": BouncingCritter}
)
让它动起来看一看。

1. A More Lifelike Simulation
为了让我们创造的世界更有意思,我们要给它加入食物,要让critter能够繁衍。
给每一种生物加上一个属性energy,每个action会消耗energy,而吃东西会增加energy。当一个critter有了足够的energy,它可以生出一个新的critter。
再增加一种生物 Plant,它不会动,靠光合作用增加成长和繁衍。
为了达到以上目的,需要修改World类,主要是 letAct 方法。但这次我们用继承的方式,创建一种新的世界LifelikeWorld,这样的话,还可以随时创建出以前的世界。
function LifelikeWorld(map, legend) {
  World.call(this, map, legend);
}
LifelikeWorld.prototype = Object.create(World.prototype);

var actionTypes = Object.create(null);

LifelikeWorld.prototype.letAct = function(critter, vector) {
  var action = critter.act(new View(this, vector));
  var handled = action &&
    action.type in actionTypes &&
    actionTypes[action.type].call(this, critter,
                                  vector, action);
  if (!handled) {
    critter.energy -= 0.2;
    if (critter.energy <= 0)
      this.grid.set(vector, null);
  }
};
通过和以前的letAct比较,可以看到,新的letAct不再负责具体action的执行,而是把执行权交给了action自己。这样可以使程序结构更简洁清晰、利于扩展。letAct中只负责一种action,或者说,一种不算是action的行为:静止不动。当critter在一个回合中没有合适的action时,它就静止不动,energy 减去五分之一。
在以前的World中,其实只有一种action —— move。现在要增加三种:eat,grow 和 reproduce。所以,需要一个容器来保存它们。
1. Action Handlers
上一节的actions容器还是空的,现在把它填上。
grow
actionTypes.grow = function(critter) {
  critter.energy += 0.5;
  return true;
};
move
actionTypes.move = function(critter, vector, action) {
  var dest = this.checkDestination(action, vector);
  if (dest == null ||
      critter.energy <= 1 ||
      this.grid.get(dest) != null)
    return false;
  critter.energy -= 1;
  this.grid.set(vector, null);
  this.grid.set(dest, critter);
  return true;
};
eat
actionTypes.eat = function(critter, vector, action) {
  var dest = this.checkDestination(action, vector);
  var atDest = dest != null && this.grid.get(dest);
  if (!atDest || atDest.energy == null)
    return false;
  critter.energy += atDest.energy;
  this.grid.set(dest, null);
  return true;
};
reproduce
actionTypes.reproduce = function(critter, vector, action) {
  var baby = elementFromChar(this.legend,
                             critter.originChar);
  var dest = this.checkDestination(action, vector);
  if (dest == null ||
      critter.energy <= 2 * baby.energy ||
      this.grid.get(dest) != null)
    return false;
  critter.energy -= 2 * baby.energy;
  this.grid.set(dest, baby);
  return true;
};
这个设计不错,如果这一大堆代码都放到World类的letAct方法中,那真会把程序员逼疯的。
1. Populating the New World
再定义两种critter:Plant 和 PlantEater。以前定义的WallFollower和BouncingCritter并不适合这个世界,它们既不能生长,也不能繁衍。
Plant
function Plant() {
  this.energy = 3 + Math.random() * 4;
}
Plant.prototype.act = function(view) {
  if (this.energy > 15) {
    var space = view.find(" ");
    if (space)
      return {type: "reproduce", direction: space};
  }
  if (this.energy < 20)
    return {type: "grow"};
};
PlantEater
function PlantEater() {
  this.energy = 20;
}
PlantEater.prototype.act = function(view) {
  var space = view.find(" ");
  if (this.energy > 60 && space)
    return {type: "reproduce", direction: space};
  var plant = view.find("*");
  if (plant)
    return {type: "eat", direction: plant};
  if (space)
    return {type: "move", direction: space};
};
1. Bringing It To Life
var valley = new LifelikeWorld(
  ["############################",
   "#####                 ######",
   "##   ***                **##",
   "#   *##**         **  O  *##",
   "#    ***     O    ##**    *#",
   "#       O         ##***    #",
   "#                 ##**     #",
   "#   O       #*             #",
   "#*          #**       O    #",
   "#***        ##**    O    **#",
   "##****     ###***       *###",
   "############################"],
  {"#": Wall,
   "O": PlantEater,
   "*": Plant}
);
随书代码中给了一个方法: animateWorld(valley) ,可以在浏览器中自动运行。
我是在console中执行 valley.turn(); valley.toString(); 在console中打印,也能看出动态效果来。一般执行几十次就只剩下plant了。
这一章太长了,而且,代码逻辑相当复杂,真心不容易看懂。我画了一张类图,是加入Plant之前的,依赖关系相当复杂。
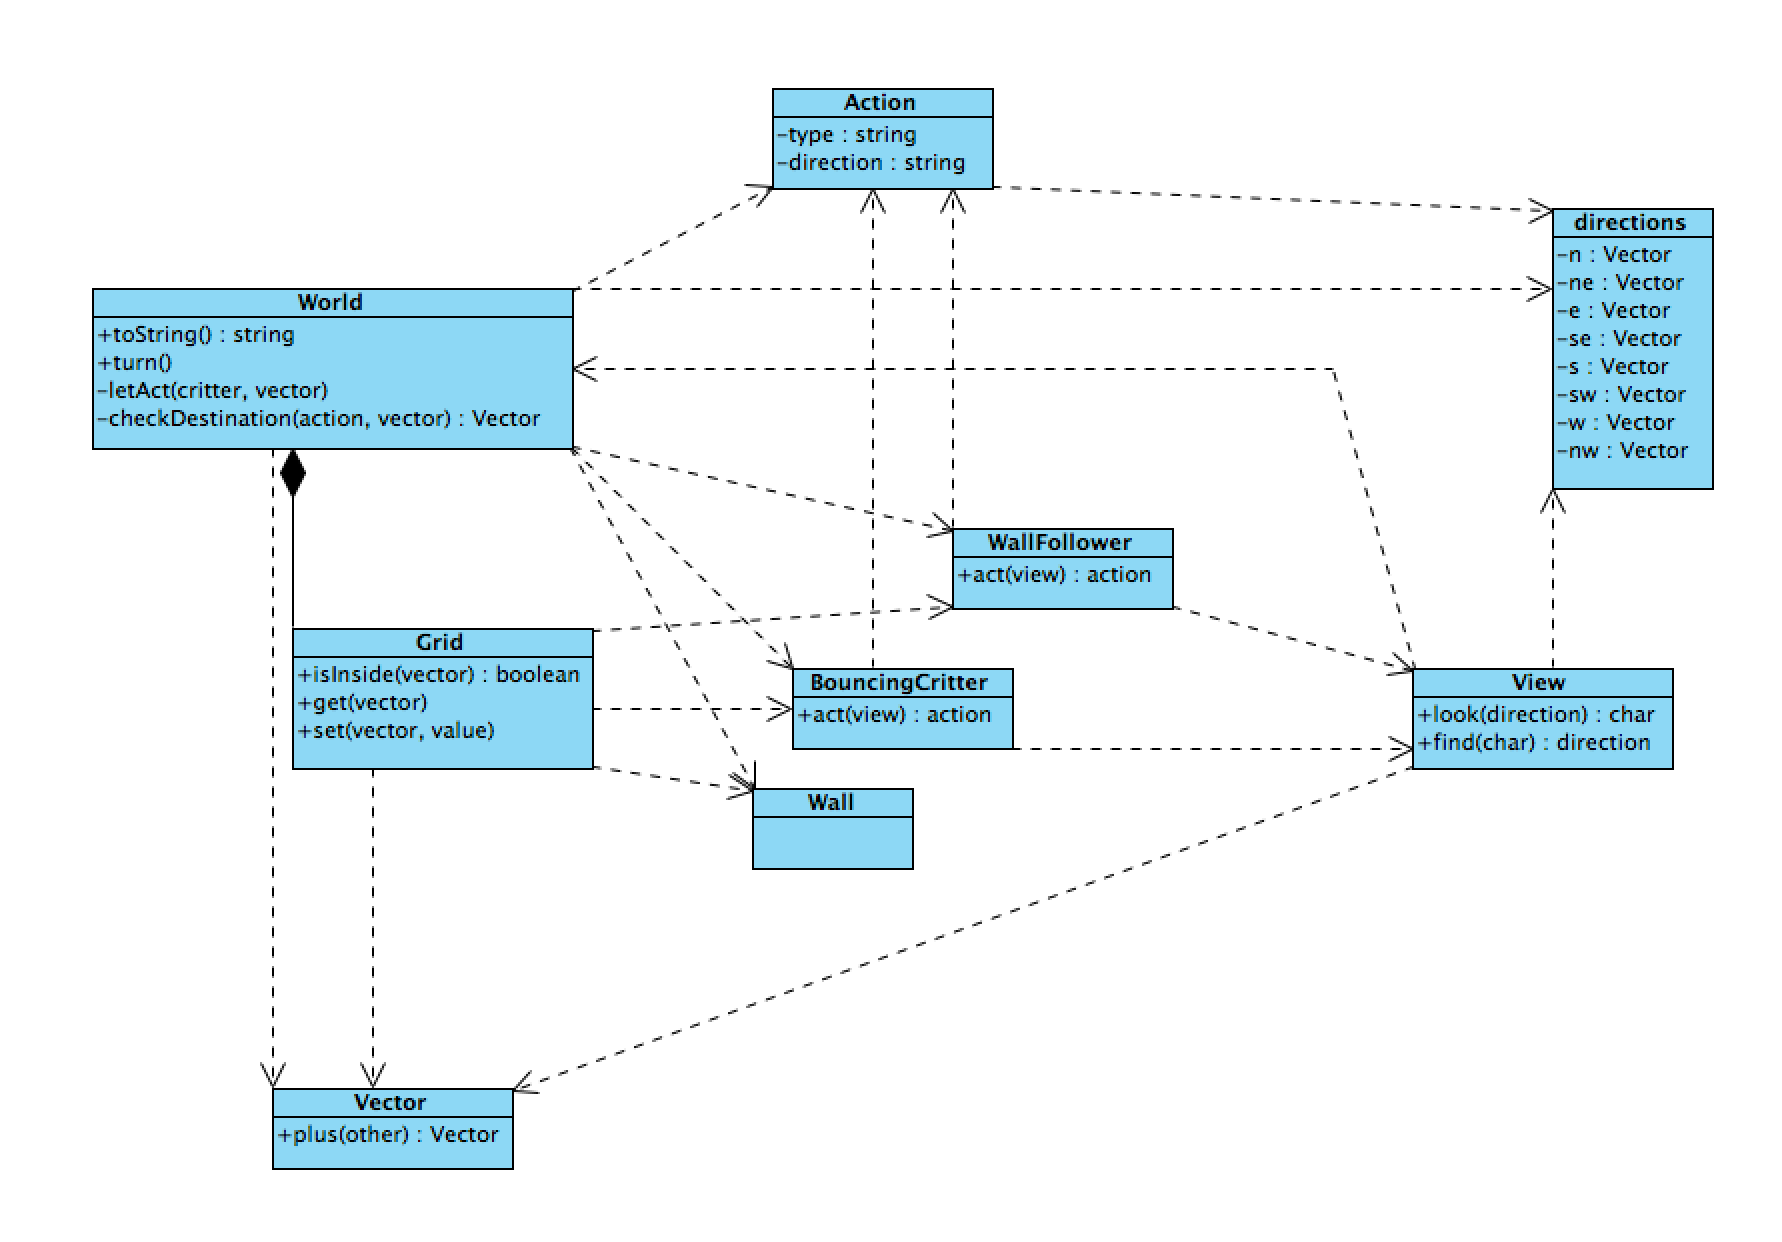
这一章看了好几天,习题也懒得做了。不过,这些代码还是挺有意思的,以后抽时间还要拿出来玩一玩。


 192
192


 被折叠的 条评论
为什么被折叠?
被折叠的 条评论
为什么被折叠?
 到【灌水乐园】发言


