


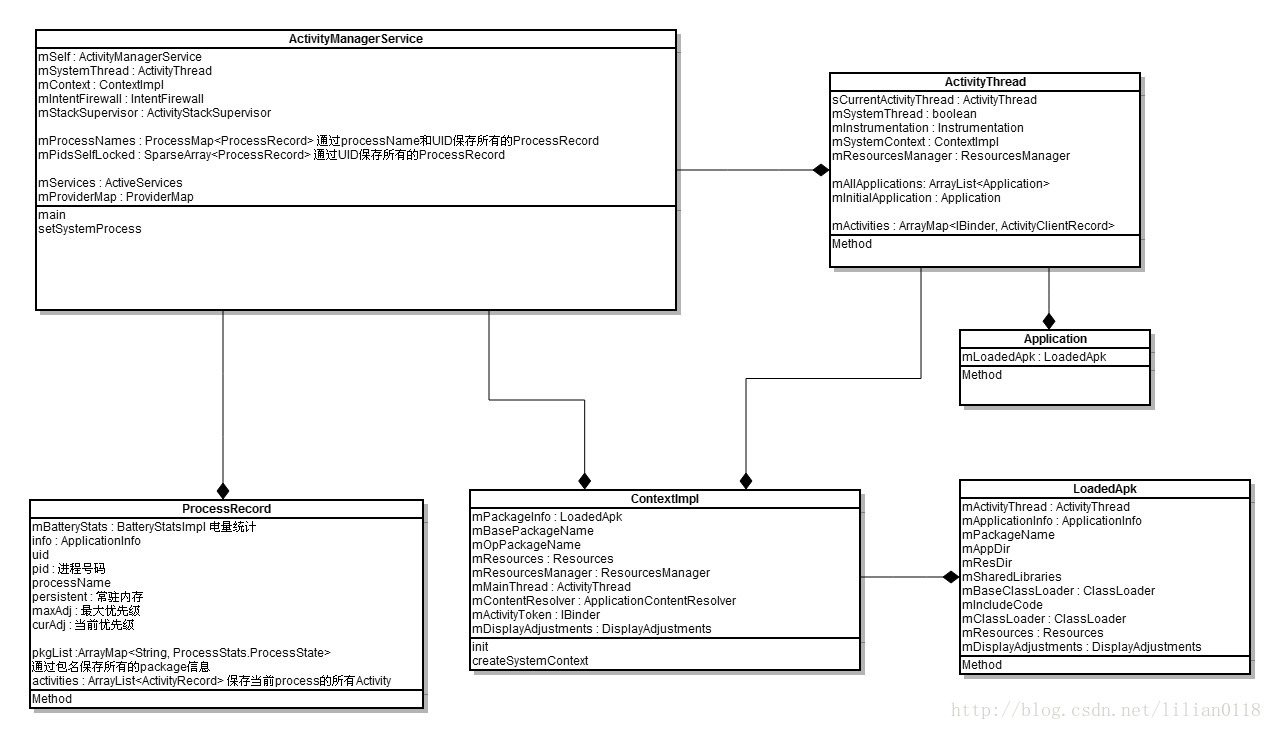
这一章我们开始分析ActivityManagerService,在后面的介绍中,我们简称为AMS。AMS并不是只用于管理所有的Activity的生命周期,它同时也管理着系统的service、broadcast以及provider等。我们首先还是从AMS的启动开始分析,它的构造以及运行都是在SystemServer当中:
- context = ActivityManagerService.main(factoryTest);
- ActivityManagerService.setSystemProcess();
- ActivityManagerService.installSystemProviders();
- ActivityManagerService.self().setWindowManager(wm);
- ActivityManagerService.self().systemReady(new Runnable()
- ActivityManagerService.self().startObservingNativeCrashes();
在SystemServer当中主要调用AMS的上面几个方法,其中通过AMS的main方法返回的context提供给其它Service上下文使用。我们接下来一个个分析上面几个函数,首先来看main方法:
ActivityManagerService的main方法
- public static final Context main(int factoryTest) {
- AThread thr = new AThread();
- thr.start();
- synchronized (thr) {
- while (thr.mService == null) {
- try {
- thr.wait();
- } catch (InterruptedException e) {
- }
- }
- }
- ActivityManagerService m = thr.mService;
- mSelf = m;
- ActivityThread at = ActivityThread.systemMain();
- mSystemThread = at;
- Context context = at.getSystemContext();
- context.setTheme(android.R.style.Theme_Holo);
- m.mContext = context;
- m.mFactoryTest = factoryTest;
- m.mIntentFirewall = new IntentFirewall(m.new IntentFirewallInterface());
- m.mStackSupervisor = new ActivityStackSupervisor(m, context, thr.mLooper);
- m.mBatteryStatsService.publish(context);
- m.mUsageStatsService.publish(context);
- m.mAppOpsService.publish(context);
- synchronized (thr) {
- thr.mReady = true;
- thr.notifyAll();
- }
- m.startRunning(null, null, null, null);
- return context;
- }
AThread继承于Thread,主要用于初始化Looper并构造AMS对象赋值给它的成员变量mService,我们首先来看AMS的构造函数:
- private ActivityManagerService() {
- Slog.i(TAG, "Memory class: " + ActivityManager.staticGetMemoryClass());
- mFgBroadcastQueue = new BroadcastQueue(this, "foreground", BROADCAST_FG_TIMEOUT, false);
- mBgBroadcastQueue = new BroadcastQueue(this, "background", BROADCAST_BG_TIMEOUT, true);
- mBroadcastQueues[0] = mFgBroadcastQueue;
- mBroadcastQueues[1] = mBgBroadcastQueue;
- mServices = new ActiveServices(this);
- mProviderMap = new ProviderMap(this);
- File dataDir = Environment.getDataDirectory();
- File systemDir = new File(dataDir, "system");
- systemDir.mkdirs();
- mBatteryStatsService = new BatteryStatsService(new File(
- systemDir, "batterystats.bin").toString());
- mBatteryStatsService.getActiveStatistics().readLocked();
- mBatteryStatsService.getActiveStatistics().writeAsyncLocked();
- mOnBattery = DEBUG_POWER ? true
- : mBatteryStatsService.getActiveStatistics().getIsOnBattery();
- mBatteryStatsService.getActiveStatistics().setCallback(this);
- mProcessStats = new ProcessStatsService(this, new File(systemDir, "procstats"));
- mUsageStatsService = new UsageStatsService(new File(systemDir, "usagestats").toString());
- mAppOpsService = new AppOpsService(new File(systemDir, "appops.xml"));
- mGrantFile = new AtomicFile(new File(systemDir, "urigrants.xml"));
- mHeadless = "1".equals(SystemProperties.get("ro.config.headless", "0"));
- // User 0 is the first and only user that runs at boot.
- mStartedUsers.put(0, new UserStartedState(new UserHandle(0), true));
- mUserLru.add(Integer.valueOf(0));
- updateStartedUserArrayLocked();
- GL_ES_VERSION = SystemProperties.getInt("ro.opengles.version",
- ConfigurationInfo.GL_ES_VERSION_UNDEFINED);
- mConfiguration.setToDefaults();
- mConfiguration.setLocale(Locale.getDefault());
- mConfigurationSeq = mConfiguration.seq = 1;
- mCompatModePackages = new CompatModePackages(this, systemDir);
- // Add ourself to the Watchdog monitors.
- Watchdog.getInstance().addMonitor(this);
- }
PMS的构造函数主要初始化一些成员变量,并在/data/system下面建立一些文件(夹)供系统统计数据用,现将一些文件及其作用列在下面的表格中,我们以后使用在再来分析:
| Service | 文件路径 | 描述 |
| BatteryStatsService | /data/system/batterystats.bin | 管理电池使用状态 |
| ProcessStatsService | /data/system/procstats | 管理进程状态 |
| UsageStatsService | /data/system/usagestats | 管理用户使用状态 |
| AppOpsService | /data/system/appops.xml | 管理进程状态 |
| AtomicFile | /data/system/urigrants.xml | 管理系统URI权限 |
回到main方法中,接着调用ActivityThread的systemMain方法去构造一个ActivityThread对象,ActivityThread是所有Application运行的主线程。这里通过systemMain去获得一个SystemContext,而一般应用程序则通过ActivityThread的main方法开始执行,我们将在后面分析到:
- public static ActivityThread systemMain() {
- HardwareRenderer.disable(true);
- ActivityThread thread = new ActivityThread();
- thread.attach(true);
- return thread;
- }
- private void attach(boolean system) {
- sCurrentActivityThread = this;
- mSystemThread = system;
- if (!system) {
- } else {
- android.ddm.DdmHandleAppName.setAppName("system_process",
- UserHandle.myUserId());
- try {
- mInstrumentation = new Instrumentation();
- ContextImpl context = new ContextImpl();
- context.init(getSystemContext().mPackageInfo, null, this);
- Application app = Instrumentation.newApplication(Application.class, context);
- mAllApplications.add(app);
- mInitialApplication = app;
- app.onCreate();
- } catch (Exception e) {
- throw new RuntimeException(
- "Unable to instantiate Application():" + e.toString(), e);
- }
- }
- ViewRootImpl.addConfigCallback(new ComponentCallbacks2() {
- @Override
- public void onConfigurationChanged(Configuration newConfig) {
- synchronized (mResourcesManager) {
- if (mResourcesManager.applyConfigurationToResourcesLocked(newConfig, null)) {
- if (mPendingConfiguration == null ||
- mPendingConfiguration.isOtherSeqNewer(newConfig)) {
- mPendingConfiguration = newConfig;
- sendMessage(H.CONFIGURATION_CHANGED, newConfig);
- }
- }
- }
- }
- @Override
- public void onLowMemory() {
- }
- @Override
- public void onTrimMemory(int level) {
- }
- });
- }
在ActivityThread的systemMain方法中,首先构造一个ActivityThread对象,然后调用它的attach方法。传入到attach方法的参数为true,我们先只看attach system的ActivityThread的流程。attach方法首先构造一个ContextImpl对象,然后调用getSystemContext来获取一个SystemContext上下文,这里成为SystemContext是因为它加载了系统中包名为"android"的应用,也就是framework-res.apk,并且mSystemContext会返回给systemServer中其它的服务使用:
- public ContextImpl getSystemContext() {
- synchronized (this) {
- if (mSystemContext == null) {
- ContextImpl context =
- ContextImpl.createSystemContext(this);
- LoadedApk info = new LoadedApk(this, "android", context, null,
- CompatibilityInfo.DEFAULT_COMPATIBILITY_INFO);
- context.init(info, null, this);
- context.getResources().updateConfiguration(mResourcesManager.getConfiguration(),
- mResourcesManager.getDisplayMetricsLocked(Display.DEFAULT_DISPLAY));
- mSystemContext = context;
- }
- }
- return mSystemContext;
- }
首先来看一下ContextImpl的createSystemContext方法:
- static ContextImpl createSystemContext(ActivityThread mainThread) {
- final ContextImpl context = new ContextImpl();
- context.init(Resources.getSystem(), mainThread, Process.myUserHandle());
- return context;
- }
- final void init(Resources resources, ActivityThread mainThread, UserHandle user) {
- mPackageInfo = null;
- mBasePackageName = null;
- mOpPackageName = null;
- mResources = resources;
- mMainThread = mainThread;
- mContentResolver = new ApplicationContentResolver(this, mainThread, user);
- mUser = user;
- }
在ContextImpl中有很多init函数,我们要根据它的参数来看正确的init函数。这里的init函数主要初始化一些成员变量。然后在getSystemContext构造LoadedApk对象,LoadedApk用于描述一个加载进来的APK文件:
- public LoadedApk(ActivityThread activityThread, String name,
- Context systemContext, ApplicationInfo info, CompatibilityInfo compatInfo) {
- mActivityThread = activityThread;
- mApplicationInfo = info != null ? info : new ApplicationInfo();
- mApplicationInfo.packageName = name;
- mPackageName = name;
- mAppDir = null;
- mResDir = null;
- mSharedLibraries = null;
- mDataDir = null;
- mDataDirFile = null;
- mLibDir = null;
- mBaseClassLoader = null;
- mSecurityViolation = false;
- mIncludeCode = true;
- mClassLoader = systemContext.getClassLoader();
- mResources = systemContext.getResources();
- mDisplayAdjustments.setCompatibilityInfo(compatInfo);
- }
然后再调用ContextImpl的init方法来初始化mSystemContext的一些成员:
- final void init(LoadedApk packageInfo, IBinder activityToken, ActivityThread mainThread) {
- init(packageInfo, activityToken, mainThread, null, null, Process.myUserHandle());
- }
- final void init(LoadedApk packageInfo, IBinder activityToken, ActivityThread mainThread,
- Resources container, String basePackageName, UserHandle user) {
- mPackageInfo = packageInfo;
- if (basePackageName != null) {
- } else {
- mBasePackageName = packageInfo.mPackageName;
- ApplicationInfo ainfo = packageInfo.getApplicationInfo();
- if (ainfo.uid == Process.SYSTEM_UID && ainfo.uid != Process.myUid()) {
- } else {
- mOpPackageName = mBasePackageName;
- }
- }
- mResources = mPackageInfo.getResources(mainThread);
- mResourcesManager = ResourcesManager.getInstance();
- CompatibilityInfo compatInfo =
- container == null ? null : container.getCompatibilityInfo();
- if (mResources != null &&
- ((compatInfo != null && compatInfo.applicationScale !=
- mResources.getCompatibilityInfo().applicationScale)
- || activityToken != null)) {
- } else {
- mDisplayAdjustments.setCompatibilityInfo(packageInfo.getCompatibilityInfo());
- mDisplayAdjustments.setActivityToken(activityToken);
- }
- mMainThread = mainThread;
- mActivityToken = activityToken;
- mContentResolver = new ApplicationContentResolver(this, mainThread, user);
- mUser = user;
- }
这里的mBasePackageName和mOpPackageName都是"android"。回到ActivityThread的attach方法中,接着调用Instrumentation的newApplication构造一个Application对象并将它设置为mInitialApplication,并添加到mAllApplications数组中,由此我们也可以看出,一个ActivityThread(也就是一个进程)中可以运行多个application,这里application都保存在mAllApplications,其中第一个运行的application保存在mInitialApplication。最后调用Application的oncreate方法:
- static public Application newApplication(Class<?> clazz, Context context)
- throws InstantiationException, IllegalAccessException,
- ClassNotFoundException {
- Application app = (Application)clazz.newInstance();
- app.attach(context);
- return app;
- }
- /* package */ final void attach(Context context) {
- attachBaseContext(context);
- mLoadedApk = ContextImpl.getImpl(context).mPackageInfo;
- }
在ActivityThread的attach方法的最后,向ViewRootImpl注册一个callback用于接收ConfigurationChanged事件(例如横竖屏切换、输入法弹出等),我们将在介绍WindowsManager的时候来分析如果dispatch这些事件到具体的activity当中。回到AMS的main方法中,接着将getSystemContext设置为刚创建的ActivityThread,并设置AMS中mContext为ActivityThread中的mSystemContext,然后向ServiceManager注册三个service后就调用AMS的startRunning开始AMS的运行:
- public final void startRunning(String pkg, String cls, String action,
- String data) {
- synchronized(this) {
- if (mStartRunning) {
- return;
- }
- mStartRunning = true;
- mTopComponent = pkg != null && cls != null
- ? new ComponentName(pkg, cls) : null;
- mTopAction = action != null ? action : Intent.ACTION_MAIN;
- mTopData = data;
- if (!mSystemReady) {
- return;
- }
- }
- systemReady(null);
- }
因为进入startRunning时mStartRunning和mSystemReady都为false,所以这里只是设置mStartRunning为true,mTopComponent为null,mTopAction为Intent.ACTION_MAIN,mTopData为null就直接返回。到这里AMS的main方法就介绍完了,回到systemServer调用AMS的第二个函数是setSystemProcess:
ActivityManagerService的setSystemProcess方法
- public static void setSystemProcess() {
- try {
- ActivityManagerService m = mSelf;
- ServiceManager.addService(Context.ACTIVITY_SERVICE, m, true);
- ServiceManager.addService(ProcessStats.SERVICE_NAME, m.mProcessStats);
- ServiceManager.addService("meminfo", new MemBinder(m));
- ServiceManager.addService("gfxinfo", new GraphicsBinder(m));
- ServiceManager.addService("dbinfo", new DbBinder(m));
- if (MONITOR_CPU_USAGE) {
- ServiceManager.addService("cpuinfo", new CpuBinder(m));
- }
- ServiceManager.addService("permission", new PermissionController(m));
- ApplicationInfo info =
- mSelf.mContext.getPackageManager().getApplicationInfo(
- "android", STOCK_PM_FLAGS);
- mSystemThread.installSystemApplicationInfo(info);
- synchronized (mSelf) {
- ProcessRecord app = mSelf.newProcessRecordLocked(info,
- info.processName, false);
- app.persistent = true;
- app.pid = MY_PID;
- app.maxAdj = ProcessList.SYSTEM_ADJ;
- app.makeActive(mSystemThread.getApplicationThread(), mSelf.mProcessStats);
- mSelf.mProcessNames.put(app.processName, app.uid, app);
- synchronized (mSelf.mPidsSelfLocked) {
- mSelf.mPidsSelfLocked.put(app.pid, app);
- }
- mSelf.updateLruProcessLocked(app, false, null);
- mSelf.updateOomAdjLocked();
- }
- } catch (PackageManager.NameNotFoundException e) {
- throw new RuntimeException(
- "Unable to find android system package", e);
- }
- }
这里首先向ServiceManager注册几个服务,然后PMS的getApplicationInfo去获取packageName为"android"的信息,我们知道包名为"android"的APK其实就是"framework-res.apk",PMS的getApplicationInfo比较简单,都是获取在scanPackageLI保存的mAndroidApplication对象,然后调用mSystemThread的installSystemApplicationInfo将前面获取到的"framework-res.apk"的ApplicantionInfo绑定到mSystemThread的Context上。接着setSystemProcess调用newProcessRecordLocked方法创建一个ProcessRecord对象,ProcessRecord描述一个进程的信息,这里代表framework-res.apk所在的进程信息(也就是systemServer的进程):
- final ProcessRecord newProcessRecordLocked(ApplicationInfo info, String customProcess,
- boolean isolated) {
- String proc = customProcess != null ? customProcess : info.processName;
- BatteryStatsImpl.Uid.Proc ps = null;
- BatteryStatsImpl stats = mBatteryStatsService.getActiveStatistics();
- int uid = info.uid;
- return new ProcessRecord(stats, info, proc, uid);
- }
- ProcessRecord(BatteryStatsImpl _batteryStats, ApplicationInfo _info,
- String _processName, int _uid) {
- mBatteryStats = _batteryStats;
- info = _info;
- isolated = _info.uid != _uid;
- uid = _uid;
- userId = UserHandle.getUserId(_uid);
- processName = _processName;
- pkgList.put(_info.packageName, null);
- maxAdj = ProcessList.UNKNOWN_ADJ;
- curRawAdj = setRawAdj = -100;
- curAdj = setAdj = -100;
- persistent = false;
- removed = false;
- lastStateTime = lastPssTime = nextPssTime = SystemClock.uptimeMillis();
- }
ProcessRecord记录了当前ApplicationInfo的uid号、processName、以及进程优先级等,并且在pkgList保存了所有在当前进程中的package信息。回到setSystemProcess中将刚创建的ProcessRecord设置为常驻内存,pid号设置为systemServer的进程号。app.makeActive方法用于调用ProcessStatsService开始记录process的状态:
- public void makeActive(IApplicationThread _thread, ProcessStatsService tracker) {
- if (thread == null) {
- final ProcessStats.ProcessState origBase = baseProcessTracker;
- if (origBase != null) {
- }
- baseProcessTracker = tracker.getProcessStateLocked(info.packageName, info.uid,
- processName);
- baseProcessTracker.makeActive();
- for (int i=0; i<pkgList.size(); i++) {
- ProcessStats.ProcessState ps = pkgList.valueAt(i);
- if (ps != null && ps != origBase) {
- ps.makeInactive();
- }
- ps = tracker.getProcessStateLocked(pkgList.keyAt(i), info.uid, processName);
- if (ps != baseProcessTracker) {
- ps.makeActive();
- }
- pkgList.setValueAt(i, ps);
- }
- }
- thread = _thread;
- }
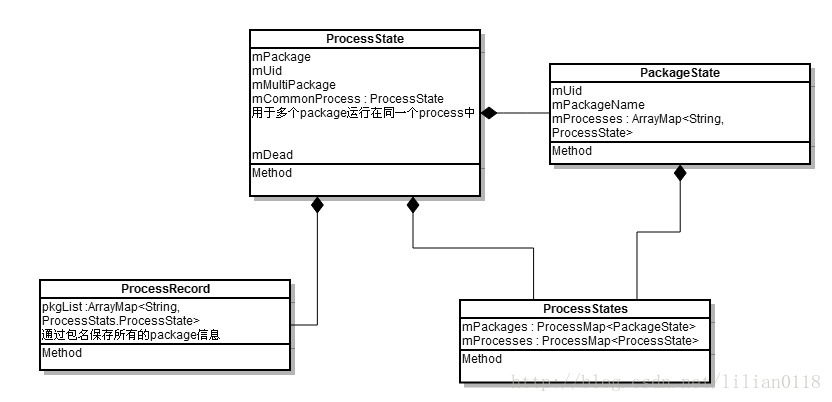
makeActive中调用两次getProcessStateLocked去获取ProcessState,其实这两次中的参数完全一样,所以pkgList保持的"system"对应的ProcessState也就是baseProcessTracker。先来看ProcessStatsService的getProcessStateLocked方法:
- public ProcessStats.ProcessState getProcessStateLocked(String packageName,
- int uid, String processName) {
- return mProcessStats.getProcessStateLocked(packageName, uid, processName);
- }
- public ProcessState getProcessStateLocked(String packageName, int uid, String processName) {
- final PackageState pkgState = getPackageStateLocked(packageName, uid);
- ProcessState ps = pkgState.mProcesses.get(processName);
- if (ps != null) {
- return ps;
- }
- ProcessState commonProc = mProcesses.get(processName, uid);
- if (commonProc == null) {
- commonProc = new ProcessState(this, packageName, uid, processName);
- mProcesses.put(processName, uid, commonProc);
- if (DEBUG) Slog.d(TAG, "GETPROC created new common " + commonProc);
- }
- if (!commonProc.mMultiPackage) {
- if (packageName.equals(commonProc.mPackage)) {
- ps = commonProc;
- if (DEBUG) Slog.d(TAG, "GETPROC also using for pkg " + commonProc);
- } else {
- }
- } else {
- }
- pkgState.mProcesses.put(processName, ps);
- if (DEBUG) Slog.d(TAG, "GETPROC adding new pkg " + ps);
- return ps;
- }
这里会构造PackageState和ProcessState,并分别添加到mPackages和mProcesses数组中,并将ProcessState添加到PackageState的mProcesses数组中,从这里可以看到,一个Package可以运行在几个process里面,通过一个process也可以运行几个package。下面是上述几个类的结构图:
最后将当前ProcessRecord加入到mProcessNames和mPidsSelfLocked数据结构当中。updateLruProcessLocked用于调整系统优先级,updateOomAdjLocked用于low memory killer,我们将在后面再来介绍。
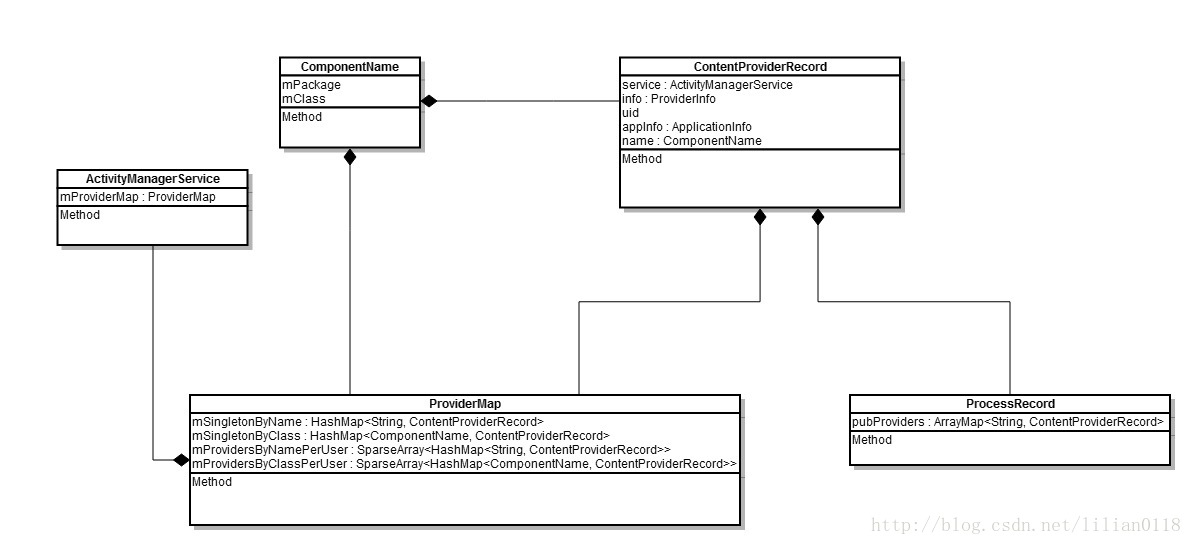
我们再来看systemServer调用AMS的第三个方法installSystemProviders,这个方法其实就是用来安装SettingsProvider:
ActivityManagerService的installSystemProviders方法
- public static final void installSystemProviders() {
- List<ProviderInfo> providers;
- synchronized (mSelf) {
- ProcessRecord app = mSelf.mProcessNames.get("system", Process.SYSTEM_UID);
- providers = mSelf.generateApplicationProvidersLocked(app);
- if (providers != null) {
- for (int i=providers.size()-1; i>=0; i--) {
- ProviderInfo pi = (ProviderInfo)providers.get(i);
- if ((pi.applicationInfo.flags&ApplicationInfo.FLAG_SYSTEM) == 0) {
- Slog.w(TAG, "Not installing system proc provider " + pi.name
- + ": not system .apk");
- providers.remove(i);
- }
- }
- }
- }
- if (providers != null) {
- mSystemThread.installSystemProviders(providers);
- }
- mSelf.mCoreSettingsObserver = new CoreSettingsObserver(mSelf);
- mSelf.mUsageStatsService.monitorPackages();
- }
这里首先获取前面在setSystemProcess添加到mProcessNames数组当中的ProcessRecord对象,然后调用generateApplicationProvidersLocked从PMS中找到"SettingsProvider.apk"提供的provider,我们可以到SettingsProvider的manifest文件中先看一下这个provider的信息:
- <manifest xmlns:android="http://schemas.android.com/apk/res/android"
- package="com.android.providers.settings"
- coreApp="true"
- android:sharedUserId="android.uid.system">
- <application android:allowClearUserData="false"
- android:label="@string/app_label"
- android:process="system"
- android:backupAgent="SettingsBackupAgent"
- android:killAfterRestore="false"
- android:icon="@mipmap/ic_launcher_settings">
- <!-- todo add: android:neverEncrypt="true" -->
- <provider android:name="SettingsProvider" android:authorities="settings"
- android:multiprocess="false"
- android:exported="true"
- android:writePermission="android.permission.WRITE_SETTINGS"
- android:initOrder="100" />
- </application>
- </manifest>
可以看到这个apk的processName也是"system",并且UID也是"android.uid.system"。再来分析generateApplicationProvidersLocked方法:
- private final List<ProviderInfo> generateApplicationProvidersLocked(ProcessRecord app) {
- List<ProviderInfo> providers = null;
- try {
- providers = AppGlobals.getPackageManager().
- queryContentProviders(app.processName, app.uid,
- STOCK_PM_FLAGS | PackageManager.GET_URI_PERMISSION_PATTERNS);
- } catch (RemoteException ex) {
- }
- int userId = app.userId;
- if (providers != null) {
- int N = providers.size();
- app.pubProviders.ensureCapacity(N + app.pubProviders.size());
- for (int i=0; i<N; i++) {
- ProviderInfo cpi =
- (ProviderInfo)providers.get(i);
- ComponentName comp = new ComponentName(cpi.packageName, cpi.name);
- ContentProviderRecord cpr = mProviderMap.getProviderByClass(comp, userId);
- if (cpr == null) {
- cpr = new ContentProviderRecord(this, cpi, app.info, comp, singleton);
- mProviderMap.putProviderByClass(comp, cpr);
- }
- app.pubProviders.put(cpi.name, cpr);
- if (!cpi.multiprocess || !"android".equals(cpi.packageName)) {
- app.addPackage(cpi.applicationInfo.packageName, mProcessStats);
- }
- ensurePackageDexOpt(cpi.applicationInfo.packageName);
- }
- }
- return providers;
- }
首先调用PMS的queryContentProviders来查询processName和uid与上面相同的provider:
- public List<ProviderInfo> queryContentProviders(String processName,
- int uid, int flags) {
- ArrayList<ProviderInfo> finalList = null;
- // reader
- synchronized (mPackages) {
- final Iterator<PackageParser.Provider> i = mProviders.mProviders.values().iterator();
- final int userId = processName != null ?
- UserHandle.getUserId(uid) : UserHandle.getCallingUserId();
- while (i.hasNext()) {
- final PackageParser.Provider p = i.next();
- PackageSetting ps = mSettings.mPackages.get(p.owner.packageName);
- if (ps != null && p.info.authority != null
- && (processName == null
- || (p.info.processName.equals(processName)
- && UserHandle.isSameApp(p.info.applicationInfo.uid, uid)))
- && mSettings.isEnabledLPr(p.info, flags, userId)
- && (!mSafeMode
- || (p.info.applicationInfo.flags & ApplicationInfo.FLAG_SYSTEM) != 0)) {
- if (finalList == null) {
- finalList = new ArrayList<ProviderInfo>(3);
- }
- ProviderInfo info = PackageParser.generateProviderInfo(p, flags,
- ps.readUserState(userId), userId);
- if (info != null) {
- finalList.add(info);
- }
- }
- }
- }
- if (finalList != null) {
- Collections.sort(finalList, mProviderInitOrderSorter);
- }
- return finalList;
- }
queryContentProviders迭代的从mProviders中查找processName为"system",uid为"SYSTEM_UID"的provider,然后调用generateProviderInfo去copy一份查找的provider信息并添加finalList中。回到前面的generateApplicationProvidersLocked,因为当前provider的processName为"system",所以singleton为true。接着把查询到的SetttingsProvider添加到AMS的mProviderMap数据结构和ProcessRecord的pubProviders数据结构当中。并把SettingsProvider这个package添加到ProcessRecord的pkgList里,这时ProcessRecord就有两个package在它里面了:
- public boolean addPackage(String pkg, ProcessStatsService tracker) {
- if (!pkgList.containsKey(pkg)) {
- if (baseProcessTracker != null) {
- ProcessStats.ProcessState state = tracker.getProcessStateLocked(
- pkg, info.uid, processName);
- pkgList.put(pkg, state);
- if (state != baseProcessTracker) {
- state.makeActive();
- }
- } else {
- pkgList.put(pkg, null);
- }
- return true;
- }
- return false;
- }
先来看一下AMS和ProcessRecord中保存SettingsProvider的数据结构:
我们知道,这里的pkg为"com.android.providers.settings",通过getProcessStateLocked方法会新建一个ProcessState加入到pkgList中:
- public ProcessState getProcessStateLocked(String packageName, int uid, String processName) {
- final PackageState pkgState = getPackageStateLocked(packageName, uid);
- ProcessState ps = pkgState.mProcesses.get(processName);
- if (ps != null) {
- return ps;
- }
- ProcessState commonProc = mProcesses.get(processName, uid);
- if (commonProc == null) {
- }
- if (!commonProc.mMultiPackage) {
- if (packageName.equals(commonProc.mPackage)) {
- } else {
- commonProc.mMultiPackage = true;
- long now = SystemClock.uptimeMillis();
- final PackageState commonPkgState = getPackageStateLocked(commonProc.mPackage, uid);
- if (commonPkgState != null) {
- ProcessState cloned = commonProc.clone(commonProc.mPackage, now);
- commonPkgState.mProcesses.put(commonProc.mName, cloned);
- ps = new ProcessState(commonProc, packageName, uid, processName, now);
- if (DEBUG) Slog.d(TAG, "GETPROC created new pkg " + ps);
- }
- } else {
- }
- pkgState.mProcesses.put(processName, ps);
- if (DEBUG) Slog.d(TAG, "GETPROC adding new pkg " + ps);
- return ps;
- }
回到AMS的installSystemProviders方法中,接着调用mSystemThread.installSystemProviders,ActivityThread是所有APK运行的主线程,所以这里会构造SettingsProvider对象,并执行它的一些回调函数,让SettingsProvider做好初始化动作:
- public final void installSystemProviders(List<ProviderInfo> providers) {
- if (providers != null) {
- installContentProviders(mInitialApplication, providers);
- }
- }
- private void installContentProviders(
- Context context, List<ProviderInfo> providers) {
- final ArrayList<IActivityManager.ContentProviderHolder> results =
- new ArrayList<IActivityManager.ContentProviderHolder>();
- for (ProviderInfo cpi : providers) {
- IActivityManager.ContentProviderHolder cph = installProvider(context, null, cpi,
- false /*noisy*/, true /*noReleaseNeeded*/, true /*stable*/);
- if (cph != null) {
- cph.noReleaseNeeded = true;
- results.add(cph);
- }
- }
- try {
- ActivityManagerNative.getDefault().publishContentProviders(
- getApplicationThread(), results);
- } catch (RemoteException ex) {
- }
- }
installContentProviders分为两步,第一步调用installProvider获得一个ContentProviderHolder对象;第二步通过AMS的publishContentProviders方法来完成注册。首先来看installProvider方法:
- private IActivityManager.ContentProviderHolder installProvider(Context context,
- IActivityManager.ContentProviderHolder holder, ProviderInfo info,
- boolean noisy, boolean noReleaseNeeded, boolean stable) {
- ContentProvider localProvider = null;
- IContentProvider provider;
- if (holder == null || holder.provider == null) {
- Context c = null;
- ApplicationInfo ai = info.applicationInfo;
- if (context.getPackageName().equals(ai.packageName)) {
- } else if (mInitialApplication != null &&
- mInitialApplication.getPackageName().equals(ai.packageName)) {
- } else {
- try {
- c = context.createPackageContext(ai.packageName,
- Context.CONTEXT_INCLUDE_CODE);
- } catch (PackageManager.NameNotFoundException e) {
- // Ignore
- }
- }
- try {
- final java.lang.ClassLoader cl = c.getClassLoader();
- localProvider = (ContentProvider)cl.
- loadClass(info.name).newInstance();
- provider = localProvider.getIContentProvider();
- localProvider.attachInfo(c, info);
- } catch (java.lang.Exception e) {
- if (!mInstrumentation.onException(null, e)) {
- throw new RuntimeException(
- "Unable to get provider " + info.name
- + ": " + e.toString(), e);
- }
- return null;
- }
- } else {
- }
- IActivityManager.ContentProviderHolder retHolder;
- synchronized (mProviderMap) {
- IBinder jBinder = provider.asBinder();
- if (localProvider != null) {
- ComponentName cname = new ComponentName(info.packageName, info.name);
- ProviderClientRecord pr = mLocalProvidersByName.get(cname);
- if (pr != null) {
- } else {
- holder = new IActivityManager.ContentProviderHolder(info);
- holder.provider = provider;
- holder.noReleaseNeeded = true;
- pr = installProviderAuthoritiesLocked(provider, localProvider, holder);
- mLocalProviders.put(jBinder, pr);
- mLocalProvidersByName.put(cname, pr);
- }
- retHolder = pr.mHolder;
- } else {
- }
- }
- return retHolder;
- }
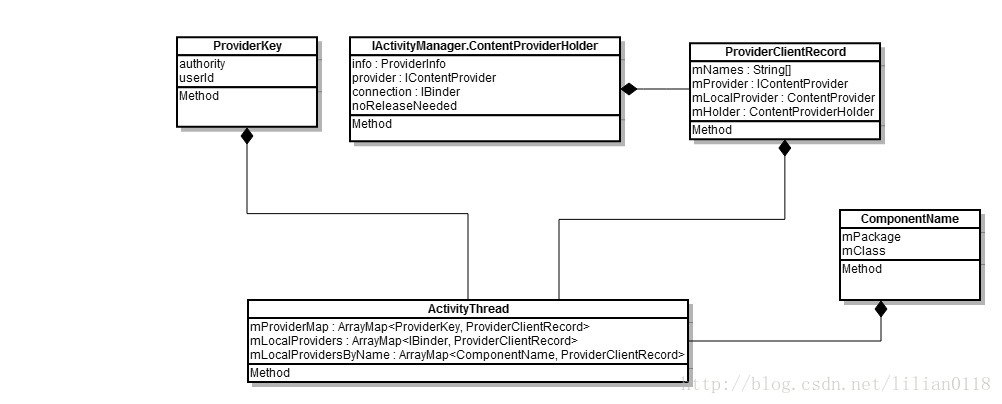
installProvider方法首先调用ContextImpl的createPackageContext方法去构造SettingsProvider所在的Context环境,在createPackageContext主要是构造一个LoadedApk对象来描述SettingsProvider这个APK,然后通过LoadedApk来初始化一个ContextImpl对象并返回,有兴趣的可以去看一下这部分code。接下来实例化一个SettingsProvider对象,SettingsProvider是继承于ContentProvider的。首先来看一下SettingsProvider的类图结构:
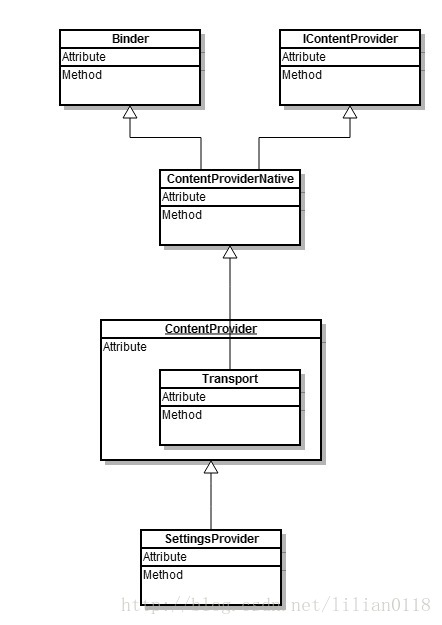
所以localProvider.getIContentProvider获取到一个Transport对象,Transport继承于Binder。接着调用SettingsProvider的attachInfo方法:
- public void attachInfo(Context context, ProviderInfo info) {
- attachInfo(context, info, false);
- }
- private void attachInfo(Context context, ProviderInfo info, boolean testing) {
- AsyncTask.init();
- mNoPerms = testing;
- if (mContext == null) {
- mContext = context;
- if (context != null) {
- mTransport.mAppOpsManager = (AppOpsManager) context.getSystemService(
- Context.APP_OPS_SERVICE);
- }
- mMyUid = Process.myUid();
- if (info != null) {
- setReadPermission(info.readPermission);
- setWritePermission(info.writePermission);
- setPathPermissions(info.pathPermissions);
- mExported = info.exported;
- }
- ContentProvider.this.onCreate();
- }
- }
attachInfo主要根据ProviderInfo设置ContentProvider的一些属性以及读写权限,然后回调SettingsProvider的onCreate方法。最后installProvider方法调用installProviderAuthoritiesLocked方法构造一个ProviderClientRecord对象,并添加到mProviderMap、mLocalProviders和mLocalProvidersByName中,这三个ArraryMap可以通过不同键值快速找到对象的ProviderClientRecord对象。最后返回ContentProviderHolder。AcitivytThread中保存SettingsProvider的信息如下:
我们来看第二步通过AMS的publishContentProviders方法来完成注册:
- public final void publishContentProviders(IApplicationThread caller,
- List<ContentProviderHolder> providers) {
- enforceNotIsolatedCaller("publishContentProviders");
- synchronized (this) {
- final ProcessRecord r = getRecordForAppLocked(caller);
- final long origId = Binder.clearCallingIdentity();
- final int N = providers.size();
- for (int i=0; i<N; i++) {
- ContentProviderHolder src = providers.get(i);
- if (src == null || src.info == null || src.provider == null) {
- continue;
- }
- ContentProviderRecord dst = r.pubProviders.get(src.info.name);
- if (dst != null) {
- ComponentName comp = new ComponentName(dst.info.packageName, dst.info.name);
- mProviderMap.putProviderByClass(comp, dst);
- String names[] = dst.info.authority.split(";");
- for (int j = 0; j < names.length; j++) {
- mProviderMap.putProviderByName(names[j], dst);
- }
- int NL = mLaunchingProviders.size();
- int j;
- for (j=0; j<NL; j++) {
- if (mLaunchingProviders.get(j) == dst) {
- mLaunchingProviders.remove(j);
- j--;
- NL--;
- }
- }
- synchronized (dst) {
- dst.provider = src.provider;
- dst.proc = r;
- dst.notifyAll();
- }
- updateOomAdjLocked(r);
- }
- }
- Binder.restoreCallingIdentity(origId);
- }
- }
getRecordForAppLocked从mLruProcesses链表中查找并返回我们前面创建的ProcessRecord对象,我们知道在generateApplicationProvidersLocked方法中,我们将从PMS得到的SettingsProvider信息已经添加到ProcessRecord的pubProviders数组中了,这里将provider信息添加到mProviderMap中,并从mLaunchingProviders(表示待启动的provider列表)中移除已经启动的provider。最后回到installSystemProviders方法中,注册一个ContentObserver来监听Settings.Secure.LONG_PRESS_TIMEOUT的变化并调用UsageStatsService去监听package的使用状态。到这里SystemServer调用AMS的installSystemProviders就介绍完了,第四个方法setWindowManager我们先不介绍,等到介绍WMS的时候再来看。最后来看SystemServer调用systemReady方法:
ActivityManagerService的systemReady方法
- public void systemReady(final Runnable goingCallback) {
- synchronized(this) {
- // Check to see if there are any update receivers to run.
- if (!mDidUpdate) {
- if (mWaitingUpdate) {
- return;
- }
- Intent intent = new Intent(Intent.ACTION_PRE_BOOT_COMPLETED);
- List<ResolveInfo> ris = null;
- try {
- ris = AppGlobals.getPackageManager().queryIntentReceivers(
- intent, null, 0, 0);
- } catch (RemoteException e) {
- }
- if (ris != null) {
- for (int i=ris.size()-1; i>=0; i--) {
- if ((ris.get(i).activityInfo.applicationInfo.flags
- &ApplicationInfo.FLAG_SYSTEM) == 0) {
- ris.remove(i);
- }
- }
- intent.addFlags(Intent.FLAG_RECEIVER_BOOT_UPGRADE);
- ArrayList<ComponentName> lastDoneReceivers = readLastDonePreBootReceivers();
- final ArrayList<ComponentName> doneReceivers = new ArrayList<ComponentName>();
- for (int i=0; i<ris.size(); i++) {
- ActivityInfo ai = ris.get(i).activityInfo;
- ComponentName comp = new ComponentName(ai.packageName, ai.name);
- if (lastDoneReceivers.contains(comp)) {
- ris.remove(i);
- i--;
- }
- }
- final int[] users = getUsersLocked();
- for (int i=0; i<ris.size(); i++) {
- ActivityInfo ai = ris.get(i).activityInfo;
- ComponentName comp = new ComponentName(ai.packageName, ai.name);
- doneReceivers.add(comp);
- intent.setComponent(comp);
- for (int j=0; j<users.length; j++) {
- IIntentReceiver finisher = null;
- if (i == ris.size()-1 && j == users.length-1) {
- finisher = new IIntentReceiver.Stub() {
- public void performReceive(Intent intent, int resultCode,
- String data, Bundle extras, boolean ordered,
- boolean sticky, int sendingUser) {
- mHandler.post(new Runnable() {
- public void run() {
- synchronized (ActivityManagerService.this) {
- mDidUpdate = true;
- }
- writeLastDonePreBootReceivers(doneReceivers);
- showBootMessage(mContext.getText(
- R.string.android_upgrading_complete),
- false);
- systemReady(goingCallback);
- }
- });
- }
- };
- }
- Slog.i(TAG, "Sending system update to " + intent.getComponent()
- + " for user " + users[j]);
- broadcastIntentLocked(null, null, intent, null, finisher,
- 0, null, null, null, AppOpsManager.OP_NONE,
- true, false, MY_PID, Process.SYSTEM_UID,
- users[j]);
- if (finisher != null) {
- mWaitingUpdate = true;
- }
- }
- }
- }
- if (mWaitingUpdate) {
- return;
- }
- mDidUpdate = true;
- }
这是systemReady最开始的一段code,主要用来处理OTA升级后database有改变的状况,这里会从PMS中获取所有接收ACTION_PRE_BOOT_COMPLETED的Receivers,并发送广播给它们,最后会记录这些已经发送广播的Receivers到/data/system/called_pre_boots.dat文件中。关于OTA升级这部分我们先不关注了,接着来看systemReady后面的代码:
- ArrayList<ProcessRecord> procsToKill = null;
- synchronized(mPidsSelfLocked) {
- for (int i=mPidsSelfLocked.size()-1; i>=0; i--) {
- ProcessRecord proc = mPidsSelfLocked.valueAt(i);
- if (!isAllowedWhileBooting(proc.info)){
- if (procsToKill == null) {
- procsToKill = new ArrayList<ProcessRecord>();
- }
- procsToKill.add(proc);
- }
- }
- }
- synchronized(this) {
- if (procsToKill != null) {
- for (int i=procsToKill.size()-1; i>=0; i--) {
- ProcessRecord proc = procsToKill.get(i);
- Slog.i(TAG, "Removing system update proc: " + proc);
- removeProcessLocked(proc, true, false, "system update done");
- }
- }
- mProcessesReady = true;
- }
上面的代码主要是杀死在AMS systemReady之前启动的启动process,且这些process没有设置FLAG_PERSISTENT(例如update进程),然后调用removeProcessLocked去结束进程并释放资源,这部分代码我们后面再来介绍。接着来看systemReady函数:
- Slog.i(TAG, "System now ready");
- synchronized(this) {
- if (mFactoryTest == SystemServer.FACTORY_TEST_LOW_LEVEL) {
- }
- }
- retrieveSettings();
- synchronized (this) {
- readGrantedUriPermissionsLocked();
- }
- if (goingCallback != null) goingCallback.run();
- synchronized (this) {
- if (mFactoryTest != SystemServer.FACTORY_TEST_LOW_LEVEL) {
- try {
- List apps = AppGlobals.getPackageManager().
- getPersistentApplications(STOCK_PM_FLAGS);
- if (apps != null) {
- int N = apps.size();
- int i;
- for (i=0; i<N; i++) {
- ApplicationInfo info
- = (ApplicationInfo)apps.get(i);
- if (info != null &&
- !info.packageName.equals("android")) {
- addAppLocked(info, false);
- }
- }
- }
- } catch (RemoteException ex) {
- // pm is in same process, this will never happen.
- }
- }
retrieveSettings从SettingsProvider中获取DEBUG_APP、WAIT_FOR_DEBUGGER、ALWAYS_FINISH_ACTIVITIES和DEVELOPMENT_FORCE_RTL四个配置项。readGrantedUriPermissionsLocked从/data/system/urigrants.xml中读取Uri权限,并构造UriPermission保存在AMS全局的mGrantedUriPermissions中,这部分我们以后遇到的时候再来介绍。goingCallback主要调用AMS的startObservingNativeCrashes去建立socket监听底层的NativeCrash消息,并把crash消息传递给AMS的handleApplicationCrashInner函数处理。接着从PMS中获取系统persistent的Application,并调用addAppLocked方法去启动这些Application,关于addAppLocked方法我们后面介绍启动Activity的时候再来介绍。来看systemReady最后一部分的代码:
- // Start up initial activity.
- mBooting = true;
- long ident = Binder.clearCallingIdentity();
- try {
- Intent intent = new Intent(Intent.ACTION_USER_STARTED);
- intent.addFlags(Intent.FLAG_RECEIVER_REGISTERED_ONLY
- | Intent.FLAG_RECEIVER_FOREGROUND);
- intent.putExtra(Intent.EXTRA_USER_HANDLE, mCurrentUserId);
- broadcastIntentLocked(null, null, intent,
- null, null, 0, null, null, null, AppOpsManager.OP_NONE,
- false, false, MY_PID, Process.SYSTEM_UID, mCurrentUserId);
- intent = new Intent(Intent.ACTION_USER_STARTING);
- intent.addFlags(Intent.FLAG_RECEIVER_REGISTERED_ONLY);
- intent.putExtra(Intent.EXTRA_USER_HANDLE, mCurrentUserId);
- broadcastIntentLocked(null, null, intent,
- null, new IIntentReceiver.Stub() {
- @Override
- public void performReceive(Intent intent, int resultCode, String data,
- Bundle extras, boolean ordered, boolean sticky, int sendingUser)
- throws RemoteException {
- }
- }, 0, null, null,
- android.Manifest.permission.INTERACT_ACROSS_USERS, AppOpsManager.OP_NONE,
- true, false, MY_PID, Process.SYSTEM_UID, UserHandle.USER_ALL);
- } finally {
- Binder.restoreCallingIdentity(ident);
- }
- mStackSupervisor.resumeTopActivitiesLocked();
- sendUserSwitchBroadcastsLocked(-1, mCurrentUserId);
- }
- }
首先广播ACTION_USER_STARTED和ACTION_USER_STARTING两个消息表示user状态的改变。最后调用mStackSupervisor.resumeTopActivitiesLocked来启动HOME界面:
ActivityMangerService启动HOME
- boolean resumeTopActivitiesLocked() {
- return resumeTopActivitiesLocked(null, null, null);
- }
- boolean resumeTopActivitiesLocked(ActivityStack targetStack, ActivityRecord target,
- Bundle targetOptions) {
- if (targetStack == null) {
- targetStack = getFocusedStack();
- }
- boolean result = false;
- for (int stackNdx = mStacks.size() - 1; stackNdx >= 0; --stackNdx) {
- final ActivityStack stack = mStacks.get(stackNdx);
- if (isFrontStack(stack)) {
- if (stack == targetStack) {
- result = stack.resumeTopActivityLocked(target, targetOptions);
- } else {
- stack.resumeTopActivityLocked(null);
- }
- }
- }
- return result;
- }
- ActivityStack getFocusedStack() {
- if (mFocusedStack == null) {
- return mHomeStack;
- }
- switch (mStackState) {
- case STACK_STATE_HOME_IN_FRONT:
- case STACK_STATE_HOME_TO_FRONT:
- return mHomeStack;
- case STACK_STATE_HOME_IN_BACK:
- case STACK_STATE_HOME_TO_BACK:
- default:
- return mFocusedStack;
- }
- }
这里主要调用mHomeStack的resumeTopActivityLocked方法来启动HOME界面,mHomeStack是在setWindowManager中构造的,如下:
- void setWindowManager(WindowManagerService wm) {
- mWindowManager = wm;
- mHomeStack = new ActivityStack(mService, mContext, mLooper, HOME_STACK_ID);
- mStacks.add(mHomeStack);
- }
来看ActivityStack的resumeTopActivityLocked函数:
- final boolean resumeTopActivityLocked(ActivityRecord prev, Bundle options) {
- ActivityRecord next = topRunningActivityLocked(null);
- final boolean userLeaving = mStackSupervisor.mUserLeaving;
- mStackSupervisor.mUserLeaving = false;
- if (next == null) {
- // There are no more activities! Let's just start up the
- // Launcher...
- ActivityOptions.abort(options);
- if (DEBUG_STATES) Slog.d(TAG, "resumeTopActivityLocked: No more activities go home");
- if (DEBUG_STACK) mStackSupervisor.validateTopActivitiesLocked();
- return mStackSupervisor.resumeHomeActivity(prev);
- }
因为当前ActivityStack(HomeStack)中的mTaskHistory为空,所以这里会调用StackSupervisor的resumeHomeActivity方法:
- boolean resumeHomeActivity(ActivityRecord prev) {
- moveHomeToTop();
- if (prev != null) {
- prev.task.mOnTopOfHome = false;
- }
- ActivityRecord r = mHomeStack.topRunningActivityLocked(null);
- if (r != null && r.isHomeActivity()) {
- }
- return mService.startHomeActivityLocked(mCurrentUser);
- }
- boolean startHomeActivityLocked(int userId) {
- Intent intent = getHomeIntent();
- ActivityInfo aInfo =
- resolveActivityInfo(intent, STOCK_PM_FLAGS, userId);
- if (aInfo != null) {
- intent.setComponent(new ComponentName(
- aInfo.applicationInfo.packageName, aInfo.name));
- aInfo = new ActivityInfo(aInfo);
- aInfo.applicationInfo = getAppInfoForUser(aInfo.applicationInfo, userId);
- ProcessRecord app = getProcessRecordLocked(aInfo.processName,
- aInfo.applicationInfo.uid, true);
- if (app == null || app.instrumentationClass == null) {
- intent.setFlags(intent.getFlags() | Intent.FLAG_ACTIVITY_NEW_TASK);
- mStackSupervisor.startHomeActivity(intent, aInfo);
- }
- }
- return true;
- }
- private ActivityInfo resolveActivityInfo(Intent intent, int flags, int userId) {
- ActivityInfo ai = null;
- ComponentName comp = intent.getComponent();
- try {
- if (comp != null) {
- } else {
- ResolveInfo info = AppGlobals.getPackageManager().resolveIntent(
- intent,
- intent.resolveTypeIfNeeded(mContext.getContentResolver()),
- flags, userId);
- if (info != null) {
- ai = info.activityInfo;
- }
- }
- } catch (RemoteException e) {
- // ignore
- }
- return ai;
- }
- public ResolveInfo resolveIntent(Intent intent, String resolvedType,
- int flags, int userId) {
- if (!sUserManager.exists(userId)) return null;
- enforceCrossUserPermission(Binder.getCallingUid(), userId, false, "resolve intent");
- List<ResolveInfo> query = queryIntentActivities(intent, resolvedType, flags, userId);
- return chooseBestActivity(intent, resolvedType, flags, query, userId);
- }
关于queryIntentActivities和chooseBestActivity我们以后再来分析,这里假设系统只有一个launcher,它的manifest文件如下:
- <application
- android:name="com.android.launcher2.LauncherApplication"
- android:label="@string/application_name"
- android:icon="@mipmap/ic_launcher_home"
- android:hardwareAccelerated="true"
- android:largeHeap="@bool/config_largeHeap"
- android:supportsRtl="true">
- <activity
- android:name="com.android.launcher2.Launcher"
- android:launchMode="singleTask"
- android:clearTaskOnLaunch="true"
- android:stateNotNeeded="true"
- android:theme="@style/Theme"
- android:windowSoftInputMode="adjustPan"
- android:screenOrientation="nosensor">
- <intent-filter>
- <action android:name="android.intent.action.MAIN" />
- <category android:name="android.intent.category.HOME" />
- <category android:name="android.intent.category.DEFAULT" />
- <category android:name="android.intent.category.MONKEY"/>
- </intent-filter>
- </activity>
在startHomeActivityLocked因为没有存在Launcher的ProcessRecord信息,所以调用mStackSupervisor.startHomeActivity去启动launcher,并且设置了FLAG_ACTIVITY_NEW_TASK,表示新建一个task来运行launcher:
- void startHomeActivity(Intent intent, ActivityInfo aInfo) {
- moveHomeToTop();
- startActivityLocked(null, intent, null, aInfo, null, null, 0, 0, 0, null, 0,
- null, false, null);
- }
- final int startActivityLocked(IApplicationThread caller,
- Intent intent, String resolvedType, ActivityInfo aInfo, IBinder resultTo,
- String resultWho, int requestCode,
- int callingPid, int callingUid, String callingPackage, int startFlags, Bundle options,
- boolean componentSpecified, ActivityRecord[] outActivity) {
- int err = ActivityManager.START_SUCCESS;
- ProcessRecord callerApp = null;
- if (caller != null) {
- }
- if (err == ActivityManager.START_SUCCESS) {
- final int userId = aInfo != null ? UserHandle.getUserId(aInfo.applicationInfo.uid) : 0;
- Slog.i(TAG, "START u" + userId + " {" + intent.toShortString(true, true, true, false)
- + "} from pid " + (callerApp != null ? callerApp.pid : callingPid));
- }
- ActivityRecord sourceRecord = null;
- ActivityRecord resultRecord = null;
- if (resultTo != null) {
- }
- ActivityStack resultStack = resultRecord == null ? null : resultRecord.task.stack;
- int launchFlags = intent.getFlags();
- if ((launchFlags&Intent.FLAG_ACTIVITY_FORWARD_RESULT) != 0
- && sourceRecord != null) {
- }
- if (err == ActivityManager.START_SUCCESS && intent.getComponent() == null) {
- }
- if (err == ActivityManager.START_SUCCESS && aInfo == null) {
- }
- if (err != ActivityManager.START_SUCCESS) {
- }
- final int startAnyPerm = mService.checkPermission(
- START_ANY_ACTIVITY, callingPid, callingUid);
- final int componentPerm = mService.checkComponentPermission(aInfo.permission, callingPid,
- callingUid, aInfo.applicationInfo.uid, aInfo.exported);
- if (startAnyPerm != PERMISSION_GRANTED && componentPerm != PERMISSION_GRANTED) {
- }
- boolean abort = !mService.mIntentFirewall.checkStartActivity(intent, callingUid,
- callingPid, resolvedType, aInfo.applicationInfo);
- if (mService.mController != null) {
- }
- if (abort) {
- }
- ActivityRecord r = new ActivityRecord(mService, callerApp, callingUid, callingPackage,
- intent, resolvedType, aInfo, mService.mConfiguration,
- resultRecord, _resultWho, requestCode, componentSpecified, this);
- if (outActivity != null) {
- outActivity[0] = r;
- }
- final ActivityStack stack = getFocusedStack();
- if (stack.mResumedActivity == null
- || stack.mResumedActivity.info.applicationInfo.uid != callingUid) {
- if (!mService.checkAppSwitchAllowedLocked(callingPid, callingUid, "Activity start")) {
- }
- }
- if (mService.mDidAppSwitch) {
- mService.mAppSwitchesAllowedTime = 0;
- } else {
- mService.mDidAppSwitch = true;
- }
- mService.doPendingActivityLaunchesLocked(false);
- err = startActivityUncheckedLocked(r, sourceRecord, startFlags, true, options);
- if (allPausedActivitiesComplete()) {
- dismissKeyguard();
- }
- return err;
- }
在startActivityLocked中首先做一些权限的检查,然后构造一个ActivityRecord对象,一个ActivityRecord就表示一个Activity实体,先来看一下构造ActivityRecord的参数:_service就是AMS本身,_caller为NULL,_launchedFromUid为0,_launchedFromPackage为NULL,_intent为启动Activity的Intent,_resolvedType为NULL,aInfo为从PMS获取到的ActivityInfo,_configuration为AMS的mConfiguration,_resultTo为NULL,_resultWho为NULl,_reqCode为0,_componentSpecified为false,supervisor为ActivityStackSupervisor本身:
- ActivityRecord(ActivityManagerService _service, ProcessRecord _caller,
- int _launchedFromUid, String _launchedFromPackage, Intent _intent, String _resolvedType,
- ActivityInfo aInfo, Configuration _configuration,
- ActivityRecord _resultTo, String _resultWho, int _reqCode,
- boolean _componentSpecified, ActivityStackSupervisor supervisor) {
- service = _service;
- appToken = new Token(this);
- info = aInfo;
- launchedFromUid = _launchedFromUid;
- launchedFromPackage = _launchedFromPackage;
- userId = UserHandle.getUserId(aInfo.applicationInfo.uid);
- intent = _intent;
- shortComponentName = _intent.getComponent().flattenToShortString();
- resolvedType = _resolvedType;
- componentSpecified = _componentSpecified;
- configuration = _configuration;
- resultTo = _resultTo;
- resultWho = _resultWho;
- requestCode = _reqCode;
- state = ActivityState.INITIALIZING;
- frontOfTask = false;
- launchFailed = false;
- stopped = false;
- delayedResume = false;
- finishing = false;
- configDestroy = false;
- keysPaused = false;
- inHistory = false;
- visible = true;
- waitingVisible = false;
- nowVisible = false;
- thumbnailNeeded = false;
- idle = false;
- hasBeenLaunched = false;
- mStackSupervisor = supervisor;
- // This starts out true, since the initial state of an activity
- // is that we have everything, and we shouldn't never consider it
- // lacking in state to be removed if it dies.
- haveState = true;
- if (aInfo != null) {
- if (aInfo.targetActivity == null
- || aInfo.launchMode == ActivityInfo.LAUNCH_MULTIPLE
- || aInfo.launchMode == ActivityInfo.LAUNCH_SINGLE_TOP) {
- realActivity = _intent.getComponent();
- } else {
- realActivity = new ComponentName(aInfo.packageName,
- aInfo.targetActivity);
- }
- taskAffinity = aInfo.taskAffinity;
- stateNotNeeded = (aInfo.flags&
- ActivityInfo.FLAG_STATE_NOT_NEEDED) != 0;
- baseDir = aInfo.applicationInfo.sourceDir;
- resDir = aInfo.applicationInfo.publicSourceDir;
- dataDir = aInfo.applicationInfo.dataDir;
- nonLocalizedLabel = aInfo.nonLocalizedLabel;
- labelRes = aInfo.labelRes;
- if (nonLocalizedLabel == null && labelRes == 0) {
- ApplicationInfo app = aInfo.applicationInfo;
- nonLocalizedLabel = app.nonLocalizedLabel;
- labelRes = app.labelRes;
- }
- icon = aInfo.getIconResource();
- logo = aInfo.getLogoResource();
- theme = aInfo.getThemeResource();
- realTheme = theme;
- if (realTheme == 0) {
- realTheme = aInfo.applicationInfo.targetSdkVersion
- < Build.VERSION_CODES.HONEYCOMB
- ? android.R.style.Theme
- : android.R.style.Theme_Holo;
- }
- if ((aInfo.flags&ActivityInfo.FLAG_HARDWARE_ACCELERATED) != 0) {
- windowFlags |= WindowManager.LayoutParams.FLAG_HARDWARE_ACCELERATED;
- }
- if ((aInfo.flags&ActivityInfo.FLAG_MULTIPROCESS) != 0
- && _caller != null
- && (aInfo.applicationInfo.uid == Process.SYSTEM_UID
- || aInfo.applicationInfo.uid == _caller.info.uid)) {
- processName = _caller.processName;
- } else {
- processName = aInfo.processName;
- }
- if (intent != null && (aInfo.flags & ActivityInfo.FLAG_EXCLUDE_FROM_RECENTS) != 0) {
- intent.addFlags(Intent.FLAG_ACTIVITY_EXCLUDE_FROM_RECENTS);
- }
- packageName = aInfo.applicationInfo.packageName;
- launchMode = aInfo.launchMode;
- AttributeCache.Entry ent = AttributeCache.instance().get(packageName,
- realTheme, com.android.internal.R.styleable.Window, userId);
- fullscreen = ent != null && !ent.array.getBoolean(
- com.android.internal.R.styleable.Window_windowIsFloating, false)
- && !ent.array.getBoolean(
- com.android.internal.R.styleable.Window_windowIsTranslucent, false);
- noDisplay = ent != null && ent.array.getBoolean(
- com.android.internal.R.styleable.Window_windowNoDisplay, false);
- if ((!_componentSpecified || _launchedFromUid == Process.myUid()
- || _launchedFromUid == 0) &&
- Intent.ACTION_MAIN.equals(_intent.getAction()) &&
- _intent.hasCategory(Intent.CATEGORY_HOME) &&
- _intent.getCategories().size() == 1 &&
- _intent.getData() == null &&
- _intent.getType() == null &&
- (intent.getFlags()&Intent.FLAG_ACTIVITY_NEW_TASK) != 0 &&
- isNotResolverActivity()) {
- // This sure looks like a home activity!
- mActivityType = HOME_ACTIVITY_TYPE;
- } else if (realActivity.getClassName().contains(RECENTS_PACKAGE_NAME)) {
- mActivityType = RECENTS_ACTIVITY_TYPE;
- } else {
- mActivityType = APPLICATION_ACTIVITY_TYPE;
- }
- immersive = (aInfo.flags & ActivityInfo.FLAG_IMMERSIVE) != 0;
- }
在ActivityRecord主要是通过ActivityInfo去设置自身的一些成员变量。然后startActivityLocked调用AMS的doPendingActivityLaunchesLocked去处理mPendingActivityLaunches中被pending中的启动Activity请求,最后调用startActivityUncheckedLocked去启动launcher这个Activity:
- final int startActivityUncheckedLocked(ActivityRecord r,
- ActivityRecord sourceRecord, int startFlags, boolean doResume,
- Bundle options) {
- final Intent intent = r.intent;
- final int callingUid = r.launchedFromUid;
- int launchFlags = intent.getFlags();
- if (!doResume) {
- }
- ActivityRecord notTop = (launchFlags&Intent.FLAG_ACTIVITY_PREVIOUS_IS_TOP) != 0 ? r : null;
- if ((startFlags&ActivityManager.START_FLAG_ONLY_IF_NEEDED) != 0) {
- }
- if (sourceRecord == null) {
- if ((launchFlags&Intent.FLAG_ACTIVITY_NEW_TASK) == 0) {
- launchFlags |= Intent.FLAG_ACTIVITY_NEW_TASK;
- }
- } else if (sourceRecord.launchMode == ActivityInfo.LAUNCH_SINGLE_INSTANCE) {
- } else if (r.launchMode == ActivityInfo.LAUNCH_SINGLE_INSTANCE
- || r.launchMode == ActivityInfo.LAUNCH_SINGLE_TASK) {
- }
- ActivityInfo newTaskInfo = null;
- Intent newTaskIntent = null;
- final ActivityStack sourceStack;
- if (sourceRecord != null) {
- } else {
- sourceStack = null;
- }
- if (r.resultTo != null && (launchFlags&Intent.FLAG_ACTIVITY_NEW_TASK) != 0) {
- }
- boolean addingToTask = false;
- boolean movedHome = false;
- TaskRecord reuseTask = null;
- ActivityStack targetStack;
- if (((launchFlags&Intent.FLAG_ACTIVITY_NEW_TASK) != 0 &&
- (launchFlags&Intent.FLAG_ACTIVITY_MULTIPLE_TASK) == 0)
- || r.launchMode == ActivityInfo.LAUNCH_SINGLE_TASK
- || r.launchMode == ActivityInfo.LAUNCH_SINGLE_INSTANCE) {
- if (r.resultTo == null) {
- //找到与此Activity相同亲属关系的ActivityRecord
- ActivityRecord intentActivity = r.launchMode != ActivityInfo.LAUNCH_SINGLE_INSTANCE
- ? findTaskLocked(r)
- : findActivityLocked(intent, r.info);
- if (intentActivity != null) {
- }
- }
- }
- if (r.packageName != null) {
- ActivityStack topStack = getFocusedStack();
- ActivityRecord top = topStack.topRunningNonDelayedActivityLocked(notTop);
- //待启动Activity所属的ActivityStack为当前focus的ActivityStack
- if (top != null && r.resultTo == null) {
- if (top.realActivity.equals(r.realActivity) && top.userId == r.userId) {
- }
- }
- } else {
- }
- boolean newTask = false;
- boolean keepCurTransition = false;
- if (r.resultTo == null && !addingToTask
- && (launchFlags&Intent.FLAG_ACTIVITY_NEW_TASK) != 0) {
- targetStack = adjustStackFocus(r);
- moveHomeStack(targetStack.isHomeStack());
- if (reuseTask == null) {
- r.setTask(targetStack.createTaskRecord(getNextTaskId(),
- newTaskInfo != null ? newTaskInfo : r.info,
- newTaskIntent != null ? newTaskIntent : intent,
- true), null, true);
- if (DEBUG_TASKS) Slog.v(TAG, "Starting new activity " + r + " in new task " +
- r.task);
- } else {
- }
- newTask = true;
- if (!movedHome) {
- if ((launchFlags &
- (Intent.FLAG_ACTIVITY_NEW_TASK|Intent.FLAG_ACTIVITY_TASK_ON_HOME))
- == (Intent.FLAG_ACTIVITY_NEW_TASK|Intent.FLAG_ACTIVITY_TASK_ON_HOME)) {
- }
- }
- } else if (sourceRecord != null) {
- } else {
- }
- targetStack.mLastPausedActivity = null;
- targetStack.startActivityLocked(r, newTask, doResume, keepCurTransition, options);
- mService.setFocusedActivityLocked(r);
- return ActivityManager.START_SUCCESS;
- }
startActivityUncheckedLocked根据系统的状态、Intent设置的flag以及待启动Activity的属性等分为很多种case,我们先只关注启动launcher的流程。这里的targetStack就是mHomeStack,调用它的createTaskRecord方法创建一个新的TaskRecord对象并设置给新的ActivityRecord,一个TaskRecord对象表示一个新的任务,一个任务由一组Activity来共同组成。先来看创建TaskRecord的代码:
- TaskRecord createTaskRecord(int taskId, ActivityInfo info, Intent intent, boolean toTop) {
- TaskRecord task = new TaskRecord(taskId, info, intent);
- addTask(task, toTop);
- return task;
- }
- TaskRecord(int _taskId, ActivityInfo info, Intent _intent) {
- taskId = _taskId;
- affinity = info.taskAffinity;
- setIntent(_intent, info);
- }
- void setIntent(Intent _intent, ActivityInfo info) {
- stringName = null;
- if (info.targetActivity == null) {
- } else {
- ComponentName targetComponent = new ComponentName(
- info.packageName, info.targetActivity);
- if (_intent != null) {
- Intent targetIntent = new Intent(_intent);
- targetIntent.setComponent(targetComponent);
- targetIntent.setSelector(null);
- targetIntent.setSourceBounds(null);
- if (ActivityManagerService.DEBUG_TASKS) Slog.v(ActivityManagerService.TAG,
- "Setting Intent of " + this + " to target " + targetIntent);
- intent = targetIntent;
- realActivity = targetComponent;
- origActivity = _intent.getComponent();
- } else {
- intent = null;
- realActivity = targetComponent;
- origActivity = new ComponentName(info.packageName, info.name);
- }
- }
- if (intent != null &&
- (intent.getFlags()&Intent.FLAG_ACTIVITY_RESET_TASK_IF_NEEDED) != 0) {
- }
- if (info.applicationInfo != null) {
- userId = UserHandle.getUserId(info.applicationInfo.uid);
- }
- }
- void addTask(final TaskRecord task, final boolean toTop) {
- task.stack = this;
- if (toTop) {
- insertTaskAtTop(task);
- } else {
- mTaskHistory.add(0, task);
- }
- }
- private void insertTaskAtTop(TaskRecord task) {
- ActivityStack lastStack = mStackSupervisor.getLastStack();
- final boolean fromHome = lastStack == null ? true : lastStack.isHomeStack();
- if (!isHomeStack() && (fromHome || topTask() != task)) {
- task.mOnTopOfHome = fromHome;
- }
- mTaskHistory.remove(task);
- int stackNdx = mTaskHistory.size();
- if (task.userId != mCurrentUser) {
- // Put non-current user tasks below current user tasks.
- while (--stackNdx >= 0) {
- if (mTaskHistory.get(stackNdx).userId != mCurrentUser) {
- break;
- }
- }
- ++stackNdx;
- }
- mTaskHistory.add(stackNdx, task);
- }
上面的代码都比较简单,首先构造TaskRecord,并把它添加到mTaskHistory数组中。接下来调用ActivityRecord的setTask把待启动的Activity绑定到此TaskRecord上:
- void setTask(TaskRecord newTask, ThumbnailHolder newThumbHolder, boolean isRoot) {
- if (task != null && task.removeActivity(this)) {
- }
- if (inHistory && !finishing) {
- }
- if (newThumbHolder == null) {
- newThumbHolder = newTask;
- }
- task = newTask;
- if (!isRoot && (intent.getFlags()&Intent.FLAG_ACTIVITY_CLEAR_WHEN_TASK_RESET) != 0) {
- } else {
- thumbHolder = newThumbHolder;
- }
- }
接下来在startActivityUncheckedLocked调用ActivityStack的startActivityLocked方法来启动这个Activity:
- final void startActivityLocked(ActivityRecord r, boolean newTask,
- boolean doResume, boolean keepCurTransition, Bundle options) {
- TaskRecord rTask = r.task;
- final int taskId = rTask.taskId;
- if (taskForIdLocked(taskId) == null || newTask) {
- }
- TaskRecord task = null;
- if (!newTask) {
- }
- if (task == r.task && mTaskHistory.indexOf(task) != (mTaskHistory.size() - 1)) {
- }
- task = r.task;
- task.addActivityToTop(r);
- r.putInHistory();
- r.frontOfTask = newTask;
- if (!isHomeStack() || numActivities() > 0) {
- boolean showStartingIcon = newTask;
- ProcessRecord proc = r.app;
- if (proc == null) {
- proc = mService.mProcessNames.get(r.processName, r.info.applicationInfo.uid);
- }
- if (proc == null || proc.thread == null) {
- showStartingIcon = true;
- }
- if ((r.intent.getFlags()&Intent.FLAG_ACTIVITY_NO_ANIMATION) != 0) {
- } else {
- mWindowManager.prepareAppTransition(newTask
- ? AppTransition.TRANSIT_TASK_OPEN
- : AppTransition.TRANSIT_ACTIVITY_OPEN, keepCurTransition);
- mNoAnimActivities.remove(r);
- }
- r.updateOptionsLocked(options);
- mWindowManager.addAppToken(task.mActivities.indexOf(r),
- r.appToken, r.task.taskId, mStackId, r.info.screenOrientation, r.fullscreen,
- (r.info.flags & ActivityInfo.FLAG_SHOW_ON_LOCK_SCREEN) != 0, r.userId,
- r.info.configChanges);
- boolean doShow = true;
- if (newTask) {
- if ((r.intent.getFlags()
- &Intent.FLAG_ACTIVITY_RESET_TASK_IF_NEEDED) != 0) {
- }
- }
- if (SHOW_APP_STARTING_PREVIEW && doShow) {
- ActivityRecord prev = mResumedActivity;
- if (prev != null) {
- }
- mWindowManager.setAppStartingWindow(
- r.appToken, r.packageName, r.theme,
- mService.compatibilityInfoForPackageLocked(
- r.info.applicationInfo), r.nonLocalizedLabel,
- r.labelRes, r.icon, r.logo, r.windowFlags,
- prev != null ? prev.appToken : null, showStartingIcon);
- }
- } else {
- }
- if (VALIDATE_TOKENS) {
- validateAppTokensLocked();
- }
- if (doResume) {
- mStackSupervisor.resumeTopActivitiesLocked();
- }
- }
在ActivityStack的startActivityLocked方法中,首先把新的ActivityRecord添加到TaskRecord的mActivities数组中,表示当前task包含此Activity。接下来调用WMS的prepareAppTransition、addAppToken和setAppStartingWindow接口为Activity的切换做准备,关于WMS的内容,我们后面再来介绍。最后调用mStackSupervisor.resumeTopActivitiesLocked去启动Activity:
- boolean resumeTopActivitiesLocked() {
- return resumeTopActivitiesLocked(null, null, null);
- }
- boolean resumeTopActivitiesLocked(ActivityStack targetStack, ActivityRecord target,
- Bundle targetOptions) {
- if (targetStack == null) {
- targetStack = getFocusedStack();
- }
- boolean result = false;
- for (int stackNdx = mStacks.size() - 1; stackNdx >= 0; --stackNdx) {
- final ActivityStack stack = mStacks.get(stackNdx);
- if (isFrontStack(stack)) {
- if (stack == targetStack) {
- result = stack.resumeTopActivityLocked(target, targetOptions);
- } else {
- stack.resumeTopActivityLocked(null);
- }
- }
- }
- return result;
- }
这里会再次调用到ActivityStack的resumeTopActivityLocked去完成Activity的启动:
- final boolean resumeTopActivityLocked(ActivityRecord prev, Bundle options) {
- ActivityRecord next = topRunningActivityLocked(null);
- final boolean userLeaving = mStackSupervisor.mUserLeaving;
- mStackSupervisor.mUserLeaving = false;
- if (next == null) {
- }
- next.delayedResume = false;
- if (mResumedActivity == next && next.state == ActivityState.RESUMED &&
- mStackSupervisor.allResumedActivitiesComplete()) {
- }
- final TaskRecord nextTask = next.task;
- final TaskRecord prevTask = prev != null ? prev.task : null;
- if (prevTask != null && prevTask.mOnTopOfHome && prev.finishing && prev.frontOfTask) {
- }
- if (mService.isSleepingOrShuttingDown()
- && mLastPausedActivity == next
- && mStackSupervisor.allPausedActivitiesComplete()) {
- }
- mStackSupervisor.mStoppingActivities.remove(next);
- mStackSupervisor.mGoingToSleepActivities.remove(next);
- next.sleeping = false;
- mStackSupervisor.mWaitingVisibleActivities.remove(next);
- next.updateOptionsLocked(options);
- if (!mStackSupervisor.allPausedActivitiesComplete()) {
- }
- boolean pausing = mStackSupervisor.pauseBackStacks(userLeaving);
- if (mResumedActivity != null) {
- pausing = true;
- startPausingLocked(userLeaving, false);
- if (DEBUG_STATES) Slog.d(TAG, "resumeTopActivityLocked: Pausing " + mResumedActivity);
- }
- if (pausing) {
- }
- if (mService.mSleeping && mLastNoHistoryActivity != null &&
- !mLastNoHistoryActivity.finishing) {
- }
- if (prev != null && prev != next) {
- }
- // Launching this app's activity, make sure the app is no longer
- // considered stopped.
- try {
- AppGlobals.getPackageManager().setPackageStoppedState(
- next.packageName, false, next.userId); /* TODO: Verify if correct userid */
- } catch (RemoteException e1) {
- } catch (IllegalArgumentException e) {
- Slog.w(TAG, "Failed trying to unstop package "
- + next.packageName + ": " + e);
- }
- boolean anim = true;
- if (prev != null) {
- } else {
- if (mNoAnimActivities.contains(next)) {
- anim = false;
- mWindowManager.prepareAppTransition(AppTransition.TRANSIT_NONE, false);
- } else {
- mWindowManager.prepareAppTransition(AppTransition.TRANSIT_ACTIVITY_OPEN, false);
- }
- }
- if (anim) {
- next.applyOptionsLocked();
- } else {
- next.clearOptionsLocked();
- }
- ActivityStack lastStack = mStackSupervisor.getLastStack();
- if (next.app != null && next.app.thread != null) {
- } else {
- // Whoops, need to restart this activity!
- if (!next.hasBeenLaunched) {
- next.hasBeenLaunched = true;
- } else {
- if (SHOW_APP_STARTING_PREVIEW) {
- }
- if (DEBUG_SWITCH) Slog.v(TAG, "Restarting: " + next);
- }
- if (DEBUG_STATES) Slog.d(TAG, "resumeTopActivityLocked: Restarting " + next);
- mStackSupervisor.startSpecificActivityLocked(next, true, true);
- }
- if (DEBUG_STACK) mStackSupervisor.validateTopActivitiesLocked();
- return true;
- }
此时topRunningActivityLocked()中返回launcher所代表的的ActivityRecord对象,并最终调用mStackSupervisor.startSpecificActivityLocked去启动Activity:
- void startSpecificActivityLocked(ActivityRecord r,
- boolean andResume, boolean checkConfig) {
- ProcessRecord app = mService.getProcessRecordLocked(r.processName,
- r.info.applicationInfo.uid, true);
- r.task.stack.setLaunchTime(r);
- if (app != null && app.thread != null) {
- }
- mService.startProcessLocked(r.processName, r.info.applicationInfo, true, 0,
- "activity", r.intent.getComponent(), false, false, true);
- }
- final ProcessRecord startProcessLocked(String processName,
- ApplicationInfo info, boolean knownToBeDead, int intentFlags,
- String hostingType, ComponentName hostingName, boolean allowWhileBooting,
- boolean isolated, boolean keepIfLarge) {
- ProcessRecord app;
- if (!isolated) {
- app = getProcessRecordLocked(processName, info.uid, keepIfLarge);
- } else {
- app = null;
- }
- if (app != null && app.pid > 0) {
- }
- String hostingNameStr = hostingName != null
- ? hostingName.flattenToShortString() : null;
- if (app == null) {
- app = newProcessRecordLocked(info, processName, isolated);
- mProcessNames.put(processName, app.uid, app);
- }
- } else {
- }
- startProcessLocked(app, hostingType, hostingNameStr);
- return (app.pid != 0) ? app : null;
- }
因为launcher的Process并没有创建,所以也没有它的ProcessRecord对象存在,这里首先创建一个ProcessRecord对象,并调用startProcessLocked通过Zygote去fork一个进程,并把进程的pid号保存在ProcessRecord.pid里。关于Zygote如何fork一个进程,我们这里先不关注了,fork进程完后,就会执行到ActivityThread的main方法,我们从这里开始分析:
- public static void main(String[] args) {
- SamplingProfilerIntegration.start();
- CloseGuard.setEnabled(false);
- Environment.initForCurrentUser();
- EventLogger.setReporter(new EventLoggingReporter());
- Security.addProvider(new AndroidKeyStoreProvider());
- Process.setArgV0("<pre-initialized>");
- Looper.prepareMainLooper();
- ActivityThread thread = new ActivityThread();
- thread.attach(false);
- if (sMainThreadHandler == null) {
- sMainThreadHandler = thread.getHandler();
- }
- AsyncTask.init();
- Looper.loop();
- throw new RuntimeException("Main thread loop unexpectedly exited");
- }
这里首先初始化一些环境,然后调用ActivtityThread自身的attach方法,并最终开始looper循环。前面在介绍AMS启动的时候,也会构造ActivityThread对象,但它调用attach方法传入的参数为true,表示为system的进程,我们这里传入的参数为false:
- private void attach(boolean system) {
- sCurrentActivityThread = this;
- mSystemThread = system;
- if (!system) {
- ViewRootImpl.addFirstDrawHandler(new Runnable() {
- @Override
- public void run() {
- ensureJitEnabled();
- }
- });
- android.ddm.DdmHandleAppName.setAppName("<pre-initialized>",
- UserHandle.myUserId());
- RuntimeInit.setApplicationObject(mAppThread.asBinder());
- IActivityManager mgr = ActivityManagerNative.getDefault();
- try {
- mgr.attachApplication(mAppThread);
- } catch (RemoteException ex) {
- // Ignore
- }
- } else {
- }
- ViewRootImpl.addConfigCallback(new ComponentCallbacks2() {
- @Override
- public void onConfigurationChanged(Configuration newConfig) {
- synchronized (mResourcesManager) {
- // We need to apply this change to the resources
- // immediately, because upon returning the view
- // hierarchy will be informed about it.
- if (mResourcesManager.applyConfigurationToResourcesLocked(newConfig, null)) {
- // This actually changed the resources! Tell
- // everyone about it.
- if (mPendingConfiguration == null ||
- mPendingConfiguration.isOtherSeqNewer(newConfig)) {
- mPendingConfiguration = newConfig;
- sendMessage(H.CONFIGURATION_CHANGED, newConfig);
- }
- }
- }
- }
- @Override
- public void onLowMemory() {
- }
- @Override
- public void onTrimMemory(int level) {
- }
- });
- }
在attach方法中,首先设置进程名字,这个名字只是在启动过程中显示。然后调用AMS的attachApplication方法:
- private final boolean attachApplicationLocked(IApplicationThread thread,
- int pid) {
- ProcessRecord app;
- if (pid != MY_PID && pid >= 0) {
- synchronized (mPidsSelfLocked) {
- app = mPidsSelfLocked.get(pid);
- }
- } else {
- app = null;
- }
- final String processName = app.processName;
- try {
- AppDeathRecipient adr = new AppDeathRecipient(
- app, pid, thread);
- thread.asBinder().linkToDeath(adr, 0);
- app.deathRecipient = adr;
- } catch (RemoteException e) {
- app.resetPackageList(mProcessStats);
- startProcessLocked(app, "link fail", processName);
- return false;
- }
- app.makeActive(thread, mProcessStats);
- app.curAdj = app.setAdj = -100;
- app.curSchedGroup = app.setSchedGroup = Process.THREAD_GROUP_DEFAULT;
- app.forcingToForeground = null;
- app.foregroundServices = false;
- app.hasShownUi = false;
- app.debugging = false;
- app.cached = false;
- mHandler.removeMessages(PROC_START_TIMEOUT_MSG, app);
- boolean normalMode = mProcessesReady || isAllowedWhileBooting(app.info);
- List<ProviderInfo> providers = normalMode ? generateApplicationProvidersLocked(app) : null;
- try {
- String profileFile = app.instrumentationProfileFile;
- ParcelFileDescriptor profileFd = null;
- boolean profileAutoStop = false;
- boolean enableOpenGlTrace = false;
- boolean isRestrictedBackupMode = false;
- ensurePackageDexOpt(app.instrumentationInfo != null
- ? app.instrumentationInfo.packageName
- : app.info.packageName);
- ApplicationInfo appInfo = app.instrumentationInfo != null
- ? app.instrumentationInfo : app.info;
- app.compat = compatibilityInfoForPackageLocked(appInfo);
- if (profileFd != null) {
- profileFd = profileFd.dup();
- }
- thread.bindApplication(processName, appInfo, providers,
- app.instrumentationClass, profileFile, profileFd, profileAutoStop,
- app.instrumentationArguments, app.instrumentationWatcher,
- app.instrumentationUiAutomationConnection, testMode, enableOpenGlTrace,
- isRestrictedBackupMode || !normalMode, app.persistent,
- new Configuration(mConfiguration), app.compat, getCommonServicesLocked(),
- mCoreSettingsObserver.getCoreSettingsLocked());
- updateLruProcessLocked(app, false, null);
- app.lastRequestedGc = app.lastLowMemory = SystemClock.uptimeMillis();
- } catch (Exception e) {
- app.resetPackageList(mProcessStats);
- app.unlinkDeathRecipient();
- startProcessLocked(app, "bind fail", processName);
- return false;
- }
- mPersistentStartingProcesses.remove(app);
- if (DEBUG_PROCESSES && mProcessesOnHold.contains(app)) Slog.v(TAG,
- "Attach application locked removing on hold: " + app);
- mProcessesOnHold.remove(app);
- boolean badApp = false;
- boolean didSomething = false;
- if (normalMode) {
- try {
- if (mStackSupervisor.attachApplicationLocked(app, mHeadless)) {
- didSomething = true;
- }
- } catch (Exception e) {
- badApp = true;
- }
- }
- if (!badApp) {
- try {
- didSomething |= mServices.attachApplicationLocked(app, processName);
- } catch (Exception e) {
- badApp = true;
- }
- }
- if (!badApp && isPendingBroadcastProcessLocked(pid)) {
- try {
- didSomething |= sendPendingBroadcastsLocked(app);
- } catch (Exception e) {
- // If the app died trying to launch the receiver we declare it 'bad'
- badApp = true;
- }
- }
- if (!didSomething) {
- updateOomAdjLocked();
- }
- return true;
- }
attachApplicationLocked函数比较长,首先调用ProcessRecord的makeActive方法调用ProcessStatsService开始记录process的状态。后面主要做了四件事情:一是调用ActivityThread的bindApplication方法去启动Application;二是调用StackSupervisor的attachApplicationLocked去启动ActivityStack栈顶的Activity;三是根据mPendingServices和mRestartingServices列表启动在当前application中的service;四是检查是否有广播broadcast到这个application,如果有则广播。后面两件事我们这里先不讨论,首先来看前面两个方法:
- public final void bindApplication(String processName,
- ApplicationInfo appInfo, List<ProviderInfo> providers,
- ComponentName instrumentationName, String profileFile,
- ParcelFileDescriptor profileFd, boolean autoStopProfiler,
- Bundle instrumentationArgs, IInstrumentationWatcher instrumentationWatcher,
- IUiAutomationConnection instrumentationUiConnection, int debugMode,
- boolean enableOpenGlTrace, boolean isRestrictedBackupMode, boolean persistent,
- Configuration config, CompatibilityInfo compatInfo, Map<String, IBinder> services,
- Bundle coreSettings) {
- if (services != null) {
- // Setup the service cache in the ServiceManager
- ServiceManager.initServiceCache(services);
- }
- setCoreSettings(coreSettings);
- AppBindData data = new AppBindData();
- data.processName = processName;
- data.appInfo = appInfo;
- data.providers = providers;
- data.instrumentationName = instrumentationName;
- data.instrumentationArgs = instrumentationArgs;
- data.instrumentationWatcher = instrumentationWatcher;
- data.instrumentationUiAutomationConnection = instrumentationUiConnection;
- data.debugMode = debugMode;
- data.enableOpenGlTrace = enableOpenGlTrace;
- data.restrictedBackupMode = isRestrictedBackupMode;
- data.persistent = persistent;
- data.config = config;
- data.compatInfo = compatInfo;
- data.initProfileFile = profileFile;
- data.initProfileFd = profileFd;
- data.initAutoStopProfiler = false;
- sendMessage(H.BIND_APPLICATION, data);
- }
这里首先调用会给H handler发送两个消息,一个是SET_CORE_SETTINGS;另一个是BIND_APPLICATION。SET_CORE_SETTINGS主要是获取系统的设定并设置到ActivityThread中。BIND_APPLICATION用于启动Application并安装所有的provider,并回调Applicant的oncreate方法:
- private void handleBindApplication(AppBindData data) {
- mBoundApplication = data;
- mConfiguration = new Configuration(data.config);
- mCompatConfiguration = new Configuration(data.config);
- mProfiler = new Profiler();
- mProfiler.profileFile = data.initProfileFile;
- mProfiler.profileFd = data.initProfileFd;
- mProfiler.autoStopProfiler = data.initAutoStopProfiler;
- Process.setArgV0(data.processName);
- android.ddm.DdmHandleAppName.setAppName(data.processName,
- UserHandle.myUserId());
- TimeZone.setDefault(null);
- Locale.setDefault(data.config.locale);
- mResourcesManager.applyConfigurationToResourcesLocked(data.config, data.compatInfo);
- mCurDefaultDisplayDpi = data.config.densityDpi;
- applyCompatConfiguration(mCurDefaultDisplayDpi);
- data.info = getPackageInfoNoCheck(data.appInfo, data.compatInfo);
- if ((data.appInfo.flags&ApplicationInfo.FLAG_SUPPORTS_SCREEN_DENSITIES)
- == 0) {
- mDensityCompatMode = true;
- Bitmap.setDefaultDensity(DisplayMetrics.DENSITY_DEFAULT);
- }
- updateDefaultDensity();
- final ContextImpl appContext = new ContextImpl();
- appContext.init(data.info, null, this);
- if (!Process.isIsolated()) {
- final File cacheDir = appContext.getCacheDir();
- if (cacheDir != null) {
- System.setProperty("java.io.tmpdir", cacheDir.getAbsolutePath());
- setupGraphicsSupport(data.info, cacheDir);
- } else {
- Log.e(TAG, "Unable to setupGraphicsSupport due to missing cache directory");
- }
- }
- if ((data.appInfo.flags &
- (ApplicationInfo.FLAG_SYSTEM |
- ApplicationInfo.FLAG_UPDATED_SYSTEM_APP)) != 0) {
- StrictMode.conditionallyEnableDebugLogging();
- }
- if (data.appInfo.targetSdkVersion > 9) {
- StrictMode.enableDeathOnNetwork();
- }
- if (data.enableOpenGlTrace) {
- GLUtils.setTracingLevel(1);
- }
- boolean appTracingAllowed = (data.appInfo.flags&ApplicationInfo.FLAG_DEBUGGABLE) != 0;
- Trace.setAppTracingAllowed(appTracingAllowed);
- if (data.instrumentationName != null) {
- } else {
- mInstrumentation = new Instrumentation();
- }
- if ((data.appInfo.flags&ApplicationInfo.FLAG_LARGE_HEAP) != 0) {
- dalvik.system.VMRuntime.getRuntime().clearGrowthLimit();
- }
- final StrictMode.ThreadPolicy savedPolicy = StrictMode.allowThreadDiskWrites();
- try {
- Application app = data.info.makeApplication(data.restrictedBackupMode, null);
- mInitialApplication = app;
- if (!data.restrictedBackupMode) {
- List<ProviderInfo> providers = data.providers;
- if (providers != null) {
- installContentProviders(app, providers);
- mH.sendEmptyMessageDelayed(H.ENABLE_JIT, 10*1000);
- }
- }
- try {
- mInstrumentation.onCreate(data.instrumentationArgs);
- }
- catch (Exception e) {
- }
- try {
- mInstrumentation.callApplicationOnCreate(app);
- } catch (Exception e) {
- }
- } finally {
- StrictMode.setThreadPolicy(savedPolicy);
- }
- }
handleBindApplication中首先修改process的名字,然后恢复时区和位置信息。通过getPackageInfoNoCheck方法获取一个LoadedApk对象,并把packageName和LoadedApk添加到全局的mPackages中。在handleBindApplication中会构造整个application运行的context环境,并构造一个Instrumentation对象用于启动Activity。如果不是restrictedBackupMode模式,就调用installContentProviders去安装这个APK里面所有的provider,关于installContentProviders,前面在介绍安装systemProvider的时候已经讲解过了。最后调用mInstrumentation.callApplicationOnCreate去回调Application的onCreate方法,如果在APK中有继承Applicantion的class,则回调对应class的oncreate方法。
attachApplicationLocked的第二件事情是调用StackSupervisor的attachApplicationLocked去启动ActivityStack栈顶的Activity:
- boolean attachApplicationLocked(ProcessRecord app, boolean headless) throws Exception {
- boolean didSomething = false;
- final String processName = app.processName;
- for (int stackNdx = mStacks.size() - 1; stackNdx >= 0; --stackNdx) {
- final ActivityStack stack = mStacks.get(stackNdx);
- if (!isFrontStack(stack)) {
- continue;
- }
- ActivityRecord hr = stack.topRunningActivityLocked(null);
- if (hr != null) {
- if (hr.app == null && app.uid == hr.info.applicationInfo.uid
- && processName.equals(hr.processName)) {
- try {
- if (headless) {
- } else if (realStartActivityLocked(hr, app, true, true)) {
- didSomething = true;
- }
- } catch (Exception e) {
- Slog.w(TAG, "Exception in new application when starting activity "
- + hr.intent.getComponent().flattenToShortString(), e);
- throw e;
- }
- }
- }
- }
- if (!didSomething) {
- ensureActivitiesVisibleLocked(null, 0);
- }
- return didSomething;
- }
attachApplicationLocked从ActivityTask中的TaskRecord列表中获取处于栈顶的ActivityRecord对象,也就是我们要启动的launcher。然后调用realStartActivityLocked方法去完成启动:
- final boolean realStartActivityLocked(ActivityRecord r,
- ProcessRecord app, boolean andResume, boolean checkConfig)
- throws RemoteException {
- r.startFreezingScreenLocked(app, 0);
- mWindowManager.setAppVisibility(r.appToken, true);
- r.startLaunchTickingLocked();
- if (checkConfig) {
- Configuration config = mWindowManager.updateOrientationFromAppTokens(
- mService.mConfiguration,
- r.mayFreezeScreenLocked(app) ? r.appToken : null);
- mService.updateConfigurationLocked(config, r, false, false);
- }
- r.app = app;
- app.waitingToKill = null;
- r.launchCount++;
- r.lastLaunchTime = SystemClock.uptimeMillis();
- int idx = app.activities.indexOf(r);
- if (idx < 0) {
- app.activities.add(r);
- }
- mService.updateLruProcessLocked(app, true, null);
- mService.updateOomAdjLocked();
- final ActivityStack stack = r.task.stack;
- try {
- if (app.thread == null) {
- throw new RemoteException();
- }
- List<ResultInfo> results = null;
- List<Intent> newIntents = null;
- if (andResume) {
- results = r.results;
- newIntents = r.newIntents;
- }
- if (r.isHomeActivity() && r.isNotResolverActivity()) {
- mService.mHomeProcess = r.task.mActivities.get(0).app;
- }
- mService.ensurePackageDexOpt(r.intent.getComponent().getPackageName());
- r.sleeping = false;
- r.forceNewConfig = false;
- mService.showAskCompatModeDialogLocked(r);
- r.compat = mService.compatibilityInfoForPackageLocked(r.info.applicationInfo);
- String profileFile = null;
- ParcelFileDescriptor profileFd = null;
- boolean profileAutoStop = false;
- app.hasShownUi = true;
- app.pendingUiClean = true;
- app.forceProcessStateUpTo(ActivityManager.PROCESS_STATE_TOP);
- app.thread.scheduleLaunchActivity(new Intent(r.intent), r.appToken,
- System.identityHashCode(r), r.info,
- new Configuration(mService.mConfiguration), r.compat,
- app.repProcState, r.icicle, results, newIntents, !andResume,
- mService.isNextTransitionForward(), profileFile, profileFd,
- profileAutoStop);
- r.launchFailed = false;
- if (stack.updateLRUListLocked(r)) {
- }
- if (andResume) {
- stack.minimalResumeActivityLocked(r);
- } else {
- r.state = ActivityState.STOPPED;
- r.stopped = true;
- }
- return true;
realStartActivityLocked方法中首先记录Activity启动时间和状态,最终调用ActivityThread的scheduleLaunchActivity去启动Activity。scheduleLaunchActivity方法中,通过传入的参数构造一个ActivityClientRecord,并发送LAUNCH_ACTIVITY消息给H handler,并最终调用handleLaunchActivity方法:
- private void handleLaunchActivity(ActivityClientRecord r, Intent customIntent) {
- unscheduleGcIdler();
- Activity a = performLaunchActivity(r, customIntent);
- if (a != null) {
- r.createdConfig = new Configuration(mConfiguration);
- Bundle oldState = r.state;
- handleResumeActivity(r.token, false, r.isForward,
- !r.activity.mFinished && !r.startsNotResumed);
- if (!r.activity.mFinished && r.startsNotResumed) {
- }
- } else {
- }
- }
在handleLaunchActivity中主要执行两个步骤,一是performLaunchActivity,这个方法用于加载对象Activity的class文件,并且实例化一个Activity对象,调用createBaseContextForActivity去创建一个ContextImpl对象并attach上这个Activity。最后通过mInstrumentation回调Activity的OnCreate、OnStart、OnRestoreInstanceState、OnPostCreate这几个方法,并把ActivityClientRecord对象加入到ActivityThread的mActivities数组;二是调用handleResumeActivity回调Activity的OnResume方法:
- final void handleResumeActivity(IBinder token, boolean clearHide, boolean isForward,
- boolean reallyResume) {
- unscheduleGcIdler();
- ActivityClientRecord r = performResumeActivity(token, clearHide);
- if (r != null) {
- final Activity a = r.activity;
- final int forwardBit = isForward ?
- WindowManager.LayoutParams.SOFT_INPUT_IS_FORWARD_NAVIGATION : 0;
- boolean willBeVisible = !a.mStartedActivity;
- if (!willBeVisible) {
- try {
- willBeVisible = ActivityManagerNative.getDefault().willActivityBeVisible(
- a.getActivityToken());
- } catch (RemoteException e) {
- }
- }
- if (r.window == null && !a.mFinished && willBeVisible) {
- r.window = r.activity.getWindow();
- View decor = r.window.getDecorView();
- decor.setVisibility(View.INVISIBLE);
- ViewManager wm = a.getWindowManager();
- WindowManager.LayoutParams l = r.window.getAttributes();
- a.mDecor = decor;
- l.type = WindowManager.LayoutParams.TYPE_BASE_APPLICATION;
- l.softInputMode |= forwardBit;
- if (a.mVisibleFromClient) {
- a.mWindowAdded = true;
- wm.addView(decor, l);
- }
- } else if (!willBeVisible) {
- if (localLOGV) Slog.v(
- TAG, "Launch " + r + " mStartedActivity set");
- r.hideForNow = true;
- }
- cleanUpPendingRemoveWindows(r);
- if (!r.activity.mFinished && willBeVisible
- && r.activity.mDecor != null && !r.hideForNow) {
- WindowManager.LayoutParams l = r.window.getAttributes();
- if ((l.softInputMode
- & WindowManager.LayoutParams.SOFT_INPUT_IS_FORWARD_NAVIGATION)
- != forwardBit) {
- l.softInputMode = (l.softInputMode
- & (~WindowManager.LayoutParams.SOFT_INPUT_IS_FORWARD_NAVIGATION))
- | forwardBit;
- if (r.activity.mVisibleFromClient) {
- ViewManager wm = a.getWindowManager();
- View decor = r.window.getDecorView();
- wm.updateViewLayout(decor, l);
- }
- }
- r.activity.mVisibleFromServer = true;
- mNumVisibleActivities++;
- if (r.activity.mVisibleFromClient) {
- r.activity.makeVisible();
- }
- }
- if (!r.onlyLocalRequest) {
- r.nextIdle = mNewActivities;
- mNewActivities = r;
- if (localLOGV) Slog.v(
- TAG, "Scheduling idle handler for " + r);
- Looper.myQueue().addIdleHandler(new Idler());
- }
- r.onlyLocalRequest = false;
- // Tell the activity manager we have resumed.
- if (reallyResume) {
- try {
- ActivityManagerNative.getDefault().activityResumed(token);
- } catch (RemoteException ex) {
- }
- }
- } else {
- }
handleResumeActivity调用performResumeActivity回调activity的performResume方法,并调用WMS的方法让这个Activity显示出来。并且向ActivityThread所在的Looper注册IdleHandler,用于在Activtiy处理空闲的时候回调。到这里启动launcher的流程就介绍完了。
关于TaskRecord、ProcessRecord、ActivityRecord和ActvityStack的关系如下,我们在下一节介绍启动一个应用的时候再来具体分析。
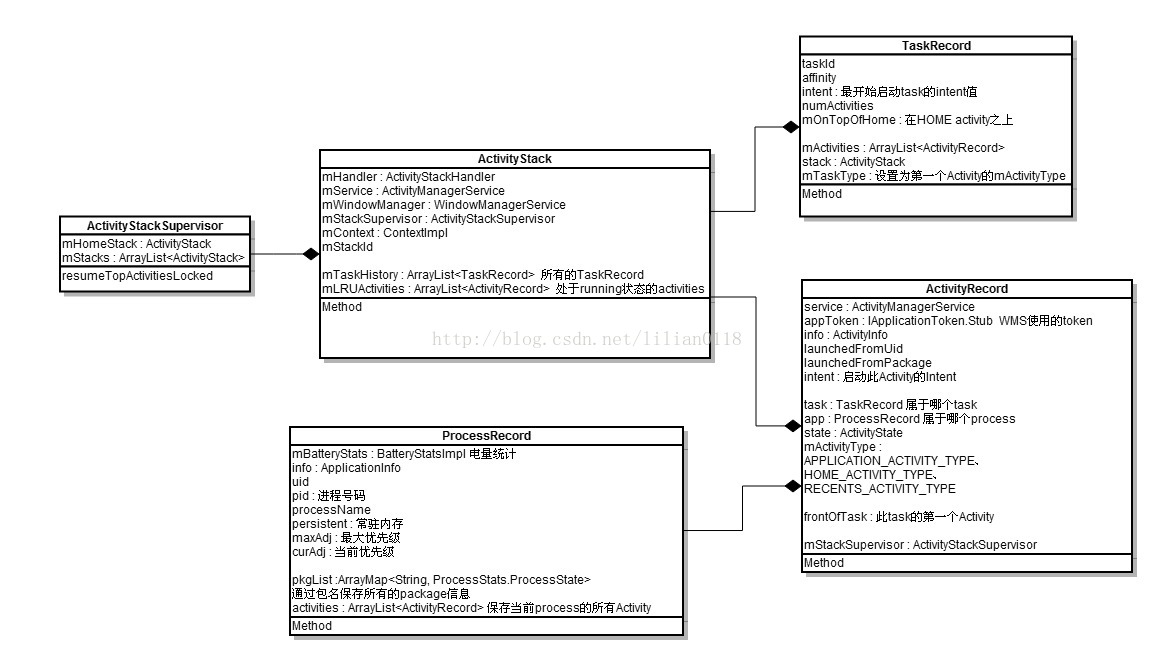


 4759
4759


 被折叠的 条评论
为什么被折叠?
被折叠的 条评论
为什么被折叠?
 到【灌水乐园】发言


