


build your first app
Now that you have Ionic and its dependencies installed, you can build your first app! This section will guide you through the process of starting a new application, adding pages, navigating between those pages, and more. Let’s get started!
Starting a New Ionic 2 App
Let’s create a new app! Use the start command to initialize a new Ionic app. Specify that you want it to be an Ionic 2 app by passing in the –v2 option. We also specify that the tutorial template should be used. Ionic 2 applications are created as TypeScript.
$ ionic start MyIonic2Project tutorial --v2This will pull Ionic 2 down, install npm modules for the application, and get Cordova set up and ready to go.
Viewing the app in a browser
$ cd MyIonic2Project/
$ ionic serve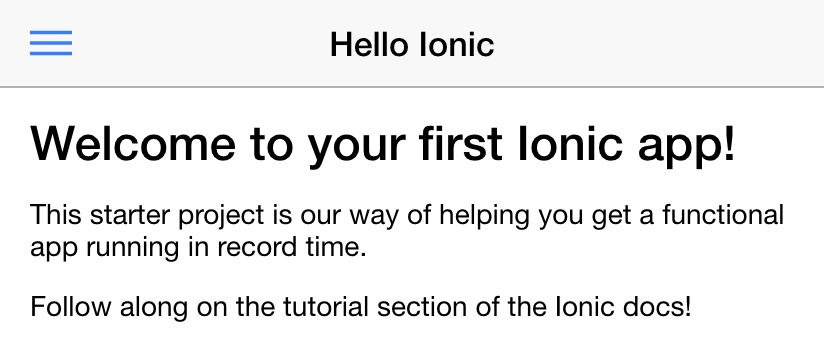
Project Structure
Let’s walk through the anatomy of an Ionic 2 app. Inside of the folder that was created, we have a typical Cordova project structure where we can install native plugins, and create platform-specific project files.
./www/index.html
www/index.html is the main entry point for the app, though its purpose is to set up script and CSS includes and bootstrap, or start running, our app. We won’t spend much of our time in this file.
For your app to function, Ionic looks for the tag in your HTML. In this example we have:
<ion-app></ion-app>And the following scripts near the bottom:
<script src="cordova.js"></script>
<script src="build/js/app.bundle.js"></script>
./app/app.ts
Inside of the app directory we find our pre-compiled code. This is where most of the work for an Ionic 2 app will take place. When we run ionic serve, our code inside of app/ is transpiled into the correct Javascript version that the browser understands (currently, ES5). That means we can work at a higher level using TypeScript and ES6+, but compile down to the older form of Javascript the browser needs.
app/app.ts is the entry point for our app.
Near the top of the file, we should see this:
@Component({
  templateUrl: 'build/app.html'
})
class MyApp {
  constructor() {
  }
}
ionicBootstrap(MyApp)
Every app has a root component that essentially controls the rest of the application. This is very similar to ng-app from Ionic and Angular 1. This is also where we bootstrap our app using ionicBootstrap.
In this component, we set the template to be the file at build/app.html, which is a compiled version of app/app.html, let’s take a look!
./app/app.html
Here’s the main template for the app in app/app.html:
<ion-menu [content]="content">

  <ion-toolbar>
    <ion-title>Pages</ion-title>
  </ion-toolbar>

  <ion-content>
    <ion-list>
      <button ion-item *ngFor="let p of pages" (click)="openPage(p)">
        {{p.title}}
      </button>
    </ion-list>
  </ion-content>

</ion-menu>

<ion-nav id="nav" [root]="rootPage" #content swipe-back-enabled="false"></ion-nav>
In this template, we set up an ion-menu to function as a side menu, and then an ion-nav component to act as the main content area. The ion-menu’s [content] property is bound to the local variable content from our ion-nav, so it knows where it should animate around.
Adding Pages
Now that we have a basic understanding of the layout of an Ionic 2 app, let’s walk through the process of creating and navigating to pages in our app.
Taking a look at app/app.html, we see this line near the bottom:
<ion-nav id="nav" [root]="rootPage" #content swipe-back-enabled="false"></ion-nav>Pay attention to the [root] property binding. This sets what is essentially the first, or “root” page for the ion-nav component. When ion-nav loads, the component referenced by the variable rootPage will be the root page.
In app/app.ts, the MyApp component specifies this in its constructor:
...
import {HelloIonicPage} from './pages/hello-ionic/hello-ionic';
...

class MyApp {
  ...

  constructor(app, platform, menu) {
    ...

    // make HelloIonicPage the root (or first) page
    this.rootPage = HelloIonicPage;
  }

  ...
}
Creating a Page
Next, let’s check out the HelloIonicPage that we are importing. Inside the app/pages/hello-ionic/ folder, go and open up hello-ionic.ts.
You may have noticed that each page has its own folder that is named after the page. Inside each folder, we also see a .html and a .scss file with the same name. For example, inside of hello-ionic/ we will find hello-ionic.ts, hello-ionic.html, and hello-ionic.scss. Although using this pattern is not required, it can be helpful to keep things organized.Below, we see the HelloIonicPage class. This creates a Page - an Angular component with all Ionic directives already provided, to be loaded using Ionic’s navigation system. Notice that because Pages are meant to be loaded dynamically, they don’t have a selector:
import {Component} from '@angular/core';

@Component({
  templateUrl: 'build/pages/hello-ionic/hello-ionic.html'
})
export class HelloIonicPage {}
All pages have both a class, and an associated template that’s being compiled as well. Let’s check out app/pages/hello-ionic/hello-ionic.html - the template file for this page:
<ion-navbar *navbar>
  <button menuToggle>
    <ion-icon name="menu"></ion-icon>
  </button>
  <ion-title>Hello Ionic</ion-title>
</ion-navbar>


<ion-content padding class="getting-started">

  <h3>Welcome to your first Ionic app!</h3>

  <p>
    This starter project is our way of helping you get a functional app running in record time.
  </p>
  <p>
    Follow along on the tutorial section of the Ionic docs!
  </p>
  <p>
    <button primary menuToggle>Toggle Menu</button>
  </p>

</ion-content>
The
import {Component} from "@angular/core";
import {NavController, NavParams} from 'ionic-angular';
import {ItemDetailsPage} from '../item-details/item-details';


@Component({
  templateUrl: 'build/pages/list/list.html'
})
export class ListPage {
  // provide Angular with metadata about things it should inject in the constructor
  static get parameters() {
    return [[NavController], [NavParams]];
  }

  constructor(nav, navParams) {
    this.nav = nav;

    // If we navigated to this page, we will have an item available as a nav param
    this.selectedItem = navParams.get('item');

    this.icons = ['flask', 'wifi', 'beer', 'football', 'basketball', 'paper-plane',
    'american-football', 'boat', 'bluetooth', 'build'];

    this.items = [];
    for(let i = 1; i < 11; i++) {
      this.items.push({
        title: 'Item ' + i,
        note: 'This is item #' + i,
        icon: this.icons[Math.floor(Math.random() * this.icons.length)]
      });
    }
  }

  itemTapped(event, item) {
     this.nav.push(ItemDetailsPage, {
       item: item
     });
  }
}
This page will create a basic list page containing a number of items.
Navigating to Pages
Recall from the previous section we had a function inside our ListPage class that looked something like this:
itemTapped(event, item) {
    this.nav.push(ItemDetailsPage, {
      item: item
    });
}
You might have noticed we are referencing ItemDetailsPage. This is a page included in the tutorial starter. Let’s import it in app/pages/list/list.js so we can use it:
...
import {ItemDetailsPage} from '../item-details/item-details';
After saving the file, you will notice the ionic serve process will recompile your app with the new changes, and reload the browser. Let’s revisit our app in the browser, and when we tap an item, it will navigate to the item details page! Notice that the menu-toggle is replaced with a back button instead. This is a native style that Ionic follows, but can be configured.
How It Works
Navigation in Ionic 2 works like a simple stack, where we push new pages onto the top of the stack, which takes us forwards in the app and shows a back button. To go backwards, we pop the top page off. Since we set this.nav in the constructor, we can call this.nav.push(), and pass it the page we want to navigate to. We can also pass it an object containing data we would like to pass to the page being navigated to. Using push to navigate to a new page is simple, but Ionic’s navigation system is very flexible. Check out the navigation docs to see more advanced navigation examples.
When it comes to URLs, Ionic 2 works a bit differently than Ionic 1. Instead of using URLs to navigate, we use them to make sure we can always come back to a page (on app launch, for example). This means we aren’t limited to using href to navigate around. However, we still have the option to use a URL to navigate to a page when necessary.
references
Tutorial - Getting Started with Ionic - Ionic Framework
effect


 959
959


 被折叠的 条评论
为什么被折叠?
被折叠的 条评论
为什么被折叠?
 到【灌水乐园】发言


