


Android系统虽然自带了很多的组件,但肯定满足我们个性化的需求,所以我们为了开发方便,需要自定义Android的UI组件,以实现我们个性化的需求。
对于设置界面的每一个条目,基本上都是相同,我们是不是可以把它看做是一个控件,而android系统并没有这样的控件,那么我们可以自定义一个组合控件
1. 自定义一个控件CustomView(extends View )类
2. 在values/attrs.xml中,编写styleable和item等标签元素,定义自定义属性
3. 在布局文件中CustomView使用自定义的属性(注意namespace)
二,定义组合控件,编写SettingItemView类继承RelativeLayout
布局文件中有三个控件,获取三个控件,获取自定义组件的属性值(在有两个参数的构造方法中通过TypedArray获取),然后分别设置给对应的控件
注意点:
实现父类的3个构造方法。一般需要在构造方法里始化初自定义布局文件。
一个参数构造方法:为new控件使用
两个参数的造方法:在调用布局文件使用
三个参数的造方法:传递带有样式的布局文件使用
首先来看看attrs.xml文件。
该文件是定义属性名和格式的地方,
需要用<declare-styleable name="SettingItemView"></declare-styleable>包围所有属性。
其中name为该属性集的名字,主要用途是标识该属性集。
那在什么地方会用到呢?
主要是在组合控件中,在获取某属性标识时,用到"R.styleable.SettingItemView",很显然,他在每个属性前面都加了"SettingItemView_"。
在来看看各种属性都有些什么类型吧:string , integer , dimension , reference , color , enum.
前面几种的声明方式都是一致的,例如:<attr name="buttonNum" format="integer"/>。
只有enum是不同的,用法举例:
<attr name="testEnum">
<enum name="fill_parent" value="-1"/>
<enum name="wrap_content" value="-2"/>
</attr>
如果该属性可同时传两种不同的属性,则可以用“|”分割开即可。
让我们再来看看布局xml中需要注意的事项。
首先得在名称空间地方声明一下:
xmlns:settingitem="http://schemas.android.com/apk/res-auto"
注意,“settingitem“可以换成其他的任何名。使用自定义属性时,在属性名前加上“settingitem”即可。
对于设置界面的每一个条目,基本上都是相同,我们是不是可以把它看做是一个控件,而android系统并没有这样的控件,那么我们可以自定义一个组合控件
来实现功能。
1. 自定义一个控件CustomView(extends View )类
2. 在values/attrs.xml中,编写styleable和item等标签元素,定义自定义属性
3. 在布局文件中CustomView使用自定义的属性(注意namespace)
4. 在自定义控件CustomView的构造方法中通过TypedArray获取自定义属性
一、在res/values文件下定义一个attrs.xml文件,代码如下:
    <declare-styleable name="SettingItemView">
        <attr name="mtitle" format="string"/>
        <attr name="desc_on" format="string"/>
        <attr name="desc_off" format="string"/>
    </declare-styleable>
二,定义组合控件,编写SettingItemView类继承RelativeLayout
布局文件中有三个控件,获取三个控件,获取自定义组件的属性值(在有两个参数的构造方法中通过TypedArray获取),然后分别设置给对应的控件
/**
 * 设置界面每个条目控件
 */
public class SettingItemView extends RelativeLayout {

    TextView tv_title;
    TextView tv_desc;
    CheckBox cb_status;

    private String title;
    private String desc_on;
    private String desc_off;

    //在代码中调用
    public SettingItemView(Context context) {
        super(context);
        initView(context);
    }
    //写在布局文件中调用
    public SettingItemView(Context context, AttributeSet attrs) {
        super(context, attrs);
        //1,获取控件
        initView(context);

        //2,在自定义组合控件中,可以获得xml中定义的属性值值:
        TypedArray typedArray = context.obtainStyledAttributes(attrs,R.styleable.SettingItemView);
        title = typedArray.getString(R.styleable.SettingItemView_mtitle);
        desc_on = typedArray.getString(R.styleable.SettingItemView_desc_on);
        desc_off = typedArray.getString(R.styleable.SettingItemView_desc_off);
        //3,给控件设置属性值
        tv_title.setText(title);
        tv_desc.setText(desc_off);

    }
    //获取控件
    public void initView(Context context){
        View.inflate(context, R.layout.setting_item_view,this);
        tv_title = (TextView) findViewById(R.id.tv_title);
        tv_desc = (TextView) findViewById(R.id.tv_desc);
        cb_status = (CheckBox) findViewById(R.id.cb_status);
    }

    public boolean isChecked(){
        return  cb_status.isChecked();
    }

    public void setChecked(boolean checked){
        if(checked){
            tv_desc.setText(desc_on);
        }else{
            tv_desc.setText(desc_off);
        }
        cb_status.setChecked(checked);
    }
}
注意点:
实现父类的3个构造方法。一般需要在构造方法里始化初自定义布局文件。
一个参数构造方法:为new控件使用
两个参数的造方法:在调用布局文件使用
三个参数的造方法:传递带有样式的布局文件使用
首先来看看attrs.xml文件。
该文件是定义属性名和格式的地方,
需要用<declare-styleable name="SettingItemView"></declare-styleable>包围所有属性。
其中name为该属性集的名字,主要用途是标识该属性集。
那在什么地方会用到呢?
主要是在组合控件中,在获取某属性标识时,用到"R.styleable.SettingItemView",很显然,他在每个属性前面都加了"SettingItemView_"。
在来看看各种属性都有些什么类型吧:string , integer , dimension , reference , color , enum.
前面几种的声明方式都是一致的,例如:<attr name="buttonNum" format="integer"/>。
只有enum是不同的,用法举例:
<attr name="testEnum">
<enum name="fill_parent" value="-1"/>
<enum name="wrap_content" value="-2"/>
</attr>
如果该属性可同时传两种不同的属性,则可以用“|”分割开即可。
三,在布局文件中使用自定义组合控件
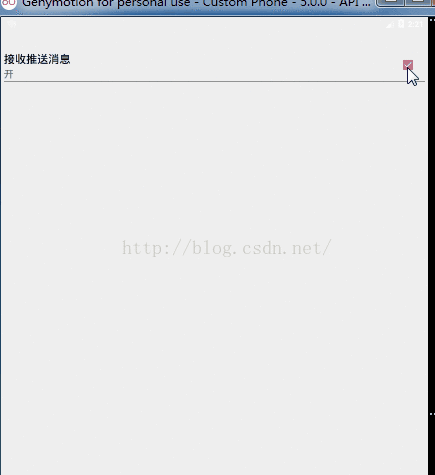
<?xml version="1.0" encoding="utf-8"?>
<LinearLayout
    xmlns:android="http://schemas.android.com/apk/res/android"
    xmlns:settingitem="http://schemas.android.com/apk/res-auto"
    xmlns:tools="http://schemas.android.com/tools"
    android:layout_width="match_parent"
    android:layout_height="match_parent"
    android:orientation="vertical"
    tools:context="com.jiwu.imageviewdemo.MainActivity">
    <view.SettingItemView
        android:id="@+id/setting_iv"
        android:layout_width="match_parent"
        android:layout_height="70dp"
        settingitem:mtitle="接收推送消息"
        settingitem:desc_on="开"
        settingitem:desc_off="关"
        >
</LinearLayout>
让我们再来看看布局xml中需要注意的事项。
首先得在名称空间地方声明一下:
xmlns:settingitem="http://schemas.android.com/apk/res-auto"
注意,“settingitem“可以换成其他的任何名。使用自定义属性时,在属性名前加上“settingitem”即可。
四,在Activity中使用
SettingItemView setting_iv = (SettingItemView) findViewById(R.id.setting_iv);
setting_iv.setOnClickListener(new View.OnClickListener() {
            @Override
            public void onClick(View v) {
                if(setting_iv.isChecked()){
                    setting_iv.setChecked(false);
                }else{
                    setting_iv.setChecked(true);
                }
            }
});至此,基本功能已实现,针对不同的设置界面,可以进行定制,如有疑问欢迎留言或加群讨论:196615382,如需源码,点击下载。。。
http://blog.csdn.net/lmj623565791/article/details/45022631
http://www.cnblogs.com/ufocdy/archive/2011/05/27/2060221.html


 2623
2623


 被折叠的 条评论
为什么被折叠?
被折叠的 条评论
为什么被折叠?
 到【灌水乐园】发言


