


一 使用TF
import os
import sys
import random
import math
import numpy as np
import scipy.misc
import matplotlib
import matplotlib.pyplot as plt

import coco                      #coco.py,里面是mask rcnn中MSCOCO的配置和数据加载
import utils                    #util.py,里面是mask rcnn的通用函数和类实现
import model as modellib     #model.py,里面是mask rcnn模型的实现
import visualize               #visualize.py,里面封装了matplotlib IPython.display ,用来显示图像画图

%matplotlib inline

# Root directory of the project
ROOT_DIR = os.getcwd()

# Directory to save logs and trained model
MODEL_DIR = os.path.join(ROOT_DIR, "logs")

# Path to trained weights file
# Download this file and place in the root of your
# project (See README file for details)
COCO_MODEL_PATH = os.path.join(ROOT_DIR, "mask_rcnn_coco.h5")

# Directory of images to run detection on
IMAGE_DIR = os.path.join(ROOT_DIR, "images")
MODEL_DIR: 保存log,和训练的模型
IMAGE_DIR: 图片存放路径 images/
COCO_MODEL_PATH:mask_rcnn_coco.h5 download下来的coco model
二 配置
class InferenceConfig(coco.CocoConfig):
    # Set batch size to 1 since we'll be running inference on
    # one image at a time. Batch size = GPU_COUNT * IMAGES_PER_GPU
    GPU_COUNT = 1
    IMAGES_PER_GPU = 1

config = InferenceConfig()
config.print()配置信息读取:从coco.py里的class CocoConfig(Config)读取,Config又是从config.py里读取的,然后更新了GPU_COUNT IMAGES_PER_GPU的配置
GPU的数量*每GPU处理的图片数
输出结果是最终的配置信息
三 创建Model 加载weights
# Create model object in inference mode.
model = modellib.MaskRCNN(mode="inference", model_dir=MODEL_DIR, config=config) #Model.py的MaskRCNN类实现

# Load weights trained on MS-COCO
model.load_weights(COCO_MODEL_PATH, by_name=True)   #从mask_rcnn_coco.h5load weights
四 加载coco name
class_names = ['BG', 'person', 'bicycle', 'car', 'motorcycle', 'airplane',
               'bus', 'train', 'truck', 'boat', 'traffic light',
               'fire hydrant', 'stop sign', 'parking meter', 'bench', 'bird',
               'cat', 'dog', 'horse', 'sheep', 'cow', 'elephant', 'bear',
               'zebra', 'giraffe', 'backpack', 'umbrella', 'handbag', 'tie',
               'suitcase', 'frisbee', 'skis', 'snowboard', 'sports ball',
               'kite', 'baseball bat', 'baseball glove', 'skateboard',
               'surfboard', 'tennis racket', 'bottle', 'wine glass', 'cup',
               'fork', 'knife', 'spoon', 'bowl', 'banana', 'apple',
               'sandwich', 'orange', 'broccoli', 'carrot', 'hot dog', 'pizza',
               'donut', 'cake', 'chair', 'couch', 'potted plant', 'bed',
               'dining table', 'toilet', 'tv', 'laptop', 'mouse', 'remote',
               'keyboard', 'cell phone', 'microwave', 'oven', 'toaster',
               'sink', 'refrigerator', 'book', 'clock', 'vase', 'scissors',
               'teddy bear', 'hair drier', 'toothbrush']
五 物体识别
# Load a random image from the images folder
file_names = next(os.walk(IMAGE_DIR))[2]
image = scipy.misc.imread(os.path.join(IMAGE_DIR, random.choice(file_names)))
# Run detection
results = model.detect([image], verbose=1)
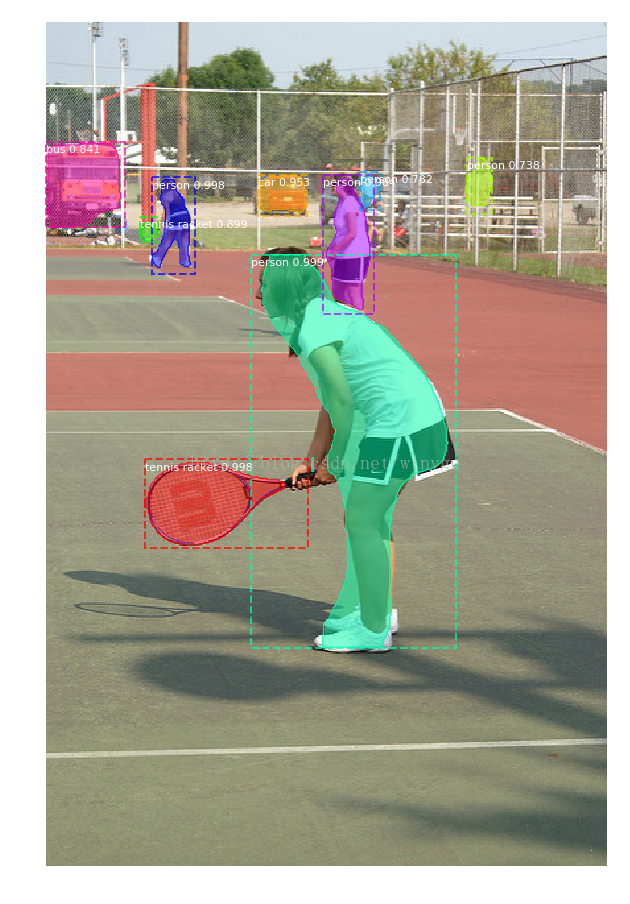
# Visualize results
r = results[0]
visualize.display_instances(image, r['rois'], r['masks'], r['class_ids'],
class_names, r['scores'])
Model.py和coco.py 下一节继续解析


 1870
1870


 被折叠的 条评论
为什么被折叠?
被折叠的 条评论
为什么被折叠?
 到【灌水乐园】发言


