


一、下载Hessian
可在hessian官网http://hessian.caucho.com/ 或者http://download.csdn.net/detail/wodediqizhang/9543682下载jar包。此处用的是hessian-4.0.3.jar
二、 搭建Hessian的Server
2.1.新建一个web项目,HessianTest,如图1。将hessian-4.0.3.jar放在lib下。

2.2.提供服务接口HessianService,代码如下:
package com.cn.wjztr.service;

import com.cn.wjztr.model.HelloWorld;
/**
 *
 *
 * 类名称:HessianService
 * 类描述: 定义对外提供服务的接口
 * 创建人:wodediqizhang@163.com
 * 修改时间:2016-6-7 下午4:39:33
 * Modification History:
 * =============================================================================
 *   Author         Date          Description
 *   ------------ ---------- ---------------------------------------------------
 *   ghb<span style="font-family: Arial, Helvetica, sans-serif;">                         2016-6-7        创建文档 </span>
 * =============================================================================
 * @version 1.0.0
 *
 */
public interface HessianService {

	public HelloWorld sayHelloWorld();
}
2.3.HessianService接口要使用HelloWorld对象,HelloWorld代码如下:
package com.cn.wjztr.model;

import java.io.Serializable;

public class HelloWorld implements Serializable{

	/**
	 * serialVersionUID:TODO(用一句话描述这个变量表示什么)
	 *
	 * @since 1.0.0
	 */
	private static final long serialVersionUID = 2303638650074878501L;
	/**
	 * 名字
	 */
	private String name;
	public HelloWorld() {

	}
	public HelloWorld(String name) {
		 this.name = name;
	}

	public String getName() {
		return name;
	}
	public void setName(String name) {
		this.name = name;
	}

}
2.4.实现HessianService接口,实现类为HessianServiceImpl:
package com.cn.wjztr.service.impl;

import com.cn.wjztr.model.HelloWorld;
import com.cn.wjztr.service.HessianService;
/**
 *
 *
 * 类名称:HessianServiceImpl
 * 类描述:对外提供服务的接口的实现
 * 创建人:<span style="font-family: Arial, Helvetica, sans-serif;">wodediqizhang@163.com</span>
 * 修改时间:2016-6-7 下午4:47:40
 * Modification History:
 * =============================================================================
 *   Author         Date          Description
 *   ------------ ---------- ---------------------------------------------------
 *   ghb           2016-6-7        创建文档
 * =============================================================================
 * @version 1.0.0
 *
 */
public class HessianServiceImpl implements HessianService {

	@Override
	public HelloWorld sayHelloWorld() {
		// TODO Auto-generated method stub
		return new HelloWorld("hello,World");
	}

}
2.5.配置web.xml,添加对HessianServlet的配置:
<?xml version="1.0" encoding="UTF-8"?>
<web-app version="3.0"
xmlns="http://java.sun.com/xml/ns/javaee"
xmlns:xsi="http://www.w3.org/2001/XMLSchema-instance"
xsi:schemaLocation="http://java.sun.com/xml/ns/javaee
http://java.sun.com/xml/ns/javaee/web-app_3_0.xsd">
<display-name></display-name>
<welcome-file-list>
<welcome-file>index.jsp</welcome-file>
</welcome-file-list>
<servlet>
<!-- 配置 HessianServlet,Servlet的命名任意-->
<servlet-name>ServiceServlet</servlet-name>
<servlet-class>com.caucho.hessian.server.HessianServlet</servlet-class>
<!-- 配置接口的具体实现类 ,param-name命名任意-->
<init-param>
<param-name>service-class</param-name>
<param-value>com.cn.wjztr.service.impl.HessianServiceImpl</param-value>
</init-param>
</servlet>
<!-- 映射 HessianServlet的访问URL地址-->
<servlet-mapping>
<servlet-name>ServiceServlet</servlet-name>
<url-pattern>/ServiceServlet</url-pattern>
</servlet-mapping>
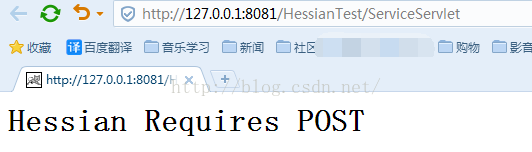
</web-app>此时,Hessian Server的配置已经完成了,接下来将应用部署在tomcat并启动。访问链接http://127.0.0.1:8081/HessianTest/ServiceServlet,得到信息如下:
三、实现Hessian的client
调用Hessian的客户端,创建HessianTestClient类,代码如下:
package com.cn.wjztr.controller;

import java.net.MalformedURLException;

import com.caucho.hessian.client.HessianProxyFactory;
import com.cn.wjztr.model.HelloWorld;
import com.cn.wjztr.service.HessianService;


/**
 *
 *
 * 类名称:HessianTestClient
 * 类描述:
 * 创建人:wodediqizhang@163.com
 * 修改时间:2016-6-7 下午4:57:11
 * Modification History:
 * =============================================================================
 *   Author         Date          Description
 *   ------------ ---------- ---------------------------------------------------
 *   ghb            2016-6-20        创建文档
 * =============================================================================
 * @version 1.0.0
 *
 */
public class HessianTestClient {
	public static void main(String[] args) {
	//在服务器端的web.xml文件中配置的HessianServlet映射的访问URL地址
	String url = "http://127.0.0.1:8081/HessianTest/ServiceServlet";
	HessianProxyFactory factory = new HessianProxyFactory();
	HessianService service = null;
	try {service = (HessianService) factory.create(HessianService.class, url);}
	catch (MalformedURLException e) {
		// TODO Auto-generated catch block
		e.printStackTrace();}
	//创建IService接口的实例对象
	HelloWorld helloWorld = service.sayHelloWorld();
	//调用Hessian服务器端的ServiceImpl类中的getUser方法来获取一个User对象
	System.out.println(helloWorld.getName());}}
	}
}
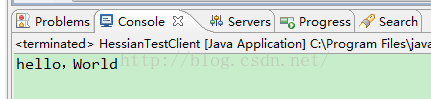
<span style="font-family: Arial, Helvetica, sans-serif; background-color: rgb(255, 255, 255);"> 运行这个类,会得到“hello,World”信息:</span>
后记:这篇博是借鉴了孤傲苍狼(http://www.cnblogs.com/xdp-gacl/p/3897534.html)这篇文章的内容实现的,不过他是将server和client分开,并将server的接口打了jar包给client,在client项目里面引用jar包里的接口实现对server的调用。这里我觉得理解原理就好,所以就我在这里就写一起了。
再后记:上个后记都说了借鉴,那这篇文章还设为转载吧。就这样。


 1589
1589


 被折叠的 条评论
为什么被折叠?
被折叠的 条评论
为什么被折叠?
 到【灌水乐园】发言


