


多线程02
A.Lock
1)概述
上一章中,使用同步机制synchronized解决了线程的安全问题
但我们并没有看到具体的锁对象是谁,JDK5以后java提供了接口Lock
Lock提供了比使用synchronized方法和语句可获得更广泛的锁定操作
由于该Lock接口不能实例化,提供了子实现类:ReentrankLock
2)方法
public void lock():获取锁
public void unlock():释放锁
测试类import java.util.concurrent.locks.Lock; import java.util.concurrent.locks.ReentrantLock; public class Tickets implements Runnable { private static int tickets = 100; private Lock l = new ReentrantLock(); @Override public void run() { while (tickets > 0) { try { l.lock(); if (tickets > 0) { try { Thread.sleep(100); } catch (InterruptedException e) { e.printStackTrace(); } System.out.println(Thread.currentThread().getName() + "正在出售电影《战狼2》第" + (100 - (--tickets)) + "张票!余票" + tickets + "张!"); } } finally { l.unlock(); } } } }
public class TicketsDemo {
	public static void main(String[] args) {
		Tickets t = new Tickets();

		Thread t1 = new Thread(t, "窗口1");
		Thread t2 = new Thread(t, "窗口2");
		Thread t3 = new Thread(t, "窗口3");

		t1.start();
		t2.start();
		t3.start();
	}
}
B.死锁
1)线程安全的弊端
使用Lock锁定的操作或者是同步锁synchronized来解决线程安全问题
线程安全的弊端:
a.执行效率低了
b.容易产生死锁
2)死锁出现的原因
两个或两个以上的线程,抢占CPU的执行权,然后出现了互相等待的情况
下面写一个死锁程序
a.自定义一个类:提供两把锁对象
b.创建一个线程对象public class MyLock { // 创建两把锁对象 public static final Object objA = new Object(); public static final Object objB = new Object(); }
c.创建测试类public class DieLock extends Thread { private boolean flag; public DieLock(boolean flag) { super(); this.flag = flag; } @Override public void run() { if (flag) { synchronized (MyLock.objA) { System.out.println("if objA..."); synchronized (MyLock.objB) { System.out.println("if objB..."); } } /** * if ObjA--->如果想要执行 ifObjB,那么需要else里面的ObjB同步机制执行完毕 */ } else { synchronized (MyLock.objB) { System.out.println("else objB..."); synchronized (MyLock.objA) { System.out.println("else objA..."); } } } } }
public class DieLockDemo {
	public static void main(String[] args) {
		DieLock d1 = new DieLock(true);
		DieLock d2 = new DieLock(false);

		d1.start();
		d2.start();
		/**
		 * 第一种: dl1线程先抢占到CPU的执行权
		 * 			if ObjA
		 * 				else ObjB
		 *
		 * 第二种: dl2线程先抢占到CPU的执行权
		 * 			else ObjB
		 * 				if ObjA
		 */
	}
}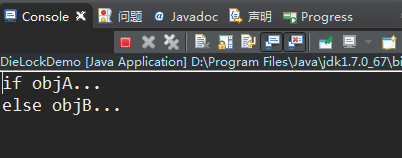
解析:可以看出:连个线程分别抢占两个代码块,并执行完第一步
然后都在等待对方执行完,就出现了死锁状态
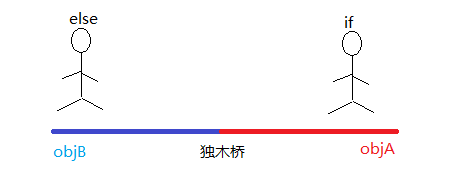
换种方式解释:
if 和 else 两个人分别从桥的两端上桥,打算过河
if objA-----------------objB
else objB-----------------objA
两人走到中间,if需要等else走完objB,而else又要等if走完objA,两人都在等
就出现了死锁状态
3)死锁解决方法
通过线程的通讯问题上面独木桥问题,两人上桥总有个先后顺序
else发现if先上就等待if走完,else再上去走
线程的通信:两个或者两个以上的线程只能针对同一资源进行操作
4)需求
模拟生产消费关系
分析:当前的资源情况
Dinner:共同资源
public class Dinner {
	String food;
	String juice;
}
setThread:设置晚餐数据(生产者)
public class SetThread implements Runnable {
	private Dinner d;

	public SetThread(Dinner d) {
		super();
		this.d = d;
	}

	@Override
	public void run() {
		// Dinner d = new Dinner();

		d.food = "盖浇饭";
		d.juice = "可乐";
	}
}
getThread:获取晚餐数据(消费者)
public class GetThread implements Runnable {

	private Dinner d;

	public GetThread(Dinner d) {
		super();
		this.d = d;
	}

	@Override
	public void run() {
		// Dinner d = new Dinner();
		System.out.println(d.food + "---" + d.juice);
	}

}
DinnerDemo:测试类
可以将代码中的注释部分放开,将Set/Get类成员变量和构造方法注释掉public class DinnerDemo { public static void main(String[] args) { Dinner d = new Dinner(); SetThread st = new SetThread(d); GetThread gt = new GetThread(d); Thread t1 = new Thread(st); Thread t2 = new Thread(gt); t1.start(); t2.start(); } }观察结果,会发现打印出来的是null---0(没有传进去)
5)针对上面的需求,改进
给每一个线程加入while循环,打印多个数据
盖浇饭-----可乐
盖浇面-----雪碧
SetThread
GetThreadprivate int x = 0 ; @Override public void run() { while(true){ synchronized (d) { if(x%2==0){ d.food = "盖浇饭" ; d.juice = "可乐" ; }else{ d.food = "盖浇面" ; d.juice = "雪碧" ; } x ++ ; } } }
@Override public void run() { while(true){ synchronized(d){ System.out.println(d.food +"---"+ d.juice); } } }改进之后出现的问题:
a.同一数据打印了多次
b.会出现搭配错误!线程的随机性导致
继续改进:(最终版代码在下一模块C-2))
加如synchronized同步锁:但会出现一大片数据(自己尝试)
我想让两者交替变化的出现(两个线程交替运行)
如何解决?
java提供了另一种机制:等待唤醒机制
C.等待唤醒机制
1)概述
Object类中提供了一些方法
wait():线程等待
public final void notify():唤醒正在等待的单个线程
public final void notifyAll():唤醒所有线程
2)针对上面的案例,加入唤醒等待机制
再做以下改进:
将Dinner类中的成员私有化
在Dinner类中使用同步方法,进行set方法/get()封装起来
在SetThread或者是GetThread只需要调用set()/get()
形成最终版代码
晚餐类
生产者类public class Dinner { private String food; private String juice; private boolean flag;// 默认是没有数据的,如果是true,说明有数据 // 生产者 public synchronized void set(String food, String jucie) { // 使用等待唤醒机制 if (this.flag) { try { // 如果有饭,等待消费者来消费 this.wait(); } catch (InterruptedException e) { e.printStackTrace(); } } // 如果没有饭 // 设置数据(做饭) this.food = food; this.juice = jucie; // 修改标记(饭做好了,该叫消费者取餐) this.flag = true; this.notify(); } // 消费者 public synchronized void get() { if (!this.flag) { try { // 如果没有饭,需要等待生产者生产数据 // 点完餐等待中 this.wait(); } catch (InterruptedException e) { e.printStackTrace(); } } // 如果有,直接消费 System.out.println(this.food + "---" + this.juice); // 消费结束,修改标记 // 告诉生产者,吃完了,该做饭了 this.flag = false; this.notify(); } }
public class SetThread implements Runnable { private Dinner d; public SetThread(Dinner d) { super(); this.d = d; } // 定义变量(不同的饭交替) private int x = 0; @Override public void run() { while (true) { if (x % 2 == 0) { d.set("盖浇饭", "可乐"); } else { d.set("盖浇面", "雪碧"); } x++; } } }消费者类
public class GetThread implements Runnable { private Dinner d; public GetThread(Dinner d) { super(); this.d = d; } @Override public void run() { while (true) { d.get(); } } }测试类
public class DinnerDemo {
	public static void main(String[] args) {
		Dinner d = new Dinner();

		SetThread st = new SetThread(d);
		GetThread gt = new GetThread(d);

		Thread t1 = new Thread(st);
		Thread t2 = new Thread(gt);

		t1.start();
		t2.start();
	}
}
3)面试题
这几个方法都是线程有关的方法,为什么把这个方法不在Thread类里面?
刚才这个案例,使用的锁对象进行调用,锁对象可以是任意对象!
而Object本身就是代表所有的类根类:代表所有对象!
D.线程组和线程池
1)线程组ThreadGroup
表示一个线程的集合,里面包含了一些线程
2)方法
public final ThreadGroup getThreadGroup():返回该线程所在的线程组
public final String getName()返回此线程组的名称。
测试类public class MyRunnable implements Runnable { @Override public void run() { for (int i = 0; i < 100; i++) { System.out.println(Thread.currentThread().getName() + ":" + i); } } }
public class ThreadGroupDemo {
	public static void main(String[] args) {
		MyRunnable mr = new MyRunnable();

		Thread t1 = new Thread(mr, "线程1");
		Thread t2 = new Thread(mr, "线程2");

		// 返回该线程所在的线程组
		ThreadGroup tg1 = t1.getThreadGroup();
		ThreadGroup tg2 = t2.getThreadGroup();

		// 返回此线程组的名称
		String name1 = tg1.getName();
		String name2 = tg2.getName();

		System.out.println(name1);// main
		System.out.println(name2);// mian

		// 通过测试:发现线程默认情况线程组属于main线程:
		System.out.println(Thread.currentThread().getThreadGroup().getName());// mian
	}
}
3)设置一个新的线程
public ThreadGroup(String name)构造一个新线程组。
public final void setDaemon(boolean daemon):设置线程组是否是一个守护线程
public class ThreadGroupDemo {
	public static void main(String[] args) {
		ThreadGroup tg = new ThreadGroup("线程组");

		MyRunnable mr = new MyRunnable();

		Thread t1 = new Thread(tg, mr, "线程1");
		Thread t2 = new Thread(tg, mr, "线程2");

		ThreadGroup tg1 = t1.getThreadGroup();
		ThreadGroup tg2 = t2.getThreadGroup();

		t1.start();
		t2.start();

		String name1 = tg1.getName();
		String name2 = tg2.getName();

		System.out.println(name1);
		System.out.println(name2);

		tg.setDaemon(true); // 该线程组中的线程都是守护线程!

	}
}
4)线程池
启动新的线程,很耗费成本
线程池有一个好处:里面可以存储多条线程
每一条线程执行完毕,不会变成垃圾,等待下次继续使用!
a.创建线程池对象
Executors工厂:专门用来创建线程池的:提供了一个方法
public static ExecutorService newFixedThreadPool(int nThreads)
b.这些方法的返回值是ExecutorService对象,该对象表示一个线程池
可以执行Runnable对象或者Callable对象代表的线程
Future<?> submit(Runnable task):Runnable接口作为一个参数:要该类的子实现类对象
c.线程池结束
void shutdown()
import java.util.concurrent.ExecutorService;
import java.util.concurrent.Executors;

public class ExecutorsDome {
	public static void main(String[] args) {
		// 创建线程池对象
		ExecutorService pool = Executors.newFixedThreadPool(2);

		// 使用ExecutorsService接口中方法:
		pool.submit(new MyRunnable());
		pool.submit(new MyRunnable());

		// 结束线程池
		pool.shutdown();
	}
}
6)实现多线程的方式3
a.自定义一个累,实现Callable接口
b.实现里面的call方法
import java.util.concurrent.Callable;

public class MyCallable implements Callable {

	@Override
	public Object call() throws Exception {
		for (int i = 0; i < 10; i++) {
			System.out.println(Thread.currentThread().getName() + ":" + i);
		}
		return null;
	}

}
c.主线程中创建线程对象
d.用线程池对象提交任务
e.提交后结束线程池
import java.util.concurrent.ExecutorService;
import java.util.concurrent.Executors;

public class CallableDemo {
	public static void main(String[] args) {
		ExecutorService threadPool = Executors.newFixedThreadPool(2);

		threadPool.submit(new MyCallable());
		threadPool.submit(new MyCallable());

		threadPool.shutdown();
	}
}
7)<T> Future<T> submit(Callable<T> task):Future 表示异步计算的结果 接口
需求,分别计算1-100和1-200的和
import java.util.concurrent.Callable;

public class MyCallable implements Callable<Integer> {

	private int number;

	public MyCallable(int number) {
		super();
		this.number = number;
	}


	@Override
	public Integer call() throws Exception {
		int sum = 0;
		for (int i = 1; i <= this.number; i++) {
			sum += i;
		}
		return sum;
	}

}
import java.util.concurrent.ExecutionException; import java.util.concurrent.ExecutorService; import java.util.concurrent.Executors; import java.util.concurrent.Future; public class CallableDemo { public static void main(String[] args) { ExecutorService threadPool = Executors.newFixedThreadPool(2); Future<Integer> f1 = threadPool.submit(new MyCallable(100)); Future<Integer> f2 = threadPool.submit(new MyCallable(200)); try { Integer i1 = f1.get(); Integer i2 = f2.get(); System.out.println(i1); System.out.println(i2); } catch (InterruptedException e) { e.printStackTrace(); } catch (ExecutionException e) { e.printStackTrace(); } threadPool.shutdown(); } }
8)匿名内部类实现多线程
本质:继承该类或者或者实现该接口的子类对象!
a.接口的匿名内部类的方式new Thread(new Runnable(){}).start();
b.Thread类的方式new Thread(new Thread(){}).start();
c.接口的匿名内部类的方式:有点难度// new Thread(new Runnable(){}){}.start();
public class Demo {
	public static void main(String[] args) {
		// 接口的匿名内部类的方式
		// new Thread(new Runnable(){}).start();
		new Thread(new Runnable() {

			@Override
			public void run() {
				for (int i = 0; i < 100; i++) {
					System.out.println(Thread.currentThread().getName() + ":" + i);
				}
			}
		}).start();

		// Thread类的方式
		// new Thread(new Thread(){}).start();
		new Thread(new Thread() {
			@Override
			public void run() {
				for (int i = 0; i < 100; i++) {
					System.out.println(Thread.currentThread().getName() + ":" + i);
				}
			}
		}).start();

		// 接口的匿名内部类的方式:有点难度
		// new Thread(new Runnable(){}){}.start();
		new Thread(new Runnable() {

			@Override
			public void run() {
				for (int i = 0; i < 100; i++) {
					System.out.println("hello" + ":" + i);
				}
			}
		}){
			@Override
			public void run() {
				for (int i = 0; i < 100; i++) {
					System.out.println("world" + ":" + i);
				}
			}
		}.start();

	}
}
F.定时器Timer和TimerTask
1)概述
可以进行任务的重复操作,定时器要依赖于两个类
Timer和TimerTask
可安排任务执行一次,或者定期重复执行
2)方法
public Timer()创建一个定时器
public void schedule(TimerTask task, Date time)安排在指定的时间执行指定的任务
参数1:task - 所要安排的任务
参数2:time - 执行该任务的时间毫秒值
public boolean cancel()取消计时器任务
需求:3s后执行爆炸操作
import java.util.Timer;
import java.util.TimerTask;

// 创建MyTask任务
class MyTask extends TimerTask {
	private Timer t;

	public MyTask() {
		super();
	}

	public MyTask(Timer t) {
		super();
		this.t = t;
	}

	@Override
	public void run() {
		System.out.println("boom!");
		t.cancel();// 任务完成后取消
	}

}

public class TimerDemo {
	public static void main(String[] args) {
		Timer t = new Timer();
		t.schedule(new MyTask(t), 3000);
	}
}
public void schedule(TimerTask task, Date firstTime,long period):每隔多少毫秒进行重复性的 任务
需求:执行一个定时器,3秒之后爆炸,并且每隔2秒继续执行
import java.util.Timer;
import java.util.TimerTask;

// 创建MyTask任务
class MyTask extends TimerTask {

	@Override
	public void run() {
		System.out.println("boom!");
	}

}

public class TimerDemo {
	public static void main(String[] args) {
		Timer t = new Timer();
		t.schedule(new MyTask(), 3000, 2000);
	}
}
3)需求
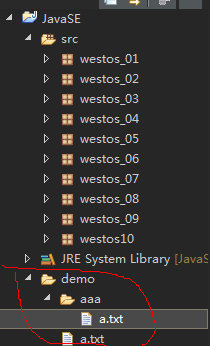
需求:在指定的时间删除我们的指定目录(我使用项目路径下的demo)
删除demo文件夹
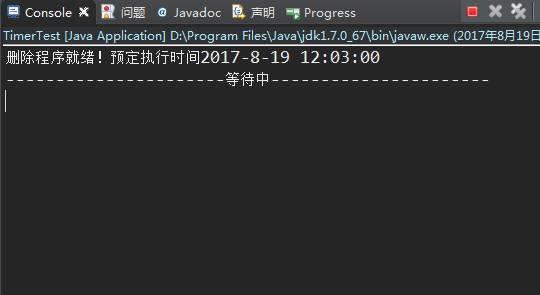
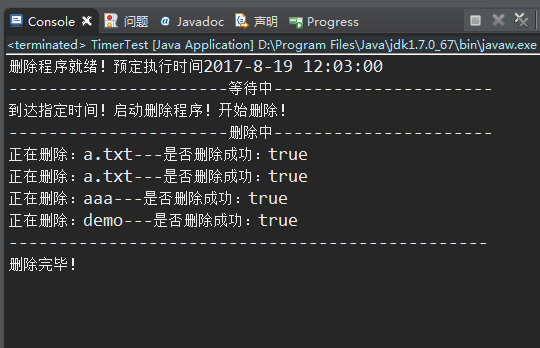
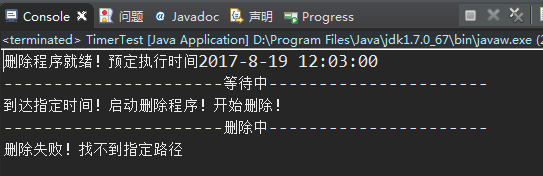
import java.io.File;
import java.text.ParseException;
import java.text.SimpleDateFormat;
import java.util.Date;
import java.util.Timer;
import java.util.TimerTask;

class DeleteFolder extends TimerTask {

	private Timer t;

	public DeleteFolder(Timer t) {
		super();
		this.t = t;
	}

	@Override
	public void run() {
		// 封装当前目录下的文件
		System.out.println("到达指定时间!启动删除程序!开始删除!");
		System.out.println("----------------------删除中----------------------");
		File srcFloder = new File("demo");
		deleteFloder(srcFloder);
		System.out.println("------------------------------------------------");
		System.out.println("删除完毕!");
		t.cancel();
	}

	private void deleteFloder(File srcFloder) {
		// 获取当前目录的所有的文件夹以及文件File数组
		File[] fileArr = srcFloder.listFiles();
		// 非空判断
		if (fileArr != null) {
			// 遍历
			for (File file : fileArr) {
				// 获取到每一个File对象,判断对象是否是一个文件夹
				if (file.isDirectory()) {
					deleteFloder(file);
				} else {
					System.out.println("正在删除:" + file.getName() + "---是否删除成功:" + file.delete());
				}
			}
			System.out.println("正在删除:" + srcFloder.getName() + "---是否删除成功:" + srcFloder.delete());
		} else {
			System.out.println("删除失败!找不到制定路径");
			System.exit(0);
		}
	}
}

public class TimerTest {
	public static void main(String[] args) {
		// 创建定时器对象
		Timer t = new Timer();

		// 设置一个删除时间,日期文本表现
		String deleteTime = "2017-8-19 12:03:00";

		// 创建SimpleDateFormat对象
		SimpleDateFormat sdf = new SimpleDateFormat("yyyy-MM-dd HH:mm:ss");
		try {
			Date date = sdf.parse(deleteTime);
			System.out.println("删除程序就绪!预定执行时间" + deleteTime);
			System.out.println("----------------------等待中----------------------");
			t.schedule(new DeleteFolder(t), date);
		} catch (ParseException e) {
			e.printStackTrace();
		}
	}
}
运行结果(等待中)
删除完毕
当路径不存在的情况下


 796
796

 被折叠的 条评论
为什么被折叠?
被折叠的 条评论
为什么被折叠?
 到【灌水乐园】发言


