


(1)navigationBar导航条可以看做是self.navigationController导航控制器的一个属性,可以直接用点来表示self.navigationController.navigationBar,当然navigationBar自己还有很多属性,比如样式barStyle、背景backgroundColor、frame属性(可以获取宽高这些信息),还可以用setBackgroundImage方法设置背景图片,当然图片多了可以使用clipsToBounds剪裁。
(2)但,navigationBar是否隐藏和显示这个需要它爸也就是self.navigationController来控制,有直接.navigationBarHidden设置为YES/NO,也可以用方法setNavigationBarHidden,都能实现效果。
(3)另一个重要的知识是对navigationItem的设置,这个属性和navigationController是平级的,所以直接可以用self.navigationItem使用。当然可用的有设置导航条标题的方法setTitle,当然你也可以直接把文字换成一个视图,即所谓的标题视图放在导航条的中间,用得方法是setTitleView,很多游戏的导航条中间貌似是一个图片,可以用这个。
(4)最重要的可能是给navigationItem设置左右两边的按钮,一般默认的在左边有“返回”,在右边的有“摄像头”(如微信朋友圈)。步骤就是创建一个UIBarButtonItem对象,然后直接把这个对象赋值给self.navigationItem.leftBarButtonItem或者右边的。当然也可以一次创建很多个UIBarButtonItem组成一个数组,然后把这个数组赋值给self.navigationItem.leftBarButtonItems,注意后面这个和前面这个相比,多了一个“s”,有很多个。也要注意一下有多个按钮时的排列顺序。
(5)我们创建的这些导航条按钮有很多种形式,有的是由文字的,有的时图片,有的时系统自带的如摄像头或者Reply这些icon,有的完全是自己定义的视图。我们当然也可以利用自己创建的导航条按钮来覆盖原来导航控制器产生的默认的按钮,如“<Back”。
同样,需要创建两个视图控制器(ViewController根视图控制器,SecondViewController子视图控制器),然后放在导航控制器栈中。并且在AppDelegate.m中进行把导航控制器赋值给self.window.rootViewController。
在ViewController.m中:
#import "ViewController.h"
#import "SecondViewController.h"
@interface ViewController ()
@end
@implementation ViewController
- (void)viewDidLoad {
//创建一个按钮,点击后进入子视图控制器,相当于进入子页面
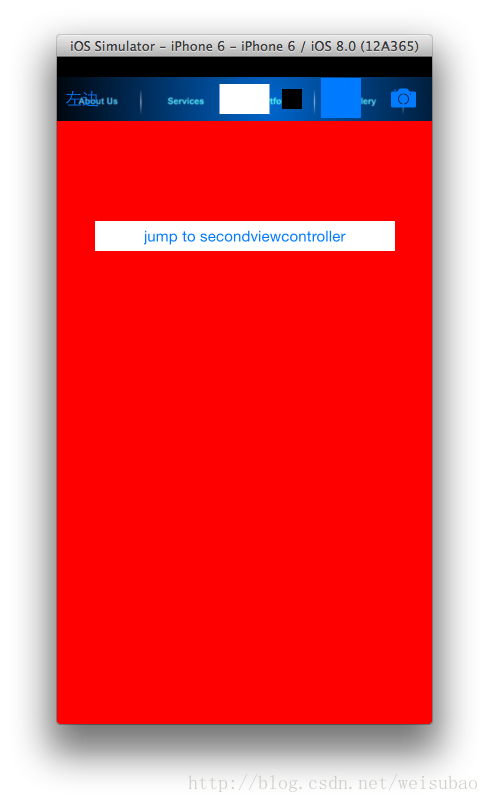
UIButton *btn1=[UIButton buttonWithType:UIButtonTypeRoundedRect];
btn1.frame=CGRectMake(38, 100, 300, 30);
[btn1 setTitle:@"jump to secondviewcontroller" forState:UIControlStateNormal];
btn1.backgroundColor=[UIColor whiteColor];
self.view.backgroundColor=[UIColor redColor];
[btn1 addTarget:self action:@selector(jumpTo) forControlEvents:UIControlEventTouchUpInside];
[self.view addSubview:btn1];
//设置导航条样式
//默认的时白色半透明(有点灰的感觉),UIBarStyleBlack,UIBarStyleBlackTranslucent,UIBarStyleBlackOpaque都是黑色半透明,其实它们有的时不透明有的时透明有的时半透明,但不知为何无效果
self.navigationController.navigationBar.barStyle=UIBarStyleDefault;
//设置导航条背景颜色,也是半透明玻璃状的颜色效果
self.navigationController.navigationBar.backgroundColor=[UIColor orangeColor];
//可以用self.navigationController.navigationBar.frame.size获得高宽,还有self.navigationController.navigationBar.frame.origin获得x和y
//高44,宽375,如果是Retina屏幕,那么宽和高@2x即可分别是750和88
//x是0很明显,y是20,其中上面20就是留给状态栏的高度
NSLog(@"%f",self.navigationController.navigationBar.frame.origin.y);
//隐藏导航条,由此点击进入其他视图时导航条也会被隐藏,默认是NO
//以下一个直接给navigationBarHidden赋值,一个调用方法,都是一样的,下面一个多了一个动画选项而已
self.navigationController.navigationBarHidden=NO;
[self.navigationController setNavigationBarHidden:NO animated:YES];
//给导航条增加背景图片,其中forBarMetrics有点类似于按钮的for state状态,即什么状态下显示
//UIBarMetricsDefault-竖屏横屏都有,横屏导航条变宽,则自动repeat图片
//UIBarMetricsCompact-竖屏没有,横屏有,相当于之前老iOS版本里地UIBarMetricsLandscapePhone
//UIBarMetricsCompactPrompt和UIBarMetricsDefaultPrompt暂时不知道用处,官方解释是Applicable only in bars with the prompt property, such as UINavigationBar and UISearchBar,以后遇到时再细说
[self.navigationController.navigationBar setBackgroundImage:[UIImage imageNamed:@"big2.png"] forBarMetrics:UIBarMetricsDefault];
//如果图片太大会向上扩展侵占状态栏的位置,在状态栏下方显示
//clipsToBounds就是把多余的图片裁剪掉
self.navigationController.navigationBar.clipsToBounds=YES;
//设置导航标题
[self.navigationItem setTitle:@"主页"];
//设置导航标题视图,就是这一块可以加载任意一种视图
//视图的x和y无效,视图上下左右居中显示在标题的位置
UIView *textView1=[[UIView alloc]initWithFrame:CGRectMake(10, 10, 50, 30)];
textView1.backgroundColor=[UIColor whiteColor];
[self.navigationItem setTitleView:textView1];
//设置导航条的左右按钮
//先实例化创建一个UIBarButtonItem,然后把这个按钮赋值给self.navigationItem.leftBarButtonItem即可
//初始化文字的按钮类型有UIBarButtonItemStylePlain和UIBarButtonItemStyleDone两种类型,区别貌似不大
UIBarButtonItem *barBtn1=[[UIBarButtonItem alloc]initWithTitle:@"左边" style:UIBarButtonItemStylePlain target:self action:@selector(changeColor)];
self.navigationItem.leftBarButtonItem=barBtn1;
//我们还可以在左边和右边加不止一个按钮,,且可以添加任意视图,以右边为例
//添加多个其实就是rightBarButtonItems属性,注意还有一个rightBarButtonItem,前者是赋予一个UIBarButtonItem对象数组,所以可以显示多个。后者被赋值一个UIBarButtonItem对象,所以只能显示一个
//显示顺序,左边:按数组顺序从左向右;右边:按数组顺序从右向左
//可以初始化成系统自带的一些barButton,比如UIBarButtonSystemItemCamera是摄像机,还有Done,Reply等等,会显示成一个icon图标
//还可以initWithImage初始化成图片
//还可以自定义,可以是任意一个UIView
UIBarButtonItem *barBtn2=[[UIBarButtonItem alloc]initWithBarButtonSystemItem:UIBarButtonSystemItemCamera target:self action:@selector(changeColor2)];
UIBarButtonItem *barBtn3=[[UIBarButtonItem alloc]initWithImage:[UIImage imageNamed:@"logo-40@2x.png"] style:UIBarButtonItemStylePlain target:self action:@selector(changeColor3)];
UIView *view4=[[UIView alloc]initWithFrame:CGRectMake(10, 10, 20, 20)];
view4.backgroundColor=[UIColor blackColor];
UIBarButtonItem *barBtn4=[[UIBarButtonItem alloc]initWithCustomView:view4];
NSArray *arr1=[[NSArray alloc]initWithObjects:barBtn2,barBtn3,barBtn4, nil];
self.navigationItem.rightBarButtonItems=arr1;
[super viewDidLoad];
// Do any additional setup after loading the view, typically from a nib.
}
-(void)changeColor{
self.view.backgroundColor=[UIColor purpleColor];
}
-(void)changeColor2{
self.view.backgroundColor=[UIColor whiteColor];
}
-(void)changeColor3{
self.view.backgroundColor=[UIColor orangeColor];
}
-(void)jumpTo{
//这里面核心的有两个,所谓跳转,其实就是往导航控制器栈中PUSH或者POP一个视图控制器,这样在最上面的视图控制器就变了,这样视图也跟着变了,因为只显示在栈顶得那个视图控制器的视图
//所以(1)控制所谓的跳转,其实是导航控制器在控制,在里面的元素都可以通过navigationController属性获取到它们所在的导航控制器
//所以(2)获取到导航控制器之后,使用Push的那个方法,往栈里面放一个视图控制器senCon1,这个新放入的在栈顶,就显示它的视图,所以用户改变页面跳转了
SecondViewController *senCon1=[[SecondViewController alloc]init];
[self.navigationController pushViewController:senCon1 animated:YES];
}
@end在SecondViewControllor.m中:
#import "SecondViewController.h"
@interface SecondViewController ()
@end
@implementation SecondViewController
- (void)viewDidLoad {
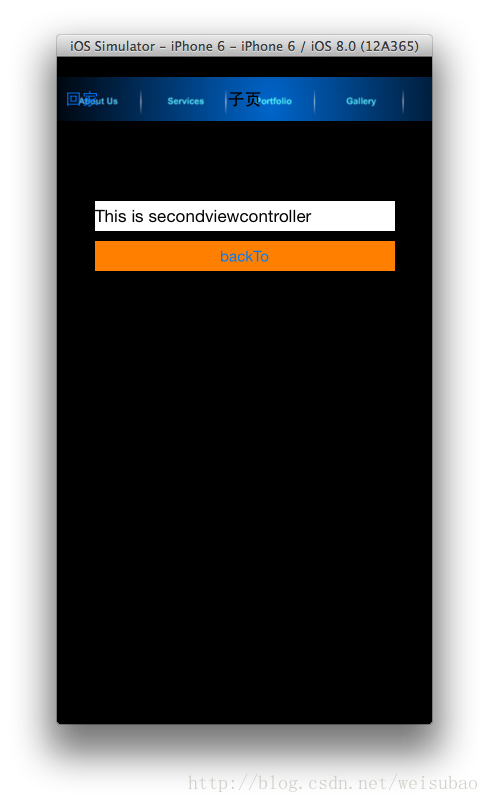
UILabel *label1=[[UILabel alloc]init];
label1.frame=CGRectMake(38, 80, 300, 30);
label1.backgroundColor=[UIColor whiteColor];
label1.text=@"This is secondviewcontroller";
[self.view addSubview:label1];
UIButton *btn2=[UIButton buttonWithType:UIButtonTypeRoundedRect];
btn2.frame=CGRectMake(38, 120, 300, 30);
[btn2 setTitle:@"backTo" forState:UIControlStateNormal];
btn2.backgroundColor=[UIColor orangeColor];
[self.view addSubview:btn2];
[btn2 addTarget:self action:@selector(backTo) forControlEvents:UIControlEventTouchUpInside];
//设置导航标题,这个时候的返回按钮的title就是上一级的navigationItem的title文字
[self.navigationItem setTitle:@"子页"];
//我们也可以在子页中自定义一个返回按钮覆盖原先的"<back"
UIBarButtonItem *barBtn5=[[UIBarButtonItem alloc]initWithTitle:@"回家" style:UIBarButtonItemStylePlain target:self action:@selector(backTo)];
self.navigationItem.leftBarButtonItem=barBtn5;
[super viewDidLoad];
// Do any additional setup after loading the view.
}
-(void)backTo{
[self.navigationController popToViewController:[self.navigationController.viewControllers objectAtIndex:0] animated:YES];
}
@end截个图:


 585
585


 被折叠的 条评论
为什么被折叠?
被折叠的 条评论
为什么被折叠?
 到【灌水乐园】发言


