写在前面:上一篇博客介绍了ES的基础知识Elasticsearch笔记-基础知识,本篇我们介绍ES怎样创建、更新以及检索文档。为便于大家理解,我们采用与关系型数据库对比的方式。
准备工作
在我们进行索引及检索数据之前,先存一些数据到ES中。ES可以当做无模式的数据库使用,可以不必先定义数据模式,但我们为演示方便,先定义其内部的格式。
{
    "mappings": {
        "article": {
            "properties": {
                "id": {
                    "type": "long",
                    "store": "yes" },
                "name": {
                    "type": "string",
                    "store": "yes" },
                "author": {
                    "type": "string",
                    "store": "yes" },
                "date": {
                    "type": "date",
                    "store": "yes" },
                "contents": {
                    "type": "string",
                    "store": "no" }
            }
        }
    }
}以上结构指定了一个article结构的类型,将其存储为json文件并用以下命令创建索引。
curl -XPUT ‘localhost:9200/posts?’ -d @posts.json
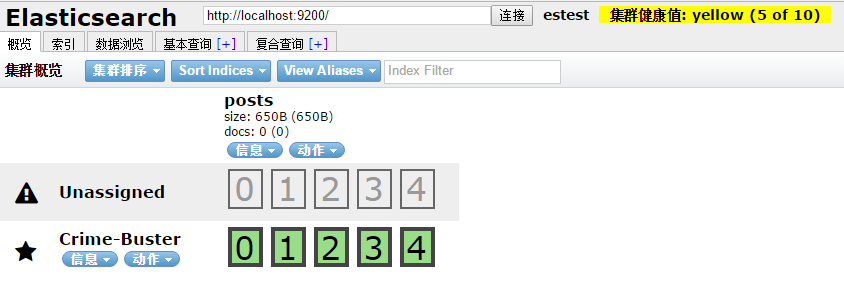
这样我们就有了名为posts的索引,它下面有一个article的类型。
提示:图中集群健康值为yellow,还有一个未分配的(Unassigned)的一行,这其实是现在我们集群中只有一个节点,而默认一个索引5个分片,1个副本。这总共10个分片至少分在2个节点中才有意义,而现在主分片全分在一个节点上,副本就没有启用。yellow状态就告诉我们:所有主分片可用,而副本不可用。还提示说本来应有10个分片(包括主分片和副本),现在只有5个。不过,这并不影响运行。
关于映射文件这里就不多说了,总之相等于关系型数据库中的建库建表,定义表结构。
简单增删查改
对应关系型数据库的 create、delete、select、update,ES也有相对的命令对应,即PUT、DELETE、GET、POST。
新建文档(PUT)
文档数据为:
{
    "id":1,
    "name":"Ealsticesarch笔记",
    "author":"wthfeng",
    "date":"2016-10-25",
    "contents":"这是我的ES学习笔记"
}
发送索引请求:
curl -XPUT localhost:9200/posts/article/1 -d @article.json
返回结果:
{
    "_index": "posts",
    "_type": "article",
    "_id": "1",
    "_version": 1,
    "_shards": {
        "total": 2,
        "successful": 1,
        "failed": 0
    },
    "created": true
}
提示我们成功创建了_index为posts,_type为article,_id为1的文档。
检索文档(GET)
1. 主键检索
简单的检索文档是根据文档的_id(唯一标识)进行查询,发送如下请求查询主键为1,类型为article的文档:
curl ‘localhost:9200/posts/article/1?pretty’
返回
{
  "_index" : "posts",
  "_type" : "article",
  "_id" : "1",
  "_version" : 1,
  "found" : true,
  "_source" : {
    "id" : 1,
    "name" : "Ealsticesarch笔记",
    "author" : "wthfeng",
    "date" : "2016-10-25",
    "contents" : "这是我的ES学习笔记"
  }
}较为复杂的查询需使用DSL(特定领域查询语言),在请求中包括_search 以表示是一次查询。
查询之前我们再插入几条数据,现在article有5篇文档。(只保留数据部分)
{

  "hits": {
    "total": 5,
    "max_score": 1,
    "hits": [
      {
        "_source": {
          "id": 5,
          "name": "生活日志",
          "author": "wthfeng",
          "date": "2015-09-21",
          "contents": "这是日常生活的记录"
        }
      },
      {
        "_source": {
          "id": 2,
          "name": "javascript笔记",
          "author": "wthfeng",
          "date": "2016-10-23",
          "contents": "这是我的javascript学习笔记"
        }
      },
      {
        "_source": {
          "id": 4,
          "name": "javascript指南",
          "author": "wthfeng",
          "date": "2016-09-21",
          "contents": "js的权威指南"
        }
      },
      {
        "_source": {
          "id": 1,
          "name": "Ealsticesarch笔记",
          "author": "wthfeng",
          "date": "2016-10-25",
          "contents": "这是我的ES学习笔记"
        }
      },
      {
        "_source": {
          "id": 3,
          "name": "java笔记",
          "author": "wthfeng",
          "date": "2016-10-23",
          "contents": "这是我的java学习笔记"
        }
      }
    ]
  }
}
2. 精确查询(term)
现在我们检索日期为10月23号的文章,发送查询:
curl localhost:9200/posts/article/_search -d @search.json
search.json文件如下,(后面同此处理)
{
    "query": {
        "term": {
            "date": "2016-10-23"
        }
    }
}
结果:(只保留数据部分)
{
    "hits": [{
        "_source": {
            "id": 2,
            "name": "javascript笔记",
            "author": "wthfeng",
            "date": "2016-10-23",
            "contents": "这是我的javascript学习笔记"
        }
    }, {
        "_source": {
            "id": 3,
            "name": "java笔记",
            "author": "wthfeng",
            "date": "2016-10-23",
            "contents": "这是我的java学习笔记"
        }
    }]
}term是一种简单的词条查询,它不会分析所查询的词,只是简单返回完全匹配的结果,也就是说如果想查询文章内容带有“笔记”词的文档,相等于SQL中“=”:
select * from article where date = '2016-10-23'
3. 简单模糊查询(match)
match将查询的词以某种分析器(可自己指定)分析,然后构建相应查询。总之重要的是,经match查询的词条是经过分析的,这一点至关重要。
让我们来查文章内容中包含“笔记”内容的文章。
curl localhost:9200/posts/article/_search -d @search.json
{
    "query": {
        "match": {
            "contents": "笔记"
        }
    }
}
返回结果(只保留数据)
{
    "hits": [{
        "_index": "posts",
        "_type": "article",
        "_id": "2",
        "_score": 0.44194174,
        "_source": {
            "id": 2,
            "name": "javascript笔记",
            "author": "wthfeng",
            "date": "2016-10-23",
            "contents": "这是我的javascript学习笔记"
        }
    }, {
        "_index": "posts",
        "_type": "article",
        "_id": "1",
        "_score": 0.13561106,
        "_source": {
            "id": 1,
            "name": "Ealsticesarch笔记",
            "author": "wthfeng",
            "date": "2016-10-25",
            "contents": "这是我的ES学习笔记"
        }
    }, {
        "_index": "posts",
        "_type": "article",
        "_id": "3",
        "_score": 0.13561106,
        "_source": {
            "id": 3,
            "name": "java笔记",
            "author": "wthfeng",
            "date": "2016-10-23",
            "contents": "这是我的java学习笔记"
        }
    }, {
        "_index": "posts",
        "_type": "article",
        "_id": "5",
        "_score": 0.014065012,
        "_source": {
            "id": 5,
            "name": "生活日志",
            "author": "wthfeng",
            "date": "2015-09-21",
            "contents": "这是日常生活的记录"
        }
    }]

}
这样就可以模糊查询数据了,不过有个问题是,我查询关键词是“笔记”,为何id为5的文章会出现?因为它有一个“记”字。ES的词条分析查询其实不完全等同于SQL中的模糊查询。ES的查询有相关性,用查询得分(_score)表示。相关性高的排在前面,低的排在后面,id为5的文章只有一个字匹配,所以排在最后。具体查询相关知识下篇讲解,现在我们知道个大概即可。
match查询有几个参数控制匹配行为,如operator,接受值or和and表示。指示关键词是以或的形式连接还是和的形式。如上例,我们想要完全匹配“笔记”的查询结果,需要这样:
{
  "query": {
    "match": {
      "contents": {
        "query":"笔记",
        "operator":"and"
      }
    }
  }
}
如此即可查询包含“笔记”的文章。它的效果类似于
select * from article where contents like '%笔记%' 查询数量(search_type=count)
用于查询符合结果的文档数而不是文档内容。需使用search_type指定为count。
curl ‘localhost:9200/posts/article/_search?pretty&search_type=count’ -d @search.json
{
    "query":{
        "match":{
            "name":"笔记"
        }
    }
}
结果为:
{
  "took" : 4,
  "timed_out" : false,
  "_shards" : {
    "total" : 5,
    "successful" : 5,
    "failed" : 0
  },
  "hits" : {
    "total" : 3,
    "max_score" : 0.0,
    "hits" : [ ]
  }
}
total 字段为3,表明查询结果为3。
更新文档(POST)
ES中的更新总是这样:先删除旧文档,再插入新文档。因为文档一旦在倒排索引中存储,就不能被更改。无论是局部更新还是完全替换,都必须走先删除后插入的流程。(ES内部是这样,不过你不用关注这个过程)。
全部更新
全部更新文档相当于重新添加一份文档,指定需更新文档的id即可。
curl -PUT localhost:9200/posts/article/1 -d @article.json
{
    "id": 1,
    "name": "ES更新过的文档",
    "author": "wthfeng",
    "date": "2016-10-25",
    "contents": "这是更新内容"
}
返回结果:
{
    "_index": "posts",
    "_type": "article",
    "_id": "1",
    "_version": 2,
    "_shards": {
        "total": 2,
        "successful": 1,
        "failed": 0
    },
    "created": false
}此文章版本号(version)加1,是否创建(created)标识为false,说明是更新而不是新建,因为ES中_id唯一,指定相同的_id 会覆盖前面的文档,版本号加1。
全部更新转为SQL的语法即更新所有字段
update article set name = 'ES更新过的文档' ,
author = 'wthfeng',date='2016-10-25', contents='这是更新内容' where id=1
局部更新(_update)
局部更新需使用_update字段,在请求体包含doc局部文档参数。
id为2的文档更新前:
{
    "id": 2,
    "name": "javascript笔记",
    "author": "wthfeng",
    "date": "2016-10-23",
    "contents": "这是我的javascript学习笔记"
}
发送更新请求:
curl -XPOST localhost:9200/posts/article/2/_update -d @article.json
{
    "doc":{
        "name":"更新后的文档",
         "brief":"简介,这是新加的字段"
    }
}
再次查询
{
    "id": 2,
    "name": "更新后的文档",
    "author": "wthfeng",
    "date": "2016-10-23",
    "contents": "这是我的javascript学习笔记",
    "brief": "简介,这是新加的字段"
}可见局部更新不仅可以修改原始字段值,还可以添加新字段。
将其转为SQL形式需有2步操作,更新name,和添加一个字段
update article set name = '更新后的文档' where id =2;
alter table article add brief varchar(20) ;
update grade set brief = '简介,这是新加的字段' where  id =1;
删除文档(DELETE)
删除文档较为简单,指定_id删除即可。
curl -XDELETE localhost:9200/posts/article/3
响应为
{
    "found": true,
    "_index": "posts",
    "_type": "article",
    "_id": "3",
    "_version": 2,
    "_shards": {
        "total": 2,
        "successful": 1,
        "failed": 0
    }
 }
表示成功找到文档并删除,删除操作也会使文档版本号加1。再次查询
{
    "_index": "posts",
    "_type": "article",
    "_id": "3",
    "found": false
}
没有找到,表明已删除。类似SQL表示为
delete from article where id=3注意SQL中的id对应ES中的_id,_id才是ES中的主键,而我们自定义的id这是一个普通字段而已。


 1433
1433


 被折叠的 条评论
为什么被折叠?


