Android 动画应用大集合

声明: 本方来源于网络,仅用于学习。

             https://cutler.github.io/android-D03/    


  动画是多媒体中的一个重要组成部分,我们常见的各种炫酷的特效大部分都是通过动画来实现的。


  在Android3.0之前,我们有两种实现动画效果的方式:帧动画 和 视图动画。

-  帧动画(Frame Animation)通过短时间内连续播放多张图片来实现动画效果,和电影类似。
-  视图动画(View Animation)通过让View对象执行平移、缩放、旋转、透明四种操作,来达到动画效果。

  从Android 3.0开始,系统推出了属性动画(property animation),它的功能非常强大,弥补了之前视图动画的一些缺陷,几乎是可以完全替代掉视图动画了。


视图动画的缺点

-  第一,视图动画提供的功能只能作用在View对象上,所以如果你想动画非View对象,你要自己来实现。 
-  第二,视图动画系统只能动画View对象几个方面,如缩放、平移等。它没法把View的背景颜色、字体颜色、margin、padding等属性进行动态变化。
-  第三,视图动画不是会修改View本身。虽然你的动画在屏幕上移动一个按钮后,从屏幕上来看按钮确实被移动到了新的位置,但按钮实际的位置不会改变,所以你要实现自己的逻辑来处理这个问题。


  视图动画的缺点在属性动画中完全被消除了,你可以动画任何对象的任何属性(视图和非视图),并且对象本身实际(尺寸、位置等)也是会被修改。属性动画的缺点是:在Android3.0中才被提出。
  即便如此,现在也算是到了学习属性动画的时候了,截止至2015/05/25,配置Android3.0以下版本系统的设备已经不足6%了,换句话说我们现在完全可以把项目的minSdkVersion设置为11了。
  当然在Android3.0之前版本的系统中我们也是可以使用属性动画的,这一点在第四节将详细介绍,第三节将以Android3.0版本来讲解属性动画。


使用视图动画还是属性动画?
  在某些时候,使用视图动画可以花费更少的时间,更少的代码,因此如果视图动画完成了你需要做的,或者你现有的代码已经完成了工作,那就没有必要使用属性动画系统。

第一节 视图动画

  虽然视图动画已经不常用了,但是我们仍然要介绍一下它们的用法。

  在Android中实现视图动画的方式有两种:

-  通过XML文件:在res/anim文件夹下面建立动画文件,每个动画文件对应一个xml文件。
-  通过编写代码:直接在代码中new出一个动画对象。


  Android提供了四种视图动画:透明平移旋转缩放


透明
  透明(alpha)动画 ,可以将一个View从某个透明度转变为另一个透明度。


  范例1:透明动画(alpha.xml)。


1
2
3
4
5
6
     
     
<set xmlns:android="http://schemas.android.com/apk/res/android">
<alpha
android:fromAlpha= "1.0"
android:toAlpha= "0"
android:duration= "5000" />
</set>
语句解释:
-  本范例通过XML文件来定义一个透明动画,必须要将动画文件放到res/anim文件夹下。
-  使用<alpha>标签来定义一个透明动画。

属性解释:
-  android:fromAlpha     控件的初始透明度。取值在0.0~1.0之间。1.0为完全不透明。
-  android:toAlpha       动画结束时,控件的透明度。
-  android:duration      播放动画时持续的时间。 


  范例2:播放动画。


1
2
3
4
5
6
7
8
9
10
11
12
     
     
public class AndroidTestActivity extends Activity {
private ImageView img;
public void onCreate(Bundle savedInstanceState) {
super.onCreate(savedInstanceState);
setContentView(R.layout.main);
this.img = (ImageView) this.findViewById(R.id.img);
// 指定动画文件的资源ID ,将其从res/anim目录导入到程序中,并将其转换为一个Animation对象。
Animation animation = AnimationUtils.loadAnimation( this, R.anim.alpha);
this.img.startAnimation(animation);
}
}
语句解释:
-  本范例是在ImageView上面播放刚才我们创建的透明动画。


  范例3:通过代码实现动画。


1
2
3
4
5
6
7
8
9
10
11
12
13
14
15
16
     
     
public class AndroidTestActivity extends Activity {
private ImageView img;
public void onCreate(Bundle savedInstanceState) {
super.onCreate(savedInstanceState);
setContentView(R.layout.main);
this.img = (ImageView) this.findViewById(R.id.img);
// 直接实例化一个AlphaAnimation对象,构造方法为:AlphaAnimation (float fromAlpha,float toAlpha)。
Animation animation = new AlphaAnimation( 1.0f, 0.1f);
// 设置动画的播放时间,单位(毫秒)。
animation.setDuration( 4000);
// 设置控件是否定格在动画播放完成后的状态。
animation.setFillAfter( true);
this.img.startAnimation(animation);
}
}
语句解释:
-  本范例是在ImageView上面播放刚才我们创建的透明动画。


平移
  平移(translate)动画,可以将指定的View从某一个位置移动到另一个位置。某个View的平移动画的播放范围是其父控件所占的空间。如下图所示:
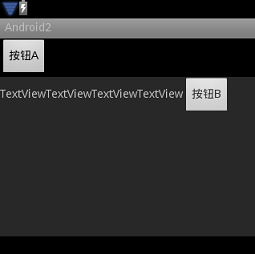


  上图中灰色部分是一个线性布局,布局内有TextViewButton两个控件 。若此时按钮B需要播放一个平移动画,那么按钮B的平移动画的可视范围则是线性布局所占据的区域,即上图中的灰色部分。


  范例1:平移动画(alpha.xml)。


1
2
3
4
5
6
7
8
     
     
<set xmlns:android="http://schemas.android.com/apk/res/android">
<translate
android:fromXDelta= "0"
android:fromYDelta= "0"
android:toXDelta= "100"
android:toYDelta= "150"
android:duration= "3000" />
</set>
属性解释:
-  android:fromXDelta    设置动画移动时的起始X坐标。
-  android:fromYDelta    设置动画移动时的起始Y坐标。
-  android:toXDelta      设置动画移动时的结束X坐标。
-  android:toYDelta      设置动画移动时的结束Y坐标。 


  对于平移动画的四个属性来说,其值可以使用百分比或具体数字来表示:

-  若取值为百分比:则表示当前控件内部的某个位置。如“50%”。
-  若取值为百分比p:则表示当前控件的父控件内部的某个位置。如“50%p”。
-  若取值为具体常量:常量就是相对于当前控件的在未播放动画时的左上角坐标的偏移量。

  因此,在范例1中,动画的起点就是按钮B的左上角,动画的终点就是左上角坐标沿着x轴偏移100像素,沿着y轴偏移150像素。


旋转
  旋转(rotate)动画,可以将指定的View沿着某一个点从某一个角度旋转到另一个角度。旋转动画的可视范围同样是待播放动画的View的父控件所占据的空间。


  范例1:旋转动画。


1
2
3
4
5
6
7
8
     
     
<set xmlns:android="http://schemas.android.com/apk/res/android">
<rotate
android:fromDegrees= "0"
android:toDegrees= "-90"
android:pivotX= "50%"
android:pivotY= "50%"
android:duration= "3000" />
</set>
属性解释:
-  android:fromDegrees       设置控件(相对于0度)最初旋转角度。若值为0则控件不旋转。
-  android:toDegrees         设置控件(相对于0度)最终旋转角度,若值与fromDegrees相等则控件不旋转。
-  android:pivotX和pivotY    设置控件旋转时所用的参照点的XY轴坐标。

若将fromDegrees或toDegrees属性的值设置为负数,则动画会按照逆时针旋转。


  范例2:RotateAnimation类。


1
2
3
4
5
6
7
8
9
10
11
12
13
14
15
     
     
// 根据指定的参数构造一个RotateAnimation对象。
// 此构造方法默认是相对于屏幕上的某个点进行旋转。若想相对于控件本身或父元素旋转,则需要调用另一个构造方法。
public RotateAnimation( float fromDegrees, float toDegrees, float pivotX, float pivotY)
// 根据指定的参数构造一个RotateAnimation对象。
// 其中pivotXType和pivotYType指出当前动画旋转的参照点的类型,有三个取值:
// - 相对的(RELATIVE):
// - Animation.RELATIVE_TO_SELF :控件围绕自己内部的某点旋转。
// - Animation.RELATIVE_TO_PARENT :控件围绕其父组件内部某点旋转。
// - 绝对的(ABSOLUTE):
// - Animation.ABSOLUTE:控件围绕屏幕中的某个具体的点旋转。
// - 其中pivotXValue和pivotYValue的取值范围为:
// - 若Type设置为相对的(RELATIVE),则取值范围是0.0~1.0之间。1.0就是100%。
// - 若Type设置为绝对的(ABSOLUTE) ,则取值可以是一个具体的数字。
public RotateAnimation( float fromDegrees, float toDegrees, int pivotXType, float pivotXValue, int pivotYType, float pivotYValue)


缩放
  缩放(scale)动画,可以将指定的View沿着某一个点从某一个尺寸缩放到另一个尺寸。缩放动画的可视范围同样是待播放动画的View的父控件所占据的空间。


  范例1:缩放动画。


1
2
3
4
5
6
7
8
9
10
     
     
<set xmlns:android="http://schemas.android.com/apk/res/android">
<scale
android:fromXScale= "1.0"
android:fromYScale= "5.0"
android:toXScale= "3.0"
android:toYScale= "1.0"
android:pivotX= "50%"
android:pivotY= "50%"
android:duration= "5000" />
</set>
属性解释:
-  android:fromXScale    设置控件最初在水平方向上被缩放的倍数。若为1.0则不缩放。
-  android:fromYScale    设置控件最初在垂直方向上被缩放的倍数。若为1.0则不缩放。
-  android:toXScale      设置控件最终在水平方向上被缩放的倍数。
-  android:toYScale      设置控件最终在垂直方向上被缩放的倍数。
-  android:pivotX        设置控件以某个中心点进行缩放时,中心点的X坐标。 
-  android:pivotY        设置控件以某个中心点进行缩放时,中心点的Y坐标。


  范例2:反向。


1
2
3
4
5
6
7
8
9
     
     
<scale
xmlns:android= "http://schemas.android.com/apk/res/android"
android:fromXScale= "1"
android:fromYScale= "1"
android:toXScale= "-1"
android:toYScale= "-1"
android:pivotX= "50%"
android:pivotY= "50%"
android:duration= "3000" />
语句解释:
-  若fromXScale、fromYScale、toXScale、toYScale四个属性的取值为负数,则:
   -  X轴会以中心点X轴坐标为准从右到左的反向。
   -  Y轴会以中心点Y轴坐标为准从上到下的反向。


AnimationSet
  使用<set>标签来定义一个动画集合,其内部可以嵌套其他动画,甚至是另一个<set><set>使用AnimationSet类来表示。

  范例1:一组动画。


1
2
3
4
5
6
7
8
9
10
11
12
13
14
15
16
17
18
19
     
     
<set xmlns:android="http://schemas.android.com/apk/res/android" >
<alpha
android:duration= "1000"
android:fromAlpha= "0.5"
android:toAlpha= "1.0" />
<scale
android:duration= "1000"
android:fromXScale= "1"
android:fromYScale= "1"
android:toXScale= "0.5"
android:toYScale= "0.5" />
<translate
android:duration= "1000"
android:fromXDelta= "0"
android:fromYDelta= "0"
android:toXDelta= "150"
android:startOffset= "3000"
android:toYDelta= "150"/>
</set>
语句解释:
-  使用动画的android:startOffset属性可以设置其播放的开始时间,单位是毫秒。
-  本范例中,当这个动画集合开始时会首先播放前两个动画,等动画集已经播放了三秒时,第三个平移动画才开始播放。

  <set>标签支持如下两个属性:

-  interpolator:表示AnimationSet所采用的插值器,插值器影响动画的速度。
  -  默认取值为@android:anim/accelerate_decelerate_interpolator-  shareInterpolator:表示AnimationSet中的动画是否和集合共享一个插值器。


Interpolators
  Interpolators是动画插值器,它可以影响动画的播放速度,可以对动画进行加速减速重复反弹等。
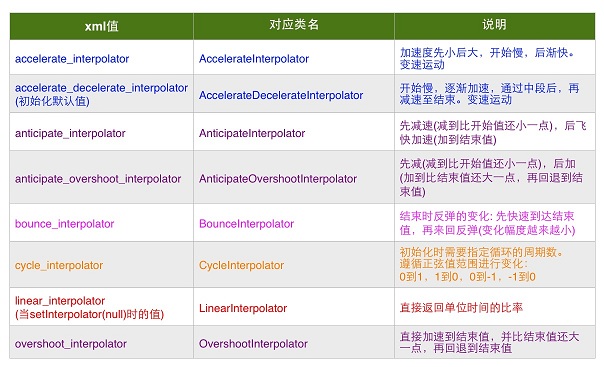
  所有的插值器都是Interpolators类的子类,现有的插值器如下表所示:


1
2
3
4
5
6
7
8
9
10
     
     
加速器类名 资源id
AccelerateDecelerateInterpolator @android:anim/accelerate_decelerate_interpolator
AccelerateInterpolator @android:anim/accelerate_interpolator
AnticipateInterpolator @android:anim/anticipate_interpolator
AnticipateOvershootInterpolator @android:anim/anticipate_overshoot_interpolator
BounceInterpolator @android:anim/bounce_interpolator
CycleInterpolator @android:anim/cycle_interpolator
DecelerateInterpolator @android:anim/decelerate_interpolator
LinearInterpolator @android:anim/linear_interpolator
OvershootInterpolator @android:anim/overshoot_interpolator

  使用的方法:


1
2
3
     
     
<set android:interpolator="@android:anim/accelerate_interpolator">
<!-- ... -->
</set>
语句解释:
-  interpolator属性的值必须指向加速器的资源Id,而不是类名。
-  <set>标签的子标签也可以使用interpolator属性来指定自己的插值器。

  插值器一个常见的应用场景是:

播放旋转动画时,如果不为其指定插值器,则系统会默认使用AccelerateDecelerateInterpolator,此插值器的特点是,在动画开始时候加速,在动画结束的时候减速。
如果我们想循环播放这个旋转动画的话,就会给人一种不连贯的感觉,此时就可以使用LinearInterpolator了,它会线性匀速的播放动画。

  关于插值器,在属性动画一节会有详细的介绍,不明白的兄弟可以暂时存疑。


事件监听
  通过AnimationsetAnimationListener方法可以给视图动画添加监听器,接口如下所示:


1
2
3
4
5
6
7
8
     
     
public static interface AnimationListener {
// 动画开始播放时调用
void onAnimationStart(Animation animation);
// 动画播放结束时调用
void onAnimationEnd(Animation animation);
// 动画重复播放时调用
void onAnimationRepeat(Animation animation);
}


出场动画
  在ViewGroup类中定义了android:layoutAnimation属性,用于给其子元素设置出场动画。

  首先要创建一个布局动画文件:

  范例1:res/anim/anim_layout.xml


1
2
3
4
5
6
     
     
<layoutAnimation xmlns:android="http://schemas.android.com/apk/res/android"
android:delay= "5"
android:animationOrder= "normal"
android:animation= "@anim/fade_in">
</layoutAnimation>
语句解释:
-  delay属性:表示子元素开始动画的时间延迟。
   -  比如动画的持续时间是1秒,那么delay=5就表示除了第一个子元素之外的每一个子元素都要依次延迟5秒才开始播放。
   -  也就是说,第一个子元素会立刻显示出来,第二个延迟5秒,第三个会延迟10秒,依次类推。
   -  delay的值也可以是小数,比如0.5就表示延迟时间为动画播放时间的一半。
-  animationOrder属性:表示子元素播放动画的顺序。取值有三个:
   -  normal:顺序显示,即从第一个子元素开始播放入场动画。
   -  reverse:倒叙显示,即从最后一个子元素开始播放入场动画。
   -  random:随机播放入场动画。
-  animation属性:每个子元素所要播放的动画。


  然后创建每个子元素所要播放的动画:

  范例2:res/anim/fade_in.xml


1
2
3
4
5
     
     
<alpha xmlns:android="http://schemas.android.com/apk/res/android"
android:duration= "1000"
android:fromAlpha= "0.0"
android:interpolator= "@android:anim/decelerate_interpolator"
android:toAlpha= "1.0" />
语句解释:
-  渐入动画,在1秒内让View从完全看不见到完全看的见。


  最后将布局动画设置到ViewGroup上:

  范例3:为控件设置动画。


1
2
3
4
5
6
7
8
9
10
11
12
13
14
15
16
17
18
19
20
21
22
23
24
25
     
     
<LinearLayout xmlns:android="http://schemas.android.com/apk/res/android"
android:layout_width= "match_parent"
android:layout_height= "match_parent"
android:layoutAnimation= "@anim/anim_layout"
android:orientation= "vertical">
<TextView
android:layout_width= "match_parent"
android:layout_height= "wrap_content"
android:text= "AAAAAAAAAAAAAAA"
android:textSize= "20sp" />
<TextView
android:layout_width= "match_parent"
android:layout_height= "wrap_content"
android:text= "BBBBBBBBBBBBBBB"
android:textSize= "20sp" />
<TextView
android:layout_width= "match_parent"
android:layout_height= "wrap_content"
android:text= "CCCCCCCCCCCCCCC"
android:textSize= "20sp" />
</LinearLayout>
语句解释:
-  任何ViewGroup的子类都可以使用android:layoutAnimation属性,通常用在ListView上。


  提示:android:layoutAnimation属性是API Level 1中提供的,可以放心使用。

第二节 帧动画

  帧动画通过在短时间内连续播放多张图片来达到动画的效果。


  范例1:建立动画文件res/drawable/look.xml


1
2
3
4
5
6
     
     
<animation-list xmlns:android="http://schemas.android.com/apk/res/android" android:oneshot="false">
<item android:drawable="@drawable/girl_1" android:duration="120" />
<item android:drawable="@drawable/girl_2" android:duration="120" />
<item android:drawable="@drawable/girl_3" android:duration="120" />
<item android:drawable="@drawable/girl_4" android:duration="120" />
</animation-list>
语句解释:
-  帧动画的根标签为<animation-list>,帧动画的xml文件必须要放在res/drawable文件夹中。
-  <item>标签描述帧动画中的每一帧所要显示的图片。

属性解释
-  android:oneshot   设置动画是否只播放一次。若值为false,则动画会循环播放。
-  <item>标签的 android:drawable 当前帧所显示的图片。
-  <item>标签的 android:duration 当前帧的持续时间(毫秒)。


  范例2:使用动画。


1
2
3
4
5
6
     
     
<ImageView
android:layout_width= "wrap_content"
android:layout_height= "wrap_content"
android:src= "@drawable/look"
android:onClick= "onClick"
android:id= "@+id/img" />
语句解释:
-  使用<ImageView>的android:src属性来指向新建立好的动画文件look.xml。


  范例3:播放动画。


1
2
     
     
AnimationDrawable drawable = (AnimationDrawable) this.img.getDrawable();
drawable.start();
语句解释:
-  调用ImageView的getDrawable方法获取动画后,就可以启动动画了。
-  提示:帧动画不可以通过AnimationUtils工具类获取,该类仅能获取视图动画。


  在ActivityonCreate()中调用AnimationDrawablestart()方法动画并不会被播放。
  这是因为AnimationDrawable不能在不完全的窗口上运行,解决方法是在onCreate()方法之后的onWindowFocusChanged()方法中启动动画。


  范例4:在onWindowFocusChanged中。


1
2
3
4
5
6
7
8
     
     
public void onWindowFocusChanged( boolean hasFocus) {
super.onWindowFocusChanged(hasFocus);
if(hasFocus){ // 若当前Activity获得焦点。
TextView text = (TextView) findViewById(R.id.text);
AnimationDrawable drawable =(AnimationDrawable) text.getBackground();
drawable.start();
}
}
语句解释:
-  onWindowFocusChanged方法将在Activity的onResume方法之后且用户可操作之前被调用。

第三节 属性动画

  在介绍属性动画之前,笔者要先统一下“动画”的概念:

-  如果笔者说“让一个Button3秒内放大两倍,其实就是在让它播放一个动画”,相信大家都不会有什么异议。
-  那么仔细想一下,可以总结出动画的本质其实就是,“让一个物体在指定时间内,从一个状态转变为另一个状态”。
-  进而可以得出:“让一个int变量的值在3秒内从0过度到100,其实也就是让int变量播放一个动画”。

  前面介绍的视图动画只支持四种(缩放平移选择透明)操作,而且只能动画View对象。而接下来要介绍的属性动画可以对任何对象做动画,就像上面说的动画一个int变量。

  此时你可能会有疑问,何时会需要动画一个int值呢?

-  在后面的章节中会介绍到,View类提供了scrollTo和scrollBy两个方法,用来滚动View的内容。
-  比如说,如果屏幕高800,但是View的高度为1400,那它的内容就没法一屏显示出来,只能通过滚动才能看到后面的内容。
-  但是scrollTo和scrollBy两个方有个缺点,它们被调用时会立刻将View的内容滚动到目标位置,也就是说没有滑翔过程,会给人很生硬的感觉。
-  此时如果我们把滚动条的当前位置定义为i,那么就可以使用属性动画来动画这个i了,即让i在1秒内从当前位置变为目标位置。
-  然后我们只需要在动画的过程中(可以给动画设置回调)不断的调用scrollTo或scrollBy即可。

  如果不理解上面举的这个例子也没关系,你只需要知道:“动画一个int变量是很常见的一个操作”就行了。事实上,视图动画可以实现的功能,属性动画都可以实现。


  笔者在此声明,本节主要参考阅读下面三篇文章(有修改):

基础入门

  属性动画有两个常用的类:ValueAnimatorObjectAnimator,接下来依次介绍它们。

ValueAnimator


  范例1:ValueAnimator的用法很简单,比如说想要将一个值从0平滑过渡到1,时长300毫秒,就可以这样写:


1
2
3
4
5
6
     
     
// 使用ofFloat()方法来创建一个ValueAnimator对象,其中参数0和1就表示将值从0平滑过渡到1。
ValueAnimator anim = ValueAnimator.ofFloat( 0f, 1f);
// setDuration()方法来设置动画运行的时长。
anim.setDuration( 300);
// 启动动画。
anim.start();
语句解释:
-  本范例使用的是android.animation.ValueAnimator类。
-  我们只需要将初始值和结束值提供给ValueAnimator,并且告诉它动画所需运行的时长,那么ValueAnimator就会自动帮我们完成从初始值平滑地过渡到结束值这样的效果。


  范例2:运行上面的代码时无法看到任何效果,需要借助监听器才能知道这个动画是否已经真正运行了,如下所示:


1
2
3
4
5
6
7
8
     
     
ValueAnimator anim = ValueAnimator.ofFloat( 0f, 1f);
anim.setDuration( 300);
anim.addUpdateListener( new ValueAnimator.AnimatorUpdateListener() {
public void onAnimationUpdate(ValueAnimator valueAnimator) {
System. out.println( "cuurent value is " + valueAnimator.getAnimatedValue());
}
});
anim.start();
语句解释:
-  在动画执行的过程中系统会不断地回调onAnimationUpdate()方法,我们只需要在回调方法当中将当前的值取出并打印出来。
-  回调onAnimationUpdate()方法的时间间隔是ValueAnimator类根据你设置的初始值、结束值、动画时间三个参数来计算出来的,不需要我们设置,它会尽可能的让动画平滑的播放出来(即在使用最少的回调次数的基础上,保证动画流畅)。


  范例3:ofFloat()方法可以传入任意多个参数。


1
2
3
4
     
     
// 在3秒内从0过渡到5,再过渡到3,再过渡到10。
ValueAnimator anim = ValueAnimator.ofFloat( 0f, 5f, 3f, 10f);
anim.setDuration( 3000);
anim.start();
语句解释:
-  如果只是希望将一个整数值从0平滑地过渡到100,那么也很简单,只需要调用ValueAnimator.ofInt(0, 100)就可以了。
-  调用anim.setRepeatCount()设置循环播放的次数,默认为1次,ValueAnimator.INFINITE为无限循环。
-  调用anim.setRepeatMode()设置循环播放的模式:
   -  RESTART(默认),动画播放到结尾时,直接从开头再播放。
   -  REVERSE,动画播放到结尾时,再从结尾再往开头播放。
-  除此之外,我们还可以调用anim.setStartDelay()方法来设置动画延迟播放的时间。

ObjectAnimator

  ObjectAnimatorValueAnimator的子类。
  ObjectAnimator除了具有其父类的所有特性之外,还在父类的基础上增加了对对象属性进行动画功能,如动画Viewalpha属性的值。


  范例1:修改透明度。


1
2
3
4
5
     
     
Button btn = (Button) findViewById(R.id.btn);
// 第一个参数是想动画的对象,第二个参数是该对象的属性。
ObjectAnimator animator = ObjectAnimator.ofFloat(btn, "alpha", 1f, 0f, 1f);
animator.setDuration( 5000);
animator.start();
语句解释:
-  本范例用来将Button5秒内从不透明变换成全透明,再从全透明变换成不透明。
-  把代码改成“ObjectAnimator.ofFloat(btn, "rotation", 0, 360)”则按钮就会被旋转。
-  把代码改成“ObjectAnimator.ofFloat(btn, "scaleY", 1f, 3f, 1f)”则按钮就会在垂直方向上进行缩放,然后还原。
-  把代码改成“ObjectAnimator.ofFloat(btn, "rotation", 0, 360)”则按钮就会被旋转。
-  把代码改成“ObjectAnimator.ofFloat(btn, "translationX", curTranslationX, -500f)”则按钮就会从curTranslationX移动到-500


  此时也许你会有一个疑问,就是ObjectAnimatorofFloat()方法的第二个参数到底可以传哪些值呢?

-  答案是,我们可以传入任意的值,系统在执行动画时会通过反射机制调用对象的getset方法。
   -  比如,若我们给第二个参数传递abc,那么系统就是调用Button的setAbc和getAbc两个方法。
-  只要在getset方法中执行相应的操作即可。

  相应的,rotation对应的就是setRotation()getRotation()方法,这两个方法在View类中定义了。


引入一个问题
  我们现在有个需求,给Button加一个动画,让这个ButtonpaddingLeft从当前值增加到500px。按照上面的思路,我们可以这么写代码:


1
2
3
4
5
6
7
8
9
10
     
     
public class MainActivity extends Activity {
protected void onCreate(Bundle savedInstanceState) {
super.onCreate(savedInstanceState);
setContentView(R.layout.activity_main);
}
public void onClick(View button) {
// 当Button被点击时,我们启动一个属性动画,修改Button的paddingLeft属性的值到500 。
ObjectAnimator.ofInt(button, "paddingLeft", 500).setDuration( 5000).start();
}
}

  上述代码运行后发现没效果,这是因为属性动画如果想成功运行,需要两个条件:

-  object必须要提供set方法,如果动画的时候没有传递初始值,那么还要提供get方法,因为系统要去拿属性的初始值。
-  objectset对属性所做的改变必须能够通过某种方法反映出来,比如会带来UI的改变之类的(如果这条不满足,动画就不会有效果)。

  上面范例之所以不成功是因为View类没有setPaddingLeft方法,而只有setPadding()方法,为了实现这个需求,我们可以用一个类来包装原始的Button对象,代码为:


1
2
3
4
5
6
7
8
9
10
11
12
13
14
15
16
17
18
19
20
21
22
23
     
     
public class MainActivity extends Activity {
protected void onCreate(Bundle savedInstanceState) {
super.onCreate(savedInstanceState);
setContentView(R.layout.activity_main);
}
public void onClick(View button) {
// 将按钮放到一个ViewWrapper中。
ObjectAnimator.ofInt( new ViewWrapper(button), "paddingLeft", 500).setDuration( 5000).start();
}
// 一个普通的包装类。
public class ViewWrapper {
private View mTarget;
public ViewWrapper(View view) {
this.mTarget = view;
}
public void setPaddingLeft( int paddingLeft) {
mTarget.setPadding(paddingLeft, mTarget.getPaddingTop(),
mTarget.getPaddingRight(), mTarget.getPaddingBottom());
}
}
}
语句解释:
-  这样一来程序运行时就可以看到动画效果了。
-  如果你修改完属性后View没有自动更新,那么你可以调用requestlayout()或invalidate()方法手动更新。


本节参考阅读:

组合动画

  我们可以通过AnimatorSet类来将多个动画组合到一起播放,这个类提供了一个play()方法,如果我们向这个方法中传入一个Animator对象(ValueAnimator的父类)将会返回一个AnimatorSet.Builder的实例。
  AnimatorSet.Builder中包括以下四个方法:

-  after(Animator anim)    将现有动画插入到传入的动画之后执行
-  after(long delay)       将现有动画延迟指定毫秒后执行
-  before(Animator anim)   将现有动画插入到传入的动画之前执行
-  with(Animator anim)     将现有动画和传入的动画同时执行


  比如说我们想要让Button先从屏幕外移动进屏幕,然后开始旋转360度,旋转的同时进行淡入淡出操作,就可以这样写:


1
2
3
4
5
6
7
8
     
     
Button btn = (Button) findViewById(R.id.btn);
ObjectAnimator moveIn = ObjectAnimator.ofFloat(btn, "translationX", - 500f, 0f);
ObjectAnimator rotate = ObjectAnimator.ofFloat(btn, "rotation", 0f, 360f);
ObjectAnimator fadeInOut = ObjectAnimator.ofFloat(btn, "alpha", 1f, 0f, 1f);
AnimatorSet animSet = new AnimatorSet();
animSet.play(rotate).with(fadeInOut).after(moveIn);
animSet.setDuration( 5000);
animSet.start();
语句解释:
-  除了上面说的4个方法外,AnimatorSet类也提供了不少方法,比如playTogether、playSequentially等。

Animator监听器

  在Animator类当中提供了一个addListener()方法,这个方法接收一个AnimatorListener用于监听动画的各种事件了。


1
2
3
4
5
6
7
8
9
10
11
12
13
14
15
16
17
18
19
20
     
     
ValueAnimator anim = ValueAnimator.ofInt( 0, 10);
anim.setDuration( 1000);
// 动画播放的过程中,会回调此接口中的方法。
anim.addUpdateListener( new ValueAnimator.AnimatorUpdateListener() {
public void onAnimationUpdate(ValueAnimator valueAnimator) {
System. out.println(valueAnimator.getAnimatedValue());
}
});
// 动画播放的状态改变时,会回调此接口中的方法。
anim.addListener( new Animator.AnimatorListener() {
// 动画开始的时候调用
public void onAnimationStart(Animator animation) { }
// 动画重复执行的时候调用
public void onAnimationRepeat(Animator animation) { }
// 动画结束的时候调用
public void onAnimationEnd(Animator animation) { }
// 动画被取消的时候调用
public void onAnimationCancel(Animator animation) { }
});
anim.start();


  为了方便使用,可以继承AnimatorListenerAdapter类,这样我们就可以只重写自己需要的方法了,如下所示:


1
2
3
4
5
     
     
anim.addListener( new AnimatorListenerAdapter() {
@Override
public void onAnimationEnd(Animator animation) {
}
});


使用XML编写动画

  通过XML来编写动画可能会比通过代码来编写动画要慢一些,但是在重用方面将会变得非常轻松。

  如果想要使用XML来编写动画,首先要在res目录下面新建一个animator文件夹,所有属性动画的XML文件都应该存放在这个文件夹当中。然后在XML文件中我们一共可以使用如下三种标签:

-  <animator>        对应代码中的 ValueAnimator
-  <objectAnimator>  对应代码中的 ObjectAnimator
-  <set>             对应代码中的 AnimatorSet


  比如说我们想要实现一个从0100平滑过渡的动画,在XML当中就可以这样写:


1
2
3
4
     
     
<animator xmlns:android="http://schemas.android.com/apk/res/android"
android:valueFrom= "0"
android:valueTo= "100"
android:valueType= "intType"/>

  而如果我们想将一个视图的alpha属性从1变成0,就可以这样写:


1
2
3
4
5
     
     
<objectAnimator xmlns:android="http://schemas.android.com/apk/res/android"
android:valueFrom= "1"
android:valueTo= "0"
android:valueType= "floatType"
android:propertyName= "alpha"/>

  其实XML编写动画在可读性方面还是挺高的,上面的内容不用解释也都能看得懂。


  另外,我们也可以使用XML来完成复杂的组合动画操作,比如将一个视图先从屏幕外移动进屏幕,然后开始旋转360度,旋转的同时进行淡入淡出操作,就可以这样写:


1
2
3
4
5
6
7
8
9
10
11
12
13
14
15
16
17
18
19
20
21
22
23
24
25
26
27
28
29
30
31
32
33
34
35
36
37
     
     
<set xmlns:android="http://schemas.android.com/apk/res/android"
android:ordering= "sequentially" >
<objectAnimator
android:duration= "2000"
android:propertyName= "translationX"
android:valueFrom= "-500"
android:valueTo= "0"
android:valueType= "floatType" >
</objectAnimator>
<set android:ordering="together" >
<objectAnimator
android:duration= "3000"
android:propertyName= "rotation"
android:valueFrom= "0"
android:valueTo= "360"
android:valueType= "floatType" >
</objectAnimator>
<set android:ordering="sequentially" >
<objectAnimator
android:duration= "1500"
android:propertyName= "alpha"
android:valueFrom= "1"
android:valueTo= "0"
android:valueType= "floatType" >
</objectAnimator>
<objectAnimator
android:duration= "1500"
android:propertyName= "alpha"
android:valueFrom= "0"
android:valueTo= "1"
android:valueType= "floatType" >
</objectAnimator>
</set>
</set>
</set>
语句解释:
-  这段XML实现的效果和刚才代码实现的效果是一模一样的,每个参数的含义都非常清楚,相信一看就懂。
-  另外,objectAnimator和animator标签除了上面的属性外,都还包含如下三个属性:
   -  startOffset、repeatCount、repeatMode
-  实际上,objectAnimator标签只是比animator标签多了一个propertyName属性。


  XML文件是编写好了,可以使用如下代码进行播放:


1
2
3
4
5
6
     
     
// 加载动画。
Animator animator = AnimatorInflater.loadAnimator(context, R.animator.anim_file);
// 设置要播放此动画的View。
animator.setTarget(view);
// 开始播放。
animator.start();


  提示:如果你使用的是NineOldAndroids动画库,那么在Android3.0之前的设备上,最好通过代码来实现属性动画。

高级用法

工作原理

  为了能深入理解属性动画的两个重要的概念:TimeInterpolatorTypeEvaluator,我们得需要先知道属性动画的工作流程。

  假设我们现在需要动画ButtontranslationX属性,让它在4秒内从0变为100
  当我们调用它的start方法启动动画时,系统会执行如下过程:

-  第一,会开启一个定时器,这个定时器每隔一段时间就会出发一次绘制动画的任务。
-  第二,当绘制任务被触发时,会调用当前ObjectAnimatorTimeInterpolator字段来计算出一个跟时间有关系的比例值。
-  第三,把计算出来的比例值交给当前ObjectAnimatorTypeEvaluator字段,由其来计算出动画当前的播放位置。
-  第四,会通过反射的方式把第三步计算出的播放位置传递给目标方法,执行更新操作。


  此时你可能会有疑问,为什么要用到TimeInterpolator类呢?

-  按照我们熟悉的逻辑,动画的播放进度是需要和时间相关的,也就是说当动画播放到1秒的时候,translationX的值应该是25,执行到2秒的时候值应该是50。这个逻辑其实是一个线性的变化,即动画的播放进度随着时间的推移,均匀的改变。
-  但是在很多时候我们有更高的要求,比如希望动画以加速度或者减速度的形式播放,又或者希望动画在开始的部分加速播放,在结束的部分减速播放。这时候就需要用到TimeInterpolator类了。
-  当绘制任务被触发时,系统会调用TimeInterpolator的getInterpolation方法,并传递过去一个数值input,这个数值表示动画当前已经播放的比率。
-  然后,我们可以依据这个input来进行计算出我们想要的结果,并将结果返回。
-  最后,系统会把getInterpolation方法返回的结果当作动画最终的播放比例,进行后续的计算。


  事实上,TimeInterpolator类有很多现有的子类,比如LinearInterpolator类:


1
2
3
4
5
6
7
8
9
     
     
public class LinearInterpolator extends BaseInterpolator implements NativeInterpolatorFactory {
public LinearInterpolator() { }
public LinearInterpolator(Context context, AttributeSet attrs) { }
public float getInterpolation( float input) {
return input;
}
}
语句解释:
-  由于系统默认使用的就是线性变化,所以LinearInterpolator的getInterpolation方法直接将参数给返回了。


  再比如,ValueAnimator类默认使用的是AccelerateDecelerateInterpolator,它的源码为:


1
2
3
4
5
6
7
8
9
     
     
public class AccelerateDecelerateInterpolator extends BaseInterpolator
implements NativeInterpolatorFactory {
public AccelerateDecelerateInterpolator() { }
public AccelerateDecelerateInterpolator(Context context, AttributeSet attrs) { }
public float getInterpolation( float input) {
return ( float)(Math.cos((input + 1) * Math.PI) / 2.0f) + 0.5f;
}
}
语句解释:
-  这个加速器的作用前面也已经说了,就是在动画开始的时候加速,在动画结束的时候减速。


  下图是笔者从网上找的一张图,简单的介绍了各个系统内置插值器的特点,但笔者没去验证它的真伪:


  此时你可能还会有疑问,那TypeEvaluator类又是干什么的呢?

-  我们已经知道,通过TimeInterpolator类计算出来的其实是动画已经播放的比率。也就是说,如果是线性插值器的话,当动画播放到第2秒时,比率的值就是0.5-  但是比率毕竟是比率,我们还需要依据这个比率来计算出动画真正的位置。
-  只有知道了的动画的当前位置,我们才能修改translationX的值,这时候就用到TypeEvaluator类了。


  事实上,TypeEvaluator类也有两个现成的子类,比如IntEvaluator类:


1
2
3
4
5
6
7
     
     
public class IntEvaluator implements TypeEvaluator<Integer> {
public Integer evaluate( float fraction, Integer startValue, Integer endValue) {
int startInt = startValue;
return ( int)(startInt + fraction * (endValue - startInt));
}
}
语句解释:
-  在上面的代码中,如果把fraction替换成0.5的话,就可以很容易的计算出结果是什么。
-  大声的告诉我,结果是什么? 是的!就是它!

  TypeEvaluator类的另一个子类FloatEvaluator的代码和IntEvaluator相仿,笔者就不再冗述了。

源码阅读

  上面简单的介绍了动画播放过程,接下来再从源码的角度来看一下。比如现在需要执行如下代码:


1
2
3
     
     
ObjectAnimator moveIn = ObjectAnimator.ofFloat(button, "translationX", - 500, 500);
moveIn.setDuration( 1000);
moveIn.start();
语句解释:
-  注意:View类定义的setTranslationX方法接收的是float类型的参数,所以调用ObjectAnimator.ofInt方法是无效的。


  首先来看看ObjectAnimator类的ofFloat方法里面执行了哪些操作:


1
2
3
4
5
6
7
8
9
10
11
12
13
14
15
16
17
18
19
20
21
22
     
     
public static ObjectAnimator ofFloat(Object target, String propertyName, float... values) {
ObjectAnimator anim = new ObjectAnimator(target, propertyName);
anim.setFloatValues(values);
return anim;
}
public void setFloatValues( float... values) {
if (mValues == null || mValues.length == 0) {
if (mProperty != null) {
setValues(PropertyValuesHolder.ofFloat(mProperty, values));
} else {
// 由于是首次调用,所以会执行这个分支,即创建一个PropertyValuesHolder对象。
setValues(PropertyValuesHolder.ofFloat(mPropertyName, values));
}
} else {
super.setFloatValues(values);
}
}
public void setValues(PropertyValuesHolder... values) {
// 此处省略若干代码...
mValues = values;
// 此处省略若干代码...
}
语句解释:
-  在上面的代码中,只需要记住两个地方即可,因为后面会用到它们:
   -  第一,ObjectAnimator类有一个mValues属性后面会用到。
   -  第二,mValues属性是PropertyValuesHolder[]类型的。


  接着来看看ObjectAnimator类的start方法,它是动画执行时最先调用的方法:


1
2
3
4
5
6
     
     
public void start() {
// 此处省略若干代码...
super.start();
}
语句解释:
-  为了减少篇幅,就不把start方法里的代码贴出来,因为贴出来并没有什么屌用。
-  省略掉的代码做的事情很简单,首先会判断如果正在播放的动画、等待的动画和延迟的动画中有和当前动画相同的动画,那么就把相同的动画给取消掉。
-  最后调用父类的start方法。


  由于ObjectAnimator类继承了ValueAnimator类,所以接着看一下ValueAnimator类的start方法:


1
2
3
4
5
6
7
8
9
10
11
12
13
14
15
16
17
18
19
20
     
     
private void start( boolean playBackwards) {
if (Looper.myLooper() == null) {
throw new AndroidRuntimeException( "Animators may only be run on Looper threads");
}
// 此处省略若干代码...
AnimationHandler animationHandler = getOrCreateAnimationHandler();
animationHandler.mPendingAnimations.add( this);
if (mStartDelay == 0) {
// This sets the initial value of the animation, prior to actually starting it running
if (prevPlayingState != SEEKED) {
setCurrentPlayTime( 0);
}
mPlayingState = STOPPED;
mRunning = true;
notifyStartListeners();
}
animationHandler.start();
}
语句解释:
-  从上面的代码可以看出如下两点:
   -  属性动画需要运行在有Looper的线程中。
   -  动画被放到了一个AnimationHandler对象中,并调用AnimationHandler对象的start方法执行播放操作。


  接着继续跟进AnimationHandler类的start方法:


1
2
3
4
5
6
7
8
9
10
11
12
13
14
15
16
17
18
19
20
21
22
23
24
25
26
27
28
     
     
public void start() {
scheduleAnimation();
}
private void scheduleAnimation() {
if (!mAnimationScheduled) {
mChoreographer.postCallback(Choreographer.CALLBACK_ANIMATION, mAnimate, null);
mAnimationScheduled = true;
}
}
final Runnable mAnimate = new Runnable() {
public void run() {
mAnimationScheduled = false;
doAnimationFrame(mChoreographer.getFrameTime());
}
};
void doAnimationFrame( long frameTime) {
// 此处省略若干代码...
for ( int i = 0; i < numAnims; ++i) {
ValueAnimator anim = mTmpAnimations.get(i);
if (mAnimations.contains(anim) && anim.doAnimationFrame(frameTime)) {
mEndingAnims.add(anim);
}
}
// 此处省略若干代码...
if (!mAnimations.isEmpty() || !mDelayedAnims.isEmpty()) {
scheduleAnimation();
}
}
语句解释:
-  在start方法内部会转调用scheduleAnimation方法,scheduleAnimation方法会将mAnimate安排到Choreographer中。
-  Choreographer内部的代码我们不再继续深入了,因为它最终会回调mAnimate的run方法。
-  从上面的第20行代码可以看出,doAnimationFrame方法中会调用ValueAnimator的doAnimationFrame方法进行绘制。
-  最后,会检测是否还有未绘制的帧,如果有则再次安排下一帧的事件到Choreographer中。


  在ValueAnimatordoAnimationFrame方法中又会依次调用animationFrameanimateValue方法。


1
2
3
4
5
6
7
8
9
10
11
12
13
14
15
16
     
     
void animateValue( float fraction) {
// 调用当前动画的插值器,计算出动画播放的比率fraction。
fraction = mInterpolator.getInterpolation(fraction);
mCurrentFraction = fraction;
int numValues = mValues.length;
for ( int i = 0; i < numValues; ++i) {
// 将播放比率传递过去,计算出动画当前的播放位置。
mValues[i].calculateValue(fraction);
}
if (mUpdateListeners != null) {
int numListeners = mUpdateListeners.size();
for ( int i = 0; i < numListeners; ++i) {
mUpdateListeners.get(i).onAnimationUpdate( this);
}
}
}
语句解释:
-  前面已经说了,mValues是PropertyValuesHolder[]类型的,而calculateValue方法是属于PropertyValuesHolder类的。


  接着查看PropertyValuesHoldercalculateValue方法:


1
2
3
4
     
     
void calculateValue( float fraction) {
Object value = mKeyframes.getValue(fraction);
mAnimatedValue = mConverter == null ? value : mConverter.convert(value);
}
语句解释:
-  前面也已经说了,当调用ObjectAnimator.ofFloat时会创建一个FloatPropertyValuesHolder对象。
-  但是当时没有进一步查看FloatPropertyValuesHolder里的代码。
-  现在回过头去就可以发现mKeyframes初始化代码为:KeyframeSet.ofFloat(values)。


  因此我们接下来要去查看KeyframeSet类的getValue方法:


1
2
3
4
5
6
7
8
     
     
public Object getValue( float fraction) {
// 此处省略若干代码...
return mEvaluator.evaluate(fraction, mFirstKeyframe.getValue(),
mLastKeyframe.getValue());
// 此处省略若干代码...
}
语句解释:
-  从上面的代码片段可以看出,在此方法中会调用动画的TypeEvaluator来计算出动画的实际位置,并将位置返回。


  至此,我们就完成了一开始说的,系统播放动画时所要执行的四步操作中的前三步的源码解读了,还剩最后一步:

-  第四,会通过反射的方式把第三步计算出的播放位置传递给目标方法,执行更新操作。

  但是目前来看,线索好像断了,我们无从追踪了。

  不过不要慌!这里有个坑,那就是ObjectAnimator类重写了animateValue方法,我们来看一下重写后的代码:


1
2
3
4
5
6
7
8
9
10
11
12
     
     
void animateValue( float fraction) {
// 此处省略若干代码...
// 调用父类的方法计算当前动画播放的位置。
super.animateValue(fraction);
int numValues = mValues.length;
for ( int i = 0; i < numValues; ++i) {
// 使用计算出来的播放位置,去绘制。
mValues[i].setAnimatedValue(target);
}
}
语句解释:
-  正如我们看到的那样,在调用父类的animateValue方法计算播放位置之后,它还有后续操作。
-  由于知道了mValues里存放的是FloatPropertyValuesHolder类型的,所以直接去查看它的setAnimatedValue方法即可。


  阅读setAnimatedValue方法的源码:


1
2
3
4
5
6
7
8
9
10
11
12
13
14
15
     
     
void setAnimatedValue(Object target) {
// 此处省略若干代码...
if (mSetter != null) {
try {
mTmpValueArray[ 0] = mFloatAnimatedValue;
mSetter.invoke(target, mTmpValueArray);
} catch (InvocationTargetException e) {
Log.e( "PropertyValuesHolder", e.toString());
} catch (IllegalAccessException e) {
Log.e( "PropertyValuesHolder", e.toString());
}
}
}
语句解释:
-  到这里就算圆满了,我们看到了反射相关的代码了。

动画对象

  通过前面的学习,我们已经可以实现如下两种属性动画了:

-  动画一个int或float值。
-  动画一个对象的某个属性值。

  本节就来介绍一下,如何动画一个对象。


  首先来定义一个Point类,如下所示:


1
2
3
4
5
6
7
8
9
10
11
12
13
14
15
16
17
18
     
     
public class Point {
private float x;
private float y;
public Point( float x, float y) {
this.x = x;
this.y = y;
}
public float getX() {
return x;
}
public float getY() {
return y;
}
}
语句解释:
-  Point类非常简单,只有x和y两个变量用于记录坐标的位置,并提供了构造方法来设置坐标。


  接下来定义PointEvaluator,如下所示:


1
2
3
4
5
6
7
8
9
10
11
     
     
public class PointEvaluator implements TypeEvaluator{
@Override
public Object evaluate( float fraction, Object startValue, Object endValue) {
Point startPoint = (Point) startValue;
Point endPoint = (Point) endValue;
float x = startPoint.getX() + fraction * (endPoint.getX() - startPoint.getX());
float y = startPoint.getY() + fraction * (endPoint.getY() - startPoint.getY());
Point point = new Point(x, y);
return point;
}
}
语句解释:
-  这样我们就将PointEvaluator编写完成了,接下来我们就可以非常轻松地对Point对象进行动画操作了。


  比如说我们有两个Point对象,现在需要将Point1通过动画平滑过度到Point2,就可以这样写:


1
2
3
4
5
     
     
Point point1 = new Point( 0, 0);
Point point2 = new Point( 300, 300);
ValueAnimator anim = ValueAnimator.ofObject(new PointEvaluator(), point1, point2);
anim.setDuration( 5000);
anim.start();
语句解释:
-  ValueAnimator.ofObject专门用来动画一个对象。


  接下来新建一个MyAnimView,在其内部播放动画,代码如下所示:


1
2
3
4
5
6
7
8
9
10
11
12
13
14
15
16
17
18
19
20
21
22
23
24
25
26
27
28
29
30
31
32
33
     
     
public class MyAnimView extends View {
public static final float RADIUS = 50f;
private Point currentPoint;
private Paint mPaint;
public MyAnimView(Context context, AttributeSet attrs) {
super(context, attrs);
mPaint = new Paint(Paint.ANTI_ALIAS_FLAG);
mPaint.setColor(Color.BLUE);
}
protected void onDraw(Canvas canvas) {
if (currentPoint == null) {
startAnimation();
} else {
canvas.drawCircle(currentPoint.getX(), currentPoint.getY(), RADIUS, mPaint);
}
}
private void startAnimation() {
Point startPoint = new Point(RADIUS, RADIUS);
Point endPoint = new Point(getWidth() - RADIUS, getHeight() - RADIUS);
ValueAnimator anim = ValueAnimator.ofObject( new PointEvaluator(), startPoint, endPoint);
anim.addUpdateListener( new ValueAnimator.AnimatorUpdateListener() {
public void onAnimationUpdate(ValueAnimator animation) {
currentPoint = (Point) animation.getAnimatedValue();
invalidate();
}
});
anim.setDuration( 5000);
anim.start();
}
}
语句解释:
-  自定义控件相关的知识在后面章节中会详细介绍。


  然后我们只需要在布局文件当中引入这个自定义控件:
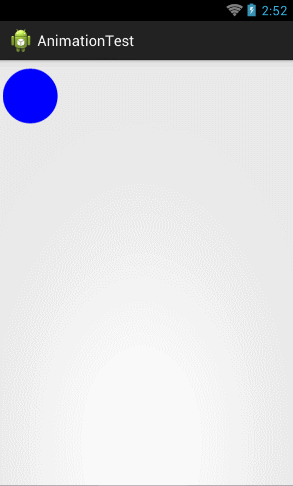
     
     
1
2
3
4
5
6
7
     
     
<RelativeLayout xmlns:android="http://schemas.android.com/apk/res/android"
android:layout_width= "match_parent"
android:layout_height= "match_parent">
<com.example.cutler.androidtest.MyAnimView
android:layout_width= "match_parent"
android:layout_height= "match_parent" />
</RelativeLayout>

  最后运行一下程序,效果如下图所示:


  我们可以再扩展一下,让圆形在移动的同时变色,代码如下:


1
2
3
4
5
6
7
8
9
10
11
12
13
14
15
16
17
18
19
20
21
22
23
24
25
26
27
28
     
     
private void startAnimation() {
// 移动动画
Point startPoint = new Point(RADIUS, RADIUS);
Point endPoint = new Point(getWidth() - RADIUS, getHeight() - RADIUS);
ValueAnimator moveAnim = ValueAnimator.ofObject( new PointEvaluator(), startPoint, endPoint);
moveAnim.addUpdateListener( new ValueAnimator.AnimatorUpdateListener() {
public void onAnimationUpdate(ValueAnimator animation) {
currentPoint = (Point) animation.getAnimatedValue();
invalidate();
}
});
// 颜色变化的动画。 8位数字表示ARGB,每个颜色占2位。
ValueAnimator colorAnim = ValueAnimator.ofInt( 0xFF0000FF, 0xFFFF0000);
colorAnim.setEvaluator( new ArgbEvaluator());
colorAnim.addUpdateListener( new ValueAnimator.AnimatorUpdateListener() {
public void onAnimationUpdate(ValueAnimator animation) {
// 获取动画的当前值,并将它转为16进制的形式。
String color = Integer.toHexString((Integer) animation.getAnimatedValue());
// 设置画笔的颜色。
mPaint.setColor(Color.parseColor( "#" + color));
}
});
// 同时播放这两个动画
AnimatorSet animSet = new AnimatorSet();
animSet.play(colorAnim).with(moveAnim);
animSet.setDuration( 5000);
animSet.start();
}
语句解释:
-  动画的效果是什么,运行代码就知道了。

第四节 NineOldAndroids

  前面说了,属性动画是在Android3.0中推出的,在Android3.0之前没法使用它。
  但是万事总有一线生机,现在有一个名为NineOldAndroids动画库,可以让低于Android3.0(API Level 11)的项目使用上属性动画。它的作者是非常牛逼的JakeWharton,好几个著名的开源库都是他的作品。
  项目的官网为:http://nineoldandroids.com/ ,JakeWhartonGithub主页为:https://github.com/JakeWharton 。

  NineOldAndroids的原理很简单,判断当前设备的API Level版本,如果大于等于11,那么就调用官方的API,否则就调用自己实现动画效果。在API的名称等方面,它与官方的属性动画基本一致(如ObjectAnimatorValueAnimator等),这意味着你只需要修改一下包名就可以在官方和NineOldAndroids之间切换。
  比如说想要将一个值从0平滑过渡到1,时长300毫秒,写法与官方API完全一致:


1
2
3
     
     
ValueAnimator anim = ValueAnimator.ofFloat( 0f, 1f);
anim.setDuration( 300);
anim.start();
语句解释:
-  值得注意的,本范例使用的是com.nineoldandroids.animation.ValueAnimator类。


  遗憾的是,经过笔者测试验证,当NineOldAndroids动画库运行在Android3.0之前(Android3.0及之后会调用系统的API所以不会)的平台时,仍然存在视图动画的缺点(视图的位置不会真正发生改变),Jake Wharton本人也对此做出了回应:


1
2
     
     
Yes, this is a platform limitation.
You need to physically move the view when the animation ends on pre-Honeycomb.

  点击查看详情

  更劲爆的是,作者本人已经将这个项目给DEPRECATED了,下面是他的解释:


1
2
3
4
5
     
     
NineOldAndroids is deprecated. No new development will be taking place.
Existing versions will (of course) continue to function.
New applications should use minSdkVersion= "14" or higher which has access to the platform animation APIs.
Thanks for all your support!


  这是不是说NineOldAndroids动画库就完全没用了? 并不是!笔者提出如下的建议:

-  如果你的项目是基于Android3.0或以上开发的,那么完全不需要使用NineOldAndroids库,直接用系统的API即可。
-  如果基于Android3.0之前的版本:
   -  如果你只是想用属性动画来动画一个非View对象,那么使用NineOldAndroids库完全没问题。
   -  如果你想真正意义的在Android3.0之前的设备上改变View位置、旋转等属性,那么NineOldAndroids库很难做到。


本节参考阅读:


  • 0
    点赞
  • 2
    收藏
    觉得还不错? 一键收藏
  • 0
    评论
Android仿iOS桌面应用删除动画可以使用属性动画实现。以下是一个简单的实现步骤: 1. 创建一个布局文件,用于显示要删除的应用图标。在这个布局中,你可以使用ImageView来显示应用图标,然后添加一个TextView来显示删除提示。 2. 在Java代码中,使用属性动画设置ImageView的透明度和缩放比例。通过逐渐降低透明度和缩放比例,可以创建一个逐渐消失的效果。 3. 在动画结束时,删除应用程序,并在屏幕上显示一个Snackbar或Toast,以显示已删除的应用程序名称。 下面是一个示例代码,可以让你更好地了解如何实现这个功能: ```java public class DeleteAnimationActivity extends AppCompatActivity { private ImageView mAppIcon; private TextView mDeleteHint; @Override protected void onCreate(Bundle savedInstanceState) { super.onCreate(savedInstanceState); setContentView(R.layout.activity_delete_animation); mAppIcon = findViewById(R.id.iv_app_icon); mDeleteHint = findViewById(R.id.tv_delete_hint); // 设置属性动画 ObjectAnimator alphaAnimator = ObjectAnimator.ofFloat(mAppIcon, "alpha", 1f, 0f); ObjectAnimator scaleXAnimator = ObjectAnimator.ofFloat(mAppIcon, "scaleX", 1f, 0f); ObjectAnimator scaleYAnimator = ObjectAnimator.ofFloat(mAppIcon, "scaleY", 1f, 0f); // 设置动画集合 AnimatorSet animatorSet = new AnimatorSet(); animatorSet.playTogether(alphaAnimator, scaleXAnimator, scaleYAnimator); animatorSet.setDuration(500); // 监听动画结束事件 animatorSet.addListener(new AnimatorListenerAdapter() { @Override public void onAnimationEnd(Animator animation) { // 删除应用程序 deleteApp(); // 显示Snackbar或Toast Snackbar.make(mAppIcon, "已删除应用程序", Snackbar.LENGTH_LONG).show(); } }); // 启动动画 animatorSet.start(); } private void deleteApp() { // 删除应用程序的代码 } } ``` 在上面的代码中,我们使用 ObjectAnimator 来设置透明度和缩放比例的动画,然后使用 AnimatorSet 将它们组合在一起。在动画结束时,我们删除应用程序并显示一个Snackbar或Toast。 如果你想要更加复杂的删除动画效果,可以尝试使用 PathInterpolator 或自定义 Interpolator 来控制动画的速度和加速度。

“相关推荐”对你有帮助么?

  • 非常没帮助
  • 没帮助
  • 一般
  • 有帮助
  • 非常有帮助
提交
评论
添加红包

请填写红包祝福语或标题

红包个数最小为10个

红包金额最低5元

当前余额3.43前往充值 >
需支付:10.00
成就一亿技术人!
领取后你会自动成为博主和红包主的粉丝 规则
hope_wisdom
发出的红包
实付
使用余额支付
点击重新获取
扫码支付
钱包余额 0

抵扣说明:

1.余额是钱包充值的虚拟货币,按照1:1的比例进行支付金额的抵扣。
2.余额无法直接购买下载,可以购买VIP、付费专栏及课程。

余额充值