


概述:
项目地址:https://github.com/nostra13/Android-Universal-Image-Loader
UIL(Universal-Image-Loader)异步图像加载、缓存和显示.这个图片异步加载并缓存的类已经被很多开发者所使用,是最常用的几个开源库之一,主流的应用,随便反编译几个火的项目,都可以见到它的身影。
同类类库(Picasso),尽管Picasso拥有更好的API,但其缺乏自定义。而使用UIL构建器几乎可以配置所有(其中最重要的就是在抓取和缓存大型图片时,Picasso会失败)。
特点:
- 多线程加载图像Multithread image loading (async or sync)
- 宽泛的自定义配置Wide customization of ImageLoader's configuration (thread executors, downloader, decoder, memory and disk cache, display image options, etc.)
- Many customization options for every display image call (stub images, caching switch, decoding options, Bitmap processing and displaying, etc.)
- 图像缓存Image caching in memory and/or on disk (device's file system or SD card)
- 加载过程监听Listening loading process (including downloading progress)
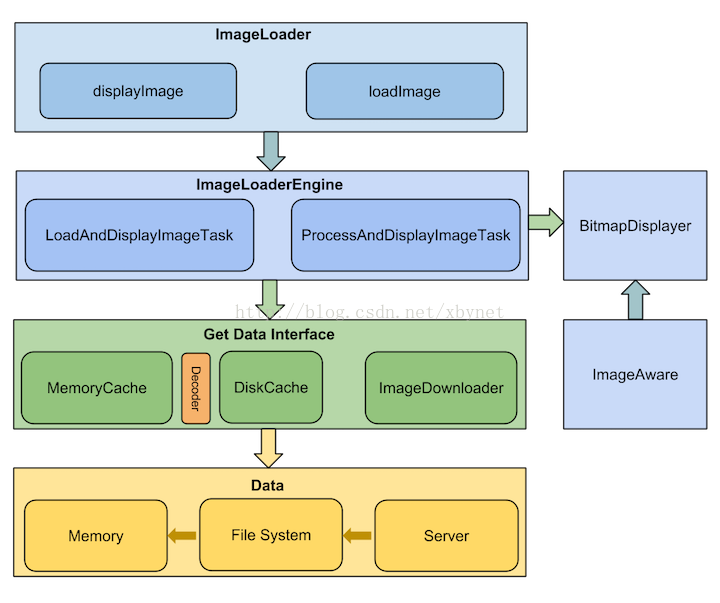
简单描述一下这个项目的结构:每一个图片的加载和显示任务都运行在独立的线程中,除非这个图片缓存在内存中,这种情况下图片会立即显示。如果需要的图片缓存在本地,他们会开启一个独立的线程队列。如果在缓存中没有正确的图片,任务线程会从线程池中获取,因此,快速显示缓存图片时不会有明显的障碍。


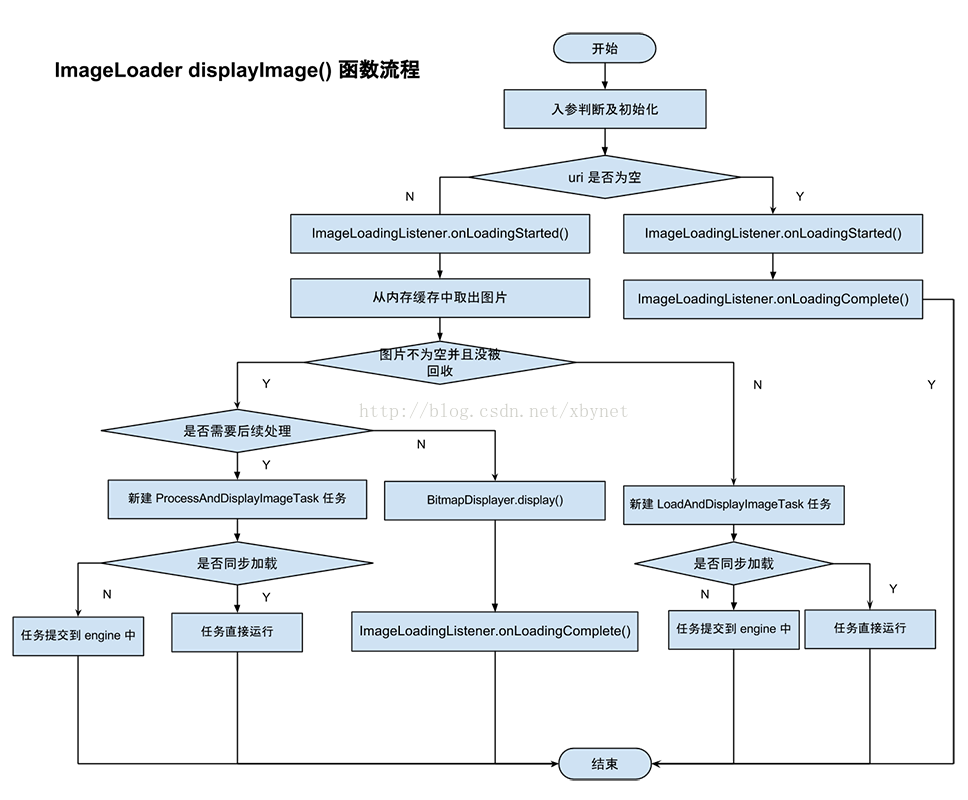
由于源码中不管是loadImageSync还是loadImage最后都会通过displayImage来加载。那我们看看其流程:
准备工作
安装:
maven:
<dependency>
    <groupId>com.nostra13.universalimageloader</groupId>
    <artifactId>universal-image-loader</artifactId>
    <version>1.9.3</version>
</dependency>compile 'com.nostra13.universalimageloader:universal-image-loader:1.9.3'添加网络和SD卡权限:
由于是使用过程中会图片获取要通过网络,并且有缓存设置,所以这2个权限必须要有。
<uses-permission android:name="android.permission.INTERNET" />
    <!-- Include following permission if you want to cache images on SD card -->
    <uses-permission android:name="android.permission.WRITE_EXTERNAL_STORAGE" />
预配置Application or Activity class (before the first usage of ImageLoader)
// Create global configuration and initialize ImageLoader with this config
        ImageLoaderConfiguration config = new ImageLoaderConfiguration.Builder(this)
            ...
            .build();
        ImageLoader.getInstance().init(config);
Acceptable URIs examples
"http://site.com/image.png" // from Web
"file:///mnt/sdcard/image.png" // from SD card
"file:///mnt/sdcard/video.mp4" // from SD card (video thumbnail)
"content://media/external/images/media/13" // from content provider
"content://media/external/video/media/13" // from content provider (video thumbnail)
"assets://image.png" // from assets
"drawable://" + R.drawable.img // from drawables (non-9patch images)示例
imageLoader.displayImage(imageUri, imageView);
imageLoader.loadImage(imageUri, new SimpleImageLoadingListener() {
    @Override
    public void onLoadingComplete(String imageUri, View view, Bitmap loadedImage) {
        // Do whatever you want with Bitmap
    }
});
// Load image, decode it to Bitmap and return Bitmap synchronously
Bitmap bmp = imageLoader.loadImageSync(imageUri);
// Load image, decode it to Bitmap and return Bitmap to callback
ImageSize targetSize = new ImageSize(80, 50); // result Bitmap will be fit to this size
imageLoader.loadImage(imageUri, targetSize, options, new SimpleImageLoadingListener() {
    @Override
    public void onLoadingComplete(String imageUri, View view, Bitmap loadedImage) {
        // Do whatever you want with Bitmap
    }
});
// Load image, decode it to Bitmap and return Bitmap synchronously
ImageSize targetSize = new ImageSize(80, 50); // result Bitmap will be fit to this size
Bitmap bmp = imageLoader.loadImageSync(imageUri, targetSize, options);配置
// DON'T COPY THIS CODE TO YOUR PROJECT! This is just example of ALL options using.
// See the sample project how to use ImageLoader correctly.
File cacheDir = StorageUtils.getCacheDirectory(context);
ImageLoaderConfiguration config = new ImageLoaderConfiguration.Builder(context)
        .memoryCacheExtraOptions(480, 800) // default = device screen dimensions 推荐
        .diskCacheExtraOptions(480, 800, null) //.推荐diskCacheExtraOptions(480, 800, null)
        .taskExecutor(...)
        .taskExecutorForCachedImages(...)
        .threadPoolSize(3) // default 推荐1-5
        .threadPriority(Thread.NORM_PRIORITY - 2) // default
        .tasksProcessingOrder(QueueProcessingType.FIFO) // default
        .denyCacheImageMultipleSizesInMemory()  //设置内存缓存不允许缓存一张图片的多个尺寸,默认允许。
        .memoryCache(new LruMemoryCache(2 * 1024 * 1024)) //使用强引用的缓存使用它,不过推荐使用weak与strong引用结合的UsingFreqLimitedMemoryCache或者使用全弱引用的WeakMemoryCache
        .memoryCacheSize(2 * 1024 * 1024)
        .memoryCacheSizePercentage(13) // default
        .diskCache(new UnlimitedDiscCache(cacheDir)) // default
        .diskCacheSize(50 * 1024 * 1024)
        .diskCacheFileCount(100)
        .diskCacheFileNameGenerator(new HashCodeFileNameGenerator()) // default
        .imageDownloader(new BaseImageDownloader(context)) // default
        .imageDecoder(new BaseImageDecoder()) // default
        .defaultDisplayImageOptions(DisplayImageOptions.createSimple()) // default
        .writeDebugLogs()
        .build();
示例配置缓存目录
File cacheDir = StorageUtils.getOwnCacheDirectory(getApplicationContext(), "imageloader/Cache"); .diskCache(new UnlimitedDiscCache(cacheDir))//自定义缓存路径 配置Display Options
// DON'T COPY THIS CODE TO YOUR PROJECT! This is just example of ALL options using.
// See the sample project how to use ImageLoader correctly.
DisplayImageOptions options = new DisplayImageOptions.Builder()
        .showImageOnLoading(R.drawable.ic_stub) // resource or drawable
        .showImageForEmptyUri(R.drawable.ic_empty) // resource or drawable
        .showImageOnFail(R.drawable.ic_error) // resource or drawable
        .resetViewBeforeLoading(false)  // default
        .delayBeforeLoading(1000)
        .cacheInMemory(false) // default
        .cacheOnDisk(false) // default
        .preProcessor(...)
        .postProcessor(...)
        .extraForDownloader(...)
        .considerExifParams(false) // default
        .imageScaleType(ImageScaleType.IN_SAMPLE_POWER_OF_2) // default 推荐.imageScaleType(ImageScaleType.EXACTLY) 节省内存
        .bitmapConfig(Bitmap.Config.ARGB_8888) // default 推荐.bitmapConfig(Bitmap.Config.RGB_565)节省内存
        .decodingOptions(...)
        .displayer(new SimpleBitmapDisplayer()) // default
<span style="white-space:pre">		</span>/*推荐使用RoundedBitmapDisplayer (Displays bitmap with rounded corners)和
<span style="white-space:pre">		</span>*FadeInBitmapDisplayer (Displays image with "fade in" animation
<span style="white-space:pre">		</span>*但是使用RoundedBitmapDisplayer有些必要的注意事项,看后面提示。
<span style="white-space:pre">		</span>*/
        .handler(new Handler()) // default
        .build();
1).imageScaleType(ImageScaleType imageScaleType) 是设置 图片的缩放方式
缩放类型mageScaleType:
EXACTLY :图像将完全按比例缩小的目标大小
EXACTLY_STRETCHED:图片会缩放到目标大小完全
IN_SAMPLE_INT:图像将被二次采样的整数倍
IN_SAMPLE_POWER_OF_2:图片将降低2倍,直到下一减少步骤,使图像更小的目标大小
NONE:图片不会调整
2).displayer(BitmapDisplayer displayer) 是设置 图片的显示方式
显示方式displayer:
RoundedBitmapDisplayer(int roundPixels) 设置圆角图片。
但是使用这个RoundedBitmapDisplayer必须注意几点:
- This implementation works only with ImageViews wrapped in ImageViewAware否则会出现异常ImageAware should wrap ImageView. ImageViewAware is expected.出现这种异常只能注释掉设置代码。
- If this implementation doesn't meet your needs then consider RoundedImageView or CircularImageView projects for usage.
FakeBitmapDisplayer()这个类什么都没做
FadeInBitmapDisplayer(int durationMillis)设置图片渐显的时间
SimpleBitmapDisplayer()正常显示一张图片
FadeInBitmapDisplayer(int durationMillis)设置图片渐显的时间
SimpleBitmapDisplayer()正常显示一张图片
注意的问题
1、缓存默认情况下是没有启用的。可以通过配置DisplayImageOptions来启用。
// Create default options which will be used for every
//  displayImage(...) call if no options will be passed to this method
DisplayImageOptions defaultOptions = new DisplayImageOptions.Builder()
        ...
        .cacheInMemory(true)
        .cacheOnDisk(true)<pre name="code" class="java">boolean pauseOnScroll = false; // or true
boolean pauseOnFling = true; // or false
PauseOnScrollListener listener = new PauseOnScrollListener(imageLoader, pauseOnScroll, pauseOnFling);
listView.setOnScrollListener(listener);
... .build();ImageLoaderConfiguration config = new ImageLoaderConfiguration.Builder(getApplicationContext()) ... .defaultDisplayImageOptions(defaultOptions) ... .build();ImageLoader.getInstance().init(config); // Do it on Application start
// Then later, when you want to display image
ImageLoader.getInstance().displayImage(imageUrl, imageView); // Default options will be usedDisplayImageOptions options = new DisplayImageOptions.Builder()
...
.cacheInMemory(true)
.cacheOnDisk(true)
...
.build();
ImageLoader.getInstance().displayImage(imageUrl, imageView, options); // Incoming options will be usedboolean pauseOnScroll = false; // or true
boolean pauseOnFling = true; // or false
PauseOnScrollListener listener = new PauseOnScrollListener(imageLoader, pauseOnScroll, pauseOnFling);
listView.setOnScrollListener(listener);几点注意事项
1.
上述提到的2个权限必须加入,否则会出错
2 .ImageLoaderConfiguration必须配置并且全局化的初始化这个配置ImageLoader.getInstance().init(config); 否则也会出现错误提示
3.ImageLoader是根据ImageView的height,width确定图片的宽高。
4.如果经常出现OOM(别人那边看到的,觉得很有提的必要)
①减少配置之中线程池的大小,(.threadPoolSize).推荐1-5;
②使用.bitmapConfig(Bitmap.config.RGB_565)代替ARGB_8888;
③使用.imageScaleType(ImageScaleType.IN_SAMPLE_INT)或者 try.imageScaleType(ImageScaleType.EXACTLY);
④避免使用RoundedBitmapDisplayer.他会创建新的ARGB_8888格式的Bitmap对象;
⑤使用.memoryCache(new WeakMemoryCache()),不要使用.cacheInMemory();
延伸阅读-如何绘制圆角图片或者组件
1、可以参考:
http://www.curious-creature.com/2012/12/11/android-recipe-1-image-with-rounded-corners/中的方法绘制图片圆角:
To generate the rounded images I simply wrote a custom Drawable that draws a rounded rectangle using Canvas.drawRoundRect(). The trick is to use a Paint with a BitmapShader to fill the rounded rectangle with a texture instead of a simple color. Here is what the code looks like:

BitmapShader shader;
shader = new BitmapShader(bitmap, Shader.TileMode.CLAMP, Shader.TileMode.CLAMP);

Paint paint = new Paint();
paint.setAntiAlias(true);
paint.setShader(shader);

RectF rect = new RectF(0.0f, 0.0f, width, height);

// rect contains the bounds of the shape
// radius is the radius in pixels of the rounded corners
// paint contains the shader that will texture the shape
canvas.drawRoundRect(rect, radius, radius, paint);
3、使用UIL并继承ImageViewAware实现图片圆角ImageView
4、使用图片圆角开源库:https://github.com/vinc3m1/RoundedImageView;或者https://github.com/Pkmmte/CircularImageView
参考:
https://github.com/nostra13/Android-Universal-Image-Loader/wiki
http://blog.csdn.net/vipzjyno1/article/details/23206387
http://blog.csdn.net/kaiqiangzhang001/article/details/41721349
RoundedBitmapDisplayer类的APIDoc


 1860
1860


 被折叠的 条评论
为什么被折叠?
被折叠的 条评论
为什么被折叠?
 到【灌水乐园】发言


