


高效的加载高分辨率的图片
- 加载图片尺寸和类型
针对不同的图片数据来源,BitmapFactory提供了不同的解码方法(decodeResource()、decodeFile()…),这些方法在构造图片的时候会申请相应的内存空间,所以它们经常抛出内存溢出的异常。这些方法都允许传入一个BitmapFactory.Options类型的参数来获取将要构建的图片的属性。如果将inJustDecodeBounds的值设置成true,这些方法将不会真正的创建图片,也就不会占用内存,它们的返回值将会是空。但是它们会读取图片资源的属性,我们就可以从BitmapFactory.Options中获取到图片的尺寸和类型。
BitmapFactory.Options options = new BitmapFactory.Options();
 options.inJustDecodeBounds = true;
 BitmapFactory.decodeResource(getResources(), R.id.myimage, options);
 int imageHeight = options.outHeight;
 int imageWidth = options.outWidth;
 String imageType = options.outMimeType;
加载缩小比例的图片到内存中
现在图片的尺寸已经获取了,接下来就是判断是将图片全尺寸加载到内存还是加载一个缩小版。判断的标准有以下几条:- 全尺寸的图片需要占用多大内存空间;
- 这里写代码片应用能够提供给这张图片的内存空间的大小;
- 展示这张图片的imageview或其他UI组件的大小;
- 设备的屏幕大小和密度。
inSampleSize的值是根据缩放比例计算出来的一个2的n次幂的数。
public static int calculateInSampleSize(BitmapFactory.Options options, int reqWidth, int reqHeight) {
     // Raw height and width of image
     final int height = options.outHeight;
     final int width = options.outWidth;
     int inSampleSize = 1;

     if (height > reqHeight || width > reqWidth) {
         final int halfHeight = height / 2;
         final int halfWidth = width / 2;
         // Calculate the largest inSampleSize value that is a power of 2 and keeps both
         // height and width larger than the requested height and width.
         while ((halfHeight / inSampleSize) >= reqHeight&& (halfWidth / inSampleSize) >= reqWidth) {
             inSampleSize *= 2;
         }
     }

     return inSampleSize;
 }
加载缩小比例图片大致有三个步骤:inJustDecodeBounds设置为true获取原始图片尺寸 –> 根据使用场景计算缩放比例inSampleSize –> inJustDecodeBounds设置为false,传递inSampleSize给解码器创建缩小比例的图片。示例代码如下
public static Bitmap decodeSampledBitmapFromResource(Resources res, int resId,int reqWidth, int reqHeight) {
     // First decode with inJustDecodeBounds=true to check dimensions
     final BitmapFactory.Options options = new BitmapFactory.Options();
     options.inJustDecodeBounds = true;
     BitmapFactory.decodeResource(res, resId, options);

     // Calculate inSampleSize
     options.inSampleSize = calculateInSampleSize(options, reqWidth, reqHeight);

     // Decode bitmap with inSampleSize set
     options.inJustDecodeBounds = false;
     return BitmapFactory.decodeResource(res, resId, options);
 }
Android中高效的显示图片 - 非UI线程加载
使用AsyncTask加载图片
class BitmapWorkerTask extends AsyncTask<Integer, Void, Bitmap> {
    private final WeakReference<ImageView> imageViewReference;
    private int data = 0;

    public BitmapWorkerTask(ImageView imageView) {
        // Use a WeakReference to ensure the ImageView can be garbage collected
        imageViewReference = new WeakReference<ImageView>(imageView);
    }

    // Decode image in background.
    @Override
    protected Bitmap doInBackground(Integer... params) {
        data = params[0];
        return decodeSampledBitmapFromResource(getResources(), data, 100, 100));
    }

    // Once complete, see if ImageView is still around and set bitmap.
    @Override
    protected void onPostExecute(Bitmap bitmap) {
        if (imageViewReference != null && bitmap != null) {
            final ImageView imageView = imageViewReference.get();
            if (imageView != null) {
                imageView.setImageBitmap(bitmap);
            }
        }
    }
}
这里ImageView使用WeakReference弱引用是为了确保AsyncTask不会阻碍垃圾回收器回收应该被释放的ImageView。例如,在任务完成之前用户退出了这个Activity,那么这个ImageView是应该被释放的。由于异步的关系我们无法保证任务执行完成后ImageView仍然存在,所以需要在onPostExecute方法里检查ImageView的引用。
- 并发
例如ListView、GridView这类视图组件结合上面的AsyncTask又会引入另一个问题。为了高效的使用内存,这类组件在滑动的时候会复用子view,如果一个view触发一个AsyncTask,那我们无法保证任务执行完成后view没有被复用。如果view被复用从而触发两次AsyncTask,我们也无法保证异步任务的执行顺序,很有可能先触发的任务后执行完成,这就会导致结果错误。
这里提供的解决方案是在ImageView中绑定最后触发的AsyncTask的引用,当任务执行完成后返回结果时再比较返回结果的任务是不是ImageView绑定的任务,这样就可以保证Imageview显示的结果就是它最后触发的AsyncTask的结果。
ImageView是系统的一个类,他并没有给我们预设一个属性让我们来记录AsyncTask,那么我们如何才能将AsyncTask绑定到ImageView中去呢?当然可以继承ImageView来自定义一个包含AsyncTask字段的AsyncImageView,但是这样可能会影响到布局文件。这里使用了另外一种实现方式。大家都知道ImageView有一个setImageDrawable(BitmapDrawable b)的方法,这就说明ImageView可以保存一个BitmapDrawable变量,如果我们能将AsyncTask放到BitmapDrawable,那么实际上AsyncTask也就放到ImageView里了。所以我们只需要继承BitmapDrawable实现一个AsyncDrawable,把这个AsyncDrawable设置给ImageView就可以了。
static class AsyncDrawable extends BitmapDrawable {
    private final WeakReference<BitmapWorkerTask> bitmapWorkerTaskReference;

    public AsyncDrawable(Resources res, Bitmap bitmap, BitmapWorkerTask bitmapWorkerTask) {
        super(res, bitmap);
        bitmapWorkerTaskReference = new WeakReference<BitmapWorkerTask>(bitmapWorkerTask);
    }

    public BitmapWorkerTask getBitmapWorkerTask() {
        return bitmapWorkerTaskReference.get();
    }
}
执行BitmapWorkerTask之前先创建一个AsyncDrawable,然后绑定到目标ImageView中。
public void loadBitmap(int resId, ImageView imageView) {
    if (cancelPotentialWork(resId, imageView)) {
        final BitmapWorkerTask task = new BitmapWorkerTask(imageView);
        final AsyncDrawable asyncDrawable =new AsyncDrawable(getResources(), mPlaceHolderBitmap, task);
        imageView.setImageDrawable(asyncDrawable);
        task.execute(resId);
    }
}
上面代码中用到的cancelPotentialWork方法是用来检查在当前的ImageView上是不是有正在运行的异步任务,如果有且上一个任务与当前请求的任务是同一个任务就直接返回false避免重复请求,如果有且任务不一样就取消上一个任务。
public static boolean cancelPotentialWork(int data, ImageView imageView) {
    final BitmapWorkerTask bitmapWorkerTask = getBitmapWorkerTask(imageView);

    if (bitmapWorkerTask != null) {
        final int bitmapData = bitmapWorkerTask.data;
        // If bitmapData is not yet set or it differs from the new data
        if (bitmapData == 0 || bitmapData != data) {
            // Cancel previous task
            bitmapWorkerTask.cancel(true);
        } else {
            // The same work is already in progress
            return false;
        }
    }

    // No task associated with the ImageView, or an existing task was cancelled
    return true;
}
getBitmapWorkerTask是从ImageView里获取绑定的AsyncTask的方法。
private static BitmapWorkerTask getBitmapWorkerTask(ImageView imageView) {
    if (imageView != null) {
        final Drawable drawable = imageView.getDrawable();
        if (drawable instanceof AsyncDrawable) {
            final AsyncDrawable asyncDrawable = (AsyncDrawable) drawable;
            return asyncDrawable.getBitmapWorkerTask();
        }
    }
    return null;
}
最后一步更新一下BitmapWorkerTask的onPostExecute()方法,检查任务是否已经取消,是否是ImageView当前绑定的任务。
class BitmapWorkerTask extends AsyncTask<Integer, Void, Bitmap> {
...

    @Override
    protected void onPostExecute(Bitmap bitmap) {
        if (isCancelled()) {
              bitmap = null;
        }

        if (imageViewReference != null && bitmap != null) {
            final ImageView imageView = imageViewReference.get();
            final BitmapWorkerTask bitmapWorkerTask =getBitmapWorkerTask(imageView);
            if (this == bitmapWorkerTask && imageView != null) {
                imageView.setImageBitmap(bitmap);
            }
        }
    }
}
现在BitmapWorkerTask可用在ListView、GradView或者别的复用子view的组件上完美运行了。只需要在你想要给ImageView设置图片的地方调用loadBitmap即可。例如,在GridView的适配器的getView方法里调用loadBitmap给子view设置图片内容。
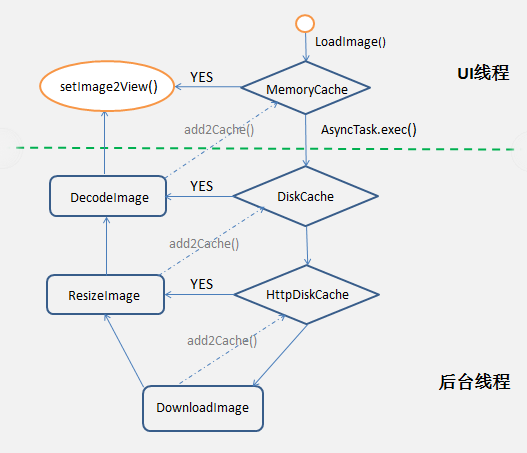
Android中高效的显示图片 - 图片缓存
面对同时加载多张图片的情况又会有新的问题。例如使用ListView、GridView或者ViewPager这类组件展示图片,快速滑动的特性决定了它们在屏幕上展示的图片的数量是无限制的。
这类组件通过复用滑动到屏幕区域以外的子view来减少内存消耗。如果我们没有用持久的引用保存已经加载的图片,那么垃圾回收器也会释放掉那些不在屏幕上显示的图片所占用的内存空间。这些特性是很好的,会减少内存的使用,但是为了快速流畅的展示UI界面,我们又避免每次显示图片时都重新加载图片。在这种场景下我们就需要使用到内存缓存和存储器缓存。
内存缓存(Memory Cache)
内存缓存使我们可以快速的获取图片,但是它也消耗了我们宝贵的内存资源。内存缓存特别适合用来做类似缓存图片的工作,它会将最近使用到的对象保存到一个LinkedHashMap中,并且在缓存的数据大小即将超过设置的上限时释放掉那些不常使用的对象。
过去我们常常使用SoftReference或者WeakReference来实现图片缓存,现在不再推荐这种这方式了。从Android 2.3 (API Level 9)开始器垃圾回收器回收软/弱引用概率提高了,那么使用这种方式实现的图片缓存工具的效率就会变低。
为了给LruCache分配一个合理缓存内存空间,我们需要考虑以下一些因素。
- 应用还剩多少可用空间?
- 需要同时显示多少张图片?需要为显示准备多少张图片?
- 设备屏幕尺寸和密度。如显示相同数量的图片Galaxy - - Nexus(xhdpi)就比Nexus S(hdpi)需要更多的内存空间。
- 图片本身的尺寸和属性。
- 图片使用的频率,有的会频繁使用,有只是偶尔使用。你也许应该直接将频繁使用的图片保存起来或者使用多个LruCache来分组管理这些图片。
- 平衡缓存图片的质量和数量。有时我们可以缓存很多低质量的图片,当图片被使用到时再用后台任务去加载一个高质量的图片。
如果缓存空间太小,就会频繁释放/加载图片,导致缓存效率较低;如果太大又会有内存溢出的风险,从而降低应用其他功能的执行效率。不幸的是没有一个适用于所有应用的确切值或者公式,我们只能根据具体使用场景来分析出一个合适的方案。
这里有一个图片缓存的例子可供参考。
private LruCache<String, Bitmap> mMemoryCache;

@Overrideprotected void onCreate(Bundle savedInstanceState) {
...
    // Get max available VM memory, exceeding this amount will throw anOutOfMemory exception.
    // Stored in kilobytes as LruCache takes anint in its constructor.
    final int maxMemory = (int) (Runtime.getRuntime().maxMemory() / 1024);

    // Use 1/8th of the available memory for this memory cache.
    final int cacheSize = maxMemory / 8;
    mMemoryCache = new LruCache<String, Bitmap>(cacheSize) {
        @Override
        protected int sizeOf(String key, Bitmap bitmap) {
            // The cache size will be measured in kilobytes rather than number of items.
            return bitmap.getByteCount() / 1024;
        }
    };
...
}

public void addBitmapToMemoryCache(String key, Bitmap bitmap) {
    if (getBitmapFromMemCache(key) == null) {
        mMemoryCache.put(key, bitmap);
    }
}

public Bitmap getBitmapFromMemCache(String key) {
    return mMemoryCache.get(key);
}
上面在内存分配最小的hdpi设备上缓存空间大约会有4M(32M/8)。在分辨率为800*480的设备上一张全屏的图片所占用的空间大概是1.5M(800x480x4),所以上面的例子在内存分配最小的hdpi设备上可以缓存约2.5屏的数据。
现在当我们要设置一个图片到ImageView中时,我们要先查看LruCache中是否已经缓存我们需要的图片。如果有,就直接设置给ImageView;如果没有,就启动一个后台任务去加载图片。
public void loadBitmap(int resId, ImageView imageView) {
    final String imageKey = String.valueOf(resId);

    final Bitmap bitmap = getBitmapFromMemCache(imageKey);
    if (bitmap != null) {
        mImageView.setImageBitmap(bitmap);
    } else {
        mImageView.setImageResource(R.drawable.image_placeholder);
        BitmapWorkerTask task = new BitmapWorkerTask(mImageView);
        task.execute(resId);
    }
}
实现的这个后台任务类BitmapWorkerTask也需要更改为:
class BitmapWorkerTask extends AsyncTask<Integer, Void, Bitmap> {
...
    // Decode image in background.
    @Override
    protected Bitmap doInBackground(Integer... params) {
       final Bitmap bitmap = decodeSampledBitmapFromResource(getResources(), params[0], 100, 100));
       addBitmapToMemoryCache(String.valueOf(params[0]), bitmap);
       return bitmap;
    }
...
}
存储器缓存(Disk Cache)
内存缓存对提升再次访问最近使用图片的速度是有帮助的,但是它还有一些不足之处。如GridView这类组件显示大量图片时,这些图片会很快用光缓存空间。缓存空间满了之后再加入缓存图片时,LruCache就会释放掉一些老的缓存图片,当我们再次使用到这些老的图片时就有需要重新加载了。还有当我们的应用被电话之类的应用中断退到后台时有可能会被系统销毁来回收内存,这时再次进入应用时,所有的缓存数据都需要重新加载了。
这种场景就需要使用到我们的存储器缓存了。存储器缓存可以持久化这些加载后的图片,缩短当内存缓存中的数据不再可用时再次加载图片的时间。当然,从存储器中加载图片会比从内存中加载慢。因为读取存储器的时间是不可预测的,所以应该使用后台线程来加载。
备注:如果应用会频繁的使用这些图片(如相册),那么使用ContentProvider存储这些图片是一个更好的选择。
如果说图片原本就存储在存储器上了,存储器缓存仍有存在的意义,因为加载本地图片时很有可能会对图片进行裁剪或者压缩操作,调整成更适合当前场景显示的图片,存储器缓存就可以将这些调整后的图片缓存起来,以便后续使用。private DiskLruCache mDiskLruCache;
private final Object mDiskCacheLock = new Object();
private boolean mDiskCacheStarting = true;
private static final int DISK_CACHE_SIZE = 1024 * 1024 * 10; // 10MB
private static final String DISK_CACHE_SUBDIR = "thumbnails";
@Override
protected void onCreate(Bundle savedInstanceState) {
...
// Initialize memory cache
...
// Initialize disk cache on background thread
File cacheDir = getDiskCacheDir(this, DISK_CACHE_SUBDIR);
new InitDiskCacheTask().execute(cacheDir);
...
}
class InitDiskCacheTask extends AsyncTask<File, Void, Void> {
@Override
protected Void doInBackground(File... params) {
synchronized (mDiskCacheLock) {
File cacheDir = params[0];
mDiskLruCache = DiskLruCache.open(cacheDir, DISK_CACHE_SIZE);
mDiskCacheStarting = false; // Finished initialization
mDiskCacheLock.notifyAll(); // Wake any waiting threads
}
return null;
}
}
class BitmapWorkerTask extends AsyncTask<Integer, Void, Bitmap> {
...
// Decode image in background.
@Override
protected Bitmap doInBackground(Integer... params) {
final String imageKey = String.valueOf(params[0]);
// Check disk cache in background thread
Bitmap bitmap = getBitmapFromDiskCache(imageKey);
if (bitmap == null) { // Not found in disk cache
// Process as normal
final Bitmap bitmap = decodeSampledBitmapFromResource(getResources(), params[0], 100, 100));
}
// Add final bitmap to caches
addBitmapToCache(imageKey, bitmap);
return bitmap;
}
...
}
public void addBitmapToCache(String key, Bitmap bitmap) {
// Add to memory cache as before
if (getBitmapFromMemCache(key) == null) {
mMemoryCache.put(key, bitmap);
}
// Also add to disk cache
synchronized (mDiskCacheLock) {
if (mDiskLruCache != null && mDiskLruCache.get(key) == null) {
mDiskLruCache.put(key, bitmap);
}
}
}
public Bitmap getBitmapFromDiskCache(String key) {
synchronized (mDiskCacheLock) {
// Wait while disk cache is started from background thread
while (mDiskCacheStarting) {
try {
mDiskCacheLock.wait();
} catch (InterruptedException e) {}
}
if (mDiskLruCache != null) {
return mDiskLruCache.get(key);
}
}
return null;
}
// Creates a unique subdirectory of the designated app cache directory. Tries to use external
// but if not mounted, falls back on internal storage.
public static File getDiskCacheDir(Context context, String uniqueName) {
// Check if media is mounted or storage is built-in, if so, try and use external cache dir
// otherwise use internal cache dir
final String cachePath = Environment.MEDIA_MOUNTED.equals(Environment.getExternalStorageState()) ||!isExternalStorageRemovable() ? getExternalCacheDir(context).getPath() : context.getCacheDir().getPath();
return new File(cachePath + File.separator + uniqueName);
}备注:存储器缓存的初始化也会有读写存储器的操作,所以上面的实现将存储器缓存的初始化工作放到了非UI线程中。这就是会有线程同步的问题,所以我们使用了锁来保证在DiskLruCache初始化完成后才可访问。
因为存储器操作不应该在UI线程中执行,所以从内存缓存中获取数据可以在UI线程执行,但从存储器缓存中获取数据要在后台线程中执行。图片加载完成后需要同时缓存到内存缓存和存储器缓存,以便后续使用。
Configuration改变时缓存图片的处理方法
应用运行时Configuration改变(如屏幕方向改变)会导致Activity销毁重启。为了提供更顺畅的用户体验,这种情况下我们需要避免再次加载我们已经加载过的图片。
如果我们使用了内存缓存保存了我们的图片,那么在Configuration改变时我们可以通过Fragment将内存缓存数据传递到新Activity中。通过调用Fragment的setRetainInstance(true)来保存起来,在新的Activity重建以后这个保留起来的Fragment实例会重新关联到Activity上,然后就可以从Fragment中获取我们之前缓存的图片了.
private LruCache<String, Bitmap> mMemoryCache;

@Override
protected void onCreate(Bundle savedInstanceState) {
...
    RetainFragment retainFragment =RetainFragment.findOrCreateRetainFragment(getFragmentManager());
    mMemoryCache = retainFragment.mRetainedCache;
    if (mMemoryCache == null) {
        mMemoryCache = new LruCache<String, Bitmap>(cacheSize) {
        ...
          // Initialize cache here as usual
        }
        retainFragment.mRetainedCache = mMemoryCache;
    }
...
}

class RetainFragment extends Fragment {
    private static final String TAG = "RetainFragment";
    public LruCache<String, Bitmap> mRetainedCache;

    public RetainFragment() {}

    public static RetainFragment findOrCreateRetainFragment(FragmentManager fm) {
        RetainFragment fragment = (RetainFragment) fm.findFragmentByTag(TAG);
        if (fragment == null) {
            fragment = new RetainFragment();
            fm.beginTransaction().add(fragment, TAG).commit();
        }
        return fragment;
    }

    @Override
    public void onCreate(Bundle savedInstanceState) {
        super.onCreate(savedInstanceState);
        setRetainInstance(true);
    }
}
你可以setRetainInstance设置成true和false,然后旋转屏幕感受下效果.
高效的显示图片 - Bitmap的内存模型
图片不再使用后应尽快释放其所占用的内存空间。
管理bitmap内存
在Android 2.3.3 (API level 10)及其以下版本上,bitmap的ARGB数据(backing pixel data)是存在native内存里的,而bitmap对象本身是存在Dalvik的堆里的。
从Android 3.0 (API level 11)开始,bitmap的ARGB数据和bitmap对象一起存在Dalvik的堆里了。这样bitmap对象和它的ARGB数据就可以同步回收了。
Android2.3.3
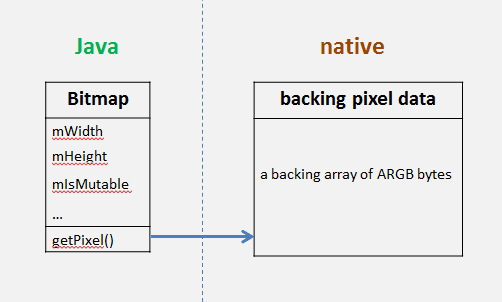
Android 3.0

不同Android版本对bitmap内存管理方式不同
在Android 2.3.3 (API level 10)及其以下版本上,Android开发文档推荐我们使用 recycle()方法。recycle()方法可以使APP尽可能快的回收bitmap所使用的native内存。
注意:recycle()方法是不可逆的,bitmap调用了recycle()之后就不能再使用了。使用recycle()之后的bitmap系统会抛出”Canvas: trying to use a recycled bitmap”的错误。所以调用recycle()方法之前一定要确认bitmap不会再使用了。
recycle()的代码示例。我们使用了引用计数来判断bitmap是否是被显示或者被缓存。当一个bitmap不再被显示也没有被缓存时就调用bitmap的recycle()方法来释放内存。
private int mCacheRefCount = 0;
private int mDisplayRefCount = 0;
...
// Notify the drawable that the displayed state has changed.
// Keep a count to determine when the drawable is no longer displayed.
public void setIsDisplayed(boolean isDisplayed) {
    synchronized (this) {
        if (isDisplayed) {
            mDisplayRefCount++;
            mHasBeenDisplayed = true;
        } else {
            mDisplayRefCount--;
        }
    }

    // Check to see if recycle() can be called.
    checkState();
}

// Notify the drawable that the cache state has changed.
// Keep a count to determine when the drawable is no longer being cached.
public void setIsCached(boolean isCached) {
    synchronized (this) {
        if (isCached) {
            mCacheRefCount++;
        } else {
            mCacheRefCount--;
        }
    }

    // Check to see if recycle() can be called.
    checkState();
}

private synchronized void checkState() {
// If the drawable cache and display ref counts = 0, and this drawable has been displayed, then recycle.
    if (mCacheRefCount <= 0 && mDisplayRefCount <= 0 && mHasBeenDisplayed && hasValidBitmap()) {
        getBitmap().recycle();
    }
}

private synchronized boolean hasValidBitmap() {
    Bitmap bitmap = getBitmap();
    return bitmap != null && !bitmap.isRecycled();
}
Android 3.0 (API level 11)及其以上版本
引入了BitmapFactory.Options.inBitmap字段。如果设置了这个字段,bitmap在加载数据时可以复用这个字段所指向的bitmap的内存空间。新增的这种内存复用的特性,可以优化掉因旧bitmap内存释放和新bitmap内存申请所带来的性能损耗。但是,内存能够复用也是有条件的。比如,在Android 4.4(API level 19)之前,只有新旧两个bitmap的尺寸一样才能复用内存空间。Android 4.4开始只要旧bitmap的尺寸大于等于新的bitmap就可以复用了。
下面是bitmap内存复用的代码示例。大致分两步:
1、不用的bitmap用软引用保存起来,以备复用;
2、使用前面保存的bitmap来创建新的bitmap。
保存废弃的bitmap
Set<SoftReference<Bitmap>> mReusableBitmaps;
 private LruCache<String, BitmapDrawable> mMemoryCache;

 // If you're running on Honeycomb or newer, create a
 // synchronized HashSet of references to reusable bitmaps.
 if (Utils.hasHoneycomb()) {
     mReusableBitmaps = Collections.synchronizedSet(new HashSet<SoftReference<Bitmap>>());
 }

 mMemoryCache = new LruCache<String, BitmapDrawable>(mCacheParams.memCacheSize) {
     // Notify the removed entry that is no longer being cached.
     @Override
     protected void entryRemoved(boolean evicted, String key, BitmapDrawable oldValue, BitmapDrawable newValue) {
         if (RecyclingBitmapDrawable.class.isInstance(oldValue)) {
             // The removed entry is a recycling drawable, so notify it
             // that it has been removed from the memory cache.
             ((RecyclingBitmapDrawable) oldValue).setIsCached(false);
         } else {
             // The removed entry is a standard BitmapDrawable.
             if (Utils.hasHoneycomb()) {
                 // We're running on Honeycomb or later, so add the bitmap
                 // to a SoftReference set for possible use with inBitmap later.
                 mReusableBitmaps.add(new SoftReference<Bitmap>(oldValue.getBitmap()));
             }
         }
     }
 ....
 }
使用现有的废弃bitmap创建新的bitmap
public static Bitmap decodeSampledBitmapFromFile(String filename, int reqWidth, int reqHeight, ImageCache cache) {
     final BitmapFactory.Options options = new BitmapFactory.Options();
     ...
     BitmapFactory.decodeFile(filename, options);
     ...
     // If we're running on Honeycomb or newer, try to use inBitmap.
     if (Utils.hasHoneycomb()) {
         addInBitmapOptions(options, cache);
     }
     ...
     return BitmapFactory.decodeFile(filename, options);
 }
addInBitmapOptions()会去废弃的bitmap中找一个能够被复用的bitmap设置到inBitmap字段。
private static void addInBitmapOptions(BitmapFactory.Options options, ImageCache cache) {
    // inBitmap only works with mutable bitmaps, so force the decoder to return mutable bitmaps.
    options.inMutable = true;

    if (cache != null) {
        // Try to find a bitmap to use for inBitmap.
        Bitmap inBitmap = cache.getBitmapFromReusableSet(options);
        if (inBitmap != null) {
            // If a suitable bitmap has been found, set it as the value of inBitmap.
            options.inBitmap = inBitmap;
        }
    }
}

// This method iterates through the reusable bitmaps, looking for one to use for inBitmap:
protected Bitmap getBitmapFromReusableSet(BitmapFactory.Options options) {
  Bitmap bitmap = null;
  if (mReusableBitmaps != null && !mReusableBitmaps.isEmpty()) {
      synchronized (mReusableBitmaps) {
          final Iterator<SoftReference<Bitmap>> iterator = mReusableBitmaps.iterator();
          Bitmap item;
          while (iterator.hasNext()) {
              item = iterator.next().get();
              if (null != item && item.isMutable()) {
                  // Check to see it the item can be used for inBitmap.
                  if (canUseForInBitmap(item, options)) {
                      bitmap = item;
                      // Remove from reusable set so it can't be used again.
                      iterator.remove();
                      break;
                  }
              } else {
                  // Remove from the set if the reference has been cleared.
                  iterator.remove();
              }
          }
      }
  }

  return bitmap;
}
canUseForInBitmap()方法用来判断bitmap是否能够被复用。
static boolean canUseForInBitmap(Bitmap candidate, BitmapFactory.Options targetOptions) {
    if (Build.VERSION.SDK_INT >= Build.VERSION_CODES.KITKAT) {
        // From Android 4.4 (KitKat) onward we can re-use if the byte size of
        // the new bitmap is smaller than the reusable bitmap candidate allocation byte count.
        int width = targetOptions.outWidth / targetOptions.inSampleSize;
        int height = targetOptions.outHeight / targetOptions.inSampleSize;
        int byteCount = width * height * getBytesPerPixel(candidate.getConfig());

        return byteCount <= candidate.getAllocationByteCount();
    }

    // On earlier versions, the dimensions must match exactly and the inSampleSize must be 1
    return candidate.getWidth() == targetOptions.outWidth && candidate.getHeight() == targetOptions.outHeight && targetOptions.inSampleSize == 1;
}

/**
  * A helper function to return the byte usage per pixel of a bitmap based on its configuration.
  */
static int getBytesPerPixel(Config config) {
    if (config == Config.ARGB_8888) {
        return 4;
    } else if (config == Config.RGB_565) {
        return 2;
    } else if (config == Config.ARGB_4444) {
        return 2;
    } else if (config == Config.ALPHA_8) {
        return 1;
    }
    return 1;
}


 1690
1690

 被折叠的 条评论
为什么被折叠?
被折叠的 条评论
为什么被折叠?
 到【灌水乐园】发言


