


声明: 本篇文章内容整理来源于互联网以及本人自己的梳理总结,目的是从零到一的搭建起来mysql mha高可用架构。
一、软件概述
MHA(Master High Availability)目前在MySQL高可用方面是一个相对成熟的解决方案,它由日本DeNA公司youshimaton(现就职于Facebook公司)开发,是一套优秀的作为MySQL高可用性环境下故障切换和主从提升的高可用软件。在MySQL故障切换过程中,MHA能做到在0~30秒之内自动完成数据库的故障切换操作,并且在进行故障切换的过程中,MHA能在最大程度上保证数据的一致性,以达到真正意义上的高可用。
该软件由两部分组成:MHA Manager(管理节点)和MHA Node(数据节点)。MHA Manager可以单独部署在一台独立的机器上管理多个master-slave集群,也可以部署在一台slave节点上。MHA Node运行在每台MySQL服务器上,MHA Manager会定时探测集群中的master节点,当master出现故障时,它可以自动将最新数据的slave提升为新的master,然后将所有其他的slave重新指向新的master。整个故障转移过程对应用程序完全透明。
在MHA自动故障切换过程中,MHA试图从宕机的主服务器上保存二进制日志,最大程度的保证数据的不丢失,但这并不总是可行的。例如,如果主服务器硬件故障或无法通过ssh访问,MHA没法保存二进制日志,只进行故障转移而丢失了最新的数据。使用MySQL 5.5的半同步复制,可以大大降低数据丢失的风险。MHA可以与半同步复制结合起来。如果只有一个slave已经收到了最新的二进制日志,MHA可以将最新的二进制日志应用于其他所有的slave服务器上,因此可以保证所有节点的数据一致性。
目前MHA主要支持一主多从的架构,要搭建MHA,要求一个复制集群中必须最少有三台数据库服务器,一主二从,即一台充当master,一台充当备用master,另外一台充当从库,因此至少需要三台服务器。
二、环境说明
2.1 系统环境
| 系统版本 | CentOS release 6.5 (Final) |
| 内核版本 | 2.6.32-431.el6.x86_64 |
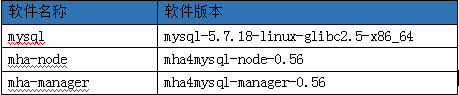
2.2 软件版本
Mysql选取最新的5.7版本,下载二进制包的方式部署
2.3 角色说明

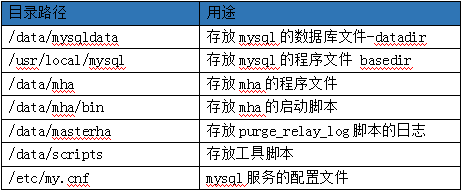
2.4 目录约定
三、Mysql安装部署
官方下载地址: https://dev.mysql.com/downloads/mysql/
3.1 准备安装包
下载二进制安装包放置三台mysql服务器的/usr/local目录下面,软件包名称为:mysql-5.7.18-linux-glibc2.5-x86_64.tar.gz
3.2 卸载系统lib包
# rpm -qa|grep mysql
mysql-libs-5.1.71-1.el6.x86_64
# rpm -e mysql-libs-5.1.71-1.el6.x86_64 -nodeps
3.3 创建mysql用户
# groupadd mysql
# useradd -r -g mysql mysql
# 参数表示mysql用户是系统用户,不可用于登录系统。
3.4 安装程序
解压TAR包,更改所属的组和用户,并且创建软连接的方式
# pwd
/usr/local
# ls mysql-5.7.18-linux-glibc2.5-x86_64.tar.gz
mysql-5.7.18-linux-glibc2.5-x86_64.tar.gz
# tar -zxvf mysql-5.7.18-linux-glibc2.5-x86_64.tar.gz
# ln -s mysql-5.7.18-linux-glibc2.5-x86_64 mysql
# ll mysql
lrwxrwxrwx 1 root root 34 May 25 12:54 mysql -> mysql-5.7.18-linux-glibc2.5-x86_64
# chown -R mysql:mysql mysql-5.7.18-linux-glibc2.5-x86_64
3.5 初始化数据库 (!!!做完3.7再做此步骤吧)
# mkdir -pv /data/mysqldata  # 创建放置mysql的数据目录
mkdir: created directory `/data/mysqldata'
# chown -R mysql:mysql /data/mysqldata/
# pwd
/usr/local/mysql
# ./bin/mysqld --user=mysql --basedir=/usr/local/mysql/ --datadir=/data/mysqldata/ --initialize
# mysql 5.7使用mysqld进行数据库的初始化
2017-05-25T05:37:55.408516Z 0 [Warning] TIMESTAMP with implicit DEFAULT value is deprecated. Please use --explicit_defaults_for_timestamp server option (see documentation for more details).
2017-05-25T05:37:55.674238Z 0 [Warning] InnoDB: New log files created, LSN=45790
2017-05-25T05:37:55.721899Z 0 [Warning] InnoDB: Creating foreign key constraint system tables.
2017-05-25T05:37:55.780139Z 0 [Warning] No existing UUID has been found, so we assume that this is the first time that this server has been started. Generating a new UUID: 4dbe04ea-410c-11e7-82cb-000e1ebbacb0.
2017-05-25T05:37:55.780754Z 0 [Warning] Gtid table is not ready to be used. Table 'mysql.gtid_executed' cannot be opened.
2017-05-25T05:37:55.781792Z 1 [Note] A temporary password is generated for root@localhost: rtSOJ:hyx54y  #会初始化一个root密码
3.6 修改启动脚本
# pwd
/usr/local/mysql
# cp -a ./support-files/mysql.server  /etc/init.d/mysqld
# vim /etc/init.d/mysqld
     basedir='/usr/local/mysql'
     datadir='/data/mysqldata'
3.7 创建配置文件
# /etc/my.cnf
[mysqld]

basedir = /usr/local/mysql
datadir = /data/mysqldata
port = 3306
server_id = 86   # !!!每台服务器的id不一样,必须更改
socket = /tmp/mysql.sock
pid-file = /data/mysqldata/mysql.pid

sql_mode=NO_ENGINE_SUBSTITUTION,STRICT_TRANS_TABLES

gtid_mode=on
enforce_gtid_consistency=on
log-bin=mysqlbin
log-slave-updates=1
binlog_format=row
log_error = /data/mysqldata/mysql-error.log

innodb_buffer_pool_size = 6G   #根据自己的内存大小进行更改,内存的70%~80%
innodb_log_buffer_size = 64M
innodb_max_dirty_pages_pct = 50

default-storage-engine = InnoDB
sync_binlog = 1
innodb_flush_log_at_trx_commit = 2
innodb_file_per_table = 1
innodb_data_file_path = ibdata1:1G:autoextend
3.8 启动数据库
# /etc/init.d/mysqld start
Starting MySQL.Logging to '/data/mysqldata/mysql-error.log'.
..... SUCCESS!
3.9 初始化密码
mysql5.7会生成一个初始化密码 ,位置在: /root/.mysql_secret ,在error日志中也有
# cat /root/.mysql_secret
# Password set for user 'root@localhost' at 2017-05-25 12:59:48
OU1qrvuT1t)?

# /usr/local/mysql/bin/mysql -uroot -p
Enter password:
Welcome to the MySQL monitor.  Commands end with ; or \g.
Your MySQL connection id is 3
Server version: 5.7.18

Copyright (c) 2000, 2017, Oracle and/or its affiliates. All rights reserved.

Oracle is a registered trademark of Oracle Corporation and/or its
affiliates. Other names may be trademarks of their respective
owners.

Type 'help;' or '\h' for help. Type '\c' to clear the current input statement.

mysql> SET PASSWORD = PASSWORD('dbpass123');
Query OK, 0 rows affected, 1 warning (0.00 sec)

mysql> flush privileges;
Query OK, 0 rows affected (0.00 sec)
3.10 设置开机启动
chkconfig --level 35 mysqld on
四、主从复制搭建
Mysql复制在5.6.5之后有两种配置方式,一种是基于binlog文件中的POS值来进行配置,另外一种则是通过GTID的方式来进行复制。
4.1 GTID工作原理
1、全局事务标识:global transaction identifiers。
2、GTID是一个事务一一对应,并且全局唯一ID。
3、一个GTID在一个服务器上只执行一次,避免重复执行导致数据混乱或者主从不一致。
4、GTID用来代替传统复制方法,不再使用MASTER_LOG_FILE+MASTER_LOG_POS开启复制。而是使用MASTER_AUTO_POSTION=1的方式开始复制。
5、MySQL-5.6.5开始支持的,MySQL-5.6.10后开始完善。
6、在传统的slave端,binlog是不用开启的,但是在GTID中slave端的binlog是必须开启的,目的是记录执行过的GTID(强制)。


过程描述:

1、当一个事务在主库端执行并提交时,产生GTID,一同记录到binlog日志中。
2、binlog传输到slave,并存储到slave的relaylog后,读取这个GTID的这个值设置gtid_next变量,即告诉Slave,下一个要执行的GTID值。
3、sql线程从relay log中获取GTID,然后对比slave端的binlog是否有该GTID。
4、如果有记录,说明该GTID的事务已经执行,slave会忽略。
5、如果没有记录,slave就会执行该GTID事务,并记录该GTID到自身的binlog,在读取执行事务前会先检查其他session持有该GTID,确保不被重复执行。
6、在解析过程中会判断是否有主键,如果没有就用二级索引,如果没有就用全部扫描。
4.2 配置文件必须参数
[mysqld]
server_id = 86  #服务器id,每个mysql实例必须不一样,建议取ip最后段的值

gtid_mode=on             #开启gtid模式
enforce_gtid_consistency=on  #强制gtid一致性,开启后对于特定create table不被支持

log-bin=mysqlbin     # 开启binlog
log-slave-updates=1
binlog_format=row   # 强烈建议,其他格式可能造成数据不一致
4.3 创建复制帐号
在主库上创建复制帐号,授权从库使用帐号来进行复制
GRANT REPLICATION SLAVE ON *.* TO repluser@192.168.129.87 IDENTIFIED BY  'replpass';
GRANT REPLICATION SLAVE ON *.* TO repluser@192.168.129.88 IDENTIFIED BY  'replpass';
flush privileges;
4.4 从库开启复制
# 在两个从库上执行:
CHANGE MASTER TO MASTER_HOST='192.168.129.86',   #  主库ip
MASTER_USER='repluser',                    #  复制帐号
MASTER_PASSWORD='replpass',              #  帐号密码
MASTER_AUTO_POSITION=1;
Start slave;
GTID复制官方地址:https://dev.mysql.com/doc/refman/5.6/en/replication-gtids-howto.html
4.5 查看复制状态
在从库主机上使用 show slave status查看复制状态,当Slave_IO_Running和Slave_SQL_Running都是Yes的时候说明主从复制状态是正常的,此时可以在主库上操作数据,然后在从库上验证数据是否会同步过来。
至此,mysql基于GTID的主从复制搭建完毕,下面就剩下mha软件的搭建了。
五、mha搭建
mha node角色需要部署在每台主机上面,mha manager只需要部署在mha控制节点89上。
5.1 配置host文件
使用主机别名的方式更容易使配置简单,在每台机器的/etc/hosts文件中添加以下对应关系
# add /etc/hosts
192.168.129.86  node86 master
192.168.129.87  node87 salve87
192.168.129.88  node88 salve88
5.2 mha node节点部署
Mha是由perl语言开发,所以需要使用perl的依赖,推荐使用yum进行安装,此软件需要安装在每台服务器上.
5.2.1 安装依赖
yum install -y perl-DBD-MySQL.x86_64 \
                     perl-DBI.x86_64 perl-ExtUtils-CBuilder \
                     perl-ExtUtils-MakeMaker perl-CPAN.x86_64 \
                     perl-Mail-Sender perl-Log-Dispatch
5.2.2 安装mha node
tar xf mha4mysql-node-0.56.tar.gz
cd mha4mysql-node-0.56
perl Makefile.PL
make
make install
5.2.3 node主要工具
Node工具包(这些工具通常由MHA Manager的脚本触发,无需人为操作)主要包括以下几个工具:
save_binary_logs                保存和复制master的二进制日志
apply_diff_relay_logs            识别差异的中继日志事件并将其差异的事件应用于其他的slave
filter_mysqlbinlog               去除不必要的ROLLBACK事件(MHA已不再使用这个工具)
purge_relay_logs                清除中继日志(不会阻塞SQL线程)
5.3 mha manager 节点部署(需要访问公网)
Mha manager控制节点单独一台服务器,部署在192.168.129.89服务器上。
由于已经安装mha node,所以相关依赖的perl模块已经安装,可以直接安装mha manager软件.
5.3.1 安装mha manager
tar -zxvf mha4mysql-manager-0.56.tar.gz
cd mha4mysql-manager-0.56
perl Makefile.PL
make
make install
5.3.2 manager主要工具
masterha_check_ssh              检查MHA的SSH配置状况
masterha_check_repl             检查MySQL复制状况
masterha_manger                启动MHA
masterha_check_status            检测当前MHA运行状态
masterha_master_monitor          检测master是否宕机
masterha_master_switch           控制故障转移(自动或者手动)
masterha_conf_host               添加或删除配置的server信息
5.4 配置ssh密钥登陆
需要配置SSH登陆无密码验证功能,因为mha切换的时候需要到主机上执行命令,各主机之间应当都是免密登陆。
需要注意的是不能禁止password登陆,否则会出现错误.
Mha manager主机需要登陆到三台node节点主机,在192.168.129.89上执行:
# ssh-keygen    #一路回车
# cd ~/.ssh
# ssh-copy-id -i ./id_rsa.pub root@192.168.129.86
# ssh-copy-id -i ./id_rsa.pub root@192.168.129.87
# ssh-copy-id -i ./id_rsa.pub root@192.168.129.88
在192.168.129.86/87/88上生成密钥对,然后互相打通ssh密钥登陆
86上执行命令:
# ssh-copy-id -i ./id_rsa.pub root@192.168.129.88
# ssh-copy-id -i ./id_rsa.pub root@192.168.129.87
87上执行命令:
# ssh-copy-id -i ./id_rsa.pub root@192.168.129.86
# ssh-copy-id -i ./id_rsa.pub root@192.168.129.88
88上执行命令:
# ssh-copy-id -i ./id_rsa.pub root@192.168.129.86
# ssh-copy-id -i ./id_rsa.pub root@192.168.129.87
5.5 设置从库只读
两台slave服务器设置read_only(从库对外提供读服务,只所以没有写进配置文件,是因为随时slave会提升为master)
# 设置只读的指令,需要在两个从库87/88上执行
# mysql -uroot -p -e 'set global read_only=1'
5.6 创建监控帐号
# 在主库上执行
grant all privileges on *.* to 'mhamon'@'192.168.129.89' identified  by 'mhamonpass';
flush  privileges;
5.7 设置relaylog清理
MHA在发生切换的过程中,从库的恢复过程中依赖于relay log的相关信息,所以这里要将relay log的自动清除设置为OFF,
采用手动清除relay log的方式。在默认情况下,从服务器上的中继日志会在SQL线程执行完毕后被自动删除。
# 设置关闭relay_log自动清理的指令,需要在两个从库87/88上执行
# mysql -uroot -p -e 'set global relay_log_purge=0'
在MHA环境中,这些中继日志在恢复其他从服务器时可能会被用到,因此需要禁用中继日志的自动删除功能。定期清除中继日志需要考虑到复制延时的问题。在ext3的文件系统下,删除大的文件需要一定的时间,会导致严重的复制延时。为了避免复制延时,需要暂时为中继日志创建硬链接,因为在linux系统中通过硬链接删除大文件速度会很快。(在mysql数据库中,删除大表时,通常也采用建立硬链接的方式)
MHA节点中包含了pure_relay_logs命令工具,它可以为中继日志创建硬链接,执行SET GLOBAL relay_log_purge=1,等待几秒钟以便SQL线程切换到新的中继日志,再执行SET GLOBAL relay_log_purge=0.这是此工具的原理.
可参照: http://blog.csdn.net/leshami/article/details/45688503
Pure_relay_log脚本介绍
--user mysql                      用户名
--password mysql                  密码
--port                            端口号
--workdir                         指定创建relay log的硬链接的位置,默认是/var/tmp,由于系统不同分区创建硬链接文件会失败,故需要执行硬链接具体位置,成功执行脚本后,硬链接的中继日志文件被删除
--disable_relay_log_purge         默认情况下,如果relay_log_purge=1,脚本会什么都不清理,自动退出,通过设定这个参数,当relay_log_purge=1的情况下会将relay_log_purge设置为0。清理relay log之后,最后将参数设置为OFF。
两台从服务器上设置relay脚本定期清除.
# crontab -l
0 4 * * * /bin/bash /data/scripts/purge_relay_log.sh
[root@nma04-305-bigdata-035129087.ctc.local][~]
# cat /data/scripts/purge_relay_log.sh   # 清理脚本
#!/bin/bash

. /etc/profile
. ~/.bash_profile
. ~/.bashrc

user=root
passwd=dbpass123
port=3306
log_dir='/data/masterha/log'
work_dir='/data/masterha'
purge='/usr/local/bin/purge_relay_logs'

if [ ! -d $log_dir ]
then
   mkdir $log_dir -p
fi

$purge --user=$user --password=$passwd --disable_relay_log_purge --port=$port --workdir=$work_dir >> $log_dir/purge_relay_logs.log 2>&1
5.8 配置mha manager
5.8.1 Mha软件目录结构
# tree /data/mha/  # 存放mha的相关配置与脚本
/data/mha/
├── app1         # 日志目录
│   ├── app1.log  # 日志文件
│   └── app1.master_status.health #检查文件
├── app1.cnf   # mha配置文件
├── bin
│   └── mhaCli.sh  # mha启动脚本,自己编写
├── master_ip_failover # mha检测失败后执行的自动切换脚本
└── sendEmail    # mha切换后的发送告警邮件的脚本
5.8.2 mha配置文件
/data/mha/app1.cnf
[server default]
manager_log=/data/mha/app1/app1.log   # 设置manager的日志
manager_workdir=/data/mha/app1/      # 设置manager的工作目录
master_binlog_dir=/data/mysqldata      # 设置master 保存binlog的位置,以便MHA可以找到master的日志,我这里的也就是mysql的数据目录
master_ip_failover_script=/data/mha/master_ip_failover # 设置自动failover时候的切换脚本
master_ip_online_change_script=/data/mha/master_ip_failover #设置手动failover时候的切换脚本
report_script=/data/mha/sendEmail    # 设置发生切换后发送的报警的脚本
remote_workdir=/tmp              # 设置远端mysql在发生切换时binlog的保存位置
ping_interval=10                  #设置监控主库,发送ping包的时间间隔,默认是3秒,尝试三次没有回应的时候自动进行railover

user=mhamon                    # 设置监控用户
password=mhamonpass         #  设置监控用户的密码

repl_password=replpass        # 设置复制账号的密码
repl_user=repluser                # 设置复制账号
ssh_port=22                     # 设置ssh的端口号
ssh_user=root                    # 设置ssh的登陆用户

secondary_check_script=/usr/local/bin/masterha_secondary_check -s slave87 -s slave88

[server1]
hostname=192.168.129.86
port=3306

[server2]
hostname=192.168.129.87
port=3306
# 下面这两个参数我没有使用,但是需要了解
# candidate_master=1 设置为候选master,如果设置该参数以后,发生主从切换以后将会将此从库提升为主库,即使这个主库不是集群中事件最新的slave
# check_repl_delay=0  默认情况下如果一个slave落后master 100M的relay logs的话,MHA将不会选择该slave作为一个新的master,
#                     因为对于这个slave的恢复需要花费很长时间,通过设置check_repl_delay=0,MHA触发切换在选择一个新的master的时候将
                      会忽略复制延时,这个参数对于设置了candidate_master=1的主机非常有用,因为这个候选主在切换的过程中一定是新的master


[server3]
hostname=192.168.129.88
port=3306
5.8.3 mha 启动脚本
# cat bin/mhaCli.sh
#!/bin/bash

. /etc/profile
. ~/.bash_profile
. ~/.bashrc

run_num=$(ps -ef|grep masterha_manager |grep -v grep|wc -l)
pid_file='/data/mha/app1/app1.master_status.health'

start() {
   if [[ $run_num < 1 ]];then
   args="--conf=/data/mha/app1.cnf --remove_dead_master_conf --ignore_last_failover"
   nohup masterha_manager $args < /dev/null > /data/mha/app1/app1.log 2>&1 &
   else
     echo 'mha is already running...'
   fi
}

stop() {

  if [[ $run_num < 1 ]];then
     echo 'mha not running ...'
     exit 64
  else
     ps -ef|grep masterha_manager |grep -v grep|awk '{print $2}'|xargs kill -9
     rm -f $pid_file
     echo 'mha stop...'
  fi
}

status() {
 masterha_check_status --conf=/data/mha/app1.cnf
}

case "$1" in
  start)
  start
  ;;
  stop)
  stop
  ;;
  status)
  status
  ;;
  *)
  echo 'mhaCli {stop|start|status}'
  ;;
esac
5.8.4 mha自动切换脚本
脚本直接使用下面的这个,注意修改标红部分
# cat master_ip_failover
#!/usr/bin/env perl

use strict;
use warnings FATAL => 'all';

use Getopt::Long;

my (
    $command,          $ssh_user,        $orig_master_host, $orig_master_ip,
    $orig_master_port, $new_master_host, $new_master_ip,    $new_master_port
);

my $vip = '192.168.129.91/26';   # 设置VIP的地方
my $key = '91';             # 此处代表 绑定在 bond0:91上
my $ssh_start_vip = "/sbin/ifconfig bond0:$key $vip";  # 开启VIP
my $ssh_stop_vip = "/sbin/ifconfig bond0:$key down";  # 关闭VIP

GetOptions(
    'command=s'          => \$command,
    'ssh_user=s'         => \$ssh_user,
    'orig_master_host=s' => \$orig_master_host,
    'orig_master_ip=s'   => \$orig_master_ip,
    'orig_master_port=i' => \$orig_master_port,
    'new_master_host=s'  => \$new_master_host,
    'new_master_ip=s'    => \$new_master_ip,
    'new_master_port=i'  => \$new_master_port,
);

exit &main();

sub main {

    print "\n\nIN SCRIPT TEST====$ssh_stop_vip==$ssh_start_vip===\n\n";

    if ( $command eq "stop" || $command eq "stopssh" ) {

        my $exit_code = 1;
        eval {
            print "Disabling the VIP on old master: $orig_master_host \n";
            &stop_vip();
            $exit_code = 0;
        };
        if ($@) {
            warn "Got Error: $@\n";
            exit $exit_code;
        }
        exit $exit_code;
    }
    elsif ( $command eq "start" ) {

        my $exit_code = 10;
        eval {
            print "Enabling the VIP - $vip on the new master - $new_master_host \n";
            &start_vip();
            $exit_code = 0;
        };
        if ($@) {
            warn $@;
            exit $exit_code;
        }
        exit $exit_code;
    }
    elsif ( $command eq "status" ) {
        print "Checking the Status of the script.. OK \n";
        exit 0;
    }
    else {
        &usage();
        exit 1;
    }
}

sub start_vip() {
    `ssh $ssh_user\@$new_master_host \" $ssh_start_vip \"`;
}
sub stop_vip() {
     return 0  unless  ($ssh_user);
    `ssh $ssh_user\@$orig_master_host \" $ssh_stop_vip \"`;
}

sub usage {
    print
    "Usage: master_ip_failover --command=start|stop|stopssh|status --orig_master_host=host --orig_master_ip=ip --orig_master_port=port --new_master_host=host --new_master_ip=ip --new_master_port=port\n";
}
5.8.5 告警脚本
# cat sendEmail
#!/usr/bin/perl

#  Copyright (C) 2011 DeNA Co.,Ltd.
#
#  This program is free software; you can redistribute it and/or modify
#  it under the terms of the GNU General Public License as published by
#  the Free Software Foundation; either version 2 of the License, or
#  (at your option) any later version.
#
#  This program is distributed in the hope that it will be useful,
#  but WITHOUT ANY WARRANTY; without even the implied warranty of
#  MERCHANTABILITY or FITNESS FOR A PARTICULAR PURPOSE.  See the
#  GNU General Public License for more details.
#
#  You should have received a copy of the GNU General Public License
#   along with this program; if not, write to the Free Software
#  Foundation, Inc.,
#  51 Franklin Street, Fifth Floor, Boston, MA  02110-1301  USA

## Note: This is a sample script and is not complete. Modify the script based on your environment.

use strict;
use warnings FATAL => 'all';
use Mail::Sender;
use Getopt::Long;

#new_master_host and new_slave_hosts are set only when recovering master succeeded
my ( $dead_master_host, $new_master_host, $new_slave_hosts, $subject, $body );
my $smtp='smtp.163.com';
my $mail_from='xxx@163.com';
my $mail_user='xxx@163.com';
my $mail_pass='xxxxxx';
my $mail_to=['xxx@xxx.cn','xxxxx@xxx.cn'];
GetOptions(
  'orig_master_host=s' => \$dead_master_host,
  'new_master_host=s'  => \$new_master_host,
  'new_slave_hosts=s'  => \$new_slave_hosts,
  'subject=s'          => \$subject,
  'body=s'             => \$body,
);

mailToContacts($smtp,$mail_from,$mail_user,$mail_pass,$mail_to,$subject,$body);

sub mailToContacts {
    my ( $smtp, $mail_from, $user, $passwd, $mail_to, $subject, $msg ) = @_;
    open my $DEBUG, "> /tmp/monitormail.log"
        or die "Can't open the debug      file:$!\n";
    my $sender = new Mail::Sender {
        ctype       => 'text/plain; charset=utf-8',
        encoding    => 'utf-8',
        smtp        => $smtp,
        from        => $mail_from,
        auth        => 'LOGIN',
        TLS_allowed => '0',
        authid      => $user,
        authpwd     => $passwd,
        to          => $mail_to,
        subject     => $subject,
        debug       => $DEBUG
    };

    $sender->MailMsg(
        {   msg   => $msg,
            debug => $DEBUG
        }
    ) or print $Mail::Sender::Error;
    return 1;
}


# Do whatever you want here

exit 0;
5.9 Mha 集群测试&启动
测试ssh免密通信是否正常:masterha_check_ssh --conf=/data/mha/app1.cnf
出现的是六个ok,没有fail的报错,则是通过。
测试mysql复制是否正常:masterha_check_repl --conf=/data/mha/app1.cnf
Wed May 31 16:14:56 2017 - [warning] Global configuration file /etc/masterha_default.cnf not found. Skipping.
Wed May 31 16:14:56 2017 - [info] Reading application default configuration from /data/mha/app1.cnf..
Wed May 31 16:14:56 2017 - [info] Reading server configuration from /data/mha/app1.cnf..
Wed May 31 16:14:56 2017 - [info] MHA::MasterMonitor version 0.56.
Wed May 31 16:14:57 2017 - [info] GTID failover mode = 1
Wed May 31 16:14:57 2017 - [info] Dead Servers:
Wed May 31 16:14:57 2017 - [info] Alive Servers:
Wed May 31 16:14:57 2017 - [info]   192.168.129.86(192.168.129.86:3306)
Wed May 31 16:14:57 2017 - [info]   192.168.129.87(192.168.129.87:3306)
Wed May 31 16:14:57 2017 - [info]   192.168.129.88(192.168.129.88:3306)
Wed May 31 16:14:57 2017 - [info] Alive Slaves:
Wed May 31 16:14:57 2017 - [info]   192.168.129.87(192.168.129.87:3306)  Version=5.7.18-log (oldest major version between slaves) log-bin:enabled
Wed May 31 16:14:57 2017 - [info]     GTID ON
Wed May 31 16:14:57 2017 - [info]     Replicating from 192.168.129.86(192.168.129.86:3306)
Wed May 31 16:14:57 2017 - [info]   192.168.129.88(192.168.129.88:3306)  Version=5.7.18-log (oldest major version between slaves) log-bin:enabled
Wed May 31 16:14:57 2017 - [info]     GTID ON
Wed May 31 16:14:57 2017 - [info]     Replicating from 192.168.129.86(192.168.129.86:3306)
Wed May 31 16:14:57 2017 - [info] Current Alive Master: 192.168.129.86(192.168.129.86:3306)
Wed May 31 16:14:57 2017 - [info] Checking slave configurations..
Wed May 31 16:14:57 2017 - [info]  read_only=1 is not set on slave 192.168.129.87(192.168.129.87:3306).
Wed May 31 16:14:57 2017 - [info]  read_only=1 is not set on slave 192.168.129.88(192.168.129.88:3306).
Wed May 31 16:14:57 2017 - [info] Checking replication filtering settings..
Wed May 31 16:14:57 2017 - [info]  binlog_do_db= , binlog_ignore_db=
Wed May 31 16:14:57 2017 - [info]  Replication filtering check ok.
Wed May 31 16:14:57 2017 - [info] GTID (with auto-pos) is supported. Skipping all SSH and Node package checking.
Wed May 31 16:14:57 2017 - [info] Checking SSH publickey authentication settings on the current master..
Wed May 31 16:14:57 2017 - [info] HealthCheck: SSH to 192.168.129.86 is reachable.
Wed May 31 16:14:57 2017 - [info]
192.168.129.86(192.168.129.86:3306) (current master)
 +--192.168.129.87(192.168.129.87:3306)
 +--192.168.129.88(192.168.129.88:3306)

Wed May 31 16:14:57 2017 - [info] Checking replication health on 192.168.129.87..
Wed May 31 16:14:57 2017 - [info]  ok.
Wed May 31 16:14:57 2017 - [info] Checking replication health on 192.168.129.88..
Wed May 31 16:14:57 2017 - [info]  ok.
Wed May 31 16:14:57 2017 - [info] Checking master_ip_failover_script status:
Wed May 31 16:14:57 2017 - [info]   /data/mha/master_ip_failover --command=status --ssh_user=root --orig_master_host=192.168.129.86 --orig_master_ip=192.168.129.86 --orig_master_port=3306

IN SCRIPT TEST====/sbin/ifconfig bond0:91 down==/sbin/ifconfig bond0:91 192.168.129.91/26===

Checking the Status of the script.. OK
Wed May 31 16:14:57 2017 - [info]  OK.
Wed May 31 16:14:57 2017 - [warning] shutdown_script is not defined.
Wed May 31 16:14:57 2017 - [info] Got exit code 0 (Not master dead).

MySQL Replication Health is OK.
启动mha manager节点:
/data/mha/bin/mhaCli.sh start
检查mha manager的状态:
masterha_check_status --conf=/data/mha/app1.cnf
或者: /data/mha/bin/mhaCli.sh status
5.10 配置VIP
因为使用脚本的方式,所以第一次VIP需要手动配置,在主服务器86上执行:
# /sbin/ifconfig bond0:91 192.168.129.91/26
# ifconfig
bond0     Link encap:Ethernet  HWaddr 00:0E:1E:BD:03:E0
          inet addr:192.168.129.86  Bcast:192.168.129.127  Mask:255.255.255.192
          UP BROADCAST RUNNING MASTER MULTICAST  MTU:1500  Metric:1
          RX packets:1335051 errors:0 dropped:0 overruns:0 frame:0
          TX packets:708712 errors:0 dropped:0 overruns:0 carrier:0
          collisions:0 txqueuelen:0
          RX bytes:1524679739 (1.4 GiB)  TX bytes:708278247 (675.4 MiB)

bond0:91  Link encap:Ethernet  HWaddr 00:0E:1E:BD:03:E0
          inet addr:192.168.129.91  Bcast:192.168.129.127  Mask:255.255.255.192
          UP BROADCAST RUNNING MASTER MULTICAST  MTU:1500  Metric:1
六、Mha集群测试
测试方法可以将主上面的mysql停掉之后,观察mha的日志,可以看到详细的切换过程.
停掉86的mysql, VIP 91会漂移到新的master,并且新的master也会被提升为主.
在87上执行 ifconfig 查看验证.
七、节点重新上线
当原来的主服务器A问题修复好之后,此时需要重新上线主机,则可以通过以下方式:
- 在服务器A上搭建好mysql服务,建议和之前配置参数一致;服务器之间免密。
- 在现在的master或者slave使用mysqldump将数据备份,加--master-data=2 -A参数
- 将备份数来的数据在服务器A上进行恢复,完成后执行flush privileges刷新权限。
- 成后配置GTID的change master操作(见4.4),start slave即可
- 将主机的信息添加到mha的配置文件中,以便mha manager检测到新的节点主机
- 使用mha的测试命令进行测试,见(5.9),成功则启动mha程序即可
八、总结
目前高可用方案可以一定程度上实现数据库的高可用,比如MMM,heartbeat+drbd,Cluster等,还有percona的Galera Cluster等。
这些高可用软件各有优劣。在进行高可用方案选择时,主要是看业务还有对数据一致性方面的要求。最后出于对数据库的高
可用和数据一致性的要求,推荐使用MHA架构。
参考文档:
https://yq.aliyun.com/articles/58004?spm=5176.100239.blogcont57855.9.jUuCt0
http://www.cnblogs.com/gomysql/p/3675429.html
http://blog.csdn.net/wb96a1007/article/details/51559741
https://github.com/yoshinorim/mha4mysql-manager/wiki/ReleaseNotes#changes-in-manager-057


 761
761


 被折叠的 条评论
为什么被折叠?
被折叠的 条评论
为什么被折叠?
 到【灌水乐园】发言


