


提示:
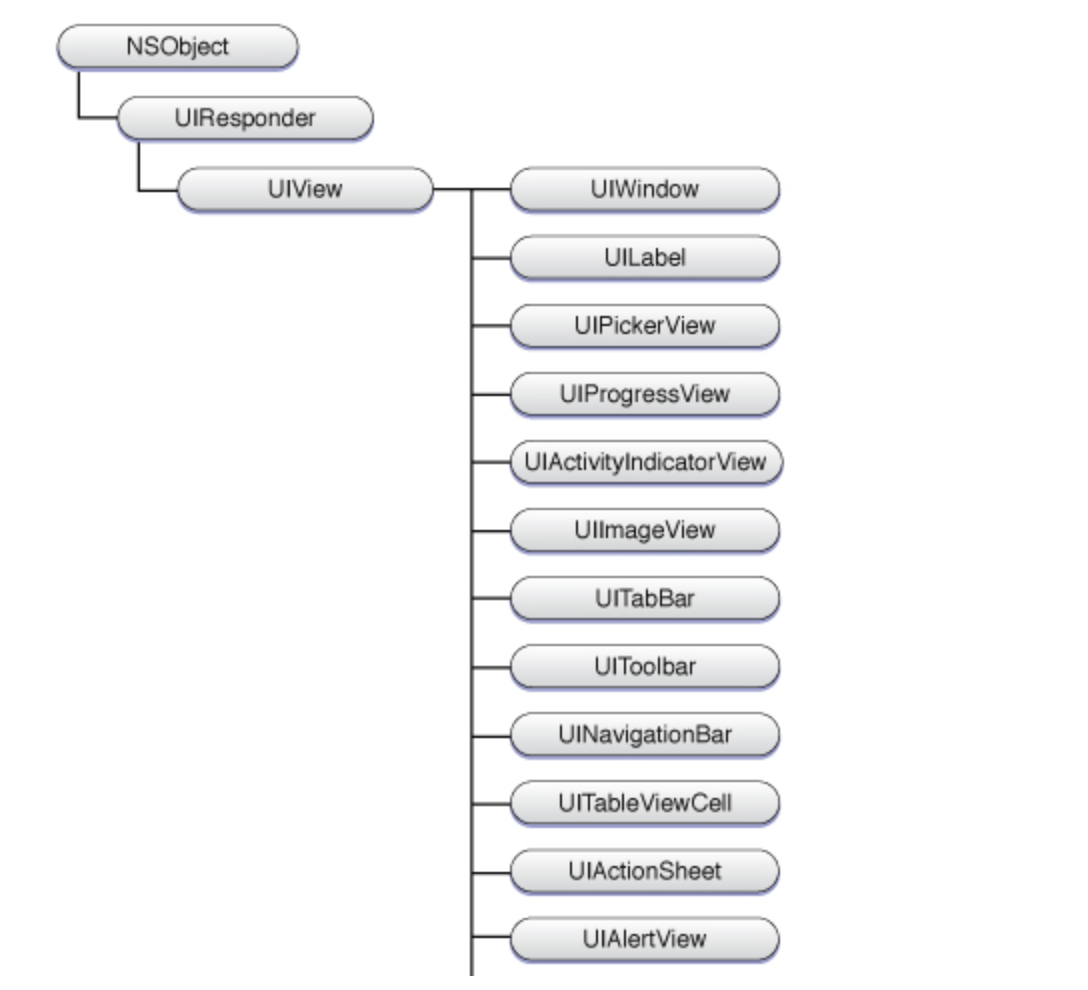
- UIView基类: UILabel,UIControl,UIScrollView,UIImageView,UIProgressView,UIAlertView,UIActionSheet,UIPickerView,UIWebView,UIToolBar,UISearchBar,UINavigationBar,UITabBar。
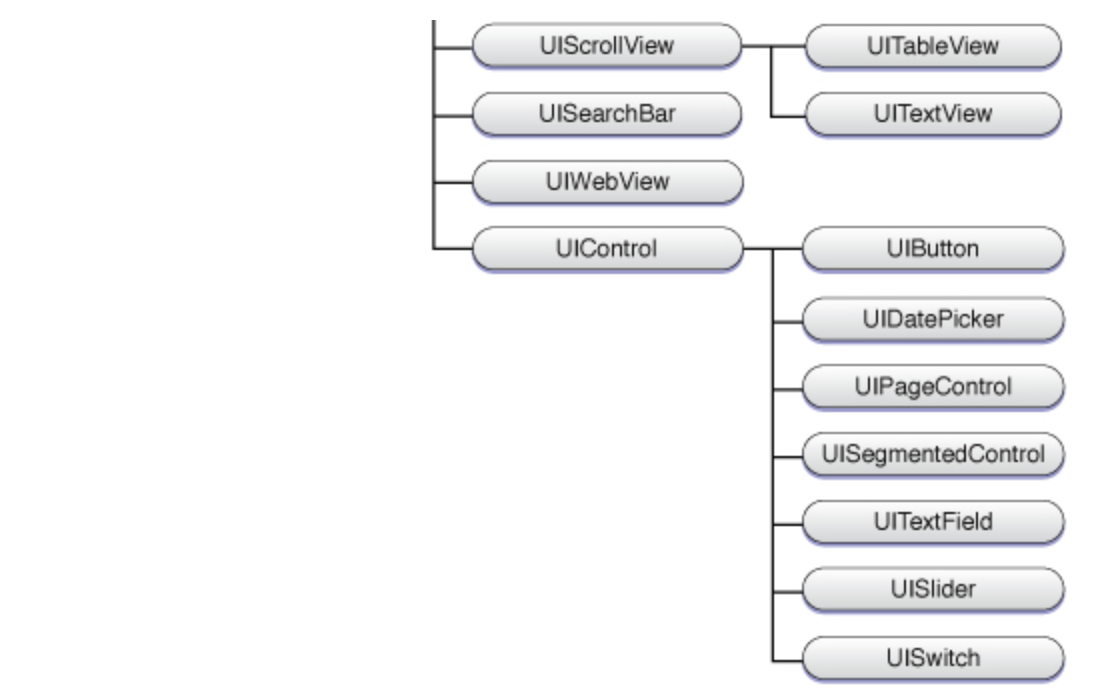
- UIControl基类: UIButton,UITextField,UISwitch,UISegmentedControl,UISlider,UIDatePicker,UIStepper。
- UIScrollView基类:UITextView,UITableView,UICollectionView。
一、UI控件概述
iOS所有的UI控件都集成了UIView,而UIView继承了UIResponder基类,UIResponder代表用户操作的响应者。
1、活动、静态和被动控件
iOS的UI控件大致可分为如下三类:
- (1)、活动控件:大部分活动控件都继承了UIControl基类,活动控件可以与用户交互,当用户操作活动控件时,该控件可以激发相应地事件,该事件就会激发该控件上为该事件绑定的事件处理方法。比如:UIButton。
- (2)、静态控件:静态控件通常只是继承了UIView,并不继承UIControl。静态控件只用于显示应用状态,用户不能对静态控件执行任何操作。比如:UILabel,UIImageView。
- (3)、被动控件:被动控件可以接受用户操作,但它们通常仅用于接受用户输入的值,知道用户输入完成为止,这些控件不会触发任何IBAction方法。典型的被动控件就是文本框,这些文本框可用于接受用户输入,但它们不会触发任何方法。
2、UIControl基类介绍
通过代码为UIControl的子类控件绑定事件处理方法。UIControl提供了如下常用的方法:
- (1)、- (void)addTarget:(id)target action:(SEL)action forControlEvents:(UIControlEvents)controlEvents;
- (2)、- (void)removeTarget:(id)target action:(SEL)action forControlEvents:(UIControlEvents)controlEvents;
- (3)、- (NSArray *)actionsForTarget:(id)target forControlEvent:(UIControlEvents)controlEvent;
- (4)、- (NSSet *)allTargets;
- (5)、- (UIControlEvents)allControlEvents;
每个UI控件都有4中不同的状态,并且它们在任意时刻总处于且只能处于一下状态之一:
- (1)、普通:普通状态是所有控件的默认状态;
- (2)、高亮:当UI控件需要突出显示时,它处于高亮状态。对按钮来说,点用户手指放在按钮上时,它才处于高亮状态。
- (3)、禁用:当UI控件被关闭时,它处于禁用状态。禁用状态的UI控件是不可操作的,如果要禁用某个控件,可以在Interface Builder中取消选中Enabled复选框,或将控件的enabled属性设为NO;
- (4)、选中:选中状态通常用于标识该控件已启用或被选中。很多时候,选中状态与高亮状态比较相似,但UI控件可以在用户不再继续保持选中状态。
为了判断UI控件所处的状态,UIControl提供了系列属性来检测该控件的状态,包括是否可用、是否高亮等。这些状态可通过如下常用属性来判断:
- (1)、enabled:该属性判断该UIControl控件是否可用;
- (2)、selected:该属性判断该UIControl控件是否被选中;
- (3)、highlighted:该属性判断该UIControl控件是否高亮;
有些时候,如果我们需要定制用户触碰UIControl控件时的外观,可通过重写UIControl控件的如下方法实现:
- (1)、- (BOOL)beginTrackingWithTouch:(UITouch )touch withEvent:(UIEvent )event;当用户开始触碰该UIControl控件时,将会自动调用该方法,重写该方法即可在用户开始触碰该UIControl时定制该控件的外观;
- (2)、- (BOOL)continueTrackingWithTouch:(UITouch )touch withEvent:(UIEvent )event;当用户连续触碰该UIControl控件时,将会自动调用该方法,重写该方法即可在用户连续触碰该UIControl时定制该控件的外观;
- (3)、- (void)endTrackingWithTouch:(UITouch )touch withEvent:(UIEvent )event;当用户结束触碰该UIControl控件时,将会自动调用该方法,重写该方法即可在用户触碰该UIControl时定制该控件的外观;
二、按钮(UIButton)
按钮是最普通的UI控件,它继承了UIControl基类,默认属于活动控件,它可以与用户交互,并激发相应地事件处理方法。
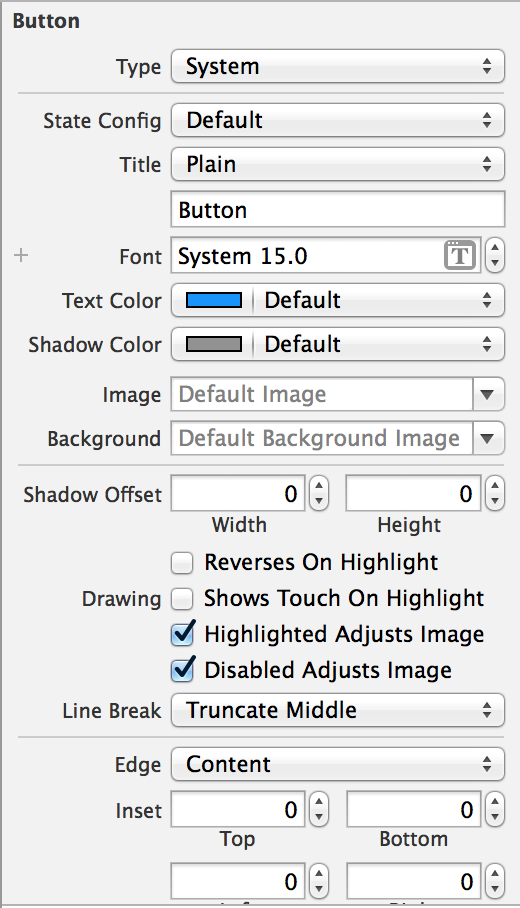
(1)、Type(UIButtonType):该属性用于为按钮选择类型,该列表支持如下表项:
- ①、UIButtonTypeCustom:如果选择它,该按钮的外观行为主要依靠开发者的设置;
- ②、UIButtonTypeSystem:iOS默认的按钮风格。在早期版本的iOS中,该属性值为Rounded Rect,也就是对应于圆角矩形按钮;
- ③、UIButtonTypeDetailDisclosure:原本显示“>”图标(iOS7中显示i图标)的图形按钮,该按钮通常用于显示当前列表表项的详情;
- ④、UIButtonTypeInfoLight:显示“i”图标的图形按钮,该按钮通常用于显示简短的说明信息;
- ⑤、UIButtonTypeInfoDark:显示“i”图标的图形按钮,该按钮通常用于显示简短的说明信息;
⑥、UIButtonTypeContactAdd:显示黑色“+”图标的图形按钮,该按钮通常用于添加联系人;
提示:如果开发者需要开发自定义的按钮,建议在Type列表中选择Custom列表项,如果选择其他列表项,该按钮将具有自己的默认行为。例如:
UIButton* button = [UIButton buttonWithType:UIButtonTypeCustom];
(2)、
State Config(UIControlState):该属性用于设置按钮的状态,UIButton具有以下4种状态:- ①、默认状态(UIControlStateNormal):按钮默认的状态就是该状态;
- ②、高亮状态(UIControlStateHighlighted):当用户触碰该按钮时,该按钮显示高亮状态;
- ③、选择状态(UIControlStateSelected):按钮被选中时的状态;
- ④、禁用状态(UIControlStateDisabled):按钮被禁用时的状态;
UIButton提供了如下方法来设置外观:
- ①、- (void)setTitle:(NSString *)title forState:(UIControlState)state;为不同状态的按钮设置文本标题;
- ②、- (void)setTitleColor:(UIColor *)color forState:(UIControlState)state;为不同状态的按钮设置文本标题的颜色;
- ③、- (void)setTitleShadowColor:(UIColor *)color forState:(UIControlState)state;为不同状态的按钮中文本的阴影设置颜色;
- ④、- (void)setImage:(UIImage *)image forState:(UIControlState)state;为不同状态的按钮设置图片;
- ⑤、- (void)setBackgroundImage:(UIImage *)image forState:(UIControlState)state;为不同状态的按钮设置背景颜色;
(3)、Title:该属性的第一个列表框可用于选择不同的文本方式,它支持Plain和Attributed两种设置方式,一般使用Plain方式设置即可。接下来的文本框内的字符串就是该按钮所显示的字符串,该文本框可输入任何字符串。
例如:[button setTitle:@"我是好人" forState:UIControlStateNormal];(4)、Font:该属性用于控制该UILabel中文本的字体、字体大小和字体风格,如果单击该属性对应的输入框最右边的向上、向下箭头,Xcode即可改变该UILabel中文字的大小。
例如:button.titleLabel.font = [UIFont systemFontOfSize:27];(5)、TextColor:该属性用于控制该按钮的文本标题的颜色。
例如:[button setTitleColor:[UIColor purpleColor] forState:UIControlStateNormal];(6)、Shadow Color:该属性用于控制按钮的文本标题阴影颜色。
例如:[button setTitleShadowColor:[UIColor yellowColor] forState:UIControlStateNormal];(7)、Image:该属性用于为该按钮设置一张图片,如果设置该属性,该按钮将会表现为一个图片按钮,前面为该按钮设置的Title属性将不会起作用。
例如:[button setImage:[UIImage imageNamed:@"slide_autoLogin_N.png"] forState:UIControlStateNormal];(8)、Background:该属性用于为该按钮设置背景图片,如果希望按钮既有背景图片,又有文本标题,可通过该文本框来设置背景图片,而不是通过Image文本框来设置图片。
例如:[button setBackgroundImage:image forState:UIControlStateNormal];(9)、Shadow Offset:该属性控制UILabel控件内的阴影文本与正常文本之间的偏移,该属性区需要指定Horizontal和Vertical两个属性值,分别指定阴影文本与正常文本在水平和垂直方向的偏移距。对于Horizontal属性值,如果该属性值大于0,阴影文本相对于正常文本向右偏移;如果该属性值小于0,阴影文本相对于正常文本向左偏移。对于Vertical属性值,如果该属性值大于0,阴影文本相当于正常文本向下偏移;如果该属性值小于0,阴影文本相当于正常文本向上偏移。
例如:[button setTitleShadowOffset:CGSizeMake(2, 2)];(10)、Line Break:该属性控制对UILabel控件内文本的截断。
例如:[button setLineBreakMode:NSLineBreakByTruncatingMiddle];(11)、Edge:该属性控制按钮的边界,其属性值是一个列表框,该列表框支持如下属性值:
- ①、Content:该属性设置以该按钮的内容作为按钮边界;
- ②、Title:该属性值设置以该按钮的标题文本作为按钮边界;
③、Image:该属性设置以该按钮的图片作为按钮边界;
例如:[button setTitleEdgeInsets:UIEdgeInsetsMake(0, 0, 0, 0)]; [button setImageEdgeInsets:UIEdgeInsetsMake(0, 0, 0, 0)]; [button setContentEdgeInsets:UIEdgeInsetsMake(0, 0, 0, 0)];
(12)、Inset:该属性控制按钮的边界间距(相当于在按钮四周留白,这些区域既不会显示图片,也不会显示按钮文本)。该属性支持Top(上)、Bottom(下)、Left(左)和Right(右)4个值,这四个值分别代表按钮上、下、左、右的间距。
(13)、showsTouchWhenHighlighted设置为YES的时候,按钮点击时会发光;
例如:button.showsTouchWhenHighlighted = YES;(14)、设置按钮文本的位置(UIControlContentHorizontalAlignment)( UIControlContentVerticalAlignment)
例如:水平方向:button.contentHorizontalAlignment = UIControlContentHorizontalAlignmentCenter; button.contentHorizontalAlignment = UIControlContentHorizontalAlignmentLeft; button.contentHorizontalAlignment = UIControlContentHorizontalAlignmentRight; button.contentHorizontalAlignment = UIControlContentHorizontalAlignmentFill;垂直方向:
button.contentVerticalAlignment = UIControlContentVerticalAlignmentCenter;
button.contentVerticalAlignment = UIControlContentVerticalAlignmentTop;
button.contentVerticalAlignment = UIControlContentVerticalAlignmentBottom;
button.contentVerticalAlignment = UIControlContentVerticalAlignmentFill;
(15)、获取按钮的文字
例如:NSString* title = [button titleForState:UIControlStateNormal];(16)、获取按钮的文字颜色
例如:UIColor* color = [button titleColorForState:UIControlStateNormal];(17)、获取按钮内部的小图片
例如:UIImage* image = [button imageForState:UIControlStateNormal];(18)、获取按钮的背景图片
例如:UIImage* backImage = [button backgroundImageForState:UIControlStateNormal];
三、文本框(UITextField)
文本框控件(UITextField)继承了UIControl控件,也可作为活动控件使用。
之前介绍过的属性
textField.text = @"aaaa";
textField.textColor = [UIColor redColor];
textField.font = [UIFont systemFontOfSize:20];
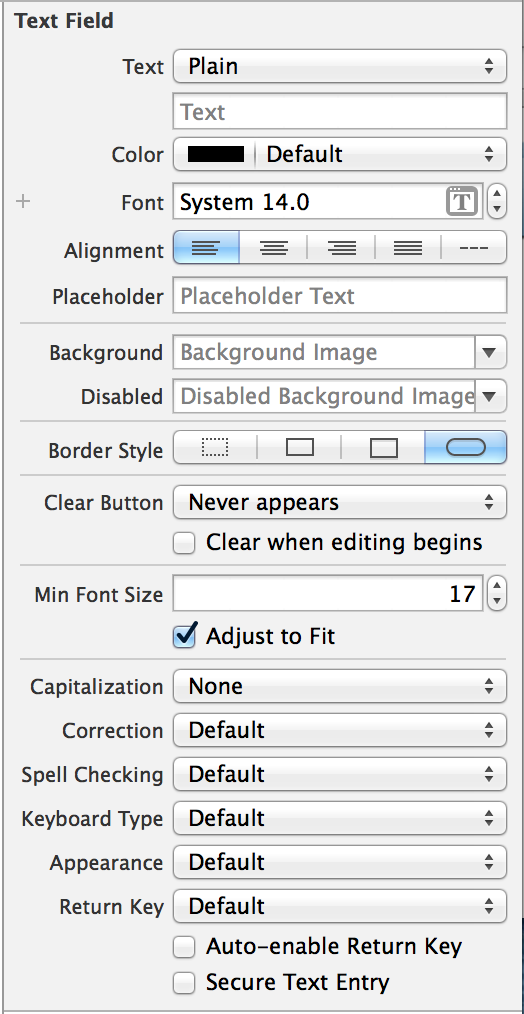
textField.textAlignment = NSTextAlignmentCenter;(1)、Placeholder:当用户还没有在该文本框内输入任何内容时,该文本框内将会显示一段灰色的文本,用来作为该文本框的提示消息。
例如:textField.placeholder = @"请输入名字";(2)、Border Style(UITextBorderStyle):该属性用于设置该文本框的边框分风格,iOS的文本框支持4种常见的风格。
例如:textField.borderStyle = UITextBorderStyleNone; textField.borderStyle = UITextBorderStyleLine; textField.borderStyle = UITextBorderStyleBezel; textField.borderStyle = UITextBorderStyleRoundedRect;(3)、Clear Button(UITextFieldViewMode):该属性控制文本是否显示清除按钮。
Clear Button属性用于控制合适显示清除按钮,该属性列表框支持如下列表项:- ①、Never Appears:从不显示清除按钮;
- ②、Appears while editing:当编辑内容时显示清除按钮;
- ③、Appears unless editing:除了编辑之外,都会显示清除按钮;
④、Is always visible:清除按钮一直可见;
例如:textField.clearButtonMode = UITextFieldViewModeNever;//重不出现 textField.clearButtonMode = UITextFieldViewModeWhileEditing;//编辑时出现 textField.clearButtonMode = UITextFieldViewModeUnlessEditing;//除了编辑外都出现 textField.clearButtonMode = UITextFieldViewModeAlways;//一直出现在Clear Button区,还有一个Clear when editing begins复选框,如果勾选该复选框,表明每次用户重新开始编辑该文本框内容时,都会自动清除该文本框内原有的内容;
例如:textField.clearsOnBeginEditing = YES;
(4)、Min Font Size与Adjust to Fit:Adjust to Fit复选框用于指定文本的字体大小是否随着文本框的贱笑而自动缩小。勾选该复选框可以确保整个文本在文本框内总是可见,即使文本长度超出了文本框的大小。在文本框内文本字体自动变小的过程中,Min Font Size属性值则指定该文本框内文本的最小值,这样就可以保证文本框内文本不会因为太小而看不见;
例如:textField.adjustsFontSizeToFitWidth = YES; textField.minimumFontSize = 4.0;(5)、Capitalization(UITextAutocapitalizationType):该属性控制是否转换该文本框输入文本的大小写,该属性支持如下属性值:
- ①、None:不自动切换大小写;
- ②、Words:自动将该文本框内每个单词的首字母转换为大写;
- ③、Sentence:自动将该文本框内每个句子的首字母转换为大写;
④、All Characters:自动将文本框内每个字母转为大写;
例如:textField.autocapitalizationType = UITextAutocapitalizationTypeNone;//不自动大写 textField.autocapitalizationType = UITextAutocapitalizationTypeWords;//单词首字母大写 textField.autocapitalizationType = UITextAutocapitalizationTypeSentences;//句子的首字母大写 textField.autocapitalizationType = UITextAutocapitalizationTypeAllCharacters;//所有字母都大写
(6)、Correction(UITextAutocorrectionType):该属性控制是否对文本框的文本进行自动更正。它支持如下属性值:
- ①、YES:自动更正文本框内的文本;
②、NO:不自动更正文本框内的文本;
例如:textField.autocorrectionType = UITextAutocorrectionTypeDefault;//默认 textField.autocorrectionType = UITextAutocorrectionTypeNo;//不自动纠错 textField.autocorrectionType = UITextAutocorrectionTypeYes;//自动纠错
(7)、Keyboard(UIKeyboardType):该属性用于设置该文本框关联的键盘——由于iphone和ipad等设备都没有提供物理键盘,因此,当用户开始编辑该文本框内容时,程序将控制系统显示一个虚拟键盘,该属性则用于这是到底显示哪一种虚拟键盘。它支持如下常用的属性值:
- ①、Default:显示默认的虚拟键盘;
- ②、ASCII Capable:显示英文字母键盘;
- ③、Numbers and Punctuation:显示数字和标点符号键盘;
- ④、Number Pad:显示数字键盘;
- ⑤、Phone Pad:显示电话拨号键盘;
- ⑥、E-mail Address:显示输入E-mail地址的虚拟键盘;
⑦、Decimal Pad:显示可输入数字和小数字的虚拟键盘 ;
例如:textField.keyboardType = UIKeyboardTypeDefault;//默认键盘,支持所有字符 textField.keyboardType = UIKeyboardTypeASCIICapable;//支持ASCII的默认键盘 textField.keyboardType = UIKeyboardTypeNumbersAndPunctuation;//标准电话键盘,支持+*#字符 textField.keyboardType = UIKeyboardTypeNumberPad;//数字键盘 textField.keyboardType = UIKeyboardTypePhonePad;//电话键盘 textField.keyboardType = UIKeyboardTypeEmailAddress;//用于输入电子 邮件地址的键盘 textField.keyboardType = UIKeyboardTypeDecimalPad;//数字键盘 有数字和小数点 textField.keyboardType = UIKeyboardTypeURL;//URL键盘,支持.com按钮 只支持URL字符 textField.keyboardType = UIKeyboardTypeNamePhonePad;//电话键盘,也支持输入人名 textField.keyboardType = UIKeyboardTypeTwitter;//优化的键盘,方便输入@、#字符 textField.keyboardType = UIKeyboardTypeWebSearch; textField.keyboardType = UIKeyboardTypeAlphabet;
(8)、Return Key(UIReturnKeyType):该属性用于设置当用户在文本框内按下return键(位于虚拟键盘右下角的按键)后的行为,比如,当我们在Safari的搜索框下输入文本时,按下return键后将会直接打开搜索。对于普通的需要与其他控件共享屏幕的文本框,按下return代表输入完成,因此,通常在该列表中选择Done;
例如:textField.returnKeyType = UIReturnKeyDefault;//默认 灰色按钮,标有Return textField.returnKeyType = UIReturnKeyGo;//标有Go的蓝色按钮 textField.returnKeyType = UIReturnKeyGoogle;//标有Google的蓝色按钮,用语搜索 textField.returnKeyType = UIReturnKeyJoin;//标有Join的蓝色按钮 textField.returnKeyType = UIReturnKeyNext;//标有Next的蓝色按钮 textField.returnKeyType = UIReturnKeyRoute;//标有Route的蓝色按钮 textField.returnKeyType = UIReturnKeySearch;//标有Search的蓝色按钮 textField.returnKeyType = UIReturnKeySend;//标有Send的蓝色按钮 textField.returnKeyType = UIReturnKeyYahoo;//标有Yahoo的蓝色按钮 textField.returnKeyType = UIReturnKeyYahoo;//标有Yahoo的蓝色按钮 textField.returnKeyType = UIReturnKeyDone;// textField.returnKeyType = UIReturnKeyEmergencyCall;//紧急呼叫按钮Return Key列表框下卖弄还有如下两个复选框:
- ①、Auto-enable Return Key:如果勾选该复选框,那么虚拟键盘上的return键默认是禁用的;只有当该用户在该文本框内输入内容后return键才会变为可用。通过这种方式可强制用户必须在该文本框内输入内容;
②、Secure:如果勾选该复选框,当用户在该文本框内输入内容时,文本框将以黑点来代替用户输入的字符。如果勾选该复选框用于设置密码输入框。
例如:textField.secureTextEntry = YES;
(9)、文本框外观
例如:textField.keyboardAppearance=UIKeyboardAppearanceDefault;//默认外观,浅灰色 textField.keyboardAppearance=UIKeyboardAppearanceDark; textField.keyboardAppearance=UIKeyboardAppearanceLight; textField.keyboardAppearance=UIKeyboardAppearanceAlert;//深灰 石墨色(10)、设置代理方式
例如:@interface RootViewController : UIViewController<UITextFieldDelegate> textField.delegate = self;(11)、添加时时监听
[_MyTextField addTarget:self action:@selector(edit:) forControlEvents:UIControlEventEditingChanged];(12)、委托方法UITextFieldDelegate
#pragma mark - UITextFieldDelegate
- (BOOL)textFieldShouldBeginEditing:(UITextField *)textField{
    //返回一个BOOL值,指定是否循序文本字段开始编辑
    return YES;
}
- (void)textFieldDidBeginEditing:(UITextField *)textField{
    //开始编辑时触发,文本字段将成为first responder
}
- (BOOL)textFieldShouldEndEditing:(UITextField *)textField{
    //返回BOOL值,指定是否允许文本字段结束编辑,当编辑结束,文本字段会让出first responder
    //要想在用户结束编辑时阻止文本字段消失,可以返回NO
    //这对一些文本字段必须始终保持活跃状态的程序很有用,比如即时消息
    return YES;
}
- (void)textFieldDidEndEditing:(UITextField *)textField{
    //返回一个BOOL值指明是否允许根据用户请求清除内容
    //可以设置在特定条件下才允许清除内容
}
- (BOOL)textField:(UITextField *)textField shouldChangeCharactersInRange:(NSRange)range replacementString:(NSString *)string{
    //string就是此时输入的那个字符 textField就是此时正在输入的那个输入框 返回YES就是可以改变输入框的值 NO相反
    if ([string isEqualToString:@"\n"])//按会车可以改变
    {
        return YES;
    }
    NSString* toBeString = [textField.text stringByReplacingCharactersInRange:range withString:string]; //得到输入框的内容
    if (_MyTextField == textField)  //判断是否时我们想要限定的那个输入框
    {
        if ([toBeString length] > 20) { //如果输入框内容大于20则弹出警告
            textField.text = [toBeString substringToIndex:20];
            UIAlertView *alert = [[UIAlertView alloc] initWithTitle:nil message:@"超过最大字数不能输入了" delegate:nil cancelButtonTitle:@"Ok" otherButtonTitles:nil, nil];
            [alert show];
            return NO;
        }
    }
    //当用户使用自动更正功能,把输入的文字修改为推荐的文字时,就会调用这个方法。
    //这对于想要加入撤销选项的应用程序特别有用
    //可以跟踪字段内所做的最后一次修改,也可以对所有编辑做日志记录,用作审计用途。
    //要防止文字被改变可以返回NO
    //这个方法的参数中有一个NSRange对象,指明了被改变文字的位置,建议修改的文本也在其中
    return YES;
}
- (BOOL)textFieldShouldClear:(UITextField *)textField{
    //点击文本中的清除按钮,返回是否清楚所有内容
    return YES;
}
- (BOOL)textFieldShouldReturn:(UITextField *)textField{
    //返回一个BOOL值,指明是否允许在按下回车键时结束编辑
    //如果允许要调用resignFirstResponder 方法,这回导致结束编辑,而键盘会被收起[textField resignFirstResponder];
    [textField resignFirstResponder];
    return YES;
}- (13)重新绘制行为
除了UITextField对象的风格选项,你还可以定制化UITextField对象,为他添加许多不同的重写方法,来改变文本字段的显示行为。这些方法都会返回一个CGRect结构,制定了文本字段每个部件的边界范围。以下方法都可以重写。
#import "MyTF.h"
@implementation MyTF
- (CGRect)textRectForBounds:(CGRect)bounds{
    //重写来重置文字区域
    return CGRectMake(0, 20, 320, 20);
}
- (void)drawTextInRect:(CGRect)rect{
    //改变绘文字属性.重写时调用super可以按默认图形属性绘制,若自己完全重写绘制函数,就不用调用super了.
    [super drawTextInRect:rect];
}
- (CGRect)placeholderRectForBounds:(CGRect)bounds{
    //重写来重置占位符区域
    return CGRectMake(0, 0, 100, 40);
}
- (void)drawPlaceholderInRect:(CGRect)rect{
    //重写改变绘制占位符属性.重写时调用super可以按默认图形属性绘制,若自己完全重写绘制函数,就不用调用super了.
}
- (CGRect)borderRectForBounds:(CGRect)bounds{
    //重写来重置边缘区域
    return CGRectMake(0, 0, 0, 0);
}
- (CGRect)editingRectForBounds:(CGRect)bounds{
    //重写来重置编辑区域
    return CGRectMake(20, 0, 100, 40);
}
- (CGRect)clearButtonRectForBounds:(CGRect)bounds{
    //重写来重置clearButton位置,改变size可能导致button的图片失真
    return CGRectMake(300, 0, 20, 40);
}
@end
(14)对UITextField进行监听,通知中心
UITextField派生自UIControl,所以UIControl类中的通知系统在文本字段中也可以使用。除了UIControl类的标准事件,你还可以使用下列UITextField类特有的事件:
例如:NSNotificationCenter* cationCenter = [NSNotificationCenter defaultCenter]; [cationCenter addObserver:self selector:@selector(didBeginEditing:) name:UITextFieldTextDidBeginEditingNotification object:nil]; [cationCenter addObserver:self selector:@selector(didChange:) name:UITextFieldTextDidChangeNotification object:nil]; [cationCenter addObserver:self selector:@selector(didEndEditing:) name:UITextFieldTextDidEndEditingNotification object:nil];
①、完成输入后关闭键盘
例如:
- (BOOL)textFieldShouldReturn:(UITextField *)textField{
    //返回一个BOOL值,指明是否允许在按下回车键时结束编辑
    //如果允许要调用resignFirstResponder 方法,这回导致结束编辑,而键盘会被收起[textField resignFirstResponder];
    [textField resignFirstResponder];
    return YES;
}
②、触碰背景关闭键盘
可以给背景添加UIControl控件,然后添加触碰事件。
四、多行文本控件(UITextView)
多行文本控件(UITextView)继承了UIScrollView:UIView控件,因此它默认带有滚动条。
UITextView与UITextField都是文本编辑、显示控件。大部分属性都是相同的,区别有三点:
- (1)、UITextView是一个多行文本框,而UITextField只是单行文本框;
- (2)、UITextView没有继承UIControl控件,因此不能在Interface Builder中为该控件的时间绑定IBAction事件处理方法;也不能调用UIControl提供的addTarget:action:forControlEvents:方法来绑定事件处理方法;
(3)、UITextView继承了UIScrollView,因此它具有UIScrollView的功能和行为;
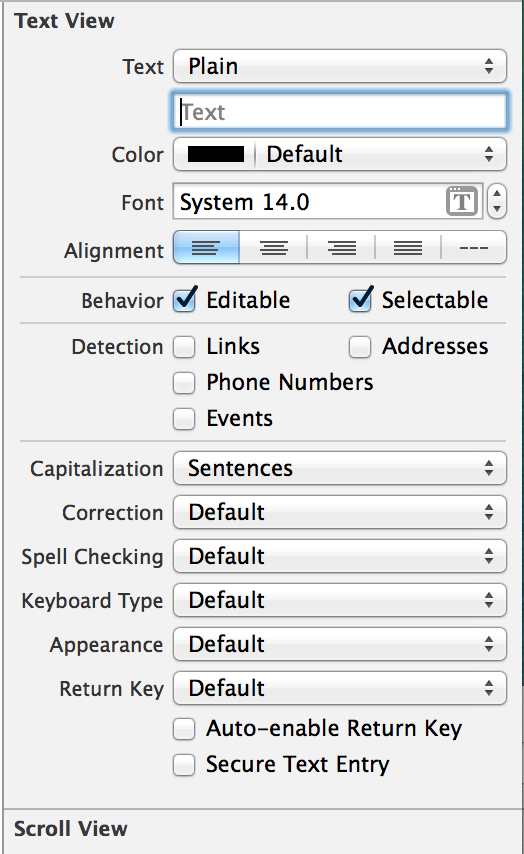
UITextView的各种属性:(1)、Text:设置文本框默认显示的文本,下面的输入框设置文本框文本的内容
例如:textView.text = @"我是好人”;(2)、Color:设置文本框文本的颜色
例如:textView.textColor = [UIColor redColor];(3)、Font:设置文本框文本的字体
例如:textView.font = [UIFont systemFontOfSize:13];(4)、Alignment:设置文本框内文本的对齐方式
例如:textView.textAlignment = NSTextAlignmentCenter;(5)、Behavior:该下面与连个复选框
①、Editable:设置文本框是否可编辑
例如:textView.editable = YES;- ②、Selectable:设置文本框是否可选择;
- (6)、Detection:设置自动检测文本框的那些特殊内容
- (7)、Capitalization:设置自动大写文本框内文本的风格
- (8)、Correction:设置文本框的自动更正风格;
(9)、Keyboard Type(UIKeyboardType):设置文本框关联的键盘类型
例如:textView.keyboardType = UIKeyboardTypeDefault;类型同UITextField
(10)、Return Key(UIReturnKeyType):这是虚拟键盘上回车键的文本
例如:textView.returnKeyType = UIReturnKeyDefault;类型同UITextField
(11)对UITextView进行监听,通知中心
使用下列UITextView类特有的事件:
例如:NSNotificationCenter* cationCenter = [NSNotificationCenter defaultCenter]; [cationCenter addObserver:self selector:@selector(didBeginEditing:) name:UITextViewTextDidBeginEditingNotification object:nil]; [cationCenter addObserver:self selector:@selector(didChange:) name:UITextViewTextDidChangeNotification object:nil]; [cationCenter addObserver:self selector:@selector(didEndEditing:) name:UITextViewTextDidEndEditingNotification object:nil];(12)、textView的选中范围
例如:NSLog(@"%d",textView.selectedRange.length);
下面先介绍UIScrollView支持的各种属性:
1、UIScrollView支持的属性
UIScrollView代表一个可滚动的额控件,该控件允许用户拖动手指来滑动该控件中的内容。通过滚动控件的支持,UIScrollView可以显示多个屏幕的内容,甚至可以显示超过能放在内容中的内容。
UIScrollView默认已经实现并处理放大和缩小手势,因此,UIScrollView及其子类默认可以通过手指的捏合动作来放大、缩小;
UIScrollView支持如下三个控制显示区域的属性:
(1)、contentSize:该属性是一个CGSize类型的值,CGSize并不是类,而是一个结构体,它包含width、height两个成员变量,用于代表UIScrollView所需要显示内容的完整宽度和完整高度;
例如:_MyScrollView.contentSize = CGSizeMake(320 * 4, 480);
(2)、contentInset:该属性是一个UIEdgeInsets类型的值,UIEdgeInsets并不是类,而是一个结构体,它包含top、left、bottom、right四个成员变量,分别代表UIScrollView所需要显示内容在上、左、下、右的留白。
例如:_MyScrollView.contentInset = UIEdgeInsetsMake(20, 20, 20, 20);(3)、contentOffSet:该属性是一个CGPoint类型的值,CGPoint也是一个结构体,它包含x、y两个成员变量,用于代表该UIScrollView的可是区域在显示内容上滑动的距离。
例如:_MyScrollView.contentOffset = CGPointMake(100, 0);
下面来介绍Xcode属性检查面板中为UIScrollView提供的属性:
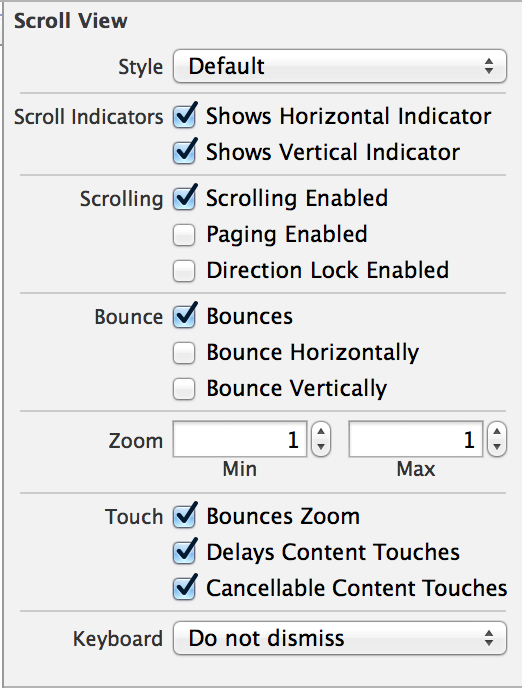
(1)、Scroll Indicators:
下面有两个复选框:①、Shows Horizontal Indicator:如果勾选该复选框(该复选框对应该控件的showsHorizontalScrollIndicator属性),当用户水平滑动该UIScrollView控件时,该控件将会显示水平滑动条。
例如:_MyScrollView.showsHorizontalScrollIndicator = NO;②、Shows Vertical Indicator:如果勾选该复选框(该复选框对应该控件的showsVerticalScrollIndicator属性),当用户垂直滑动该UIScrollView控件时,该控件将会显示垂直滑动条。
例如:_MyScrollView.showsVerticalScrollIndicator = NO;
(2)、Scrolling:
下面有三个复选框:①、Scrolling Enabled:只有勾选该复选框(该复选框对应该控件的scrollEnabled属性),该UIScrollView控件才能滚动它包含的内容;
例如:_MyScrollView.scrollEnabled = YES;②、Paging Enabled:只有勾选该复选框(该复选框对应该控件的pagingEnabled属性),该UIScrollView将会对它所有包含的内容进行分页。也就是说,每当用户滚动该控件时,不能随心所欲的停留,只能停留在UIScrollView按分页逻辑分出的某一“页”上;
例如:_MyScrollView.pagingEnabled = YES;③、Direction Lock Enabled:如果没有勾选该复选框(该复选框对应该控件的directionalLockEnabled属性),用户可以同时在水平和垂直方向上滑动该UIScrollView;如果勾选该复选框,当用户第一次在水平或垂直方向滑动该UIScrollView之后,系统将不会允许在其他方向上滚动该UIScrollView控件;
例如:_MyScrollView.directionalLockEnabled = YES;
(3)、Bounce:
该属性提供了三个可勾选的复选框,其含义如下:①、Bounces:如果勾选该复选框(该复选框对应该控件的Bounces属性),则该UIScrollView控件是有“弹性”的,当用户拖动该控件内容遇到边界时,该控件会显示“弹回”效果;如果没有勾选该复选框,点那个用户拖动该控件的内容遇到边界时会立即停止;
例如:_MyScrollView.bounces = YES;②、Bounce Horizontally:如果勾选该复选框(该复选框对应该控件的alwaysBounceHorizontal属性),则该UIScrollView控件在水平方向上是有“弹性”的,如果还勾选了Bounces复选框,那么即使在水平方向已经到了内容边界,用户也可像拉伸橡皮筋一样滑动该控件的内容,但控件的内容会自动弹回去;
例如:_MyScrollView.alwaysBounceHorizontal = NO;③、Bounce Vertically:如果勾选该复选框(该复选框对应该控件的alwaysBounceVertically属性),则该UIScrollView控件在垂直方向上是有“弹性”的,如果还勾选了Bounces复选框,那么即使在垂直方向已经到了内容边界,用户也可像拉伸橡皮筋一样滑动该控件的内容,但控件的内容会自动弹回去;
例如:_MyScrollView.alwaysBounceVertical = NO;
(4)、zoom:
该属性区提供了一下两个文本框供用户填写:①、Min:设置该UIScrollView最小的可缩放比例。(此处的设置对应于该控件的minimumZoomScale属性);
例如:_MyScrollView.minimumZoomScale = 0.5;②、Max:设置该UIScrollView最大的可缩放比例。(此处的设置对应于该控件的maximumZoomScale属性);
例如:_MyScrollView.minimumZoomScale = 0.5;
(5)、设置该UIScrollView控件的滑动条的类型(UIScrollViewIndicatorStyle)
例如:_MyScrollView.indicatorStyle = UIScrollViewIndicatorStyleBlack;(6)、Touch:
该属性区提供了如下三个复选框:①、Bounces Zoom:该复选框控制该UIScrollView对内容进行缩放时是否具有弹性(该复选框对应该控件的BouncesZoom属性)。如果勾选该复选框,当用户通过手势对该UIScrollView进行缩放时,如果缩放比例超过该控件的minimunZoomScale属性,或者放大比例超过maximunZoomScale属性,该控件将会短暂的超过该缩放限制,然后迅速弹回最小缩放比例或最大缩放比例;
例如:_MyScrollView.bouncesZoom = YES;②、Delays Content Touches:如果勾选该复选框(该复选框对应该控件的delaysContentTouches属性),该UIScrollView将延迟到真正确定滚动意图才去处理触碰手势。如果没有勾选该复选框,只要用户触碰该控件,该UIScrollView立即调用touchesShouldBegin:withEvent:inContentView方法处理滚动;
例如:_MyScrollView.delaysContentTouches = YES;③、Cancelable Content Touches:如果勾选该复选框(该复选框对应该控件的CancelContentTouches属性),如果该UIScrollView中的内容已经跟踪用户手指触碰动作的情况下,且用户拖动手指以启动一个滚动事件,该UIScrollView控件将会调用touchesCancelled:withEvent:方法,并将该手指拖动事件当成滚动该UIScrollView控件。但如果没有勾选该复选框,只要该UIScrollView控件的内容已经跟踪用户手指触碰事件,将不会理会手指在该控件上的其他移动。通常建议勾选该复选框。即假如你设置canCancelContentTouches为YES,那么当你在UIScrollView上面放置任何子视图的时候,当你在子视图上移动手指的时候,UIScrollView会给子视图发送touchCancel的消息。而如果该属性设置为NO,ScrollView本身不 处理这个消息,全部交给子视图处理。
例如:_MyScrollView.canCancelContentTouches = YES;附加:例子
单独图片添加手势实现放大缩小功能
- (void)pinch:(UIPinchGestureRecognizer *)sender{
    //将试图放在页面最上面
    [self.view bringSubviewToFront:[(UIPinchGestureRecognizer*)sender view]];
    //当手指离开屏幕时,将lastscale设置为1.0
    if([(UIPinchGestureRecognizer*)sender state] == UIGestureRecognizerStateEnded) {
        lastScale = 1.0;
        return;
    }
    CGFloat scale = 1.0 - (lastScale - [(UIPinchGestureRecognizer*)sender scale]);
    CGAffineTransform currentTransform = [(UIPinchGestureRecognizer*)sender view].transform;
    CGAffineTransform newTransform = CGAffineTransformScale(currentTransform, scale, scale);
    [[(UIPinchGestureRecognizer*)sender view] setTransform:newTransform];
    lastScale = [(UIPinchGestureRecognizer*)sender scale];
}
利用UIScrollView实现图片的放大缩小功能
RootViewController.h的接口部分
#import <UIKit/UIKit.h>
@interface RootViewController : UIViewController<UIScrollViewDelegate>{
    UIScrollView *_scrollview;
    UIImageView *_imageview;
}
@end
RootViewController.m的实现部分
#import "RootViewController.h"
@interface RootViewController ()
@end
@implementation RootViewController
- (void)viewDidLoad
{
[super viewDidLoad];
//添加 UIScrollView
//设置 UIScrollView的位置与屏幕大小相同
_scrollview=[[UIScrollView alloc]initWithFrame:self.view.bounds];
[self.view addSubview:_scrollview];
//2添加图片
//有两种方式
//(1)一般方式
// UIImageView *imageview=[[UIImageView alloc]init];
// UIImage *image=[UIImage imageNamed:@"minion"];
// imageview.image=image;
// imageview.frame=CGRectMake(0, 0, image.size.width, image.size.height);
//(2)使用构造方法
UIImage *image=[UIImage imageNamed:@"1.png"];
_imageview=[[UIImageView alloc]initWithFrame:_scrollview.bounds];
_imageview.image = image;
//调用initWithImage:方法,它创建出来的imageview的宽高和图片的宽高一样
[_scrollview addSubview:_imageview];
//设置UIScrollView的滚动范围和图片的真实尺寸一致
_scrollview.contentSize= self.view.bounds.size;
//设置实现缩放
//设置代理scrollview的代理对象
_scrollview.delegate=self;
//设置最大伸缩比例
_scrollview.maximumZoomScale=2.0;
//设置最小伸缩比例
_scrollview.minimumZoomScale=0.5;
}
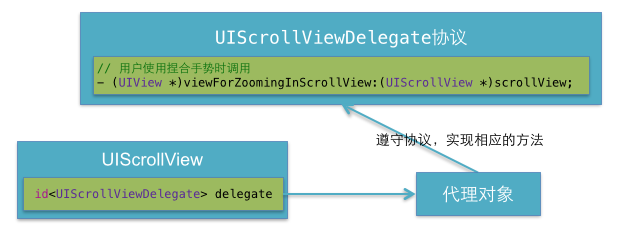
#pragma mark UIScrollViewDelegate
//告诉scrollview要缩放的是哪个子控件
-(UIView *)viewForZoomingInScrollView:(UIScrollView *)scrollView{
return _imageview;
}
//缩放完毕的时候调
- (void)scrollViewWillBeginZooming:(UIScrollView *)scrollView withView:(UIView *)view{
_imageview.center = CGPointMake(self.view.bounds.size.width/2, self.view.bounds.size.height/2);
}
//正在缩放的时候调用
- (void)scrollViewDidZoom:(UIScrollView *)scrollView{
_imageview.center = CGPointMake(self.view.bounds.size.width/2, self.view.bounds.size.height/2);
}
@end- (7)、双击缩小时常用方法
- ①、- (void)setZoomScale:(CGFloat)scale animated:(BOOL)animated;
//这种方法调整的zoomScale进行必要的缩放以便使内容视图成为由矩形定义的区域 - ②、- (void)zoomToRect:(CGRect)rect animated:(BOOL)animated;
//把从scrollView里截取的矩形区域缩放到整个scrollView当前可视的frame里面。所以如果截取的区域大于scrollView的frame时,图片缩小。如果截取区域小于frame,会看到图片放大。一般情况下rect需要自己计算出来。
- ①、- (void)setZoomScale:(CGFloat)scale animated:(BOOL)animated;
(8)、UIScrollViewDelegate
#pragma mark UIScrollViewDelegate①、缩放Delegate
//告诉scrollview要缩放的是哪个子控件
- (UIView *)viewForZoomingInScrollView:(UIScrollView *)scrollView;
//缩放开始的时候调用
- (void)scrollViewWillBeginZooming:(UIScrollView *)scrollView withView:(UIView *)view;
//正在缩放的时候调用
- (void)scrollViewDidZoom:(UIScrollView *)scrollView;
//缩放完毕的时候调
- (void)scrollViewDidEndZooming:(UIScrollView *)scrollView withView:(UIView *)view atScale:(CGFloat)scale;
②、滑动的时候调用
//只要view有滚动(不管是拖、拉、放大、缩小等导致)都会执行此函数
- (void)scrollViewDidScroll:(UIScrollView *)scrollView;
//将要开始拖拽,手指已经放在view上并准备拖动的那一刻
- (void)scrollViewWillBeginDragging:(UIScrollView *)scrollView;
//将要结束拖拽,手指已拖动过view并准备离开手指的那一刻,注意:当属性pagingEnabled为YES时,此函数不被调用
- (void)scrollViewWillEndDragging:(UIScrollView *)scrollView withVelocity:(CGPoint)velocity targetContentOffset:(inout CGPoint *)targetContentOffset;
//已经结束拖拽,手指刚离开view的那一刻
- (void)scrollViewDidEndDragging:(UIScrollView *)scrollView willDecelerate:(BOOL)decelerate;
//view将要开始减速,view滑动之后有惯性
- (void)scrollViewWillBeginDecelerating:(UIScrollView *)scrollView;
//view已经停止滚动
- (void)scrollViewDidEndDecelerating:(UIScrollView *)scrollView;
//有动画时调用
- (void)scrollViewDidEndScrollingAnimation:(UIScrollView *)scrollView;
//如果你不是完全滚动到滚轴视图的顶部,你可以轻点状态栏,那个可视的滚轴视图会一直滚动到顶部,那是默认行为,你可以通过该方法返回NO来关闭它
- (BOOL)scrollViewShouldScrollToTop:(UIScrollView *)scrollView;
//判断是哪一个可以返回滚轴视图的顶部 当有多个UIScrollView时,必须保证有且只有一个UIScrollView才能有效
- (void)scrollViewDidScrollToTop:(UIScrollView *)scrollView;
2、使用委托对象处理UITextView
UITextViewDelegate协议定义如下方法:
- (1)、- (BOOL)textViewShouldBeginEditing:(UITextView *)textView;//用户将要开始编辑该UITextView的内容时会激发该方法
- (2)、- (void)textViewDidBeginEditing:(UITextView *)textView;//用户开始编辑该UITextView的内容时会激发该方法
- (3)、- (BOOL)textViewShouldEndEditing:(UITextView *)textView;//用户将要结束编辑该UITextView的内容时会激发该方法
- (4)、- (void)textViewDidEndEditing:(UITextView *)textView;//用户结束编辑该UITextView的内容时会激发该方法
- (5)、- (BOOL)textView:(UITextView )textView shouldChangeTextInRange:(NSRange)range replacementText:(NSString )text;//该UITextView内指定范围内的文本内容将要被替换时激发该方法
- (6)、- (void)textViewDidChange:(UITextView *)textView;//该UITextView中包含的文本内容发生改变时会激发该方法
- (7)、- (void)textViewDidChangeSelection:(UITextView *)textView;//当用户选中该UITextView控件内某些文本时会激发该方法
3、关闭虚拟键盘
- (1)、如果程序界面带导航条,可通过导航条来关闭虚拟键盘;
- (2)、通过自定义虚拟键盘附件来关闭虚拟键盘;
4、自定义选择内容后的菜单
当用户在UITextView中选择部分内容后,系统默认会系那是几个菜单项,实际上,用户也可以添加自己的菜单。
例如:
//首先创建两个菜单选项
UIMenuItem* mailShare = [[UIMenuItem alloc]initWithTitle:@"邮件分享" action:@selector(mailShare:)];
UIMenuItem* weiboShare = [[UIMenuItem alloc]initWithTitle:@"微博分享" action:@selector(weiboShare:)];
UIMenuController* menu = [UIMenuController sharedMenuController];
[menu setMenuItems:[NSArray arrayWithObjects:mailShare,weiboShare, nil]];
//重写UIResponder的canPerformAction:withSender:方法
//当该方法返回YES时,该界面将会显示该Action对应的控件
- (BOOL)canPerformAction:(SEL)action withSender:(id)sender{
    //如果Action是mailShare:或weiboShare:方法
    if (action == @selector(mailShare:)||action == @selector(weiboShare:)) {
        //如果textView选中的内容长度大于0,返回YES,
        //当该方法返回YES时,该Action对应的控件将会显示出来
        if (textView.selectedRange.length > 0) {
            return YES;
        }
    }
    return NO;
}
五、开关按钮(UISwitch)
UISwitch控件代表一个开关按钮,类似于传统的物理开关。UISwitch继承了UIControl基类,因此可以当成活动控件使用,通过ValueChanged事件来检测开关按钮的状态切换;
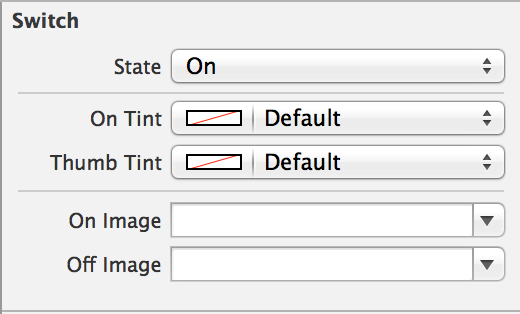

(1)、State:设置该开关按钮的初始状态;
例如:MySwitch.on = YES;(2)、On Tint:设置该按钮处于打开状态的颜色;
例如:MySwitch.onTintColor = [UIColor redColor];(3)、Thumb Tint:设置该按钮的颜色;
例如:MySwitch.thumbTintColor = [UIColor purpleColor];(4)、On Image:设置按钮处于打开状态时的图片
例如:MySwitch.onImage = image;(5)、Off Image:设置按钮处于关闭状态时的图片
例如:MySwitch.offImage = image;(6)、实现基类UIControl的方法:
例如:[MySwitch addTarget:self action:@selector(clicked:) forControlEvents:UIControlEventValueChanged];
六、分段控件(UISegmentedControl)
分段控件提供一栏按钮,当每次只能激活其中一个按钮。UISegmentedControl控件也继承了UIControl,因此它也可以作为活动控件:
SegmentedControl = [[UISegmentedControl alloc]initWithItems:[NSArray arrayWithObjects:@"",@"",@"", nil]];1、Style:该属性支持一个列表项,该列表可支持如下三个列表项;
- ①、Plain:如果选择该列表项,该分段控件将使用最普通的风格;
- ②、Bordered:如果选择该列表项,该分段控件将在最普通的风格周围添加一圈边框;
③、Bar:如果选择该列表项,该分段控件将会使用工具条风格;
例如:SegmentedControl.segmentedControlStyle = UISegmentedControlStylePlain;
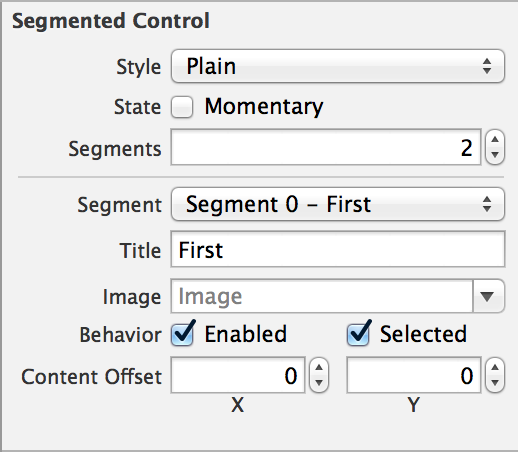
2、State:该属性区提供了一个Momentary复选框,u如果勾选该复选框,那么该分段控件将不会保存控件的状态,当用户点击分段控件的某个分段时,该控件只在用户点击时高亮显示,用户点击结束时,该分段控件不会继续高亮显示用户点击的那个分段。
例如:SegmentedControl.momentary = NO;3、Tint:该属性的值是一个颜色选择框,用于设置该分段控件被选中分段的高亮颜色;
例如:SegmentedControl.tintColor = [UIColor redColor];- 4、Segments:该属性的值是一个整数,用于控制该分段控件总共被分为几段;
注意:该属性只读不写
例如:
NSLog(@"number = %lu",(unsigned long)SegmentedControl.numberOfSegments);
- 5、Segment:该属性是一个列表框,用于徐那种指定的分段。该列表框所包含的列表项会动态改变,如果开发者将前面的Segments设置为4,那么该列表框将包含四个选项,供开发者选择指定的列表项进行配置;
该列表框中Segment 0代表第一个分段,Segment 1代表第二个分段,以此类推。 6、Title:该属性用于为Segment列表框中选择中的分段设置标题。随着前面Segment列表框所选中分段的不同,此处的Title用于为不同的分段设置标题;
例如:[SegmentedControl setTitle:@"11" forSegmentAtIndex:1];7、Image:该属性用于为Segment列表框中选中的分段设置图片,随着前面的Segment列表框所选中分段的不同,此处的Image用于为不同的分段设置图片;
例如:[SegmentedControl setImage:image forSegmentAtIndex:1];8、Behavior:该属性包含以下两个复选框。
①、Enabled:该属性用于控制Segment列表框中的分段是否可用。如果取消勾选该复选框,那么Segment列表框中选中的分段将变为不可用。
例如:[SegmentedControl setEnabled:NO forSegmentAtIndex:1];②、Selected:该属性用于控制Segment列表框中选中的分段是否被选中。如果勾选该复选框,那么Segment列表框中的分段将变成高亮被选中状态;
例如:[SegmentedControl setSelectedSegmentIndex:1];
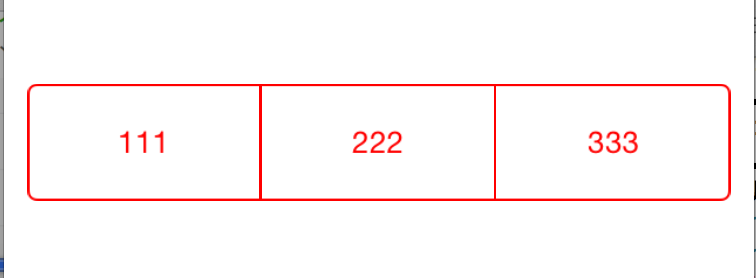
1、通过分段控件控制背景颜色
例如:
[SegmentedControl addTarget:self action:@selector(segmentControl:) forControlEvents:UIControlEventValueChanged];
- (void)segmentControl:(UISegmentedControl *)segmentControl{
    switch ([segmentControl selectedSegmentIndex]) {
        case 0:
            self.view.backgroundColor = [UIColor redColor];
            break;
        case 1:
            self.view.backgroundColor = [UIColor yellowColor];
            break;
        case 2:
            self.view.backgroundColor = [UIColor purpleColor];
            break;
        default:
            break;
    }
}
2、动态删除、添加分段
例如:
①、添加:
[SegmentedControl insertSegmentWithImage:image atIndex:1 animated:YES];
[SegmentedControl insertSegmentWithTitle:@"2" atIndex:1 animated:YES];
②、删除:
例如:[SegmentedControl removeSegmentAtIndex:1 animated:YES];
七、图像控件(UIImageView)
UIImageView代表一个图片显示控件,他直接继承了UIView基类,UIImageView只能作为图片的显示控件,不能接受用户输入,也不能与用户交互,他只是一个静态控件。
创建UIImageView对象之后,接下来可以通过以下两个属性访问或设置该控件显示的图片:
- ①、image:访问或设置该控件显示的图片;
- ②、highlightedImage:访问或设置该控件处于高度状态时显示的图片;
除此之外,UIImageView还可以使用动画显示一组图片,使用UIImageView动画显示一组图片的属性和方法如下:
- (1)、animationImages:访问或者设置该UIImageView需要动画显示的多张图片,该属性的值是一个NSArray;
- (2)、highlightedAnimationImages:访问或者设置该UIImageView高亮状态下需要动画显示的多张图片,该属性值是一个NSArray;
- (3)、animationDuration:访问或者设置该UIImageView的动画持续时间;
- (4)、animationRepeatCount:访问或者设置该UIImageView的动画重复次数;
- (5)、startAnimating:开始播放动画;
- (6)、stopAnimating:停止播放动画;
- (7)、isAnimating:该方法判断该UIImageView是否在播放动画;
UIImageView的属性:
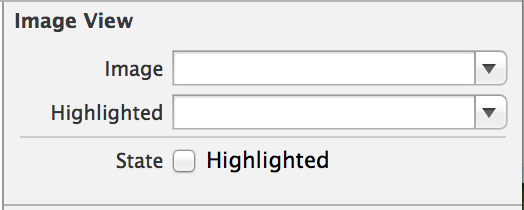
1、image:设置该控件显示的图片
例如:imageView.image = image;2、Highlighted:设置该控件高亮状态显示的图片
例如:imageView.highlightedImage = highLightedImage;3、设置该控件是否处于高亮状态
例如:imageView.highlighted = NO;4、Mode
Mode属性用于控制该UI控件内图片的对齐方式,以及是否缩放该图片来适应该控件,其属性值支持一个弹出菜单。- ①、Scale to Fit:不保持纵横缩放图片,是图片完全适应该UIImageView控件;
- ②、Aspect Fit:保持纵横比缩放图片,使图片的长边能完全显示出来。也就是说,可以完整的将图片显示出来;
- ③、Aspect Fill:保持纵横比缩放图片,只保证图片的短边能完全显示出来。也就是说,图片通常只在水平或垂直方向是完整的,另一个方向将会发生截取;
- ④、Center:不缩放图片,只显示图片的中间区域;
- ⑤、Top:不缩放图片,只显示图片的顶部部分;
- ⑥、Bottom:不缩放图片,值显示图片的底部区域;
- ⑦、Left:不缩放图片,值显示图片的左边区域;
- ⑧、Right:不缩放图片,值显示图片的右边区域;
- ⑨、Top Left:不缩放图片,值显示图片的左上边区域;
⑩、Top Right:不缩放图片,值显示图片的右上边区域;
例如:imageView.contentMode = UIViewContentModeScaleAspectFit;
1、图片浏览器//当触碰时图片截图放大一倍
例如:当触碰时图片截图放大一倍
- (void)tap:(UITapGestureRecognizer *)tap{
    UIImage* srcImage = imageView.image;//获取正在显示的原始位图
    //获取用户手指在imageView控件上的触碰点
    CGPoint point = [tap locationInView:imageView];
    //获取正在显示的原图对应的CGImageRef
    CGImageRef sourceImageRef = [srcImage CGImage];
    //获取图片实际大小与图片的缩放比例
    CGFloat scale1 = srcImage.size.width/self.view.frame.size.width;
    CGFloat scale2 = srcImage.size.height/self.view.frame.size.height;
    CGFloat x;
    CGFloat y;
    NSLog(@"point.x * scale = %f weight = %f",point.x * scale1,srcImage.size.width/4);
    if (point.x * scale1 < srcImage.size.width/4) {
        x = 0;
    }else if(point.x * scale1 > srcImage.size.width/4 * 3){
        x = srcImage.size.width/4 * 3;
    }else{
        x = point.x * scale1 - srcImage.size.width/4;
    }
    if (point.y * scale2 < srcImage.size.height/4) {
        y = 0;
    }else if(point.y * scale2 > srcImage.size.height/4 * 3){
        y = srcImage.size.height/4 * 3;
    }else{
        y = point.y * scale2 - srcImage.size.height/4;
    }

    NSLog(@"x = %f,y = %f",x,y);
    //调用CGImageCreateWithImageInRect函数获取sourceImageRef中指定区域的图片
    CGImageRef newImageRef = CGImageCreateWithImageInRect(sourceImageRef, CGRectMake(x, y, srcImage.size.width/2, srcImage.size.height/2));
    //让imageView控件显示newImageRef对应的图片
    imageView.image = [UIImage imageWithCGImage:newImageRef];
}
2、“幻灯片”播放器
例如:
imageView = [[UIImageView alloc]initWithFrame:CGRectMake(0, 0, self.view.frame.size.width, self.view.frame.size.height)];
image = [NSArray arrayWithObjects:[UIImage imageNamed:@"1.png"],[UIImage imageNamed:@"2.png"],[UIImage imageNamed:@"3.png"],[UIImage imageNamed:@"4.png"],[UIImage imageNamed:@"5.png"],[UIImage imageNamed:@"6.png"], nil];
//设置imageView控件需要动画的图片为image集合元素
imageView.animationImages = image;
imageView.animationDuration = 12;
imageView.animationRepeatCount = 44;
[imageView startAnimating];
[self.view addSubview:imageView];
八、进度条
广义的进度条包括两个控件:UIProgressView与UIActivityIndicatorView,其中UIProgressView用于向用户显示某个耗时操作完成的百分比。因此,它可以动态的显示进度,从而更好地提高用户界面的友好性;而UIActivityIndicatorView则显示一个旋转的齿轮,它仅仅显示某个耗时操作正在执行中,但并不明确完成的百分比。
1、UIProgressView
UIProfressView直接继承了UIView,因此它一般作为静态控件使用,只是想用户显示某个耗时操作完成的百分比,不会参与用户交互。
属性如下:
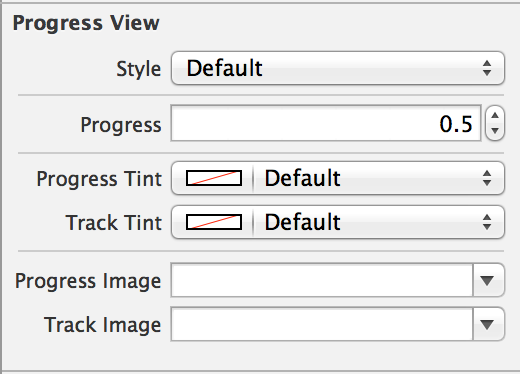
- (1)、Style(UIProgressViewStyle):该属性的属性值是一个列表框,该列表框支持如下来个那个列表项。
- ①、Default:设置使用默认风格的进度条;
- ②、Bar:设置使用工具条风格的进度条;
例如:
UIProgressView* progressView = [[UIProgressView alloc]initWithProgressViewStyle:UIProgressViewStyleDefault];
- (2)、Progress:该属性设置该进度条中任务的完成比例,其属性值是0.0~1.0之间的一个浮点值,其中1.0代表任务完成了100%,即全部完成。
例如:
progressView.progress = 0.5;
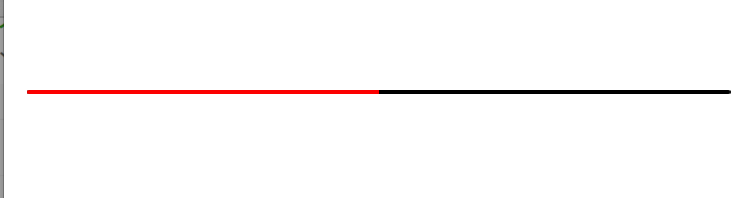
- (3)、Progress Tint:该属性设置进度条上已经完成进度的颜色;
例如:
progressView.progressTintColor = [UIColor redColor];
- (4)、Track Tint:该属性设置进度条的轨道颜色;
例如:
progressView.trackTintColor = [UIColor blackColor];
- (5)、ProgressImage:设置该进度条完成部分的图片;
例如:
progressView.progressImage = [UIImage imageNamed:@"1.png"];
- (6)、trackImage:访问或设置该进度条的轨道图片;
例如:
progressView.trackImage = [UIImage imageNamed:@"1.png"];
- (7)、设置进度
例如:
[progressView setProgress:1.0 animated:YES];
2、UIActivityIndicatorView
UIActivityIndicatorView用于表示任务正在进行中,该控件显示一个旋转的进度环,由于该进度环只是用旋转来表示任务正在进行中,它不会精确显示进度完成的百分比。因此该控件实质上相当于不显示进度的进度环。
属性如下:
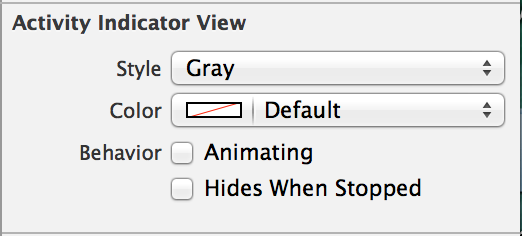

(1)、Style:该属性设置该控件的风格,其属性值支持如下三个列表项;
- ①、Large White:设置大的、白色的风格;
- ②、White:设置白色风格;
③、Gray:设置灰色风格;
例如:UIActivityIndicatorView* activityIndicatorView = [[UIActivityIndicatorView alloc]initWithActivityIndicatorStyle:UIActivityIndicatorViewStyleGray];
(2)、Color:该属性用于直接设置该进度环的颜色,该属性的设置会覆盖前面风格中选择的颜色,前面风格选择的大小依然起作用。Color属性设置的颜色只是改变进度环的颜色;
例如:activityIndicatorView.color = [UIColor redColor];(3)、Behavior:该属性支持如下两个复选框;
①、Animating:勾选该复选框控制进度环显示出来后立即开始转动;
例如:NSLog(@"%d",activityIndicatorView.isAnimating);②、Hides When Stopped:勾选该复选框设置进度环停止时自动隐藏;
例如:activityIndicatorView.hidesWhenStopped = YES;
(4)、UIActivityIndicatorView提供了如下两个方法来启动进度环的转动和停止转动
- ①、- (void)startAnimating;控制进度环开始转动;
②、- (void)stopAnimating;控制进度环停止转动;
注意:UIActivityIndicatorView控件是不允许改变大小的,它标准风格显示时大小是20像素*20像素;大的风格显示时,大小是37像素*37像素。
提示:系统的刷新设置:
[UIApplication sharedApplication].networkActivityIndicatorVisible = YES;
九、拖动条(UISlider)
拖动条通常用于对系统的某种数值进行调节,比如调节音量,控制播放进度等。
拖动条UISlider继承了UIControl,因此UISlider可以作为活动控件与用户交互,但必须用Value Change来绑定事件
属性如下:
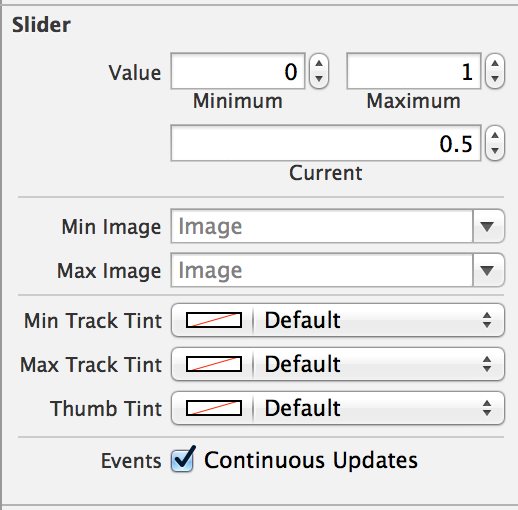
(1)、Value:设置拖动条的最大值和最小值以及当前值;
例如:slider.minimumValue = 0.0; slider.maximumValue = 1.0; slider.value = 0.5;(2)、Min Image:设置拖动条最小值边界的图标;
例如:slider.minimumValueImage = image;(3)、Max Image:设置拖动条最大值边界的图标;
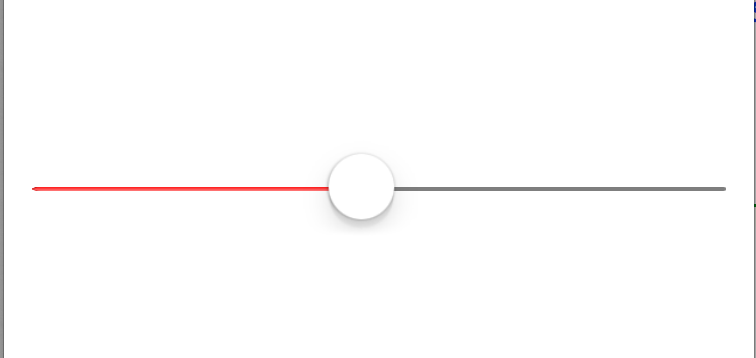
例如:slider.maximumValueImage = image;(4)、Min Track Tin:设置该拖动条的完成部分的轨道颜色;
例如:slider.minimumTrackTintColor = [UIColor redColor];(5)、Max Track Tin:设置该拖动条的未完成部分的轨道颜色;
例如:slider.maximumTrackTintColor = [UIColor grayColor];(6)、Thumb Tint:设置滑块的颜色;
例如:slider.thumbTintColor = [UIColor blackColor];(7)、Events:滑动时是否连接触发事件;
例如:[slider addTarget:self action:@selector(slider:) forControlEvents:UIControlEventValueChanged];
同UIProgressView类似的是,UISlider同样支持高度定制,包括定制拖动条的轨道、也完成进度的外观。例如如下方法:
- ①、- (void)setThumbImage:(UIImage *)image forState:(UIControlState)state;//设置拖动条已完成进度的轨道图片
- ②、- (void)setMinimumTrackImage:(UIImage *)image forState:(UIControlState)state;//设置拖动条外完成进度的轨道图片
- ③、- (void)setMaximumTrackImage:(UIImage *)image forState:(UIControlState)state;//设置滑动条上滑块的图片
十、警告框(UIAlertView)与UIActionSheet
UIAlertView和UIActionSheet都是iOS系统自带的弹出式对话框。当UIAlertView或UIActionSheet显示出来时,用户无法与应用界面中的其他控件交互。UIAlertView与UIActionSheet的最大区别在于:UIAlertView表现为显示在屏幕中央的弹出警告框;UIActionSheet则表现为显示在底部的按钮列表;
1、UIAlertView的基本用法
- ①、创建UIAlertView,创建该对象时刻指定该警告框的标题、消息内容,以及该警告框包含多少个按钮等信息。如果程序需要监听用户点击了警告框的哪个按钮,还需要在创建UIAlertView时设置UIAlertViewDelegate委托对象;
- ②、调用UIAlertView显示出来即可;
- ③、如果需要监听用户点击了警告框中的哪个按钮,为委托对象是吸纳UIAlertViewDelegate协议中的方法。
例如:
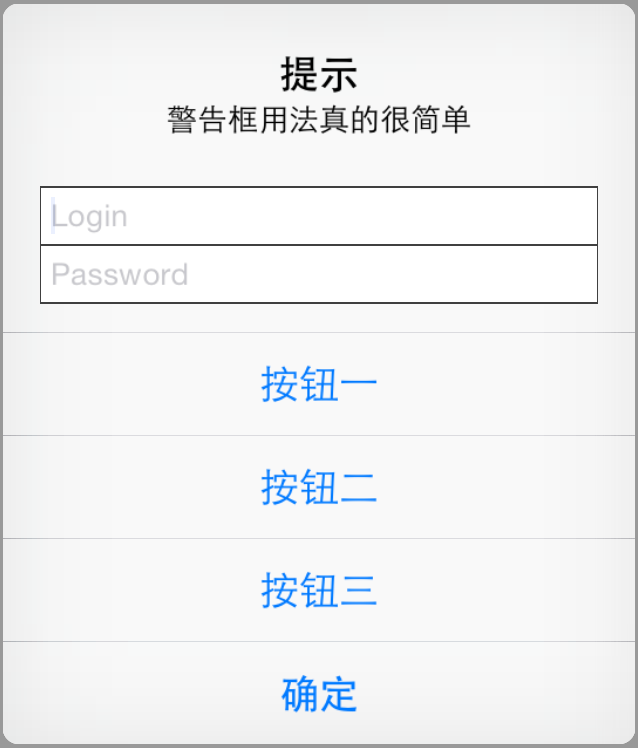
MyAlertView = [[UIAlertView alloc]initWithTitle:@"提示" message:@"警告框用法真的很简单" delegate:self cancelButtonTitle:@"确定" otherButtonTitles:@"按钮一",@"按钮二",@"按钮三", nil];
[MyAlertView show];
#pragma mark -UIAlertViewDelegate
- (void)alertView:(UIAlertView *)alertView clickedButtonAtIndex:(NSInteger)buttonIndex{
    if (alertView == MyAlertView) {
        NSString* msg = [NSString stringWithFormat:@"您点击了第%ld个按钮",(long)buttonIndex];
        UIAlertView* alert = [[UIAlertView alloc]initWithTitle:@"提示" message:msg delegate:self cancelButtonTitle:@"确定" otherButtonTitles:nil];
        [alert show];
    }
}
#pragma mark -UIAlertViewDelegate委托方法
- (1)、- (void)willPresentAlertView:(UIAlertView *)alertView;//当警告框将要显示出来时将会激发该方法;
- (2)、 - (BOOL)alertViewShouldEnableFirstOtherButton:(UIAlertView *)alertView;//当该警告框中第一个非Cancel按钮被启用时激发该方法;
- (3)、 - (void)didPresentAlertView:(UIAlertView *)alertView;//当警告框完全显示出来后将会激发该方法;
- (4)、 - (void)alertView:(UIAlertView *)alertView willDismissWithButtonIndex:(NSInteger)buttonIndex;//当用户通过单击某个按钮将要隐藏该警告框时激发该方法;
- (5)、 - (void)alertView:(UIAlertView *)alertView clickedButtonAtIndex:(NSInteger)buttonIndex;//当用户单击该警告框中某个按钮时激发该方法,其中buttonIndex参数代表用户单击的按钮的索引,该索引从0开始;
- (6)、 - (void)alertView:(UIAlertView *)alertView didDismissWithButtonIndex:(NSInteger)buttonIndex;//点那个用户用过单击某个按钮完全隐藏该警告框时激发该方法;
- (7)、 - (void)alertViewCancel:(UIAlertView *)alertView;//当该对话框被取消时(如用户点击了Home键)激发该方法;
2、带输入框的UIAlertView
(1)、在使用UIAlertView控件时,该控件支持一个actionSheetStyle属性,该属性用于设置该UIAlertView的风格,它支持如下枚举值:
(UIAlertViewStyle)
UIAlertViewStyleDefault:默认的警告框风格;
UIAlertViewStyleSecureTextInput:警告框中包含一个密码的输入框;
UIAlertViewStylePlainTextInput:警告框中包含一个普通的输入框;
UIAlertViewStyleLoginAndPasswordInput:警告框中包含用户名、密码两个输入框。
例如:
MyAlertView.alertViewStyle = UIAlertViewStyleDefault;通过该百年UIAlertView的actionSheerStyle属性,即可控制警告框使用不同的风格,包括带普通文本框、带密码框、带用户名和密码输入框的警告框。
(2)、如果UIAlertView控件中带有输入框,程序可通过如下方法来访问该警告框中的输入框:
- (UITextField *)textFieldAtIndex:(NSInteger)textFieldIndex;获取textFieldIndex索引对应的文本框。第一个文本框的索引为0;通过上述的方式获取UIAlertView中包含的UITextView控件之后,接下来就可以对该UITextField进行任何操作,包括定制其外观(改变它的字体和颜色、关联的键盘灯等)。也可以获取用户在UITextView中输入的字符。
例如:UITextField* textField = [MyAlertView textFieldAtIndex:0];(3)、当想改变UIAlertView中的message中的UILabel的属性时,可在UIAlertView将要出现的时候遍历其子视图,然后设置属性,例如:
- (void)willPresentAlertView:(UIAlertView *)alertView{
    for (UIView* view in alertView.subviews) {
        if ([view isKindOfClass:[UILabel class]]) {
            UILabel* label = (UILabel *)view;
            label.textAlignment = NSTextAlignmentLeft;
        }
    }
}
3、使用UIActionSheet
UIActionSheet变现为显示底部按钮列表,用户通过单击某个按钮来表明自己的态度,默认情况下,UIActionSheet只支持一个标题和多个按钮,UIActionSheet会有两个固定的按钮和多个其他按钮,两个固定按钮如下:
- (1)、灰色背景的取消按钮,该按钮用户取消显示该UIActionSheet。
(2)、红色背景的销毁按钮,当用户视图删除某个文件或某条记录时,可让用户通过该按钮来确认删除。
使用UIActionSheet时同样通过actionSheetStyle属性来控制该控件的风格,该属性支持如下枚举值(UIActionSheetStyle):UIActionSheetStyleDefault:默认风格,灰色背景上显示白色文字; UIActionSheetStyleBlackTranslucent:在透明的黑色背景上显示白色文字; UIActionSheetStyleBlackOpaque:在纯黑的背景上显示白色文字;例如:
actionSheet.actionSheetStyle = UIActionSheetStyleDefault;在创建之后需要完成UIActionSheetDelegate委托方法:
例如:
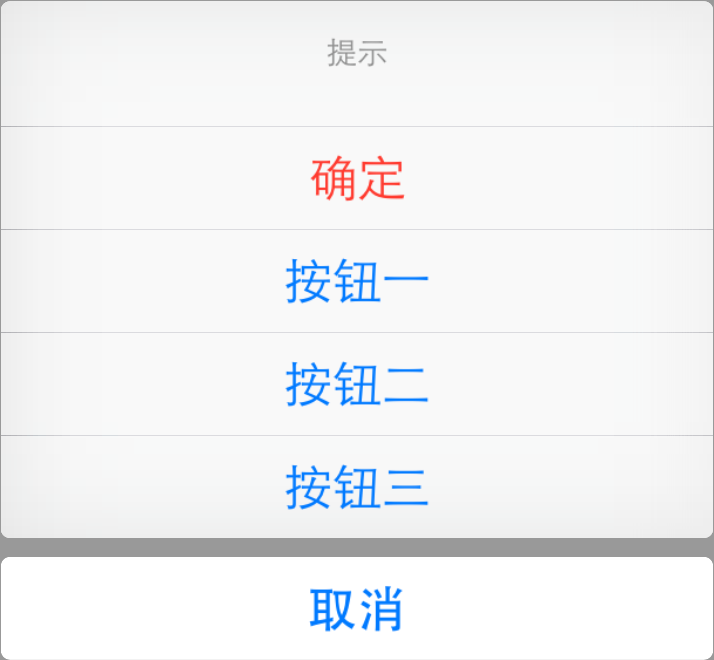
actionSheet = [[UIActionSheet alloc]initWithTitle:@"提示" delegate:self cancelButtonTitle:@"确定" destructiveButtonTitle:@"取消" otherButtonTitles:@"按钮一",@"按钮二",@"按钮三", nil];
actionSheet.actionSheetStyle = UIActionSheetStyleDefault;
[actionSheet showInView:self.view];
#pragma mark -UIActionSheetDelegate
- (void)actionSheet:(UIActionSheet *)actionSheet clickedButtonAtIndex:(NSInteger)buttonIndex{
    NSLog(@"%ld",(long)buttonIndex);
}
#pragma mark -UIActionSheetDelegate委托方法
- (1)、- (void)actionSheet:(UIActionSheet *)actionSheet clickedButtonAtIndex:(NSInteger)buttonIndex;//当用户单击该警告框中某个按钮时激发该方法,其中buttonIndex参数代表用户单击的按钮的索引,该索引从0开始;
- (2)、 - (void)actionSheetCancel:(UIActionSheet *)actionSheet;//当该对话框被取消时(如用户点击了Home键)激发该方法;
- (3)、 - (void)willPresentActionSheet:(UIActionSheet *)actionSheet;//当警告框将要显示出来时将会激发该方法;
- (4)、- (void)didPresentActionSheet:(UIActionSheet *)actionSheet;//当警告框完全显示出来后将会激发该方法;
- (5)、- (void)actionSheet:(UIActionSheet *)actionSheet willDismissWithButtonIndex:(NSInteger)buttonIndex;//当用户单击该警告框中某个按钮时激发该方法,其中buttonIndex参数代表用户单击的按钮的索引,该索引从0开始;
- (6)、- (void)actionSheet:(UIActionSheet *)actionSheet didDismissWithButtonIndex:(NSInteger)buttonIndex;//点那个用户用过单击某个按钮完全隐藏该警告框时激发该方法;
十一、日期选择器(UIDatePicker)
UIDatePicker是一个可以用来选择日期和时间的控件。除此之外,它也可以作为倒计时控件。
日期选择器(UIDatePicker)继承了UIControl,因此UIDatePicker可以作为活动控件使用,能用用户交互。
注意:需使用ValueChanged事件绑定处理方法。
UIDatePicker的属性如下:
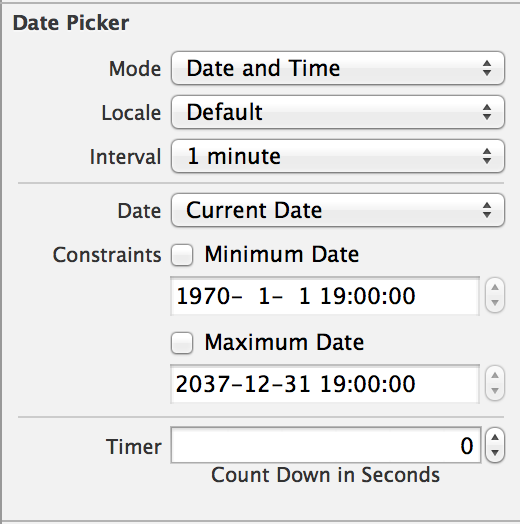
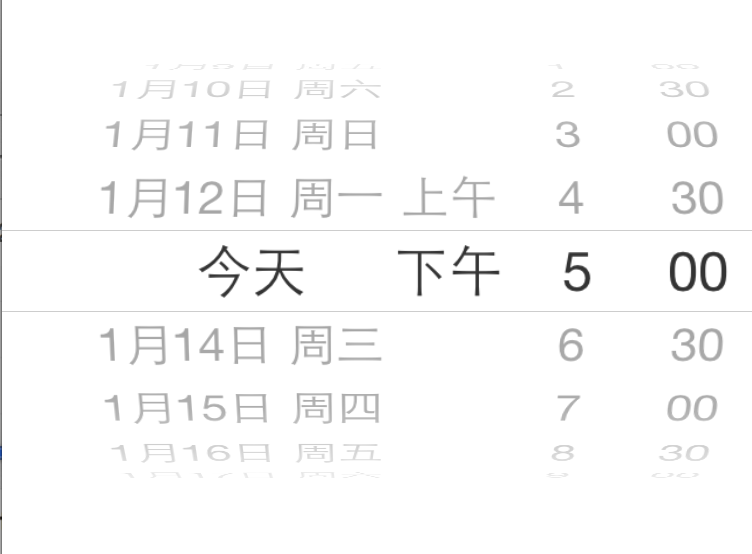
(1)、Mode(UIDatePickerMode):该属性用于设置该UIDatePicker的模式,它支持如下表项。
- ①、Date:该UIDatePicker控件仅显示日期,不显示时间;
- ②、Time:该UIDatePicker控件仅显示时间,不显示日期;
- ③、Date and Time:该UIDatePicker控件同时显示日期和时间;
④、Count Down Timer:该UIDatePicker控件仅显示为倒计时器。
例如:datePicker.datePickerMode = UIDatePickerModeDateAndTime;
(2)、Locale:该属性用于设置该UIDatePicker的股计划Locale,假设设置该UIDatePicker控件国际化Locale为简体中文环境,那么它将以简体中文习惯显示日期。实际上,我们通常无须手动设置Locale,该UIDatePicker控件默认使用iOS系统的国际化Locale;
例如:datePicker.locale = [[NSLocale alloc]initWithLocaleIdentifier:@"zh_CN"];(3)、Interval:仅当该UIDatePicker控件采用Time、Date and Time和Count Down Timer这三种模式时有效,该属性设置UIDatePicker控件上两个时间之间的间隔。单位为分钟;
例如:datePicker.minuteInterval = 30;(4)、Date:该属性设置开始时间;
例如:datePicker.date = [NSDate date];(5)、Constraints:该属性为UIDatePicker控件设置最小时间和最大时间。如果设置了该属性值,用户无法通过该UIDatePicker控件选择超出该范围的日期和时间。
例如:datePicker.minimumDate = date;datePicker. maximumDate = date;
(6)、Timer:仅当UIDatePicker控件采用Count Down Timer模式时有效,该属性设置该控件作为倒计时剩下的秒数。
例如:datePicker.countDownDuration = 360;
注意:点击确定获取选择的时间
- (void)btn{
    //获取用户通过UIDatePicker设置的日期和时间
    NSDate* selected = [datePicker date];
    //创建一个日期格式器
    NSDateFormatter* dateFormatter = [[NSDateFormatter alloc]init];
    //为日期各时期设置字符串
    [dateFormatter setDateFormat:@"yyyy年MM月dd日 HH:mm+0800"];
    //使用日期格式器格式化日期、时间
    NSString* dateString = [dateFormatter stringFromDate:selected];
    NSLog(@"dateString = %@",dateString);
}
十二、选择器(UIPickerView)
UIPickerView可以生成单列的选择器,也可生成多列的选择器,而且开发者完全可以自定义选择项的外观。
UIPickerView能设置出了日期之外的其它内容,不过需要两个非常重要的协议:UIPickerViewDelegate,UIPickerViewDataSource。
UIPickerView直接继承UIView,UIPickerView的处理事件由其委托对象完成。
UIPickerView的常用属性和方法如下:
(1)、//获取UIPickerView指定列表中包含的列表项的数量。该属性只是一个只读属性。
@property(nonatomic,readonly) NSInteger numberOfComponents;例如:
NSLog(@"number = %ld",(long)cxPickerView.numberOfComponents);(2)、//该属性控制是否显示UIPickerView中的选中标记(以高亮背景作为选中标记)。
@property(nonatomic)BOOL showsSelectionIndicator;例如:
cxPickerView.showsSelectionIndicator = YES;(3)、//获取UIPickerView包含的列数量。
- (NSInteger)numberOfRowsInComponent:(NSInteger)component;例如:
NSLog(@"%ld",[cxPickerView numberOfRowsInComponent:0]);(4)、//获取UIPickerView包含的指定列表中列表项的大小。该方法返回一个CGSize的对象。
- (CGSize)rowSizeForComponent:(NSInteger)component;例如:
CGSize size = [cxPickerView rowSizeForComponent:0];(5)、//该方法设置选中该UIPickerView中指定列的特定列表项,最后一个参数控制是否使用动画。
- (void)selectRow:(NSInteger)row inComponent:(NSInteger)component animated:(BOOL)animated;例如:
[cxPickerView selectRow:5 inComponent:0 animated:YES];(6)、//该方法返回该UIPickerView指定列表中被选中的列表项。
- (NSInteger)selectedRowInComponent:(NSInteger)component;例如:
NSInteger row = [cxPickerView selectedRowInComponent:0];(7)、//该方法放回该UIPickerView指定列的列表选项所使用UIView控件。
- (UIView *)viewForRow:(NSInteger)row forComponent:(NSInteger)component;例如:
UIView* view = [cxPickerView viewForRow:1 forComponent:0];
如果程序想要控制该控件包含多少列,各列包含多少个列表项,则有UIPickerViewDataSource对象负责。开发者必须为UIPickerView设置UIPickerViewDataSource对象,并实现如下两个方法:
#pragma mark - UIPickerViewDataSource
- (1)、- (NSInteger)numberOfComponentsInPickerView:(UIPickerView *)pickerView;//该UIPickerView将通过该方法来判断应该包含多少列。
- (2)、- (NSInteger)pickerView:(UIPickerView *)pickerView numberOfRowsInComponent:(NSInteger)component;//该UIPickerView将通过该方法来判断指定列应该包含多少个列表项。
如果程序需要控制UIPickerView中各列的宽度,以及各列中列表项的大小和外观,或程序需要为UIPickerView的选中事件提供响应,都需要为UIPickerView设置UIPickerViewDelegate委托对象,并根据需要是吸纳该委托对象中的如下方法:
#pragma mark - UIPickerViewDelegate
- (1)、- (CGFloat)pickerView:(UIPickerView *)pickerView widthForComponent:(NSInteger)component;//该方法返回的CGFloat值作为该UIPickerView控件中指定列的宽度;
- (2)、 - (CGFloat)pickerView:(UIPickerView *)pickerView rowHeightForComponent:(NSInteger)component; //该方法返回的CGFloat值将作为UIPickerView控件中指定列中列表项的高度;
- (3)、 - (NSString )pickerView:(UIPickerView )pickerView titleForRow:(NSInteger)row forComponent:(NSInteger)component;//该方法返回的NSString值将作为该UIPickerView控件中指定列的列表项的文本标题;
- (4)、- (NSAttributedString )pickerView:(UIPickerView )pickerView attributedTitleForRow:(NSInteger)row forComponent:(NSInteger)component;//该方法待定
- (5)、 - (UIView )pickerView:(UIPickerView )pickerView viewForRow:(NSInteger)row forComponent:(NSInteger)component reusingView:(UIView *)view;//该方法返回的UIView控件将直接作为该UIPickerView控件中指定列的指定列表项;
- (6)、 - (void)pickerView:(UIPickerView *)pickerView didSelectRow:(NSInteger)row inComponent:(NSInteger)component;//当用户选中该UIPickerView控件的指定列表列表项时将会激发该方法。
1、单项选择器
注意:UIPickerView高度有三种大小,最大的是216。
可以利用CALayer来改变UIPickerView,具体如下:
cxPickerView = [[UIPickerView alloc]init];
CALayer* layer = cxPickerView.layer;
[layer setFrame:CGRectMake(100, 100, 200, 40)];
@interface RootViewController ()
{
    UIPickerView* cxPickerView;
    NSArray* array;
    NSInteger selectRow;
}
@end
@implementation RootViewController
- (void)viewDidLoad {
    [super viewDidLoad];
    array = [[NSArray alloc]initWithObjects:@"疯狂iOS讲义",@"疯狂Android讲义",@"疯狂Ajax讲义",@"疯狂XML讲义",@"疯狂英语", nil];
    cxPickerView = [[UIPickerView alloc]initWithFrame:CGRectMake(60, 100, 200, 60)];
    cxPickerView.delegate = self;
    cxPickerView.dataSource = self;
    cxPickerView.showsSelectionIndicator = YES;
    [self.view addSubview:cxPickerView];
}
#pragma mark - UIPickerViewDataSource
//列数
- (NSInteger)numberOfComponentsInPickerView:(UIPickerView *)pickerView{
    return 1;
}
//行数
- (NSInteger)pickerView:(UIPickerView *)pickerView numberOfRowsInComponent:(NSInteger)component{
    return array.count;
}
//高度
- (CGFloat)pickerView:(UIPickerView *)pickerView rowHeightForComponent:(NSInteger)component{
    return 40;
}
//宽度
- (CGFloat)pickerView:(UIPickerView *)pickerView widthForComponent:(NSInteger)component{
    return 200;
}
//自定义view
- (UIView *)pickerView:(UIPickerView *)pickerView viewForRow:(NSInteger)row forComponent:(NSInteger)component reusingView:(UIView *)view{
    UILabel* label = [[UILabel alloc]initWithFrame:CGRectMake(0, 0, 200, 40)];
    label.textAlignment = NSTextAlignmentCenter;
    label.text = [array objectAtIndex:row];
    if (row == selectRow) {
        label.textColor = [UIColor redColor];
    }else{
        label.textColor = [UIColor blackColor];
    }
    return label;
}
//选中调用
- (void)pickerView:(UIPickerView *)pickerView didSelectRow:(NSInteger)row inComponent:(NSInteger)component{
    selectRow = row;
    [pickerView reloadComponent:0];
}
2、多项选择器
@interface RootViewController ()
{
UIPickerView* cxPickerView;
NSArray* array1;
NSArray* array2;
}
@end
@implementation RootViewController
- (void)viewDidLoad {
[super viewDidLoad];
array1 = [[NSArray alloc]initWithObjects:@"泰戈尔",@"冯梦龙",@"李刚", nil];
array2 = [[NSArray alloc]initWithObjects:@"飞鸟集",@"吉檀迦利",@"醒世恒言",@"喻世明言",@"警世通言",@"疯狂Android讲义",@"疯狂iOS讲义",@"疯狂Ajax讲义",@"疯狂XML讲义", nil];
cxPickerView = [[UIPickerView alloc]initWithFrame:CGRectMake(10, 100, 300, 0)];
cxPickerView.delegate = self;
cxPickerView.dataSource = self;
cxPickerView.showsSelectionIndicator = YES;
[cxPickerView selectRow:1 inComponent:0 animated:YES];
[cxPickerView selectRow:1 inComponent:1 animated:YES];
[self.view addSubview:cxPickerView];
}
#pragma mark - UIPickerViewDataSource
//列数
- (NSInteger)numberOfComponentsInPickerView:(UIPickerView *)pickerView{
return 2;
}
//行数
- (NSInteger)pickerView:(UIPickerView *)pickerView numberOfRowsInComponent:(NSInteger)component{
if (component == 0) {
return array1.count;
}else{
return array2.count;
}
}
//高度
- (CGFloat)pickerView:(UIPickerView *)pickerView rowHeightForComponent:(NSInteger)component{
return 30;
}
//宽度
- (CGFloat)pickerView:(UIPickerView *)pickerView widthForComponent:(NSInteger)component{
return 150;
}
//自定义view
- (UIView *)pickerView:(UIPickerView *)pickerView viewForRow:(NSInteger)row forComponent:(NSInteger)component reusingView:(UIView *)view{
UILabel* label = [[UILabel alloc]initWithFrame:CGRectMake(0, 0, 150 , 40)];
label.textAlignment = NSTextAlignmentCenter;
if (component == 0) {
label.text = [array1 objectAtIndex:row];
}else{
label.text = [array2 objectAtIndex:row];
}
return label;
}
//选中调用
- (void)pickerView:(UIPickerView *)pickerView didSelectRow:(NSInteger)row inComponent:(NSInteger)component{
UILabel* label = (UILabel *)[pickerView viewForRow:row forComponent:component];
label.textColor = [UIColor redColor];
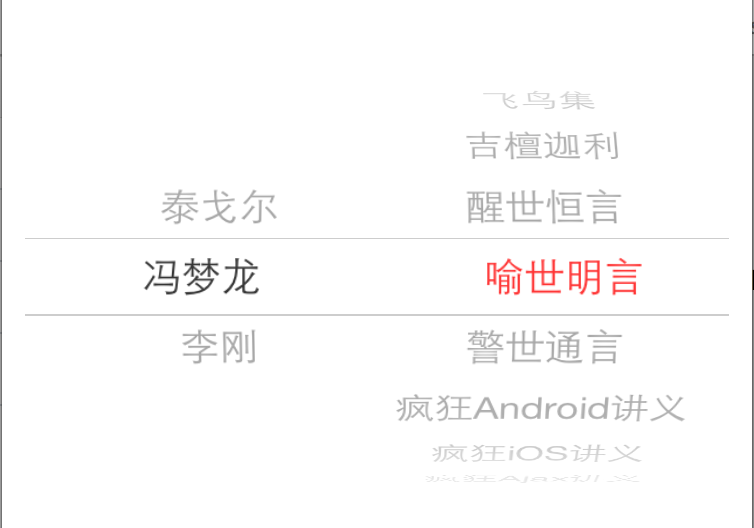
}3、相互依赖的多列选择器
为了让第二列能根据第一列的选择动态加载,程序需要用户选择第一列的事件,并根据该时间动态加载第二列的数据,然后强制重新加载UIPickerView,例如:
UIPickerVie刷新
- (1)、- (void)reloadAllComponents; //全部刷新
- (2)、- (void)reloadComponent:(NSInteger)component;//刷新指定的某一列;
@interface RootViewController ()
{
    UIPickerView* cxPickerView;
    NSDictionary* books;
    NSArray* authors;
    //selectedAuthor保存当前选中的作者
    NSString* selectedAuthor;
}
@end
@implementation RootViewController
- (void)viewDidLoad {
    [super viewDidLoad];
    //创建并初始化NSDictionary对象
    books = [NSDictionary dictionaryWithObjectsAndKeys:[NSArray arrayWithObjects:@"飞鸟集",@"吉檀迦利", nil],@"泰戈尔", [NSArray arrayWithObjects:@"醒世恒言",@"喻世明言",@"警世通言", nil],@"冯梦龙",[NSArray arrayWithObjects:@"疯狂Android讲义",@"疯狂iOS讲义",@"疯狂Ajax讲义",@"疯狂XML讲义", nil],@"李刚",nil];
    //使用authors保存所有key组成的NSArray排序后的而结果
    authors = [[books allKeys]sortedArrayUsingSelector:@selector(compare:)];
    selectedAuthor = [authors objectAtIndex:0];
    cxPickerView = [[UIPickerView alloc]initWithFrame:CGRectMake(10, 100, 300, 0)];
    cxPickerView.delegate = self;
    cxPickerView.dataSource = self;
    cxPickerView.showsSelectionIndicator = YES;
    [self.view addSubview:cxPickerView];
}
#pragma mark - UIPickerViewDataSource
//列数
- (NSInteger)numberOfComponentsInPickerView:(UIPickerView *)pickerView{
    return 2;
}
//行数
- (NSInteger)pickerView:(UIPickerView *)pickerView numberOfRowsInComponent:(NSInteger)component{
    if (component == 0) {
        return authors.count;
    }else{
        return [[books objectForKey:selectedAuthor] count];
    }
}
//高度
- (CGFloat)pickerView:(UIPickerView *)pickerView rowHeightForComponent:(NSInteger)component{
    return 30;
}
//宽度
- (CGFloat)pickerView:(UIPickerView *)pickerView widthForComponent:(NSInteger)component{
    if (component == 0) {
        return 90;
    }else{
        return 150;
    }
}
//自定义view
- (UIView *)pickerView:(UIPickerView *)pickerView viewForRow:(NSInteger)row forComponent:(NSInteger)component reusingView:(UIView *)view{
    UILabel* label;
    if (component == 0) {
        label = [[UILabel alloc]initWithFrame:CGRectMake(0, 0, 90 , 40)];
    }else{
        label = [[UILabel alloc]initWithFrame:CGRectMake(0, 0, 150 , 40)];
    }
    label.textAlignment = NSTextAlignmentCenter;
    if (component == 0) {
        label.text = [authors objectAtIndex:row];
    }else{
        label.text = [[books objectForKey:selectedAuthor] objectAtIndex:row];
    }
    return label;
}
//选中调用
- (void)pickerView:(UIPickerView *)pickerView didSelectRow:(NSInteger)row inComponent:(NSInteger)component{
    if (component == 0) {
        //改变被选中的作者
        selectedAuthor = [authors objectAtIndex:row];
        [pickerView reloadComponent:1];
    }
}
4、自定义选择器视图
UIPickerView允许开发者对列表进行任意定制,开发者只要实现UIPickerViewDelegate协议中的- (UIView )pickerView:(UIPickerView )pickerView viewForRow:(NSInteger)row forComponent:(NSInteger)component reusingView:(UIView *)view;方法即可,该方法返回的UIView将作为UIPickerView制定和列表项的视图控件。
实例:“老虎机游戏”
在.h文件中的声明部分
#import <UIKit/UIKit.h>
#import "MyScrollView.h"
@interface RootViewController : UIViewController<UIPickerViewDelegate,UIPickerViewDataSource]] >
//分别绑定到应用界面的三个UI控件
@property (nonatomic,strong)UIPickerView* picker;
@property (nonatomic,strong)UIImageView* image;
@property (nonatomic,strong)UIButton* startBn;
@end
.m的实现部分
@interface RootViewController (){
UIImage* loseImage;
UIImage* winImage;
NSArray* images;
}
@end
@implementation RootViewController
- (void)viewDidLoad {
[super viewDidLoad];
loseImage = [UIImage imageNamed:@"7.png"];
winImage = [UIImage imageNamed:@"8.png"];
//依次加载6张图片,生成对应的Image对象
images = [NSMutableArray arrayWithObjects:[UIImage imageNamed:@"11.png"],[UIImage imageNamed:@"12.png"],[UIImage imageNamed:@"13.png"],[UIImage imageNamed:@"14.png"],[UIImage imageNamed:@"15.png"],[UIImage imageNamed:@"16.png"], nil];
self.picker = [[UIPickerView alloc]initWithFrame:CGRectMake(10, 100, 300, 100)];
_picker.delegate = self;
_picker.dataSource = self;
[self.view addSubview:_picker];
//开始按钮
self.startBn = [UIButton buttonWithType:UIButtonTypeRoundedRect];
[_startBn setTitle:@"开始" forState:UIControlStateNormal];
_startBn.frame = CGRectMake(0, 300, 320, 40);
[_startBn addTarget:self action:@selector(start) forControlEvents:UIControlEventTouchUpInside];
[self.view addSubview:_startBn];
//显示输赢的图片
self.image = [[UIImageView alloc]initWithFrame:CGRectMake(100, 340, 40, 40)];
[self.view addSubview:_image];
}
//开始旋转
- (void)start{
self.startBn.enabled = NO;//禁用该按钮
self.image.image = nil;//清空界面上image控件中的图片
//定义一个NSMutableDictionary来记录每个随机数的出现次数
NSMutableDictionary* result = [[NSMutableDictionary alloc]init];
for (int i = 0; i < 5; i ++) {
int selectedVal = arc4random()%images.count;
[self.picker selectRow:selectedVal inComponent:i animated:YES];
//在result中已经为该随机数记录了出现的次数
if ([result objectForKey:[NSNumber numberWithInt:selectedVal]]) {
//获取该result中该随机数的出现次数
int newCount = [[result objectForKey:[NSNumber numberWithInt:selectedVal]]intValue];
[result setObject:[NSNumber numberWithInt:(newCount + 1)] forKey:[NSNumber numberWithInt:selectedVal]];
}else{
//使用result记录该随机数的出现次数为1
[result setObject:[NSNumber numberWithInt:1] forKey:[NSNumber numberWithInt:selectedVal]];
}
//使用该变量记录随机数的最出现次数
int maxOccurs = 1;
for (NSNumber* num in [result allKeys]) {
//只要任何随机数的出现次数大于maxOccurs
if ([[result objectForKey:num] intValue] > maxOccurs) {
maxOccurs = [[result objectForKey:num] intValue];
}
}
if (i == 4) {
//如果某个随机数的出现字数大于或者等于3
if (maxOccurs >= 3) {
[self performSelector:@selector(showWin) withObject:nil afterDelay:0.5];
}else{
[self performSelector:@selector(showLose) withObject:nil afterDelay:0.5];
}
}
}
}
- (void)showWin{
self.image.image = winImage;
self.startBn.enabled = YES;
}
- (void)showLose{
self.image.image = loseImage;
self.startBn.enabled = YES;
}
#pragma mark - UIPickerViewDataSource
//列数
- (NSInteger)numberOfComponentsInPickerView:(UIPickerView *)pickerView{
return 5;
}
//行数
- (NSInteger)pickerView:(UIPickerView *)pickerView numberOfRowsInComponent:(NSInteger)component{
NSLog(@"%@",images);
return images.count;
}
//高度
- (CGFloat)pickerView:(UIPickerView *)pickerView rowHeightForComponent:(NSInteger)component{
return 40;
}
//宽度
- (CGFloat)pickerView:(UIPickerView *)pickerView widthForComponent:(NSInteger)component{
return 40;
}
//自定义view
- (UIView *)pickerView:(UIPickerView *)pickerView viewForRow:(NSInteger)row forComponent:(NSInteger)component reusingView:(UIView *)view{
if (view.tag != kImageTag) {
view = [[UIImageView alloc]initWithImage:[images objectAtIndex:row]];
view.frame = CGRectMake(0, 0, 40, 40);
view.tag = kImageTag;
//设置不允许用户交互
view.userInteractionEnabled = NO;
}
return view;
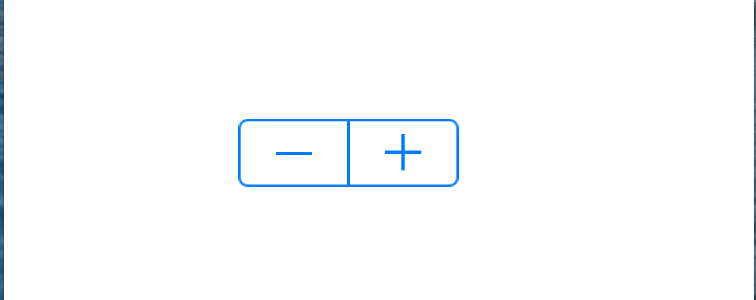
}十三、微调器(UIStepper)
UIStepper是iOS5新增的控件,该控件的外观和UISwitch相似,但是该控件上包含了“+”,“-”两个按钮,共同用于控制某个值的增、减。它继承UIControl基类,默认属于活动控件,他可以与用户交互并激发相应地事件处理方法。
UIStepper属性如下:
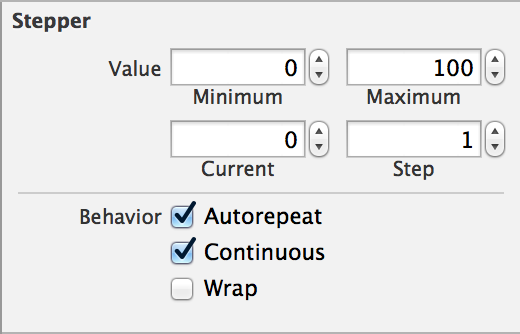
(1)、Value:该区域支持指定如下的4个属性
①、Minimum:该属性用于控制UIStepper控件的最小值。对应于minimumValue属性,默认为0。当该属性被设为大于或等于maximumValue时,会报一个NSInvalidArgumentException异常;
例如:stepper.minimumValue = 1;②、Maximum:该属性用于控制UIStepper控件的最大者。对应于MaximumValue属性,默认为100。当该属性被设为小于或等于minimumValue时,会报一个NSInvalidArgumentException异常;
例如:stepper.maximumValue = 100;③、Current:该属性用于控制该UIStepper中数值的当前值。对应于value属性,上限是maximumValue,下限是minimumValue,当数值改变时,会发送事件激发对应的事件处理方法;
例如:stepper.value = 50;④、Step:该属性用于控制该UIStepper中数值变化的步长。对应于stepValue属性,该属性默认为1。当该属性值为10时,用户每单击一次“+”图标,该UIStepper就增加10;用户每单击一个“-”,该UIStepper就减少10;
例如:stepper.stepValue = 2;
(2)、Behavior:该支持勾选如下三个复选框
①、Autorepeat:对应于autorepeat属性,该属性默认为YES。当该属性为YES时,标识用户按住加好或减号不松手,数字会持续变化。
例如:stepper.autorepeat = NO;②、Continuous:对应于continuous属性,该属性的默认值为YES。当该属性为YES时,表示当该用户交互时会立刻发送ValueChange事件,NO则表示只有等用户交互结束时才发送ValueChange事件;
例如:stepper.continuous = NO;③、Wrap:岁英语wraps属性,该属性的默认值为NO。当该属性为YES时,若value加到超过maximumValue,value将自动“转头”变成minimumValue的值;若减到比minimumValue还小,则value将自动“转头”变成maximumValue的值。
例如:stepper.wraps = YES;
(3)、自定义“+”或者“-”号图片
例如:改变“+”号图片:[stepper setIncrementImage:image forState:UIControlStateNormal];例如:改变“-”号图片:
[stepper setDecrementImage:image forState:UIControlStateNormal];
十四、页面控件(UIWebView)
通过使用UIWebView控件,可以是实现一个内置的浏览器(类似于Safari),而且可以直接将这个浏览器内嵌到应用的任意位置。
UIWebView直接继承了UIView基类。UIWebView属性如下:
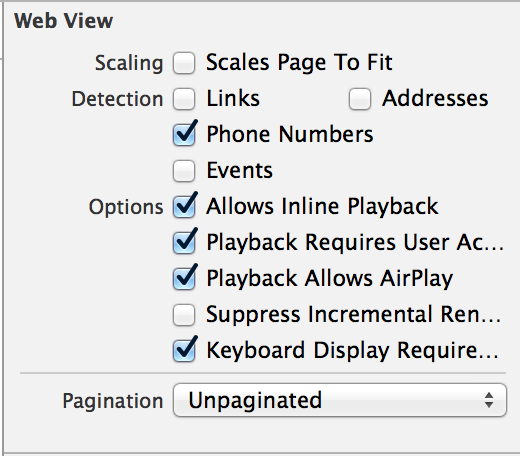
(1)、Scales Page To Fit:对应属性检查器中的Scale Page To Fit。该属性控制是否缩放网页以适应该控件。
例如:webView.scalesPageToFit = YES;(2)、dataDetectionTypes(UIDataDetectorTypes):对应属性面板中的Detection属性,该属性支持如下枚举值。
- ①、UIDataDetectorTypePhoneNumber:自动检测网页上的电话号码,点击该号码就会拨号;
- ②、UIDataDetectorTypeLink:自动检测网页上的超链接,点击该链接就会导航到链接对应的页面;
- ③、UIDataDetectorTypeAddress:自动检测网页上的地址;
- ③、UIDateDetectorTypeCalendarEvent:自动检测网页上的日历事件;
- ④、UIDataDetectorTypeNone:不检测网页上的任何内容;
⑤、UIDataDetectorTypeAll:自动检测网页上的所有特殊内容;
例如:webView.dataDetectorTypes = UIDataDetectorTypeAll;
设置完UIWebView对象之后,接下来可通过如下方法控制UIWebView加载内容
- (1)、- (void)loadHTMLString:(NSString )string baseURL:(NSURL )baseURL;加载并显示HTML字符串;
- (2)、- (void)loadRequest:(NSURLRequest *)request;加载并显示指定URL对应网页;
- (3)、- (NSString )stringByEvaluatingJavaScriptFromString:(NSString )script;执行指定的JavaScript字符串,并返回执行结果。
- (4)、- (void)goBack;后退;
- (5)、- (void)goForward;前进;
- (6)、- (void)reload;重新加载网页;
- (7)、- (void)stopLoading;停止加载网页;
#pragma mark - UIWebViewDelegate
当UIWebView加载网页时,程序可为UIWebView设置一个delegate委托(该委托对象必须实现UIWebViewDelegate协议),该协议中包含如下方法:
- (1)、- (BOOL)webView:(UIWebView )webView shouldStartLoadWithRequest:(NSURLRequest )request navigationType:(UIWebViewNavigationType)navigationType;该UIWebView将要开始装载指定URL对应的网页时激发该方法;
- (2)、- (void)webViewDidStartLoad:(UIWebView *)webView;该UIWebView开始装载时激发该方法;
- (3)、- (void)webViewDidFinishLoad:(UIWebView *)webView;该UIWebView装载完成时激发该方法;
(4)、- (void)webView:(UIWebView )webView didFailLoadWithError:(NSError )error;该UIWebView装载响应出现错误时激发该方法;
例如:NSMutableString* sb = [[NSMutableString alloc]init];//拼写一段HTML代码
[sb appendString:@"<html>"];
[sb appendString:@"<head>"];
[sb appendString:@"<title>欢迎你</title>"];
[sb appendString:@"</head>"];
[sb appendString:@"<body>"];
[sb appendString:@"<h2>欢迎您访问<a href=\"http://www.crazyit.org\">"];
[sb appendString:@"疯狂Java联盟</a></h2>"];
//HTML代码中支持Javacript脚本
[sb appendString:@"<script language='javascript'>"];
[sb appendString:@"alert('欢迎使用UIWebView');</script>"];
[sb appendString:@"</body>"];
[sb appendString:@"</html>"];
webView = [[UIWebView alloc]initWithFrame:CGRectMake(0, 20, 320, 480)];
webView.scalesPageToFit = YES;
webView.dataDetectorTypes = UIDataDetectorTypeAll;
//加载并显示HTML代码
[webView loadHTMLString:sb baseURL:[NSURL URLWithString:@"http://www.fkit.org"]];
[self.view addSubview:webView];
实例:迷你浏览器
借助UIWebView的loadRequest:方法,可让该控件加载并显示指定URL对应的网页,通过这个功能,可实现自己的额浏览器。
例如:
声明部分
#import <UIKit/UIKit.h>
#import "MyScrollView.h"
@interface RootViewController : UIViewController<UIWebViewDelegate]] >
@end
实现部分
@interface RootViewController (){
    UIWebView* webView;
    UITextField* textField;
    UIActivityIndicatorView* activityIndicatorView;
}
@end
@implementation RootViewController
- (void)viewDidLoad {
    [super viewDidLoad];
    textField = [[UITextField alloc]initWithFrame:CGRectMake(0, 20, self.view.frame.size.width, 40)];
    textField.text = @"baidu.com";
    [self.view addSubview:textField];
    //设置自动缩放网页以适应该控件
    webView = [[UIWebView alloc]initWithFrame:CGRectMake(0, 60, self.view.frame.size.width, self.view.frame.size.height - 60)];
    webView.scalesPageToFit = YES;
    //为webView控件设置委托
    webView.delegate = self;
    [self.view addSubview:webView];
    //创建一个UIActivityIndicatorView控件
    activityIndicatorView = [[UIActivityIndicatorView alloc]initWithFrame:CGRectMake(0, 0, 20, 20)];
    //控制UIActivityIndicatorView在视图的正中央
    [activityIndicatorView setCenter:self.view.center];
    //隐藏UIActivityIndicatorView控件
    activityIndicatorView.hidden = YES;
    [self.view addSubview:activityIndicatorView];
    [self goClicked:nil];
}
- (void)goClicked:(id)sender{
    [textField resignFirstResponder];
    //获取用户输入的字符串
    NSString* reqAddr = textField.text;
    //如果regAddr不一http://开头,为该用户输入的网址添加http://前缀
    if (![reqAddr hasPrefix:@"http://"]) {
        reqAddr = [NSString stringWithFormat:@"http://%@",reqAddr];
        textField.text = reqAddr;
    }
    NSURLRequest* request = [NSURLRequest requestWithURL:[NSURL URLWithString:reqAddr]];
    //加载指定URL对应的网址
    [webView loadRequest:request];
}
#pragma mark - UIWebViewDelegate
//当UIWebView开始加载时激发该方法
- (void)webViewDidStartLoad:(UIWebView *)webView{
    //显示UIActivityIndicatorView控件
    activityIndicatorView.hidden = NO;
    //启动UIActivityIndicatorView控件的转动
    [activityIndicatorView startAnimating];
}
//当UIWebView加载完成时调用该方法
- (void)webViewDidFinishLoad:(UIWebView *)webView{
    //停止UIActivityIndicatorView控件的转动
    [activityIndicatorView stopAnimating];
    //隐藏UIActivityIndicatorView控件
    activityIndicatorView.hidden = YES;
}
//当UIWebView加载失败时激发该方法
- (void)webView:(UIWebView *)webView didFailLoadWithError:(NSError *)error{
    //使用UIAlertView显示错误信息
    UIAlertView* alertView = [[UIAlertView alloc]initWithTitle:@"" message:[error localizedDescription] delegate:nil cancelButtonTitle:nil otherButtonTitles:@"确定", nil];
    [alertView show];
}
@end
十五、工具条(UIToolBar)
UIToolBar控件代表工具条,该工具条本身可以被放在应用界面的任意位置。
UIToolBar继承了UIView,它通常仅作为多个UIBarButtonItem的容器,每个UIBarButtonItem代表工具条上的一个控件。UIToolBar属性如下:
(1)、barStyle(UIBarStyle):该属性指定工具条的风格,它支持如下枚举值
- ①、UIBarStyleDefault(默认风格);
- ②、UIBarStyleBlack(黑色背景,白字风格);
- ③、UIBarStyleBlackOpaque(黑色不透明背景、白字风格);
④、UIBarStyleBlackTranslucent(黑色透明背景、白字风格);
例如:toolBar.barStyle = UIBarStyleDefault;
- (2)、items:该属性值是一个NSArray对象,该NSArray对象包含多个BarButtonItem对象,每个BarButtonItem对象代表工具条上的一个控件。
- (3)、工具条上的按钮:
- ①、BarButtonItem:工具条上的按钮;
- ②、Fixed Space Bar Button Item:工具条上固定宽度的空白间隔。该对象其实也是UIBarButtonItem的实例;
- ③、Flexible Space Bar Button Item:工具条上课伸缩宽度的空白间隔。该对象也是UIBarButtonItem的实例。该空白间隔默认会“努力占据”更多的宽度。
- (4)、UIBarButtonItem的初始化方法:
- ①、- (instancetype)initWithTitle:(NSString *)title style:(UIBarButtonItemStyle)style target:(id)target action:(SEL)action;初始化包装普通按钮的UIBarButtonItem;
- ②、- (instancetype)initWithImage:(UIImage *)image style:(UIBarButtonItemStyle)style target:(id)target action:(SEL)action;初始化包装UIImageView的UIBarButtonItem;
- ③、- (instancetype)initWithBarButtonSystemItem:(UIBarButtonSystemItem)systemItem target:(id)target action:(SEL)action;初始化包装系统按钮的UIBarButtonItem。这个系统按钮的图标,风格都是固定的。该方法需要一个UIBarButtonSystemItem类型的枚举值;
- ④、- (instancetype)initWithCustomView:(UIView *)customView;初始化包装任意UI控件的UIBarButtonItem。该初始化方法需要传入一个UIView参数,UIBarButtonItem就是用于包装该参数代表的控件;
实例:自定义工具条控件
@interface RootViewController (){
    UIToolbar* toolBar;
}
@end
@implementation RootViewController
- (void)viewDidLoad {
    [super viewDidLoad];
    //创建一个工具条,并设置它的大小和位置
    toolBar = [[UIToolbar alloc]initWithFrame:CGRectMake(0, self.view.frame.size.height - 44, self.view.frame.size.width, 44)];
    toolBar.barStyle = UIBarStyleDefault;
    [self.view addSubview:toolBar];
    //创建使用文本标题的UIBarButtonItem
    UIBarButtonItem* bn1 = [[UIBarButtonItem alloc]initWithTitle:@"OK" style:UIBarButtonItemStylePlain target:self action:@selector(clicked:)];
    //创建使用自定义图片的UIBarButtonItem
    UIBarButtonItem* bn2 = [[UIBarButtonItem alloc]initWithImage:[UIImage imageNamed:@"hsvrb.png"] style:UIBarButtonItemStyleBordered target:self action:@selector(clicked:)];
    //创建使用系统图标的UIBarButtonItem
    UIBarButtonItem* bn3 = [[UIBarButtonItem alloc]initWithBarButtonSystemItem:UIBarButtonSystemItemAdd target:self action:@selector(clicked:)];
    //创建一个可伸缩的UIBarButtonItem—自动填充
    UIBarButtonItem* flexItem = [[UIBarButtonItem alloc]initWithBarButtonSystemItem:UIBarButtonSystemItemFlexibleSpace target:nil action:nil];
    UIProgressView* pro = [[UIProgressView alloc]initWithProgressViewStyle:UIProgressViewStyleBar];
    //固定距离来填充
    UIBarButtonItem* button = [[UIBarButtonItem alloc] initWithBarButtonSystemItem:UIBarButtonSystemItemFixedSpace target:self action:@selector(buttonClick)];
    button.width = 28;
    //设置UIProgressView的大小
    pro.frame = CGRectMake(0, 0, 80, 20);
    //设置该进度条的进度为0.5
    pro.progress = 1;
    //创建使用UIView的UIBarButtonItem
    UIBarButtonItem* bn4 = [[UIBarButtonItem alloc]initWithCustomView:pro];
    //为工具条设置工具按钮
    toolBar.items = [NSArray arrayWithObjects:bn1,bn2,bn3,flexItem,bn4, nil];
}
- (void)clicked:(id)sender{

}
@end
提示:系统自带的toolBar,必须带有导航的视图才可使用
[self.navigationController setToolbarHidden:YES];
[self setToolbarItems:[NSArray arrayWithObjects:bn1,bn2,bn3,flexItem,bn4, nil]];
十六、表格(UITableView)与表格控制器(UITableViewController)
各种表格效果:单分区表格,分区页眉,分区页脚,分区索引。
UITableView继承了UIScrollView,它具有UIScrollView的功能,默认情况下,UITableViewController实例被自动设为UIScrollView委托。
注意:在带有导航的前提下,加载UITableView,tableView的位置默认为在导航的下面,当导航隐藏的时候,默认在状态栏的下面,若想改变这个情况,可将视图控制器的属性 automaticallyAdjustsScrollViewInsets设为NO;
UITabelView属性如下:
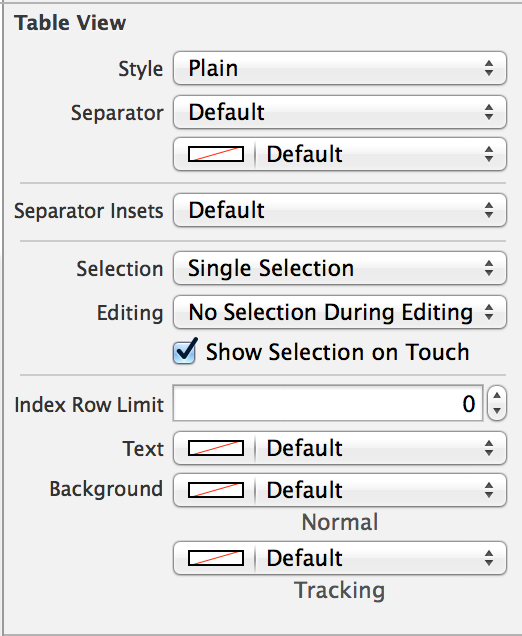
(1)、Style:该属性指定该表格的风格,它对应的UITableView对象的style属性。该属性支持如下两个属性值;
- ①、Plain:指定该表格使用最普通的风格;
②、Grouped:指定该表格使用分组风格;
例如:_tableView = [[UITableView alloc]initWithFrame:CGRectMake(0, 0, self.view.frame.size.width, self.view.frame.size.height) style:UITableViewStylePlain];
(2)、Separator(UITableViewCellSeparatorStyle):该区域的属性用于指定表格行之间分隔条的样式,该区域可配置两个属性;
①、分隔条样式:该分区的第一个列表框用于设置分隔条样式,该列表框可选择Single Line(单线)和Single Line Etched(被蚀刻的单线);
UITableViewCellSeparatorStyleNone,
UITableViewCellSeparatorStyleSingleLine,
UITableViewCellSeparatorStyleSingleLineEtched
例如:
_tableView.separatorStyle = UITableViewCellSeparatorStyleSingleLineEtched;②、分隔条颜色;
例如:_tableView.separatorColor = [UIColor purpleColor];
(3)、Selection:该属性用于控制该表格的选择风格,该属性对应的列表框可支持如下属性值:
- ①、NO Selection:不允许选中;
- ②、Single Selection:只允许选中;
③、Multiple Selection:允许多选;
例如:_tableView.allowsSelection = YES; _tableView.allowsMultipleSelection = YES;
(4)、Editing:该属性用于控制当表格处于编辑状态是否允许选择,该属性对应的列表框可支持如下属性值;
- ①、No Selection During Editing:编辑状态时不允许选中;
- ②、Single Selection During Editing:编辑状态时只允许单选;
③、Multiple Selection During Editing:编辑状态时允许多选;
例如:_tableView.allowsSelectionDuringEditing = YES; _tableView.allowsMultipleSelectionDuringEditing = YES;
在程序中获取UITableView对象之后,接下来即可通过如下属性或方法来设置该表格控件的外观。
- (1)、style:只读属性,用于返回该表格的样式。该属性可能返回UITableViewStylePlain(普通)和UITableViewStyleGrouped(分组)两个样式;
(2)、rowHeight:该属性用于返回或设置表格的行高。通常来说,建议实现表格对应的委托对象的tableView:heightForRowAtIndexPath:方法来设置行高;
例如:_tableView.rowHeight = 50.0f;(3)、separateStyle:该属性用于返回或设置表格的分隔条样式。它支持UITableViewCellSeparateStyleNone(无分隔条)、UITableViewCellSeparatorStyleSingleLine(单线分隔条)、UITableViewCellSeparatorStyleSingleLineEtched(被蚀刻的单线分隔条)这三个枚举值。
例如:_tableView.separatorStyle = UITableViewCellSeparatorStyleSingleLineEtched;(4)、separateColor:该属性用于设置分隔条的颜色;
例如:_tableView.separatorColor = [UIColor purpleColor];(5)、backgroundView:该属性用于返回或者设置表格的背影控件。它可以设置一个任意的UIView控件,该UIView控件将呗自动缩放匹配该表格;
例如:_tableView.backgroundView = [[UIImageView alloc]initWithImage:[UIImage imageNamed:@"1.png"]];(6)、tableHeaderView:该属性设置或返回该表格的页眉控件;
例如:_tableView.tableHeaderView = imageView1;(7)、tableFooterView:该属性设置或返回该表格的页脚控件;
例如:_tableView.tableFooterView = imageView2;(8)、- (NSInteger)numberOfRowsInSection:(NSInteger)section;该属性返回指定分区包含的行数;
例如:NSLog(@"%ld",[_tableView numberOfRowsInSection:0]);(9)、- (NSInteger)numberOfSections;该属性返回表格所包含的分区数;
例如:NSLog(@"%ld",[_tableView numberOfSections]);
UITableView只负责最通用的行为,而该控件包含多少个分区,每个分组包含多少表格行、各表格行对应的UI控件都有UITableViewDataSource提供。因此开发者必须为UITableView设置UITableViewDataSource对象,并根据需要实现如下方法:
#pragma mark -UITableViewDataSource
- (1)、- (UITableViewCell )tableView:(UITableView )tableView cellForRowAtIndexPath:(NSIndexPath *)indexPath;必需方法。该方法返回的UITableViewCell对象将作为指定IndexPath对应表格的控件;
- (2)、- (NSInteger)tableView:(UITableView *)tableView numberOfRowsInSection:(NSInteger)section;必需方法。该方法返回的NSInteger值决定指定分区包含的表格行数量;
- (3)、- (NSInteger)numberOfSectionsInTableView:(UITableView *)tableView;可选方法。该方法返回NSInteger值决定该表格所包含的分区数量。如果不实现该方法,该表格默认只包含一个分区
1、简单表格

声明部分:
#import <UIKit/UIKit.h>
#import "MyScrollView.h"
@interface RootViewController : UIViewController<UITableViewDataSource,UITableViewDelegate]] >
@property (nonatomic,strong)UITableView* table;
@property (nonatomic,strong)NSArray* books;
@property (nonatomic,strong)NSArray* details;
@end
实现部分
@interface RootViewController (){
}
@end
@implementation RootViewController
- (void)viewDidLoad {
    [super viewDidLoad];
    self.table = [[UITableView alloc]initWithFrame:CGRectMake(0, 20, self.view.frame.size.width, self.view.frame.size.height - 20) style:UITableViewStylePlain];
    //设置tableView控件的dataSource
    _table.dataSource = self;
    [self.view addSubview:_table];
    //为UITableView控件设置页眉控件
//    self.table.tableHeaderView = [[UIImageView alloc]initWithImage:[UIImage imageNamed:@"3.png"]];
    //为UITableView控件设置页脚控件
//    self.table.tableFooterView = [[UIImageView alloc]initWithImage:[UIImage imageNamed:@"6.png"]];
    self.books = [NSArray arrayWithObjects:@"疯狂Android讲义",@"疯狂iOS讲义",@"疯狂Ajax讲义",@"疯狂XML讲义", nil];
    self.details = [NSArray arrayWithObjects:@"长期雄踞各网点销量排行榜榜首的图书",@"全面而详细的iOS开发图书",@"Ajax开发图书",@"系统介绍XML相关知识", nil];
}
#pragma mark -UITableViewDataSource
//该方法的返回值决定指定分区内包含多少个表格行
- (NSInteger)tableView:(UITableView *)tableView numberOfRowsInSection:(NSInteger)section{
    //由于表格只有一个分区,直接返回books中集合元素个数代表表格的行数
    return _books.count;
}
//该方法返回值决定各表格行的控件
- (UITableViewCell *)tableView:(UITableView *)tableView cellForRowAtIndexPath:(NSIndexPath *)indexPath{
    //为表格行定义一个静态字符串作为标识符
    static NSString* cellId = @"cellId";
    UITableViewCell* cell = [tableView dequeueReusableCellWithIdentifier:cellId];
    //如果取出的列表行为为nil
    if (cell == nil) {
        switch (indexPath.row % 4) {
            case 0:
                //创建一个UITableViewCell对象,使用UITableViewCellStyleSubtitle风格
                cell = [[UITableViewCell alloc]initWithStyle:UITableViewCellStyleSubtitle reuseIdentifier:cellId];
                break;
            case 1:
                //创建一个UITableViewCell对象,使用默认风格
                cell = [[UITableViewCell alloc]initWithStyle:UITableViewCellStyleDefault reuseIdentifier:cellId];
                break;
            case 2:
                //创建一个UITableViewCell对象,使用UITableViewCellStyleValue1风格
                cell = [[UITableViewCell alloc]initWithStyle:UITableViewCellStyleValue1 reuseIdentifier:cellId];
                break;
            case 3:
                //创建一个UITableViewCell对象,使用UITableViewCellStyleValue2风格
                cell = [[UITableViewCell alloc]initWithStyle:UITableViewCellStyleValue2 reuseIdentifier:cellId];
            default:
                break;
        }
    }
    //将单元格的边框设置为圆角
    cell.layer.cornerRadius = 12;
    cell.layer.masksToBounds = YES;
    //从InsexPath参数中获取当前行的行号
    NSUInteger rowNo = indexPath.row;
    //从取出books中索引为rowNo的元素作为UITableViewCell的标题
    cell.textLabel.text = [_books objectAtIndex:rowNo];
    //为UITableViewCell的左端设置图片
    cell.imageView.image = [UIImage imageNamed:@"1.png"];
    //为UITableViewCell的左端设置高亮状态时的图片
    cell.imageView.highlightedImage = [UIImage imageNamed:@"3.png"];
    //取出details中索引为rowNo的元素作为UITableViewCell的详细内容
    cell.detailTextLabel.text = [_details objectAtIndex:rowNo];
    return cell;
}
@end
默认的UITableViewCell中包含五个可配置的属性:
- (1)、textLabel:该属性是一个UILabel控件,代表该UITableViewCell显示的标题;
- (2)、detailTextLabel:该属性是一个UILabel控件,代表该UITableViewCell显示的详细内容;
- (3)、imageView:该属性是一个UIImageView对象,代表UITableViewCell左边的图标;
- (4)、accessoryType:该属性设置附件类型,支持如下:
- ①、UITableViewCellAccessoryDetailDisclosureButton:附件是一个圆形的大于符号图标(>)的按钮;
- ②、UITableViewCellAccessoryCheckMark:附件是一个复选框;
- ③、UITableViewCellAccessoryDisclosureIndicator:附件是一个大于符号图标的(>)的按钮
- (5)、selectionStyle:该属性设置单元格的选中状态,支持如下:
- ①、UITableViewCellSelectionStyleNone:无选择状态;
- ②、UITableViewCellSelectionStyleBlue:选择蓝色状态;
- ③、UITableViewCellSelectionStyleGray:选择灰色状态;
- ④、UITableViewCellSelectionStyleDefault:默认状态;
另外可点击该附件调用方法为:
- (void)tableView:(UITableView *)tableView accessoryButtonTappedForRowWithIndexPath:(NSIndexPath *)indexPath;

提示:layer属性的cornerRadius、masksToBounds两个属性赋值,这两行代码用于给UIView控件增加圆角边框。
UITableViewCellStyle的4种不同的风格:
- ①、UITableViewCellStyleSubtitle:detailTextLabel字体略小,显示在textLabel的下方。
- ②、UITableViewCellStyleDefault:不显示detailTextLabel,只显示textLabel。
- ③、UITableViewCellStyleValue1:textLabel以淡蓝色显示,显示在表格的右边;
- ④、UITableViewCellStyleValue2:textLabel以淡蓝色、略小字体显示;detailTextLabel以大字体显示在表格的右边;不显示imageView控件;
获取UITableView控件之后,可通过如下方法访问表格控件的表格行和分区;
- (1)、- (UITableViewCell )cellForRowAtIndexPath:(NSIndexPath )indexPath;返回该表格中指定NSIndexPath对应的表格行;
- (2)、- (NSIndexPath )indexPathForCell:(UITableViewCell )cell;获取该表格中指定表格行对应的NSIndexPath;
- (3)、- (NSIndexPath *)indexPathForRowAtPoint:(CGPoint)point;获取该表格中指定点所在的NSIndexPath;
- (4)、- (NSArray *)indexPathsForRowsInRect:(CGRect)rect;获取该表格中指定区域内所有NSIndexPath组成的数组;
- (5)、- (NSArray *)visibleCells;返回该表格中所有可见区域内的表格行组成的数组;
- (6)、- (NSArray *)indexPathsForVisibleRows;返回该表格中所有可见区域内的表格行对应的NSIndexPath组成的数组;
也可以通过如下方法来控制表格控件的滚动:
- (1)、- (void)scrollToRowAtIndexPath:(NSIndexPath *)indexPath atScrollPosition:(UITableViewScrollPosition)scrollPosition animated:(BOOL)animated;控制该表格滚动到指定NSIndexPath对应的表格的顶端、中间或下方;
- (2)、- (void)scrollToNearestSelectedRowAtScrollPosition:(UITableViewScrollPosition)scrollPosition animated:(BOOL)animated;控制该表格滚动到选中表格行的顶端、中间或下方;
2、处理单元格的选中
UITableView提供了如下属性来配置表格的选中状态:
- (1)、@property (nonatomic) BOOL allowsSelection;该属性控制该表格是否允许被选中;
- (2)、@property (nonatomic) BOOL allowsMultipleSelection;该属性控制该表格是否允许多选;
- (3)、@property (nonatomic) BOOL allowsSelectionDuringEditing;该属性控制该表格处于编辑状态时是否允许被选中;
- (4)、@property (nonatomic) BOOL allowsMultipleSelectionDuringEditing;该属性控制该表格处于编辑状态时是否允许多选;
除此之外,也可通过UITableView提供的如下方法来操作表格中被选中的行:
- (1)、- (NSIndexPath *)indexPathForSelectedRow;获取选中表格中对应的NSIndexPath;
- (2)、- (NSArray *)indexPathsForSelectedRows;获取选中表格中对应的NSIndexPath组成的数组;
- (3)、- (void)selectRowAtIndexPath:(NSIndexPath *)indexPath animated:(BOOL)animated scrollPosition:(UITableViewScrollPosition)scrollPosition;控制该表格选中指定NSIndexPath对应的表格行,最后一个参数控制是否滚动到被选中行的顶端、中间和底部;
- (4)、- (void)deselectRowAtIndexPath:(NSIndexPath *)indexPath animated:(BOOL)animated;控制取消选中该表格中指定NSIndexPath对应的表格行;
UITableView处理选中事件
如果程序需要响应表格行选中事件,就需要借组UITableView的委托对象,委托对象必须实现UITableViewDelegate对象——当UITableView的表格行发生选中相关事件时,都会激发该委托对象的响应方法。UITableViewDelegate中定义了如下方法:
#pragma mark -UITableViewDelegate
- (1)、- (NSIndexPath )tableView:(UITableView )tableView willSelectRowAtIndexPath:(NSIndexPath *)indexPath;当用户将要选中表格中的某行时激发该方法;
- (2)、- (void)tableView:(UITableView )tableView didSelectRowAtIndexPath:(NSIndexPath )indexPath;当用户完成选中表格中的某行时激发的方法;
(3)、- (NSIndexPath )tableView:(UITableView )tableView willDeselectRowAtIndexPath:(NSIndexPath *)indexPath;当用户将要取消选中表格中某行时激发该方法;
(4)、- (void)tableView:(UITableView )tableView didDeselectRowAtIndexPath:(NSIndexPath )indexPath;当用户完成取消选中表格中的某行时激发的方法;
实例:编辑选中行
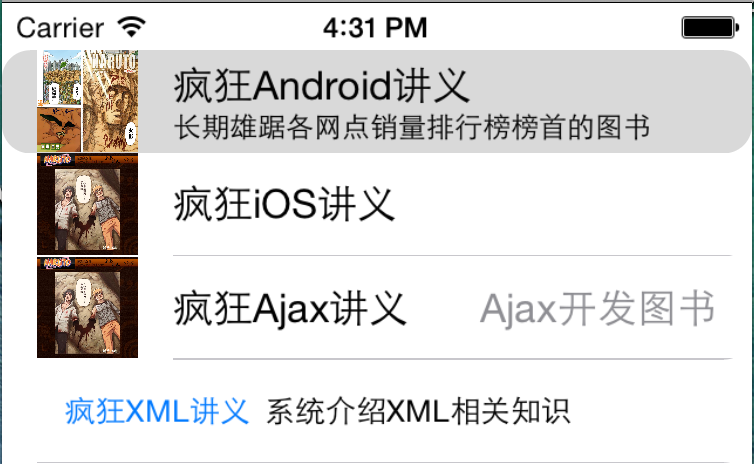
RootViewController页面部分
声明部分
#import <UIKit/UIKit.h>
#import "MyScrollView.h"
@interface RootViewController : UIViewController<UITableViewDataSource,UITableViewDelegate]] >
@property (nonatomic,strong)UITableView* table;
@property (nonatomic,strong)NSMutableArray* books;
@property (nonatomic,strong)NSMutableArray* details;
@end
实现部分
#import "RootViewController.h"
#import "AppDelegate.h"
#import "SecondViewController.h"
@interface RootViewController (){
}
@end
@implementation RootViewController
- (void)viewDidLoad {
    [super viewDidLoad];
    self.table = [[UITableView alloc]initWithFrame:CGRectMake(0, 20, self.view.frame.size.width, self.view.frame.size.height - 20) style:UITableViewStylePlain];
    //设置tableView控件的dataSource
    _table.dataSource = self;
    _table.delegate = self;
    [self.view addSubview:_table];
    self.books = [NSMutableArray arrayWithObjects:@"疯狂Android讲义",@"疯狂iOS讲义",@"疯狂Ajax讲义",@"疯狂XML讲义", nil];
    self.details = [NSMutableArray arrayWithObjects:@"长期雄踞各网点销量排行榜榜首的图书",@"全面而详细的iOS开发图书",@"Ajax开发图书",@"系统介绍XML相关知识", nil];
}
#pragma mark -UITableViewDataSource
#pragma mark -UITableViewDelegate
//该方法的返回值决定指定分区内包含多少个表格行
- (NSInteger)tableView:(UITableView *)tableView numberOfRowsInSection:(NSInteger)section{
    //由于表格只有一个分区,直接返回books中集合元素个数代表表格的行数
    return _books.count;
}
//该方法返回值决定各表格行的控件
- (UITableViewCell *)tableView:(UITableView *)tableView cellForRowAtIndexPath:(NSIndexPath *)indexPath{
    //为表格行定义一个静态字符串作为标识符
    static NSString* cellId = @"cellId";
    UITableViewCell* cell = [tableView dequeueReusableCellWithIdentifier:cellId];
    //如果取出的列表行为为nil
    if (cell == nil) {
        //创建一个UITableViewCell对象,使用UITableViewCellStyleSubtitle风格
        cell = [[UITableViewCell alloc]initWithStyle:UITableViewCellStyleSubtitle reuseIdentifier:cellId];
    }
    //将单元格的边框设置为圆角
    cell.layer.cornerRadius = 12;
    cell.layer.masksToBounds = YES;
    //从InsexPath参数中获取当前行的行号
    NSUInteger rowNo = indexPath.row;
    //从取出books中索引为rowNo的元素作为UITableViewCell的标题
    cell.textLabel.text = [_books objectAtIndex:rowNo];
    //为UITableViewCell的左端设置图片
    cell.imageView.image = [UIImage imageNamed:@"1.png"];
    //为UITableViewCell的左端设置高亮状态时的图片
    cell.imageView.highlightedImage = [UIImage imageNamed:@"3.png"];
    //取出details中索引为rowNo的元素作为UITableViewCell的详细内容
    cell.detailTextLabel.text = [_details objectAtIndex:rowNo];
    return cell;
}
- (void)tableView:(UITableView *)tableView didSelectRowAtIndexPath:(NSIndexPath *)indexPath{
    SecondViewController* sec = [[SecondViewController alloc]init];
    sec.string1 = [_books objectAtIndex:indexPath.row];
    sec.string2 = [_details objectAtIndex:indexPath.row];
    [self presentViewController:sec animated:YES completion:nil];
}
SecondViewController页面部分
声明部分
#import <UIKit/UIKit.h>
@interface SecondViewController : UIViewController
@property (nonatomic,strong)UITextField* textField1;
@property (nonatomic,strong)UITextField* textField2;
@property (nonatomic,strong)NSString* string1;
@property (nonatomic,strong)NSString* string2;
@end
实现部分
#import "SecondViewController.h"
@interface SecondViewController ()
@end
@implementation SecondViewController
- (void)viewDidLoad {
    [super viewDidLoad];
    self.view.backgroundColor = [UIColor whiteColor];
    self.textField1 = [[UITextField alloc]initWithFrame:CGRectMake(20, 100, self.view.frame.size.width - 40, 40)];
    self.textField2 = [[UITextField alloc]initWithFrame:CGRectMake(20, 160, self.view.frame.size.width - 40, 40)];
    _textField1.borderStyle = UITextBorderStyleRoundedRect;
    _textField2.borderStyle = UITextBorderStyleRoundedRect;
    _textField1.text = self.string1;
    _textField2.text = self.string2;
    [self.view addSubview:_textField1];
    [self.view addSubview:_textField2];
}
3、定制表格行
如果只是使用系统提供的UITableViewCell,UITableView控件的表格只支持有限的样式,而且每个表格行只是包含textLabel、detailTextLabel、UIImageView这三个控件。因此,程序猿需要对表格进行定制。
实例1:继承UITableViewCell定制表格行
#import "FKTableViewCell.h"
@implementation FKTableViewCell
- (id)initWithStyle:(UITableViewCellStyle)style reuseIdentifier:(NSString *)reuseIdentifier{
    self = [super initWithStyle:style reuseIdentifier:reuseIdentifier];
    if (self) {
        //创建所需要的控件 然后添加到self.contentView中;
    }
    return self;
}
@end
实例2:使用动态单元格原型定制表格行
实例3:利用XIB文件定制表格行
UserCell.xib继承UserCell
- (UITableViewCell *)tableView:(UITableView *)tableView cellForRowAtIndexPath:(NSIndexPath *)indexPath{
    static NSString* cellId = @"cellId";
    UserCell* cell = [tableView dequeueReusableCellWithIdentifier:cellId];
    if (cell) {
        cell = [[[NSBundle mainBundle]loadNibNamed:@"UserCell" owner:self options:nil]lastObject];
    }
    return cell;
}
- (void)tableView:(UITableView *)tableView willDisplayCell:(UITableViewCell *)cell forRowAtIndexPath:(NSIndexPath *)indexPath{
    cell.backgroundColor = indexPath.row%2?[UIColor redColor]:[UIColor purpleColor];
    ((UserCell*)cell).nameLabel.backgroundColor = [UIColor blackColor];
}
4、编辑表格
UITableView生成的表格控件功能非常灵活,不仅可作为数据显示控件,还可支持对表格行执行移动、删除和插入等操作。
(1)、- (void)setEditing:(BOOL)editing animated:(BOOL)animated;editing属性来判断该表格控件是否处于编辑状态,如果该表格处于编辑状态,该属性返回YES;否则返回NO。
例如:[_table setEditing:YES animated:YES];- (2)、- (void)beginUpdates;对表格控件执行多个连续的插入、删除和移动操作前,先调用该方法开始更新;
- (3)、- (void)endUpdates;对表格控件执行多个连续的插入、删除和移动操作后,调用该方法结束并提交更新;
//对表格行操作 - (4)、- (void)insertRowsAtIndexPaths:(NSArray *)indexPaths withRowAnimation:(UITableViewRowAnimation)animation;在一个或者多个NSIndexPath处插入表格行;
- (5)、- (void)deleteRowsAtIndexPaths:(NSArray *)indexPaths withRowAnimation:(UITableViewRowAnimation)animation;删除一个或者多个NSIndexPath处的表格行;
- (6)、- (void)moveRowAtIndexPath:(NSIndexPath )indexPath toIndexPath:(NSIndexPath )newIndexPath;将指定NSIndexPath处的表格行移动到另一个NSIndexPath处;
- (7)、- (void)reloadRowsAtIndexPaths:(NSArray *)indexPaths withRowAnimation:(UITableViewRowAnimation)animation;刷新一个或者多个NSIndexPath处的表格行;
//对分区操作 - (8)、- (void)insertSections:(NSIndexSet *)sections withRowAnimation:(UITableViewRowAnimation)animation;在指定的NSIndexSet所包含的一个或多个分区号对应的位置插入分区;
- (9)、- (void)deleteSections:(NSIndexSet *)sections withRowAnimation:(UITableViewRowAnimation)animation;删除指定NSIndexSet所包含的一个或者多个分区号对应的分区;
- (10)、- (void)moveSection:(NSInteger)section toSection:(NSInteger)newSection;将指定分区移动到另一个位置。
- (11)、- (void)reloadSections:(NSIndexSet *)sections withRowAnimation:(UITableViewRowAnimation)animation;刷新指定NSIndexSet所包含的一个或者多个分区号对应的分区.
#pragma mark - UITableViewDataSource
为了让动态编辑表格,必须实现UITableView对应的dataSource对象中的如下方法(这些方法都是由UITableViewDataSource协议定义的)
- (1)、- (BOOL)tableView:(UITableView )tableView canEditRowAtIndexPath:(NSIndexPath )indexPath;该方法的返回值决定指定NSIndexPath对应的表格行是否可编辑;
- (2)、- (void)tableView:(UITableView )tableView commitEditingStyle:(UITableViewCellEditingStyle)editingStyle forRowAtIndexPath:(NSIndexPath )indexPath;当用户对指定表格行编辑(包括删除或插入)完成时激发该方法;
- (3)、- (BOOL)tableView:(UITableView )tableView canMoveRowAtIndexPath:(NSIndexPath )indexPath;该方法返回值据顶指定NSIndexPath对应的表格行是否可移除;
- (4)、- (void)tableView:(UITableView )tableView moveRowAtIndexPath:(NSIndexPath )sourceIndexPath toIndexPath:(NSIndexPath *)destinationIndexPath;该方法告诉该DataSource将指定的表格行移动到另一个位置;
#pragma mark - UITableViewDelegate
除此之外UITableViewDelegate协议也为编辑表格定义了如下方法
- (1)、- (void)tableView:(UITableView*)tableView willBeginEditingRowAtIndexPath:(NSIndexPath *)indexPath;开始编辑某个表格行时激发该委托对象的该方法;
- (2)、- (void)tableView:(UITableView*)tableView didEndEditingRowAtIndexPath:(NSIndexPath *)indexPath;当编辑完某个表格行时激发该委托对象的该方法;
- (3)、- (UITableViewCellEditingStyle)tableView:(UITableView )tableView editingStyleForRowAtIndexPath:(NSIndexPath )indexPath;该方法返回值决定了该表格行的编辑状态;该方法返回UITableViewCellEditingStyleNone、UITableViewCellEditingStyleDelete、UITableViewCellEditingStyleInsert这三个枚举值之一,其中后面两个分别代表删除和插入两种编辑状态;
- (4)、- (NSString )tableView:(UITableView )tableView titleForDeleteConfirmationButtonForRowAtIndexPath:(NSIndexPath *)indexPath;该方法返回的NSString将作为删除指定表格时确定按钮的文本;
- (5)、- (BOOL)tableView:(UITableView )tableView shouldIndentWhileEditingRowAtIndexPath:(NSIndexPath )indexPath;该方法返回的BOOL决定指定表格行处于编辑状态时,该表格行是否应该缩进。如果开发者没有重写该方法,默认所有的表格行处于编辑状态都会缩进。
实例:移动、删除和插入表格行
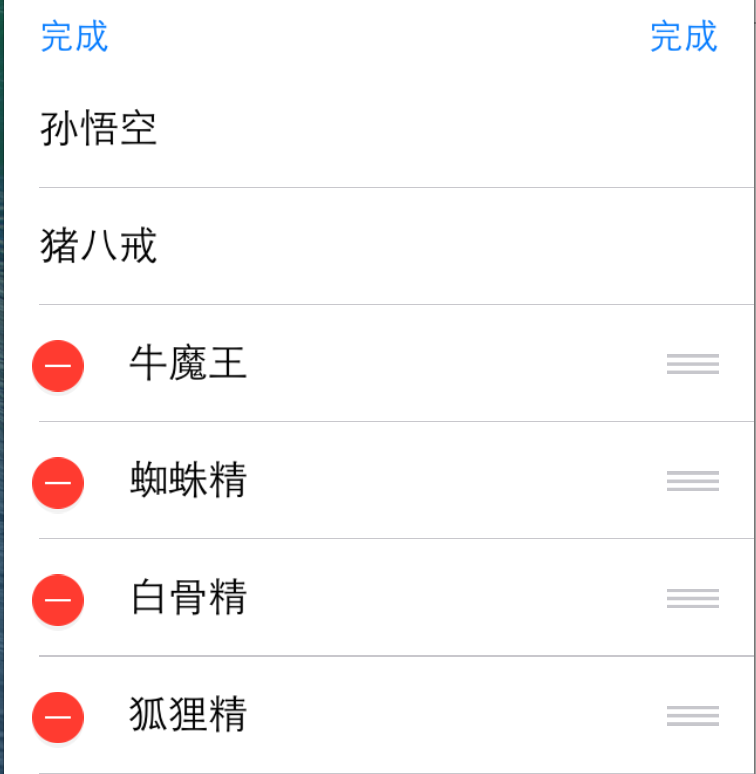
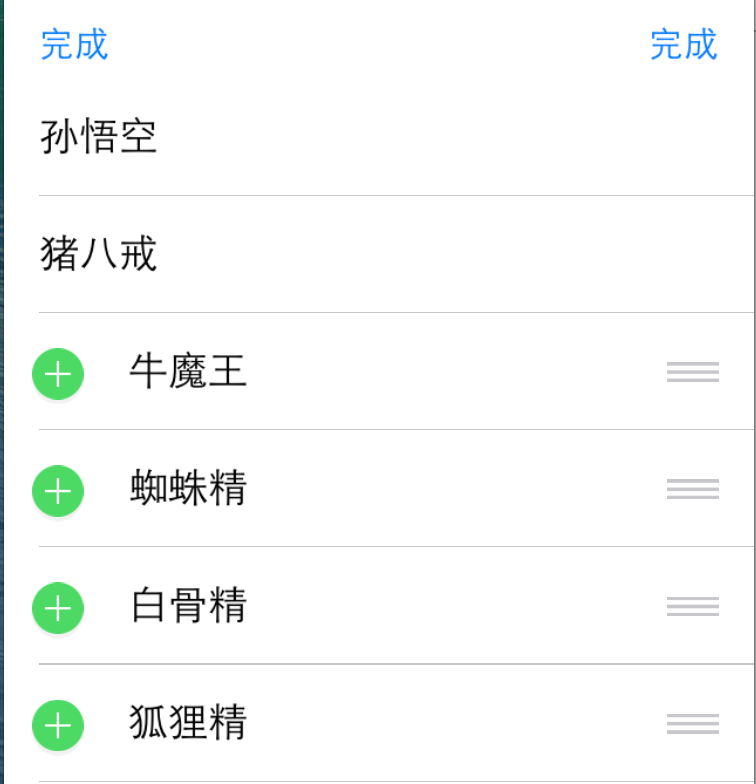
@interface RootViewController ()
{
    NSMutableArray* list;
    //记录当前正在执行的操作,0代表删除,1代表插入
    NSUInteger action;
    UIButton* deleteBtn;
    UIButton* addBtn;
}
@end
@implementation RootViewController
- (void)viewDidLoad {
[super viewDidLoad];
self.table = [[UITableView alloc]initWithFrame:CGRectMake(0, 50, self.view.frame.size.width, self.view.frame.size.height - 50)];
_table.delegate = self;
_table.dataSource = self;
[self.view addSubview:_table];
addBtn = [UIButton buttonWithType:UIButtonTypeRoundedRect];
[addBtn setTitle:@"删除" forState:UIControlStateNormal];
addBtn.frame = CGRectMake(0, 20, 60, 30);
[addBtn addTarget:self action:@selector(btnClicked:) forControlEvents:UIControlEventTouchUpInside];
[self.view addSubview:addBtn];
deleteBtn = [UIButton buttonWithType:UIButtonTypeRoundedRect];
[deleteBtn setTitle:@"添加" forState:UIControlStateNormal];
deleteBtn.frame = CGRectMake(self.view.frame.size.width - 60, 20, 60, 30);
[deleteBtn addTarget:self action:@selector(btnClicked:) forControlEvents:UIControlEventTouchUpInside];
[self.view addSubview:deleteBtn];
list = [NSMutableArray arrayWithObjects:@"孙悟空",@"猪八戒",@"牛魔王",@"蜘蛛精",@"白骨精",@"狐狸精", nil];
action = 0;
}
- (void)btnClicked:(UIButton *)btn{
//如果用户点击了删除按钮action设为0 否则action设为1
if ([btn.titleLabel.text isEqualToString:@"删除"]) {
action = 0;
}else{
action = 1;
}
//使用动画切换表格的编辑状态
[_table setEditing:!_table.editing animated:YES];
if (self.table.editing) {
//修改工具条上的两个按钮文本
[addBtn setTitle:@"完成" forState:UIControlStateNormal];
[deleteBtn setTitle:@"完成" forState:UIControlStateNormal];
}else{
[addBtn setTitle:@"添加" forState:UIControlStateNormal];
[deleteBtn setTitle:@"删除" forState:UIControlStateNormal];
}
}
#pragma mark - UITableViewDelegate
#pragma mark - UITableViewDataSource
//行数
- (NSInteger)tableView:(UITableView *)tableView numberOfRowsInSection:(NSInteger)section{
return list.count;
}
//行高
- (CGFloat)tableView:(UITableView *)tableView heightForRowAtIndexPath:(NSIndexPath *)indexPath{
return 50;
}
//自定义cell
- (UITableViewCell *)tableView:(UITableView *)tableView cellForRowAtIndexPath:(NSIndexPath *)indexPath{
//为表格定义一个静态字符串作为标识符
static NSString* cellId = @"cellId";
//获取可重用的单元格
UITableViewCell* cell = [tableView dequeueReusableCellWithIdentifier:cellId];
if (cell == nil) {
cell = [[UITableViewCell alloc]initWithStyle:UITableViewCellStyleDefault reuseIdentifier:cellId];
}
cell.textLabel.text = [list objectAtIndex:indexPath.row];
return cell;
}
//UITableViewDelegate协议中定义的方法。该方法的返回值决定单元格的编辑状态
- (UITableViewCellEditingStyle)tableView:(UITableView *)tableView editingStyleForRowAtIndexPath:(NSIndexPath *)indexPath{
//如果action的值为0,代表将要删除
return action == 0?UITableViewCellEditingStyleDelete:UITableViewCellEditingStyleInsert;
}
//UITableViewDelegate协议中定义的方法
//该方法的返回值作为删除指定表格行时确定按钮的文本
- (NSString *)tableView:(UITableView *)tableView titleForDeleteConfirmationButtonForRowAtIndexPath:(NSIndexPath *)indexPath{
return @"确认删除";
}
//UITableViewDataSource协议中定义的方法。该方法的返回值决定某行是否可编辑
- (BOOL)tableView:(UITableView *)tableView canEditRowAtIndexPath:(NSIndexPath *)indexPath{
//如果该表格行的数据为孙悟空,返回NO——代表这行数据不能编辑
if ([[list objectAtIndex:indexPath.row] isEqualToString:@"孙悟空"]) {
return NO;
}
//除了第2个表格行的数据不能编辑
if (indexPath.row == 1) {
return NO;
}
return YES;
}
//UITableViewDataSource协议中定义的方法。移动完成时激发该方法
- (void)tableView:(UITableView *)tableView moveRowAtIndexPath:(NSIndexPath *)sourceIndexPath toIndexPath:(NSIndexPath *)destinationIndexPath{
NSInteger sourceRowNo = [sourceIndexPath row];
NSInteger destRowNo = [destinationIndexPath row];
//获取要移动的数据
id targetObj = [list objectAtIndex:sourceRowNo];
//从底层数组中删除指定额数据项
[list removeObjectAtIndex:sourceRowNo];
//将移动的数据项插入到指定位置
[list insertObject:targetObj atIndex:destRowNo];
}
//UITableViewDataSource协议中定义的方法。编辑包括删除或插入完成时激发该方法
- (void)tableView:(UITableView *)tableView commitEditingStyle:(UITableViewCellEditingStyle)editingStyle forRowAtIndexPath:(NSIndexPath *)indexPath{
//如果正在提交删除操作
if (editingStyle == UITableViewCellEditingStyleDelete) {
NSInteger rowNo = [indexPath row];
//从底层NSArray集合中删除指定的数据项
[list removeObjectAtIndex:rowNo];
//从UITable程序界面上删除指定的表格行
[tableView deleteRowsAtIndexPaths:[NSArray arrayWithObject:indexPath] withRowAnimation:UITableViewRowAnimationAutomatic];
}
//如果正在提交插入操作
if (editingStyle == UITableViewCellEditingStyleInsert) {
//将当前的数据插入到底层NSArray集合中
[list insertObject:[list objectAtIndex:indexPath.row] atIndex:indexPath.row + 1];
//在UITableView程序界面上插入一行
[tableView insertRowsAtIndexPaths:[NSArray arrayWithObject:indexPath] withRowAnimation:UITableViewRowAnimationAutomatic];
}
}
@end5、多分区表格以及分区索引
如果希望UITableView生成的表格控件包含更多的分区,则需要为表格的dataSource对象实现更多的方法。UITableViewDataSource协议为建立多分区表格和分区索引定义了如下方法:
- (1)、- (NSInteger)numberOfSectionsInTableView:(UITableView *)tableView;该方法的返回值决定该表格包含多少个分区;
- (2)、- (NSArray )sectionIndexTitlesForTableView:(UITableView )tableView;该方法的返回值用于在表格右边建立一列浮动的索引;
- (3)、- (NSString )tableView:(UITableView )tableView titleForHeaderInSection:(NSInteger)section;该方法的返回值决定指定分区的页眉;
- (4)、- (NSString )tableView:(UITableView )tableView titleForFooterInSection:(NSInteger)section;该方法的返回值决定指定分区的页脚;
实例:多分区以及分区索引
@interface RootViewController ()
{
    NSDictionary* tableData;
    NSArray* stories;
}
@end
@implementation RootViewController
- (void)viewDidLoad {
[super viewDidLoad];
self.table = [[UITableView alloc]initWithFrame:CGRectMake(0, 50, self.view.frame.size.width, self.view.frame.size.height - 50)];
_table.delegate = self;
_table.dataSource = self;
[self.view addSubview:_table];
tableData = [NSDictionary dictionaryWithObjectsAndKeys:[NSArray arrayWithObjects:@"孙悟空",@"猪八戒",@"牛魔王",@"蜘蛛精",@"唐僧",@"沙和尚", nil],@"西游记",[NSArray arrayWithObjects:@"宝玉",@"黛玉",@"元春",@"探春",@"惜春",@"可卿", nil],@"红楼梦",[NSArray arrayWithObjects:@"武松",@"林冲",@"鲁达",@"杨志",@"宋江",@"史进", nil],@"水浒", [NSArray arrayWithObjects:@"关羽",@"刘备",@"张飞",@"曹操",@"张辽",@"吕布", nil],@"三国演义",nil];
//获取tableData的所有key排序后组成的数组
stories = [[tableData allKeys]sortedArrayUsingSelector:@selector(compare:)];
//可以自定义索引
UIButton* btn = [UIButton buttonWithType:UIButtonTypeRoundedRect];
[btn setTitle:@"选择" forState:UIControlStateNormal];
btn.frame = CGRectMake(0, 20, 60, 30);
[btn addTarget:self action:@selector(btnClicked) forControlEvents:UIControlEventTouchUpInside];
[self.view addSubview:btn];
}
//自定义索引的选择方法
- (void)btnClicked{
[_table scrollToRowAtIndexPath:[NSIndexPath indexPathForRow:0 inSection:2] atScrollPosition:UITableViewScrollPositionTop animated:NO];
}
#pragma mark - UITableViewDelegate
#pragma mark - UITableViewDataSource
//UITableViewDataSource协议中定义的方法。该方法的返回值决定表格包含多少个分区
- (NSInteger)numberOfSectionsInTableView:(UITableView *)tableView{
return stories.count;
}
//UITableViewDataSource协议中定义的方法。该方法的返回值决定指定分区包含多少个元素
- (NSInteger)tableView:(UITableView *)tableView numberOfRowsInSection:(NSInteger)section{
//获取指定分区对应的stories集合中的元素
NSString* story = [stories objectAtIndex:section];
//该stories集合元素包含多少个人物,该分区就包含多少表格行
return [[tableData objectForKey:story] count];
}
//行高
- (CGFloat)tableView:(UITableView *)tableView heightForRowAtIndexPath:(NSIndexPath *)indexPath{
return 50;
}
//自定义cell
- (UITableViewCell *)tableView:(UITableView *)tableView cellForRowAtIndexPath:(NSIndexPath *)indexPath{
//为表格定义一个静态字符串作为标识符
static NSString* cellId = @"cellId";
//获取可重用的单元格
UITableViewCell* cell = [tableView dequeueReusableCellWithIdentifier:cellId];
if (cell == nil) {
cell = [[UITableViewCell alloc]initWithStyle:UITableViewCellStyleDefault reuseIdentifier:cellId];
}
//获取分无号
NSUInteger sectionNo = indexPath.section;
//获取表格行的行号
NSUInteger rowNo = indexPath.row;
NSString* story = [stories objectAtIndex:sectionNo];
//将单元格的边框设置为圆角
cell.layer.cornerRadius = 12;
cell.layer.masksToBounds = YES;
//为表格行的textLabel设置文本
cell.textLabel.text = [[tableData objectForKey:story] objectAtIndex:rowNo];
return cell;
}
//UITableViewDataSource协议中定义的方法。该方法的返回值用于在表格右边创建一列浮动的索引
- (NSArray *)sectionIndexTitlesForTableView:(UITableView *)tableView{
return stories;
}
//UITableViewDataSource协议中定义的方法。该方法的返回值决定指定分区的页眉
- (NSString *)tableView:(UITableView *)tableView titleForHeaderInSection:(NSInteger)section{
return [stories objectAtIndex:section];
}
//UITableViewDataSource协议中定义的方法。该方法的返回值决定指定分区的页脚
- (NSString *)tableView:(UITableView *)tableView titleForFooterInSection:(NSInteger)section{
NSString* story = [stories objectAtIndex:section];
return [NSString stringWithFormat:@"一共有%ld个人物",[[tableData objectForKey:story]count]];
}
@end6、直接使用UITableViewController
如果应用界面中只需要显示一个表格,让用户控制器直接继承UITableViewController即可,UITableViewController已经实现了UITableViewDelegate和UITableViewDataSource协议,因此用起来更加方便;
此处不再详细介绍
@interface RootTableViewController ()
{
    NSDictionary* tableData;
    NSArray* stories;
}
@end
@implementation RootTableViewController
- (void)viewDidLoad {
[super viewDidLoad];
tableData = [NSDictionary dictionaryWithObjectsAndKeys:[NSArray arrayWithObjects:@"孙悟空",@"猪八戒",@"牛魔王",@"蜘蛛精",@"唐僧",@"沙和尚", nil],@"西游记",[NSArray arrayWithObjects:@"宝玉",@"黛玉",@"元春",@"探春",@"惜春",@"可卿", nil],@"红楼梦",[NSArray arrayWithObjects:@"武松",@"林冲",@"鲁达",@"杨志",@"宋江",@"史进", nil],@"水浒", [NSArray arrayWithObjects:@"关羽",@"刘备",@"张飞",@"曹操",@"张辽",@"吕布", nil],@"三国演义",nil];
//获取tableData的所有key排序后组成的数组
stories = [[tableData allKeys]sortedArrayUsingSelector:@selector(compare:)];
}
#pragma mark - Table view data source
//UITableViewDataSource协议中定义的方法。该方法的返回值决定表格包含多少个分区
- (NSInteger)numberOfSectionsInTableView:(UITableView *)tableView {
return stories.count;
}
//UITableViewDataSource协议中定义的方法。该方法的返回值决定指定分区包含多少个元素
- (NSInteger)tableView:(UITableView *)tableView numberOfRowsInSection:(NSInteger)section {
//获取指定分区对应的stories集合中的元素
NSString* story = [stories objectAtIndex:section];
//该stories集合元素包含多少个人物,该分区就包含多少表格行
return [[tableData objectForKey:story] count];
}
- (UITableViewCell *)tableView:(UITableView *)tableView cellForRowAtIndexPath:(NSIndexPath *)indexPath {
//为表格定义一个静态字符串作为标识符
static NSString* cellId = @"cellId";
//获取可重用的单元格
UITableViewCell* cell = [tableView dequeueReusableCellWithIdentifier:cellId];
if (cell == nil) {
cell = [[UITableViewCell alloc]initWithStyle:UITableViewCellStyleDefault reuseIdentifier:cellId];
}
//获取分无号
NSUInteger sectionNo = indexPath.section;
//获取表格行的行号
NSUInteger rowNo = indexPath.row;
NSString* story = [stories objectAtIndex:sectionNo];
//将单元格的边框设置为圆角
cell.layer.cornerRadius = 12;
cell.layer.masksToBounds = YES;
//为表格行的textLabel设置文本
cell.textLabel.text = [[tableData objectForKey:story] objectAtIndex:rowNo];
return cell;
}
//UITableViewDataSource协议中定义的方法。该方法的返回值决定指定分区的页眉
- (NSString *)tableView:(UITableView *)tableView titleForHeaderInSection:(NSInteger)section{
return [stories objectAtIndex:section];
}
//UITableViewDataSource协议中定义的方法。该方法的返回值决定指定分区的页脚
- (NSString *)tableView:(UITableView *)tableView titleForFooterInSection:(NSInteger)section{
NSString* story = [stories objectAtIndex:section];
return [NSString stringWithFormat:@"一共有%ld个人物",[[tableData objectForKey:story]count]];
}7、静态单元格
需要使用storyboard,此处不再介绍;
8、使用iOS6新增的UIRefreshController刷新表格
当程序使用UITableViewController创建表格时,该控制器类可指定一个refreshControl属性,该属性值应该是一个UIRefreshControl控件(刷新控件),该控件可用于刷新表格数据。当程序创建UIRefreshController控件时,可为该空间爱你的刷新事件指定事件处理方法,当用户通过该刷新控件进行数据刷新时,系统就会激发该事件处理方法,该方法用于从底层数据库、网络、远程应用等地方检索数据,并将这些数据添加、显示到表格中。
(1)、设置refreshControl属性,该属性值应该是UIRefreshControl控件
self.refreshControl = [[UIRefreshControl alloc]init];(2)、设置UIRefreshControl控件的颜色
self.refreshControl.tintColor = [UIColor grayColor];(3)、设置该控件的提示标题
self.refreshControl.attributedTitle = [[NSAttributedString alloc]initWithString:@"下拉刷新"];(4)为UIRefreshControl控件的刷新事件设置处理方法;
[self.refreshControl addTarget:self action:@selector(refreshData) forControlEvents:UIControlEventValueChanged];
//刷新实现方法
- (void)refreshData{
    [self performSelector:@selector(handleData) withObject:nil afterDelay:2];
}
- (void)handleData{
    NSString* randStr = [NSString stringWithFormat:@"%d",arc4random()%10000];
    [list addObject:randStr];
    self.refreshControl.attributedTitle = [[NSAttributedString alloc]initWithString:@"正在刷新..."];
    //停止刷新
    [self.refreshControl endRefreshing];
    //控制表格重新加载数据
    [self.tableView reloadData];
}
提示:该刷新只使用于UITableViewController
十七、搜索条(UISearchBar)
搜索条(UISearchBar)由一个文本框和几个按钮组成,当用户在文本框内输入部分内容之后,程序即可按指定的规则执行搜索。该搜索条的属性如下:
首先介绍前面提到过的大部分的属性
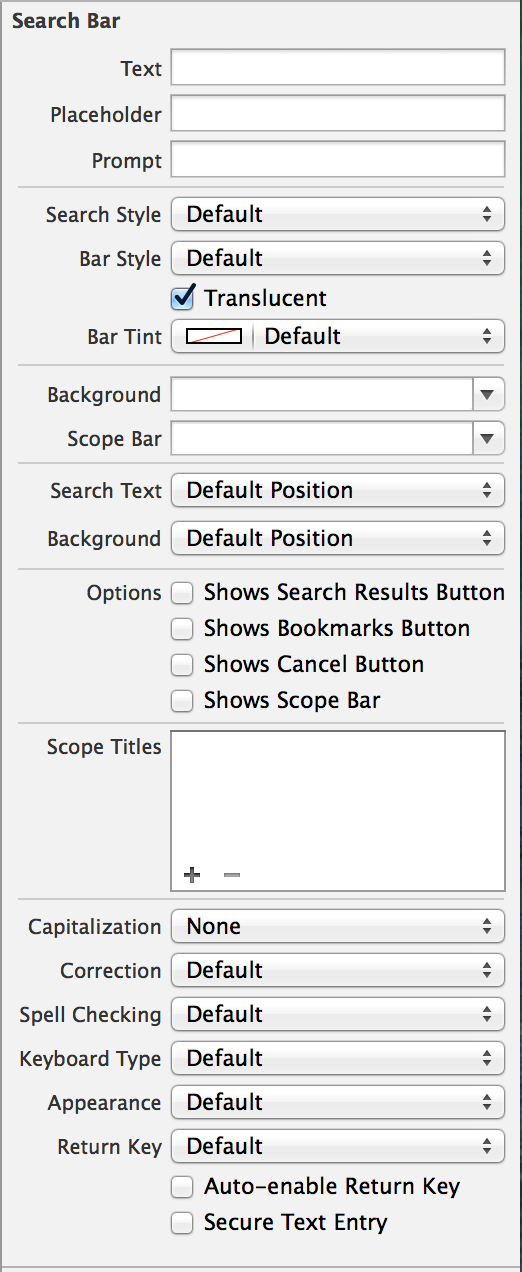
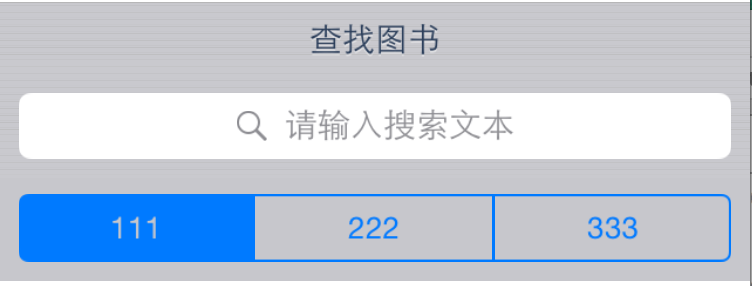
(1)、Text:设置搜索文本框内默认的文本;
例如:searchBar.text = @"你好";(2)、Placeholder:设置搜素搜文本框的提示文本;
例如:searchBar.placeholder = @"请输入搜索文本";(3)、Prompt:设置搜索文本框上面的标题;
例如:searchBar.prompt = @"...";(4)、Search Style(UISearchBarStyle):设置搜索条的风格;
例如:searchBar.searchBarStyle = UISearchBarStyleMinimal;(5)、Bar Tint:设置搜索条的颜色;
例如:searchBar.barTintColor = [UIColor whiteColor];(6)、Options:
①、Shows Search Results Button:勾选该复选框后,将会在搜索文本框的右端显示一个如“三”形状的图标按钮,用户可通过单击该按钮激发特定的事件;
例如:searchBar.showsSearchResultsButton = YES;②、Shows Bookmarks Button:勾选该复选框后,将会在搜索文本框的右端显示一个类似图书的书签按钮,用户可通过单击该按钮激发特定的事件;
例如:searchBar.showsBookmarkButton = YES;③、Shows Cancel Button:勾选该复选框后,将会在搜索文本框的右端显示一个“Cancel”取消按钮,用户可通过单击该按钮激发特定的事件;
例如:searchBar.showsCancelButton = YES;
(7)、Shows scope Bar 与 Scope Titles
如果勾选Shows scope Bar复选框,系统将会在搜索框下显示一个分段条,接下来的Scope Titles将用于设置各分段的标题,如果Scope Titles包含三个列表项:aaa、bbb、ccc,则表明搜索框下方显示一个分为三段的分段条;当用户点击分段条上指定的分段按钮时,系统将会激发一个方法,从而允许程序通过该方法控制只对指定范围的数据执行搜索。
例如:searchBar.showsScopeBar = YES; searchBar.scopeButtonTitles = [NSArray arrayWithObjects:@"111",@"222",@"333", nil];(8)、UISearchBar控件的不同部分会触发不同的事件,而这些事件也由该控件对应的委托对象处理,UISearchBar的委托对象必须实现UISearchBarDelegate协议,该协议中包含如下常见的事件处理方法:
#pragma mark - UISearchBarDelegate- ①、- (void)searchBar:(UISearchBar )searchBar textDidChange:(NSString )searchText;当搜索文本框内的文本发生改变时激发该方法;
- ②、- (void)searchBarBookmarkButtonClicked:(UISearchBar *)searchBar;当用户点击搜索条的书签按钮时激发该方法;
- ③、- (void)searchBarCancelButtonClicked:(UISearchBar *)searchBar;当用户单击搜索条的取消按钮时激发该方法;
- ④、- (void)searchBarSearchButtonClicked:(UISearchBar *)searchBar;当用户单击搜索文本框关联键盘上的”Search”按钮时激发该方法;
- ⑤、- (void)searchBarResultsListButtonClicked:(UISearchBar *)searchBar;当用户点击搜索条上的查询结果按钮时激发该方法;
- ⑥、- (void)searchBar:(UISearchBar *)searchBar selectedScopeButtonIndexDidChange:(NSInteger)selectedScope;当用户点击分段条上的分段按钮时激发该方法;
1、使用搜索条
声明部分:
#import <UIKit/UIKit.h>
#import "MyScrollView.h"
@interface RootViewController : UIViewController<UITableViewDataSource,UITableViewDelegate,UISearchBarDelegate]] >
@property (nonatomic,strong)UITableView* table;
@property (nonatomic,strong)UISearchBar* search;
@end
实现部分
@interface RootViewController ()
{
    NSArray* tableData;
    NSArray* searchData;
    BOOL isSearch;
}
@end
@implementation RootViewController
- (void)viewDidLoad {
    [super viewDidLoad];
    self.table = [[UITableView alloc]initWithFrame:CGRectMake(0, 20, self.view.frame.size.width, self.view.frame.size.height - 20)];
    _table.delegate = self;
    _table.dataSource = self;
    [self.view addSubview:_table];
    isSearch = NO;
    tableData = [NSArray arrayWithObjects:@"疯狂Java讲义",@"轻量级Java EE企业应用实战",@"疯狂Android讲义",@"疯狂Ajax讲义",@"疯狂HTML5/CSS3/JavaScript讲义",@"疯狂iOS讲义",@"疯狂XML讲义",@"经典Java EE企业应用实战",@"Java入门与精髓",@"Java基础教程",@"学习Java",@"Objective-C基础",@"Ruby入门与精髓",@"iOS开发教程", nil];
    self.search = [[UISearchBar alloc]initWithFrame:CGRectMake(0, 0, self.view.frame.size.width, 40)];
    self.search.delegate = self;
    _search.showsCancelButton = YES;
    _table.tableHeaderView = _search;
}
#pragma mark - UITableViewDelegate
#pragma mark - UITableViewDataSource
//行数
- (NSInteger)tableView:(UITableView *)tableView numberOfRowsInSection:(NSInteger)section{
    //如果处于搜索状态
    if (isSearch) {
        //使用searchData作为表格显示的数据
        return searchData.count;
    }else{
        //否则使用原始的tableData作为表格显示的数据
        return tableData.count;
    }
}
//行高
- (CGFloat)tableView:(UITableView *)tableView heightForRowAtIndexPath:(NSIndexPath *)indexPath{
    return 50;
}
//自定义cell
- (UITableViewCell *)tableView:(UITableView *)tableView cellForRowAtIndexPath:(NSIndexPath *)indexPath{
    //为表格定义一个静态字符串作为标识符
    static NSString* cellId = @"cellId";
    //获取可重用的单元格
    UITableViewCell* cell = [tableView dequeueReusableCellWithIdentifier:cellId];
    if (cell == nil) {
        cell = [[UITableViewCell alloc]initWithStyle:UITableViewCellStyleDefault reuseIdentifier:cellId];
    }
    //获取当前正在处理的表格行的行号
    NSInteger rowNo = indexPath.row;
    //如果处于搜索状态
    if (isSearch) {
        //使用searchData作为表格显示的数据
        cell.textLabel.text = [searchData objectAtIndex:rowNo];
    }else{
        //否则使用原始的tableData作为表格显示的数据
        cell.textLabel.text = [tableData objectAtIndex:rowNo];
    }
    return cell;
}
//UISearchBarDelegate定义的方法,用户单击取消按钮时激发该方法
- (void)searchBarCancelButtonClicked:(UISearchBar *)searchBar{
    //取消搜索状态
    isSearch = NO;
    [self.table reloadData];
}
//UISearchBarDelegate定义的方法,当搜索文本框内的文本改变激发该方法
- (void)searchBar:(UISearchBar *)searchBar textDidChange:(NSString *)searchText{
    //调用filterBySubstring:方法执行搜索
    [self filterBySubstring:searchBar.text];
}
//UISearchBarDelegate定义的方法,用户单击模拟键盘上的Search按键时激发该方法
- (void)searchBarSearchButtonClicked:(UISearchBar *)searchBar{
    //调用filterBySubstring:方法
    [self filterBySubstring:searchBar.text];
    //放弃作为第一响应者,关闭键盘
    [searchBar resignFirstResponder];
}
- (void)filterBySubstring:(NSString *)subStr{
    //设置为搜索状态
    isSearch = YES;
    //定义搜索谓词
    NSPredicate* pred = [NSPredicate predicateWithFormat:@"SELF CONTAINS[C]%@",subStr];
    //使用谓词过滤NSArray
    searchData = [tableData filteredArrayUsingPredicate:pred];
    //让表格控件重新加载数据
    [self.table reloadData];
}
@end
2、使用UISearchDisplayController
待续
十八、导航条(UINavigationBar)与导航条控制器(UINavigationController)
当iOS应用需要显示具有层次化的工作流时,采用UINaviigationController比较合适,这样用户可以从上一层界面进入下一层界面,当用户在下一层界面处理完之后,用户可以方便地返回上一层界面。UINavigationController是一个控制器,用户交互行为则主要靠UINavigationBar(导航条)来完成;
1、使用导航条
导航条(UINavigationBar)通常是位于屏幕顶端的控件,它继承了UIView控件,且通常只是作为多个UINavigationItem的容器。在同一时刻,UINavigationBar只能看到最上面的额UINavigationItem,UINavigationBar最低层的控件被称为rootUINavigationItem,其关系如下
rootUINavigationItem——>UINavigationItem——>UINavigationBar
系统提供如下方法和属性来管理UINavigationBar中的UINavigationItem
- (1)、- (void)pushNavigationItem:(UINavigationItem *)item animated:(BOOL)animated;该方法用于将一个UINavigationItem压入UINavigationBar的栈中;
- (2)、- (UINavigationItem *)popNavigationItemAnimated:(BOOL)animated;该方法用于将一个UINavigationBar定栈UINavigationItem弹出栈;
- (3)、- (void)setItems:(NSArray *)items animated:(BOOL)animated;同时为UINavigationBar设置多个UINavigationItem控件;
(4)、items:该属性用于设置或返回UINavigationBar所包含的多个UINavigationItem控件;
例如:navigationBar.items = items;(5)、topItem:该只读属性用于返回UINavigationItem控件最顶层的UINavigationItem控件;
例如:UINavigationItem* topItem = navigationBar.topItem;(6)、backItem:该只读属性用于返回UINavigationItem控件最顶层下面的UINavigationItem控件;
例如:UINavigationItem* backItem = navigationBar.backItem;(7)、barStyle(UIBarStyle):导航条类型;
例如:navigationBar.barStyle = UIBarStyleBlack;(8)、barTintColor:导航条的背景颜色;
例如:navigationBar.barTintColor = [UIColor redColor];(9)、- (void)setBackgroundImage:(UIImage *)backgroundImage forBarMetrics:(UIBarMetrics)barMetrics;设置导航条的背影图片;
其中枚举值为:- ①、UIBarMetricsDefault:默认的图片,支持横竖屏;
②、UIBarMetricsLandscapePhonePrompt:横屏情况下的图片
例如:[navigationBar setBackgroundImage:[UIImage imageNamed:@"1.png"] forBarMetrics:UIBarMetricsDefault];
(10)、设置按钮颜色;
例如:[navigationBar setTintColor:[UIColor redColor]];
UINavigationItem也作为一个容器,它由标题、左边N个按钮、右边N个按钮组成,每个按钮都是一个UIBarButtonItem控件。它提供了如下属性和方法配置UINavigationItem:
- (1)、title:设置UINavigationItem的标题文本;
- (2)、hidesBackButton:该属用于设置或返回是否显示后退按钮。如果该属性设置为YES,就会隐藏后退按钮;
- (3)、titleView:该属性用于设置或返回UINavigationItem的标题控件。如果设置了该属性,UINavigationItem将会使用自定义的标题控件;
- (4)、leftBarButtonItems:该属性用于设置或返回UINavigationItem左边的多个按钮组成的数组;
- (5)、leftBarButtonItem:该属性用于设置或返回UINavigationItem左边的单个按钮;
- (6)、rightBarButtonItem:该属性用于设置或返回UINavigationItem右边的多个按钮组成的数字;
- (7)、rightBarButtonItem:该属性用于设置或返回UINavigationItem右边的单个按钮;
- (8)、- (void)setHidesBackButton:(BOOL)hidesBackButton animated:(BOOL)animated;该方法用于设置是否显示后退按钮;
- (9)、- (void)setLeftBarButtonItems:(NSArray *)items animated:(BOOL)animated;该方法用于同时设置UINavigationItem左边的多个按钮;
- (10)、- (void)setLeftBarButtonItem:(UIBarButtonItem *)item animated:(BOOL)animated;该方法用于设置UINavigationItem左边的单个按钮;
- (11)、- (void)setRightBarButtonItems:(NSArray *)items animated:(BOOL)animated;该方法用于设置UINavigationItem右边的多个按钮;
- (12)、- (void)setRightBarButtonItem:(UIBarButtonItem *)item animated:(BOOL)animated;该方法用于设置UINavigationItem右边的单个按钮;
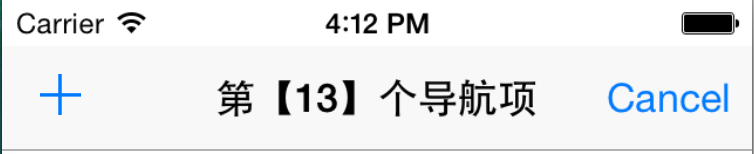
@interface RootViewController ()
{
    NSInteger count;
    UINavigationBar* navigationBar;
}
@end
@implementation RootViewController
- (void)viewDidLoad {
[super viewDidLoad];
count = 1;
//创建一个导航栏
navigationBar = [[UINavigationBar alloc]initWithFrame:CGRectMake(0, 20, self.view.frame.size.width, 44)];
//把导航添加到视图中
[self.view addSubview:navigationBar];
//调用push方法添加一个UINavigationItem
[self push];
}
- (void)push{
//把导航栏集合添加到导航栏中,设置动画打开
[navigationBar pushNavigationItem:[self makeNavItem] animated:NO];
count ++;
}
- (void)pop{
//如果导航栏中还有超过两个UINavigationItem
if (count > 2) {
[navigationBar popNavigationItemAnimated:NO];
count -- ;
}else{
//使用UIAlertView提示用户
UIAlertView* alertView = [[UIAlertView alloc]initWithTitle:@"提示" message:@"只剩下一个导航项,再出栈就没有了" delegate:self cancelButtonTitle:@"OK" otherButtonTitles:nil];
[alertView show];
}
}
- (UINavigationItem *)makeNavItem{
//创建一个导航项
UINavigationItem* navigationItem = [[UINavigationItem alloc]initWithTitle:nil];
//创建一个左边按钮
UIBarButtonItem* leftButton = [[UIBarButtonItem alloc]initWithBarButtonSystemItem:UIBarButtonSystemItemAdd target:self action:@selector(push)];
//创建一个右边按钮
UIBarButtonItem* rightButton = [[UIBarButtonItem alloc]initWithBarButtonSystemItem:UIBarButtonSystemItemCancel target:self action:@selector(pop)];
//设置导航栏内容
navigationItem.title = [NSString stringWithFormat:@"第【%ld】个导航项",count];
//把左右两个按钮添加到导航栏集合中
[navigationItem setLeftBarButtonItem:leftButton];
[navigationItem setRightBarButtonItem:rightButton];
return navigationItem;
}2、使用UINavigationController
与UINavigationBar完全的类似是,UINavigationController使用栈的形式来管理多个UIViewController(每个控制器对应的一个界面),UINavigationController不仅封装了UINavigationBar,而且会自动为每个接受它管理的UIViewController自动添加UINavigationBar,接受UIViewController管理的UIViewController对应的UI控件实际上位于UIViewController的NavigationView容器中,除此之外,UIViewController底部还可以设置一个工具条(UIToolBar对象)。
(1)、UINavigationController导航控制器如何使用
下面的图显示了导航控制器的流程。最左侧的是根视图,当用户点击其中的General项时,General视图会划入屏幕;当用户继续点击Auto-Lock,Auto-Lock视图将滑入屏幕。相应地,在对象管理上,导航控制器使用导航堆栈。根视图控制器在堆栈最底层,接下来入栈的是General视图控制器和Auto-Lock视图控制器。可以调用pushViewControllerAnimated:方法将视图控制器推入栈顶,也可以调用popViewControllerAnimated:方法将视图控制器弹出堆栈;
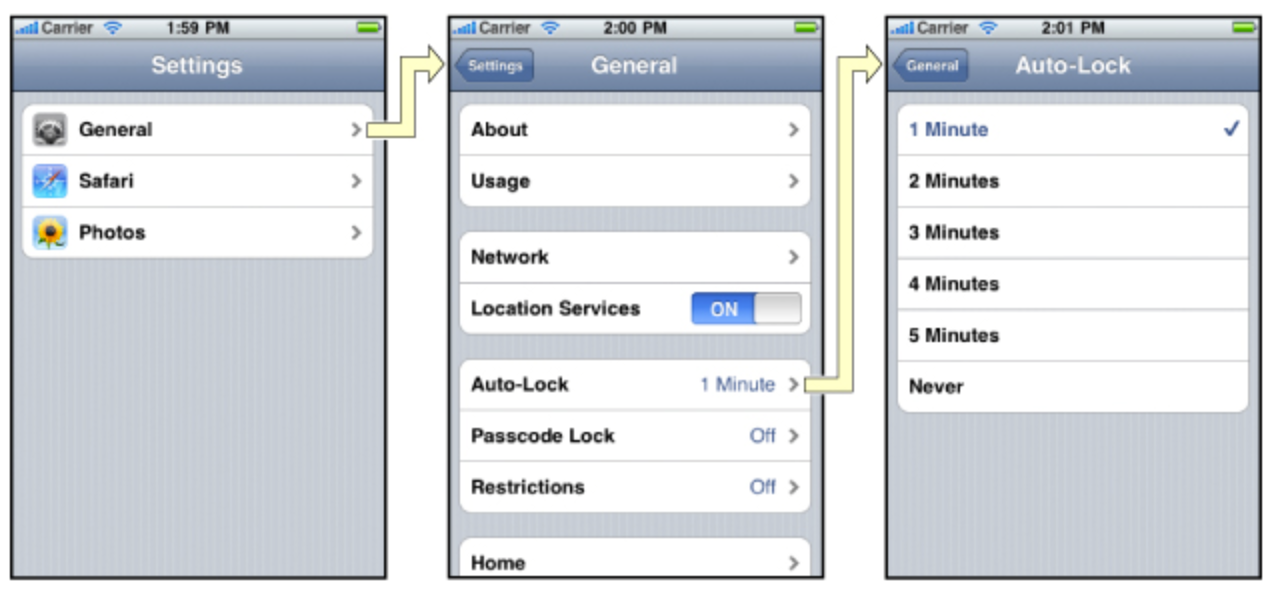
(2)、UINavigationController的结构组成
UINavigationController有NavigationBar,NavigationView,NavigationToolbar等组成
UINavigationController提供了如下属性和方法来操作接受UINavigationController管理的多个UIViewController:
- (1)、topViewController:该只读属性返回栈顶得UIViewController;
- (2)、visibleViewController:该只读属性返回UINavigationController中当前可见的界面对应的UIViewController;
- (3)、viewControllers:该属性设置或返回UINavigationController管理的栈中所有的UIViewController
- (4)、- (void)setViewControllers:(NSArray *)viewControllers animated:(BOOL)animated;该属性同时为UINavigationController设置所有的UIViewController;
- (5)、- (void)pushViewController:(UIViewController *)viewController animated:(BOOL)animated;该方法用于将指定的UIViewController压入UINavigationController管理的栈中;
- (6)、- (UIViewController *)popViewControllerAnimated:(BOOL)animated;该方法用于弹出UINavigationController管理的栈顶得UIViewController;
- (7)、- (NSArray *)popToRootViewControllerAnimated:(BOOL)animated;该方法将会弹出除了rootUIViewController以外的所有UIViewController;
- (8)、- (NSArray )popToViewController:(UIViewController )viewController animated:(BOOL)animated;该方法用于弹出到指定的UIViewController。
UINavigationController提供了如下属性和方法来配置导航条:
- (1)、navigationBar:该只读属性返回该UINavigationController管理的导航条;
- (2)、navigationBarHidden:该属性用于设置或者返回是否隐藏导航条;
- (3)、- (void)setNavigationBarHidden:(BOOL)hidden animated:(BOOL)animated;该方法用于设置是否隐藏导航条;
(4)、用自定义的图片来替换返回按钮的V型;
例如:[self.navigationController.navigationBar setBackIndicatorImage:image]; [self.navigationController.navigationBar setBackIndicatorTransitionMaskImage:image];
UINavigationController提供如下属性来配置导航标题
(1)、title:设置导航条中间标题;
例如:self.title = @"好人"; self.navigationItem.title = @"好人”;
注意:self.title可以改变self.navigationItem.title,反之不可以;
(2)、改变title的字体属性;
例如:NSFontAttributeName 字体key; NSForegroundColorAttributeName NSTextAttributeTextColor 字体颜色key例如:
[self.navigationController.navigationBar setTitleTextAttributes:[NSDictionary dictionaryWithObjectsAndKeys:font,NSFontAttributeName,[UIColor redColor],NSForegroundColorAttributeName, nil]];
UINavigationController提供了如下属性来配置工具条:
- (1)、toolbar:该只读属性返回该UINavigationController管理的工具条;
- (2)、- (void)setToolbarHidden:(BOOL)hidden animated:(BOOL)animated;该方法用于设置是否隐藏工具条;
- (3)、toolbarHidden:该属性用于设置或者返回是否隐藏工具条;
实例:查看、编辑图书信息
3、使用segue控制过渡
4、使用segue控制导航
待续
十九、网格(UICollectionView)与网格控制器(UICollectionViewController)
UICollectionView继承了UIScrollView,它具有UIScrollView的功能,这个UIScrollView中主要封装了UITableViewCell单元格控件,因此,UICollectionView默认可以对单元格进行滚动。默认状态下,IUCollectionViewController实例被自动设为UIScrollView委托。
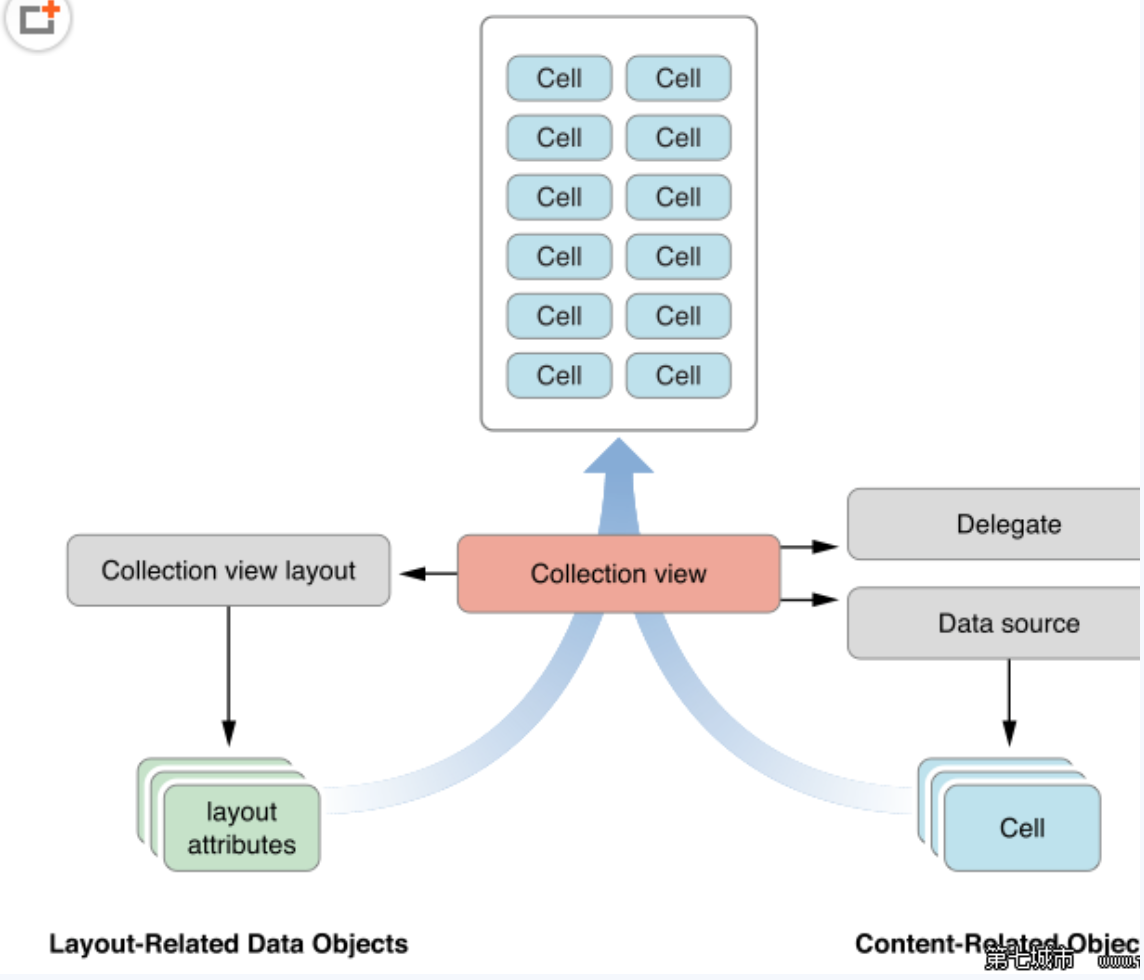
组件一个UICollectionView不仅需要内容相关的对象,如DataSource和Delegate,还需要布局相关的对象即UICollectionViewLayout。
- DataSource:提供相关的data和view;
- Delegate:实现点击/插入/删除等操作时需要的方法;
- Layout:提供布局view(如cell,supplementary,decoration view)需要的相关数据
- UICollectionViewLayout:是一个新类,作用控制所有view显示,Layout会为每个view(如果需要显示),提供LayoutAttribute,通过LayoutAttribute,CollectionView就知道如何去组织;
- UICollectionViewLayoutAttributes:提供frame和伪3D的信息和UIKit的动态信息。
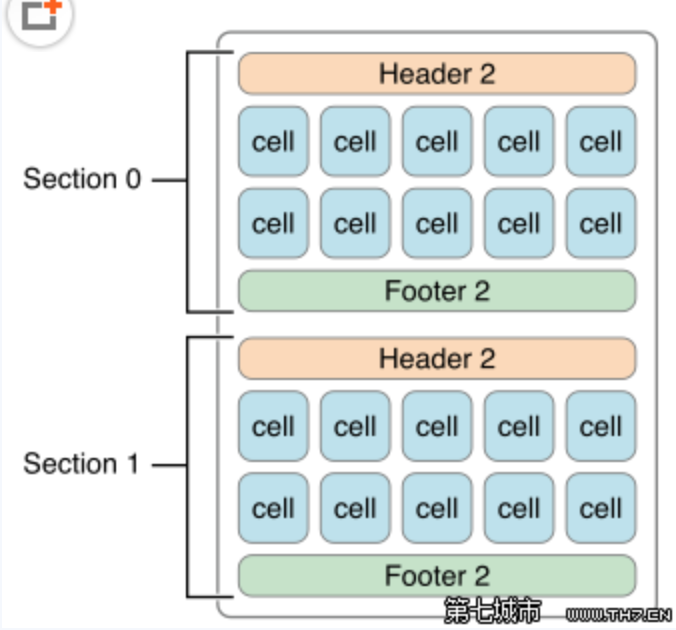
上图是UICollectionViewFlowLayout的一个布局,我们一次进行介绍:
- Cell:如上每一个单元格就是一个cell,和UITableViewCell一样,你可以进行自定义,添加image,Label等等
- Supplementary view:图中的Header和Footer就是Supplementary view;
- Decoration view:图中没有显示,不过顾名思义可以理解为修饰的view,如背景之类。他和Supplementary的区别在于,后者往往是和数据相关联的。
UICollectionView的属性如下:
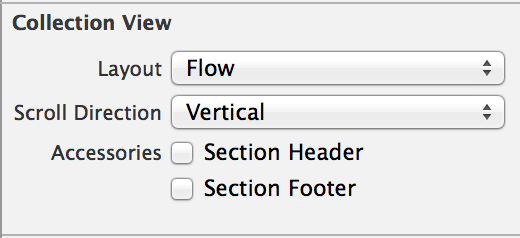
Layout:该属性用于指定UICollectionView所使用的布局对象,它可支持Flow,Custom两个属性,如果指定Flow属性值,表明使用UICollectionViewFlowLayout布局对象录入过指定Custom属性值,则表明将会使用自定义的UICollectionViewLayout布局对象;
对UICollectionView而言,它大致由页眉控件,单元格,装饰控件,页脚控件组成。1、如果选择Flow,在Xcode的dock面板中可以看到UICollectionView的下面包含一个CollectionViewFlowLayout对象,该对象布局采用“流”的方式管理UICollectionView中的所有单元格,这些单元格要么横向排列,要么纵向排列,其效果就像一个网格。
UICollectionViewFlowLayout的属性如下
①、Cell Size:设置每个单元格的宽和高;itemSize:该属性用于设置单元格的宽度和高度;
例如:flowLayout.itemSize = CGSizeMake(120, 160);②、Header Size:设置各分区的页眉控件的宽和高;
例如:flowLayout.headerReferenceSize = CGSizeMake(120, 40);③、Footer Size:设置各分区的页脚控件的宽和高;
例如:flowLayout.footerReferenceSize = CGSizeMake(120, 40);④、Min Spacing:设置各单元格之间的最小行间距和最小列间距;
minimumLineSpacing:用于控制单元格之间的最小行间距;
例如:flowLayout.minimumLineSpacing = 12;⑤、minimumInteritem Spacing:用于控制单元格之间的最小列间距;
例如:flowLayout.minimumInteritemSpacing = 12;⑥、Section Insets:设置各分区上、下、左、右空白区的大小;
例如:lowLayout.sectionInset = UIEdgeInsetsMake(0, 2, 0, 0);⑦、scrollDirection:用于控制UICollectionView的滚动方向;
例如:flowLayout.scrollDirection = UICollectionViewScrollDirectionHorizontal;
- 2、如果该属性选择Custom,UICollection对象的属性检查器面板则只会显示如下界面;
- (2)、Scroll Direction:该属性实际上来自UICollectionViewFlowLayout布局对象,如果将Layout属性设为Custom属性值,该下拉属性选择器就会消失。该属性用于设置该控件的滚动方向,他支持Vertical和Horizontal两个属性值,分别代表垂直滚动和水平滚动。
- (3)、Accessories:该属性是否显示UICollectionView分区的页眉和页脚。
与UITableView控件类似的是,UICollectionView同样采用分区(section)来管理过个单元格(cell),同样适用NSIndexPath来封装单元格的位置信息,包括该单元格所在的分区号、行号等信息;
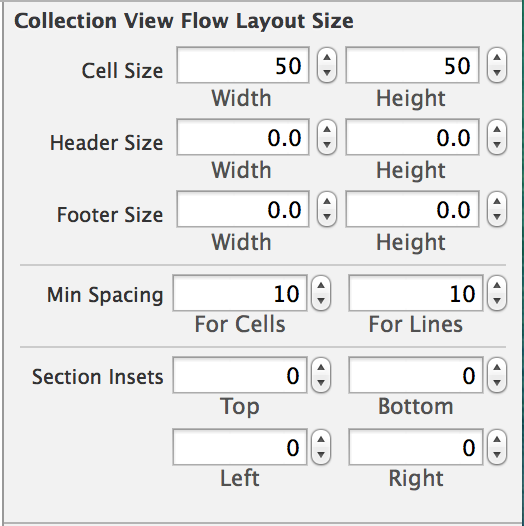
1、UICollectionView的功能和用法
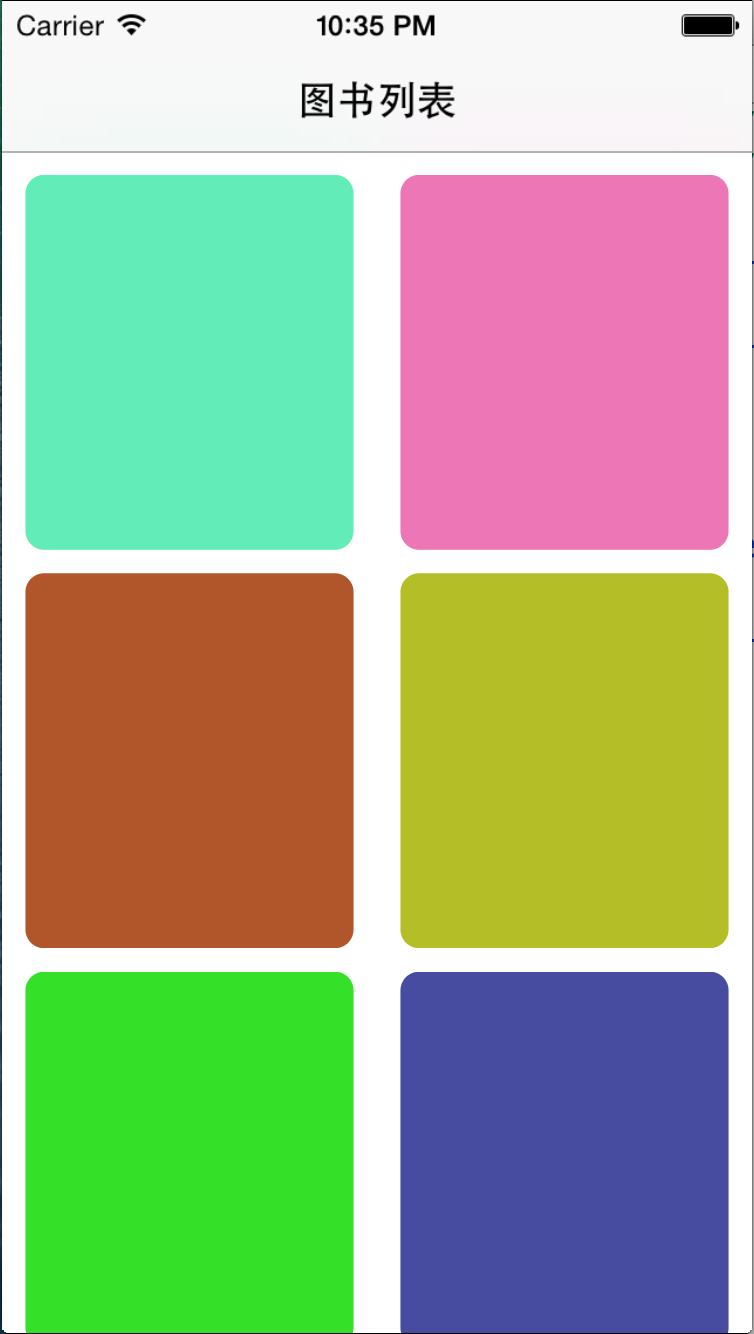
声明部分
#import <UIKit/UIKit.h>
@interface MyRootViewController : UIViewController<UICollectionViewDelegate,UICollectionViewDataSource]] >
@property (nonatomic ,strong) UICollectionView* collextionView;
@end
实现部分
@interface MyRootViewController ()
{
    NSArray* books;
    NSArray* covers;
}
@end
@implementation MyRootViewController
- (void)viewDidLoad {
[super viewDidLoad];
//创建并初始化NSArray对象
books = [NSArray arrayWithObjects:@"疯狂Ajax讲义",@"疯狂Android",@"疯狂HTML5/CSS3/JavaScripts讲义",@"疯狂Java讲义",@"疯狂Java程序员基本修养",@"轻量级Java EE企业应用实战",@"经典Java EE企业应用实战",@"疯狂XML讲义", nil];
//创建并初始化NSArray
covers = [NSArray arrayWithObjects:@"1.png",@"2.pmg",@"3.png",@"4.png",@"5.png",@"6.png",@"7.png",@"8.png", nil];
//为当前导航项设置标题
self.navigationItem.title = @"图书列表";
//创建UICollectionViewFlowLayout布局对象
UICollectionViewFlowLayout* flowLayout = [[UICollectionViewFlowLayout alloc]init];
// flowLayout.footerReferenceSize = CGSizeMake(120, 40);
// flowLayout.headerReferenceSize = CGSizeMake(120, 40);
// flowLayout.minimumInteritemSpacing = 12;
// flowLayout.minimumLineSpacing = 12;
//设置UIVollectionView中单元格的大小
flowLayout.itemSize = CGSizeMake(self.view.frame.size.width/2 - 20, 160);
//设置该UICollectionView只支持水平移动
flowLayout.scrollDirection = UICollectionViewScrollDirectionVertical;
//设置各分区上、下、左、右空白的大小
flowLayout.sectionInset = UIEdgeInsetsMake(10, 10, 10, 10);
//为UICollectionView设置dataSource和delegate
self.collextionView = [[UICollectionView alloc]initWithFrame:CGRectMake(0, 0, self.view.frame.size.width, self.view.frame.size.height) collectionViewLayout:flowLayout];
_collextionView.dataSource = self;
_collextionView.delegate = self;
//为UICollectionView设置布局对象
[_collextionView registerClass:[UICollectionViewCell class] forCellWithReuseIdentifier:@"cellId"];
_collextionView.backgroundColor = [UIColor whiteColor];
[self.view addSubview:_collextionView];
}
#pragma mark --UICollectionViewDataSource
//该方法的返回值决定个单元格的控件
- (UICollectionViewCell *)collectionView:(UICollectionView *)collectionView cellForItemAtIndexPath:(NSIndexPath *)indexPath{
//为单元格定义一个静态字符串作为标识符
static NSString* cellId = @"cellId";
//从可重用单元格的队列中取出一个单元格
UICollectionViewCell* cell = [collectionView dequeueReusableCellWithReuseIdentifier:cellId forIndexPath:indexPath];
//设置圆角
cell.layer.cornerRadius = 8;
cell.layer.masksToBounds = YES;
cell.backgroundColor = [ UIColor colorWithRed :(( arc4random ()% 255 )/ 255.0 ) green :(( arc4random ()% 255 )/ 255.0 ) blue :(( arc4random ()% 255 )/ 255.0 ) alpha : 1.0f ];
return cell;
}
//该方法的返回值决定UICollectionView包含多少个单元格
- (NSInteger)collectionView:(UICollectionView *)collectionView numberOfItemsInSection:(NSInteger)section{
return books.count;
}2、使用UICollectionViewDelegateFlowLayout定制布局
如果直接使用UICollectionViewFlowLayout布局对象来管理UICollectionView的所有单元格,那么这些单元格的大小、单元格之间的间距和行距都是相同的。当UICollectionView端丽的所有单元格控件的大小本来就是相同时,直接使用UICollectionViewFlowLayout,即可实现非常整齐的网络效果。
但是在某些时候,UICollectionView控件中个单元格的大小是参差不齐的,如果强行将这些控件缩放到同一大小,势必会影响现实效果。如果程序需要让UICollectionView中各控件各自显示不同的大小,则可借助UICollectionViewDelagateFlowLayout协议来实现。
UICollectionViewDelegateFlowLayout协议继承了UICollectionViewDelegate协议,因此实现该协议的对象可以当成UICollectionView的委托对象使用。UICollectionViewDelegateFlowLayout一些额外定义了如下常用方法:
#pragma mark --UICollectionViewDelegateFlowLayout
- (1)、- (CGSize)collectionView:(UICollectionView )collectionView layout:(UICollectionViewLayout)collectionViewLayout sizeForItemAtIndexPath:(NSIndexPath *)indexPath;该方法返回的CGSize对象将控制指定NSIndexPath对应的单元格大小;
- (2)、- (UIEdgeInsets)collectionView:(UICollectionView )collectionView layout:(UICollectionViewLayout)collectionViewLayout insetForSectionAtIndex:(NSInteger)section;该方法返回的UIEdgeInsets对象将控制指定分区上、下、左、右空白区域的大小;
- (3)、- (CGFloat)collectionView:(UICollectionView )collectionView layout:(UICollectionViewLayout)collectionViewLayout minimumLineSpacingForSectionAtIndex:(NSInteger)section;该方法返回的长度值将控制指定分区内最小的行间距;
- (4)、- (CGFloat)collectionView:(UICollectionView )collectionView layout:(UICollectionViewLayout)collectionViewLayout minimumInteritemSpacingForSectionAtIndex:(NSInteger)section;该方法返回的长度值将控制指定分区内最小的列间距;
- (5)、- (CGSize)collectionView:(UICollectionView )collectionView layout:(UICollectionViewLayout)collectionViewLayout referenceSizeForHeaderInSection:(NSInteger)section;该方法返回的CGSize将控制指定分区的页眉控件的大小;
- (6)、- (CGSize)collectionView:(UICollectionView )collectionView layout:(UICollectionViewLayout)collectionViewLayout referenceSizeForFooterInSection:(NSInteger)section;该方法返回的CGSize将控制指定分区的页脚控制的大小;
实例:单元格大小不同的网格
不在举例
3、扩展UICollectionViewLayout定制布局
如果采用UICollectionViewFlowLayout管理UICollectionView中单元格的布局,所有的单元格总会分布成网格形式。如果希望UICollectionView以更复杂,更灵活的方式对单元格进行布局,可以通过集成UICollectionViewLayout,实现自己的布局管理器来实现,通过这种方式,开发者激活而已任意控制UICollectionView中单元格的布局。
——继承UICollectionFlowLayout时,通常会重写如下常用的方法:
- (1)、- (void)prepareLayout;开始布局时调用该方法执行准备工作;
(2)、- (NSArray *)layoutAttributesForElementsInRect:(CGRect)rect;该方法返回值控制只大牛股NSRect区域内所有单元格的大小和位置等布局信息;
- ①、返回rect中所有的元素的布局属性;
- ②、返回的是包含UICollectionViewLayoutAttributes的NSArray
③、UICollectionViewLayoutAttributes可以是cell,追加视图或装饰视图的信息,通过不同的UICollectionViewLayoutAttributes初始化方法得到不同类型的UICollectionViewLayoutAttributes:
①、- (UICollectionViewLayoutAttributes *)layoutAttributesForItemAtIndexPath:(NSIndexPath *)indexPath;
②、- (UICollectionViewLayoutAttributes *)layoutAttributesForSupplementaryViewOfKind:(NSString *)elementKind atIndexPath:(NSIndexPath *)indexPath;
③、- (UICollectionViewLayoutAttributes *)layoutAttributesForDecorationViewOfKind:(NSString*)elementKind atIndexPath:(NSIndexPath *)indexPath;
- (3)、- (UICollectionViewLayoutAttributes )layoutAttributesForItemAtIndexPath:(NSIndexPath )indexPath;该方法返回值控制指定NSIndexPath对应的单元格的大小和位置等布局信息;
- (4)、- (UICollectionViewLayoutAttributes )layoutAttributesForSupplementaryViewOfKind:(NSString )elementKind atIndexPath:(NSIndexPath *)indexPath;该方法返回值控制指定分区的页眉控件、页脚控件的大小和位置等布局信息;返回对应于indexPath的位置的追加视图的布局属性,如果没有追加视图可不重载;
- (5)、- (UICollectionViewLayoutAttributes )layoutAttributesForDecorationViewOfKind:(NSString)elementKind atIndexPath:(NSIndexPath *)indexPath;该方法的返回值控制指定分区的装饰控件的大小和位置等布局信息;返回对应于indexPath的位置的装饰视图的布局属性,如果没有装饰视图可不重载;
——如果程序希望控制UICollectionView的单元格显示、隐藏时的动画效果,还可以重写如下方法:
- (1)、- (UICollectionViewLayoutAttributes )initialLayoutAttributesForAppearingItemAtIndexPath:(NSIndexPath )itemIndexPath;每当单元格动态增加时,自动调用该方法;
- (2)、- (UICollectionViewLayoutAttributes )initialLayoutAttributesForAppearingSupplementaryElementOfKind:(NSString )elementKind atIndexPath:(NSIndexPath *)elementIndexPath;每当指定分区的页眉控件或页脚控件动态增加时,自动调用该方法;
- (3)、- (UICollectionViewLayoutAttributes )initialLayoutAttributesForAppearingDecorationElementOfKind:(NSString )elementKind atIndexPath:(NSIndexPath *)decorationIndexPath;每当指定分区的装饰控件动态增加时,自动调用该方法;
- (4)、- (UICollectionViewLayoutAttributes )finalLayoutAttributesForDisappearingItemAtIndexPath:(NSIndexPath )itemIndexPath;每当单元格动态消失时自动调用该方法;
- (5)、- (UICollectionViewLayoutAttributes )finalLayoutAttributesForDisappearingSupplementaryElementOfKind:(NSString )elementKind atIndexPath:(NSIndexPath *)elementIndexPath;每当指定分区的页眉控件或页脚控件动态消失时自动调用该方法;
(6)、- (UICollectionViewLayoutAttributes )finalLayoutAttributesForDisappearingDecorationElementOfKind:(NSString )elementKind atIndexPath:(NSIndexPath *)decorationIndexPath;每当指定分区的装饰控件动态消失时自动调用该方法;
提示: 初始化一个UICollectionViewFlowLayout实例后,会有一系列准备方法被自动调用,以保证layout实例的争取:

首先,-(void)prepareLayout将被调用,默认下该方法什么没做,但是在自己的子类实现中,一般在该方法中设定一些必要的layout的结构和初始需要的参数等。

之后,-(CGSize) collectionViewContentSize将被调用,以确定collection应该占据的尺寸。注意这里的尺寸不是指可视部分的尺寸,而应该是所有内容所占的尺寸。collectionView的本质是一个scrollView,因此需要这个尺寸来配置滚动行为。

接下来-(NSArray *)layoutAttributesForElementsInRect:(CGRect)rect被调用,这个没什么值得多说的。初始的layout的外观将由该方法返回的UICollectionViewLayoutAttributes来决定。
另外,在需要更新layout时,需要给当前layout发送 -invalidateLayout,该消息会立即返回,并且预约在下一个loop的时候刷新当前layout,这一点和UIView的setNeedsLayout方法十分类似。在-invalidateLayout后的下一个collectionView的刷新loop中,又会从prepareLayout开始,依次再调用-collectionViewContentSize和-layoutAttributesForElementsInRect来生成更新后的布局。
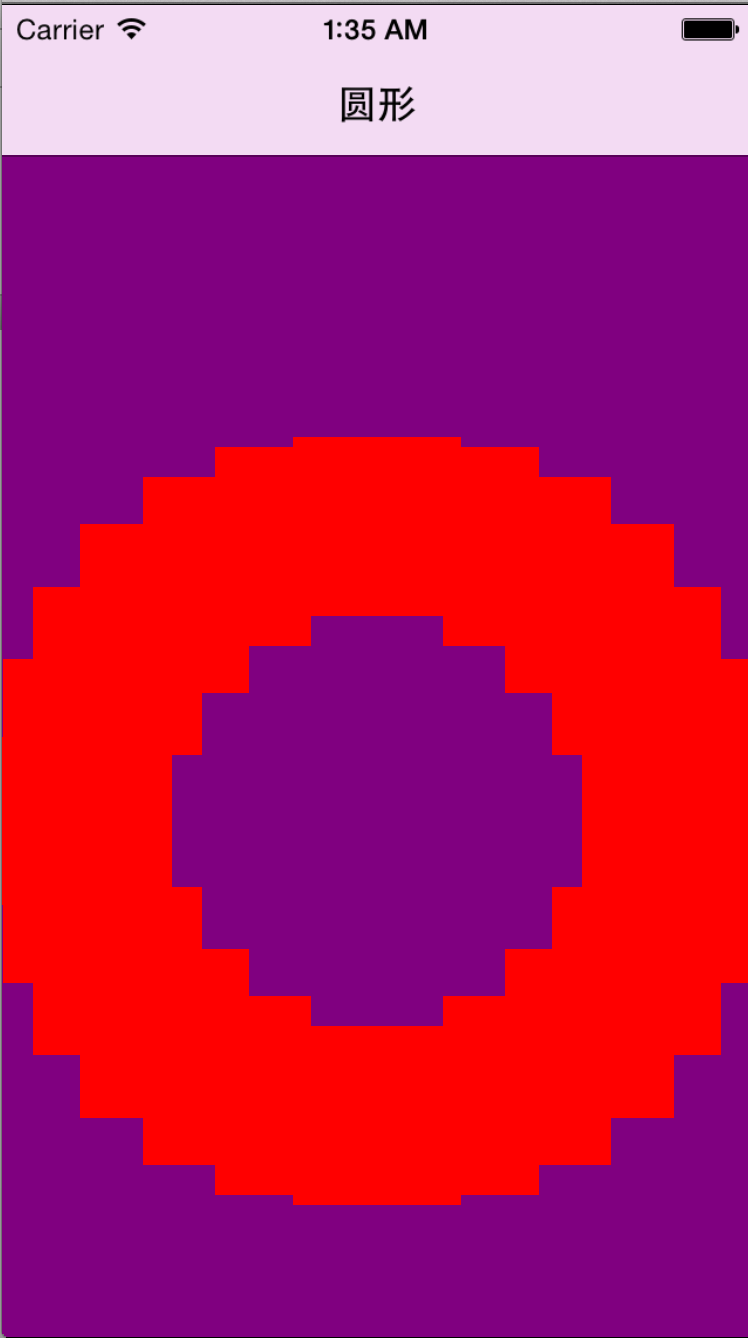
实例:环形布局的UICollectionView
MyRootViewController.h声明部分
#import <UIKit/UIKit.h>
@interface MyRootViewController : UIViewController<UICollectionViewDelegate,UICollectionViewDataSource]] >
@property (nonatomic ,strong) UICollectionView* collextionView;
@end
MyRootViewController.m实现部分
#import "MyRootViewController.h"
#import "FKCircleLayout.h"
@interface MyRootViewController ()
{
    NSInteger cellCount;
}
@end
@implementation MyRootViewController
- (void)viewDidLoad {
    [super viewDidLoad];
    cellCount = 16;
    //创建自定义的FKCircleLayout布局对象
    FKCircleLayout* circleLayout = [[FKCircleLayout alloc]init];
    //设置自定义布局对象
    self.collextionView = [[UICollectionView alloc]initWithFrame:CGRectMake(0, 0, self.view.frame.size.width, self.view.frame.size.height) collectionViewLayout:circleLayout];
    _collextionView.backgroundColor = [UIColor purpleColor];
    //为UICollectionView设置dataSource和delegate
    _collextionView.dataSource = self;
    _collextionView.delegate = self;
    //为UICollectionView设置布局对象
    [_collextionView registerClass:[UICollectionViewCell class] forCellWithReuseIdentifier:@"cellId"];
//    _collextionView.backgroundColor = [UIColor whiteColor];
    [self.view addSubview:_collextionView];
    //创建一个处理点击的手势处理器
    UITapGestureRecognizer* tapRecognizer = [[UITapGestureRecognizer alloc]initWithTarget:self action:@selector(handleTap:)];
    [_collextionView addGestureRecognizer:tapRecognizer];
    //为当前导航项设置标题
    self.navigationItem.title = @"圆形";
}
#pragma mark --UICollectionViewDataSource
//该方法的返回值决定UICollectionView包含多少个单元格
- (NSInteger)collectionView:(UICollectionView *)collectionView numberOfItemsInSection:(NSInteger)section{
    return cellCount;
}
//该方法的返回值决定个单元格的控件
- (UICollectionViewCell *)collectionView:(UICollectionView *)collectionView cellForItemAtIndexPath:(NSIndexPath *)indexPath{
    //为单元格定义一个静态字符串作为标识符
    static NSString* cellId = @"cellId";
    //从可重用单元格的队列中取出一个单元格
    UICollectionViewCell* cell = [collectionView dequeueReusableCellWithReuseIdentifier:cellId forIndexPath:indexPath];
    cell.backgroundColor = [UIColor redColor];
    return cell;
}
//定义处理点击手势的方法
- (void)handleTap:(UITapGestureRecognizer *)sender{
    if (sender.state == UIGestureRecognizerStateEnded) {
        //获取点击的位置
        CGPoint initoalPinchPoint = [sender locationInView:_collextionView];
        //获取电机电所在的NSIndexPath(可用于获取被点击的单元格)
        NSIndexPath* tappedCellPath = [_collextionView indexPathForItemAtPoint:initoalPinchPoint];
        //如果被点击的单元格存在
        if (tappedCellPath) {
            cellCount --;//减少一个单元格
            //删除被点击的单元格
            [_collextionView deleteItemsAtIndexPaths:[NSArray arrayWithObject:tappedCellPath]];
        }else{
            cellCount++;//增加一个单元格
            //在UICollectionView的开始处添加一个单元格
            [_collextionView insertItemsAtIndexPaths:[NSArray arrayWithObject:[NSIndexPath indexPathForItem:0 inSection:0]]];
        }
    }
}
FKCircleLayout.h声明部分
#import <UIKit/UIKit.h>
@interface FKCircleLayout : UICollectionViewLayout
@property (nonatomic,assign)CGPoint center;
@property (nonatomic,assign)CGFloat radius;
@property (nonatomic,assign)NSInteger cellCount;
@end
FKCircleLayout.m实现部分
#import "FKCircleLayout.h"
#define ITEM_SIZE 72
@implementation FKCircleLayout
//开始执行的方法
- (void)prepareLayout{
    [super prepareLayout];
    CGSize size = self.collectionView.frame.size;
    //计算需要包含多少个单元格
    _cellCount = [[self collectionView] numberOfItemsInSection:0];
    //计算环的圆心
    _center = CGPointMake(size.width/2.0, size.height/2.0);
    //计算环的半径(以宽、高中较小值的2.5分之一作为半径)
    _radius = MIN(size.width, size.height)/2.5;
}
//该方法的返回值决定UICollectionView所包含控件的大小
- (CGSize)collectionViewContentSize{
    return [self collectionView].frame.size;
}
//该方法返回的UICollectionViewLayoutAttributes控制指定单元格的大小和位置
- (UICollectionViewLayoutAttributes *)layoutAttributesForItemAtIndexPath:(NSIndexPath *)indexPath{
    //创建一个UICollectionViewLayoutAttributes控制指定单元格的大小和位置
    UICollectionViewLayoutAttributes* attributes = [UICollectionViewLayoutAttributes layoutAttributesForCellWithIndexPath:indexPath];
    //设置各单元格的大小
    attributes.size = CGSizeMake(ITEM_SIZE, ITEM_SIZE);
    //设置单元格的中心点坐标
    //由于程序需要控制各单元格绕成一个圆圈,因此此处使用了三角函数进行计算
    attributes.center = CGPointMake(_center.x + _radius * cosf(2 * M_PI * indexPath.item/_cellCount), _center.y + _radius * sinf(2 * M_PI * indexPath.item/_cellCount));
    return attributes;
}
//该方法的返回值控制UICollectionViewLayoutAttributes集合依次控制
//指定CGRect范围内各单元格大小和位置
- (NSArray *)layoutAttributesForElementsInRect:(CGRect)rect{
    NSMutableArray* attributes = [NSMutableArray array];
    //将控制每个单元格大小和位置的UIVollectionViewLayoutAttributes
    //添加到NSArray中
    for (NSInteger i = 0; i < _cellCount; i ++) {
        NSIndexPath* indexPath = [NSIndexPath indexPathForItem:i inSection:0];
        [attributes addObject:[self layoutAttributesForItemAtIndexPath:indexPath]];
    }
    return attributes;
}
//每当单元格动态显示时自动调用该方法
- (UICollectionViewLayoutAttributes *)initialLayoutAttributesForAppearingItemAtIndexPath:(NSIndexPath *)itemIndexPath{
    UICollectionViewLayoutAttributes* attributes = [self layoutAttributesForItemAtIndexPath:itemIndexPath];
    attributes.alpha = 0.0;
    attributes.center = CGPointMake(_center.x, _center.y);
    return attributes;
}
//每当单元格动态消失时自动调用该方法
- (UICollectionViewLayoutAttributes *)finalLayoutAttributesForDisappearingItemAtIndexPath:(NSIndexPath *)itemIndexPath{
    UICollectionViewLayoutAttributes* attributes = [self layoutAttributesForItemAtIndexPath:itemIndexPath];
    attributes.alpha = 0.0;
    attributes.center = CGPointMake(_center.x, _center.y);
    attributes.transform3D = CATransform3DMakeScale(0.1, 0.1, 1.0);
    return attributes;
}
4、多分区网格
与UITableView类似的是,UICollectionView同样支持多分区,如果需要实现多分区UICollectionView控件,则需要重写UICollectionViewDataSource协议的numberOfSectionInCollectionView:方法,该方法的返回值控制该UICollectionView可以包含多少个分区;
如果程序需要为各分区添加页眉控件和页脚控件,还需要重写UICollectionViewDataSource协议中的-collectionView:viewForSupplementaryElementOfKind:atIndexPath:方法,该方法返回的控件将作为各分区的页眉、页脚控件。
实例:带页眉、页脚的多分区网格
MyRootViewController.h的声明部分
#import <UIKit/UIKit.h>
@interface MyRootViewController : UIViewController<UICollectionViewDelegate,UICollectionViewDataSource]] >
@property (nonatomic ,strong) UICollectionView* collextionView;
@end
MyRootViewController.m的实现部分
@interface MyRootViewController ()
{
    NSDictionary* books;//定义保存所有图书信息的NSDictionary对象
    NSArray* authors;//定义保存所有作者的NSArray对象
    NSDictionary* covers;//定义所有图书封面的NSDictionary对象
    NSDictionary* header;//定义所有作者头像的NSDictionary对象
}
@end
@implementation MyRootViewController
- (void)viewDidLoad {
[super viewDidLoad];
//设置导航的标题
self.navigationItem.title = @"图书列表";
//创建并开始初始化NSDictionary对象
books = [NSDictionary dictionaryWithObjectsAndKeys:[NSArray arrayWithObjects:@"疯狂Ajax讲义",@"疯狂Android",@"疯狂HTML5/CSS3/JavaScripts讲义",@"疯狂Java讲义",@"疯狂Java程序员基本修养",@"轻量级Java EE企业应用实战",@"经典Java EE企业应用实战",@"疯狂XML讲义", nil],@"李刚",[NSArray arrayWithObjects:@"醒世恒言",@"喻世明言",@"警世通言", nil],@"冯梦龙", nil];
//authors保存books的所有key
authors = [[books allKeys] sortedArrayUsingSelector:@selector(compare:)];
//为所有作者保存头像
header = [NSDictionary dictionaryWithObjectsAndKeys:@"1.png",@"李刚",@"2.png",@"冯梦龙", nil];
//创建并初始化NSArray对象
covers = [NSDictionary dictionaryWithObjectsAndKeys:@"1.png",@"疯狂Ajax讲义",@"2.png",@"疯狂Android",@"3.png",@"疯狂HTML5/CSS3/JavaScripts讲义",@"4.png",@"疯狂Java讲义",@"5.png",@"疯狂Java程序员基本修养",@"6.png",@"轻量级Java EE企业应用实战",@"7.png",@"经典Java EE企业应用实战",@"8.png",@"疯狂XML讲义", @"11.png",@"醒世恒言",@"12.png",@"喻世明言",@"13.png",@"警世通言",nil];
//创建UICollectionViewLayout对象
UICollectionViewFlowLayout* flowLayout = [[UICollectionViewFlowLayout alloc]init];
//设置单元格的大小
flowLayout.itemSize = CGSizeMake(160, 200);
//设置flowLayout的滚动方向
flowLayout.scrollDirection = UICollectionViewScrollDirectionHorizontal;
flowLayout.sectionInset = UIEdgeInsetsMake(0, 2, 0, 0);
flowLayout.headerReferenceSize = CGSizeMake(80, 80);
flowLayout.footerReferenceSize = CGSizeMake(50, 240);
//为UICollectionView设置布局管理器具
self.collextionView = [[UICollectionView alloc]initWithFrame:CGRectMake(0, 0, self.view.frame.size.width, self.view.frame.size.height) collectionViewLayout:flowLayout];
_collextionView.backgroundColor = [UIColor purpleColor];
//为UICollectionView设置dataSource和delegate
_collextionView.dataSource = self;
_collextionView.delegate = self;
//为UICollectionView设置布局对象
[_collextionView registerClass:[UICollectionViewCell class] forCellWithReuseIdentifier:@"cellId”];
//为页眉设置标识符
[_collextionView registerClass:[UICollectionReusableView class] forSupplementaryViewOfKind:UICollectionElementKindSectionHeader withReuseIdentifier:@"headerId”];
//为页脚设置标识符
[_collextionView registerClass:[UICollectionReusableView class] forSupplementaryViewOfKind:UICollectionElementKindSectionFooter withReuseIdentifier:@"supplyId"];
[self.view addSubview:_collextionView];
}
#pragma mark --UICollectionViewDataSource
//该方法的返回值控制该UICollectionView包含多少个分区
- (NSInteger)numberOfSectionsInCollectionView:(UICollectionView *)collectionView{
return authors.count;
}
//该方法的返回值决定UICollectionView包含多少个单元格
- (NSInteger)collectionView:(UICollectionView *)collectionView numberOfItemsInSection:(NSInteger)section{
//获取该分区对象的作者
NSString* author = [authors objectAtIndex:section];
//返回该作者对象的图书的数量
return [[books objectForKey:author] count];
}
//该方法返回值将左前卫指定分区的页眉控件和页脚控件
- (UICollectionReusableView *)collectionView:(UICollectionView *)collectionView viewForSupplementaryElementOfKind:(NSString *)kind atIndexPath:(NSIndexPath *)indexPath{
//为表格行定义一个静态字符串作为标识符
static NSString* headerId = @"headerId";
static NSString* supplyId = @"supplyId";
UICollectionReusableView* view;
if (kind == UICollectionElementKindSectionHeader) {
//从可重用队列中取出一个UICollectionReusableView
view = [collectionView dequeueReusableSupplementaryViewOfKind:UICollectionElementKindSectionHeader withReuseIdentifier:headerId forIndexPath:indexPath];
//取出页眉控件中
view.backgroundColor = [UIColor redColor];
}
//如果正在处理页脚控件
if (kind == UICollectionElementKindSectionFooter) {
//从可重用队列中取出一个UICollectionResuableView
view = [collectionView dequeueReusableSupplementaryViewOfKind:UICollectionElementKindSectionFooter withReuseIdentifier:supplyId forIndexPath:indexPath];
view.backgroundColor = [UIColor yellowColor];
}
return view;
}
//该方法的返回值决定个单元格的控件
- (UICollectionViewCell *)collectionView:(UICollectionView *)collectionView cellForItemAtIndexPath:(NSIndexPath *)indexPath{
//为单元格定义一个静态字符串作为标识符
static NSString* cellId = @"cellId";
//从可重用单元格的队列中取出一个单元格
UICollectionViewCell* cell = [collectionView dequeueReusableCellWithReuseIdentifier:cellId forIndexPath:indexPath];
cell.backgroundColor = [ UIColor colorWithRed :(( arc4random ()% 255 )/ 255.0 ) green :(( arc4random ()% 255 )/ 255.0 ) blue :(( arc4random ()% 255 )/ 255.0 ) alpha : 1.0f ];
return cell;
}5、UICollectionViewDataSource代理方法
#pragma mark --UICollectionViewDataSource
- (1)、- (NSInteger)numberOfSectionsInCollectionView:(UICollectionView *)collectionView;返回UICollectionView区(section)的个数,如果没有该方法,默认返回1;
- (2)、- (NSInteger)collectionView:(UICollectionView *)collectionView numberOfItemsInSection:(NSInteger)section;返回指定区(section)包含的数据源条目数(number of items),该方法必须是实现;
- (3)、- (UICollectionViewCell )collectionView:(UICollectionView )collectionView cellForItemAtIndexPath:(NSIndexPath *)indexPath;返回否个indexPath对应的cell,该方法必须实现;
(4)、- (UICollectionReusableView )collectionView:(UICollectionView )collectionView viewForSupplementaryElementOfKind:(NSString )kind atIndexPath:(NSIndexPath )indexPath;为UICollectionView添加一个补充视图(页眉或页脚控件);
特别注意:在添加页眉或者页脚之前需要注册类和标识;
- (void)registerClass:(Class)viewClass forSupplementaryViewOfKind:(NSString *)elementKind withReuseIdentifier:(NSString *)identifier;
6、直接使用UICollectionViewController
待续。
二十、标签条(UITabBar)与标签页控制器
1、使用UITabBar
UITabBar属性如下:
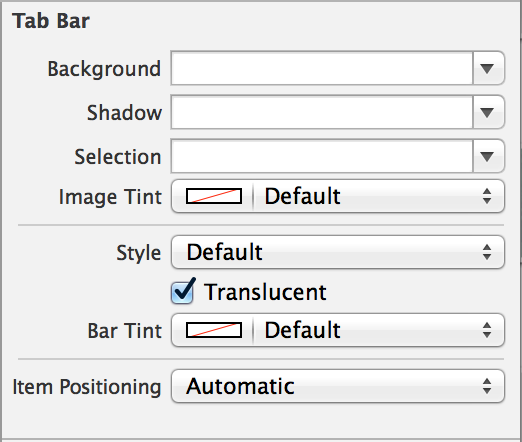
- (1)、Tint:该属性对应UITabBar的tintColor属性,它用于设置UITabBar控件的背景图片;
例如:tabBar.tintColor = [UIColor yellowColor];//貌似没有用 - (2)、ImageTint:该属性对应UITabBar的selectedImageTintColor属性,它用于设置UITabBar控件选中项上标题的高亮颜色;
例如:tabBar.selectedImageTintColor = [UIColor blackColor]; (3)、Bar Tint:该属性对应UITabBar的TintColor属性,它用于设置UITabBar控件的颜色;
例如:tabBar.barTintColor = [UIColor purpleColor];
UITabBar代表一个标签条,它是UITabBarItem的容器,可用于组合多个UITabBarItem对象,每个UITabBarItem对象代表一个标签项。UITabBar提供了如下属性和方法来访问它所包含的标签项;
(1)、items:通过该属性即可返回该UITabBar所包含的多个UITabBarItem对象;
例如:tabBar.items = [NSArray arrayWithObjects:tabBarItem1,tabBarItem2, nil];(2)、selectedItem:该属性用于返回该UITabBar当前被选中的标签项;
例如:tabBar.selectedItem = tabBarItem1;- (3)、- (void)setItems:(NSArray *)items animated:(BOOL)animated;该属性用于设置该UITabBar所包含的多个UITabBarItem对象;
UITabBarItem代表一个标签项,通常由一个图标和一个标签标题组成,因此程序可通过如下方法来创建UITabBarItem:
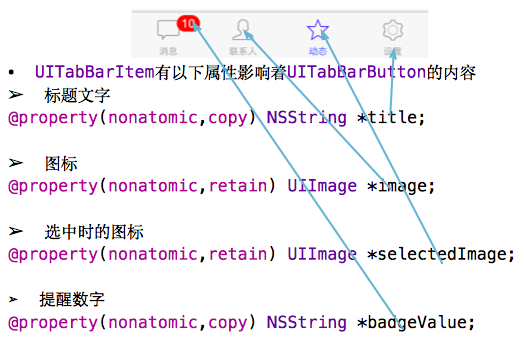
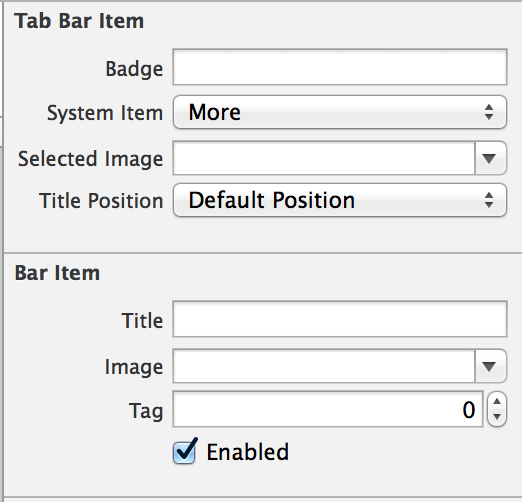
- (1)、- (instancetype)initWithTabBarSystemItem:(UITabBarSystemItem)systemItem tag:(NSInteger)tag;使用指定的系统图标和指定标签创建UITabBarItem;
- (2)、- (instancetype)initWithTitle:(NSString )title image:(UIImage )image tag:(NSInteger)tag;使用自定义标题、自定义图标和指定标签创建UITabBarItem;
(3)、badgeValue:用于设置一个徽标,该徽标将会以红色圆圈显示在标签项的右上角;
例如:tabBarItem1.badgeValue = @"热";
如果程序想要监听用户点击了那个标签项,只要为UITabBar设置一个delegate属性即可,该属性值必须是一个实现UITabBarDelegate协议的对象。当用户选中某个标签项时,将会激发UITabBarDelegate协议中的-tabBar:didSelectItem:方法;
#pragma mark - UITabBarDelegate
- (1)、- (void)tabBar:(UITabBar )tabBar didSelectItem:(UITabBarItem )item;在点击UITabBarItem时调用该方法;
- (2)、- (void)tabBar:(UITabBar )tabBar willBeginCustomizingItems:(NSArray )items;在UITabBar的item将要开始改动的时候调用该方法;
- (3)、- (void)tabBar:(UITabBar )tabBar didBeginCustomizingItems:(NSArray )items;在UITabBar的item已经开始改动的时候调用该方法;
- (4)、- (void)tabBar:(UITabBar )tabBar willEndCustomizingItems:(NSArray )items changed:(BOOL)changed;在UITabBar的item将要结束改动的时候调用该方法;
- (5)、- (void)tabBar:(UITabBar )tabBar didEndCustomizingItems:(NSArray )items changed:(BOOL)changed;在UITabBar的item改动的时候调用该方法;
2、使用UITabBarController
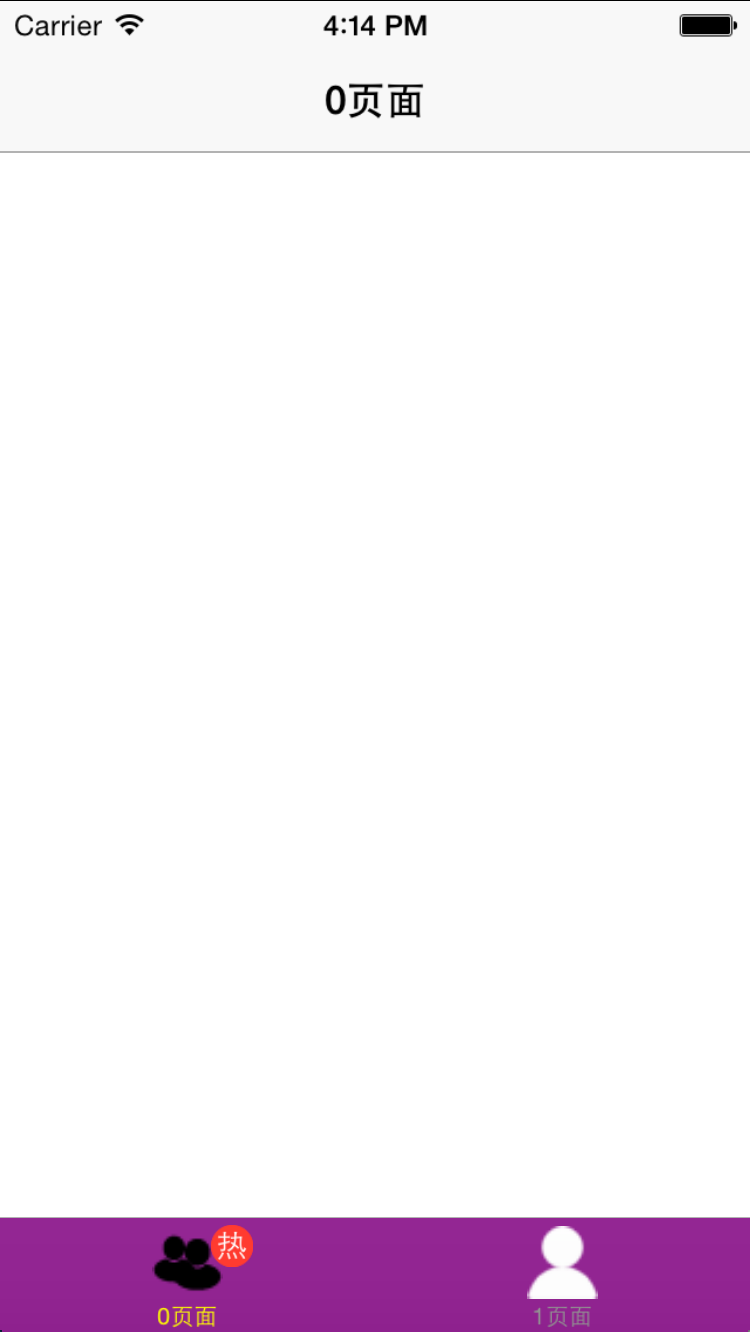
NSMutableArray* controllers = [NSMutableArray array];
UITabBarController* tabBarController = [[UITabBarController alloc]init];
tabBarController.tabBar.barTintColor = [UIColor purpleColor];
tabBarController.tabBar.selectedImageTintColor = [UIColor yellowColor];
for (int i = 0; i < 2 ; i ++) {
    UIViewController* vc;
        if (i == 0) {
            vc = [[FirstViewController alloc]init];
            vc.tabBarItem.badgeValue = @"热";
        }else{
            vc = [[SecondViewController alloc]init];
        }
    UINavigationController* nc = [[UINavigationController alloc]initWithRootViewController:vc];
    vc.title = [NSString stringWithFormat:@"%d页面",i];
    vc.tabBarItem.image = [[UIImage imageNamed:[NSString stringWithFormat:@"frum%d.png",i + 1]] imageWithRenderingMode:UIImageRenderingModeAlwaysOriginal];
    vc.tabBarItem.selectedImage = [[UIImage imageNamed:[NSString stringWithFormat:@"infoicon%d.png",i + 1]] imageWithRenderingMode:UIImageRenderingModeAlwaysOriginal];
    [controllers addObject:nc];
}
tabBarController.viewControllers = controllers;
tabBarController.selectedIndex = 1;
self.window.rootViewController = tabBarController;
UITabBar上最多可以显示5个Tab,当我们往UITabBarController中添加超过的viewController超过5个时候,最后一个就会自动变成,按照设置的viewControlles的顺序,显示前四个viewController的tabBarItem,后面的tabBarItem将不再显示。当点击more时候将会弹出一个标准的navigationViewController,里面放有其它未显示的的viewController,并且带有一个edit按钮,通过点击该按钮可以进入类似与ipod程序中设置tabBar的编辑界面。编辑界面中默认所有的viewController都是可以编辑的,我们可以通过设置UITabBarController的customizableViewControllers属性来指定viewControllers的一个子集,即只允许一部分viewController是可以放到tabBar中显示的。但是这块儿要注意一个问题就是每当UITabBarController的viewControllers属性发生变化的时候,customizableViewControllers就会自动设置成跟viewControllers一致,即默认的所有的viewController都是可以编辑的,如果我们要始终限制只是某一部分可编辑的话,记得在每次viewControlles发生改变的时候,重新设置一次customizableViewControllers。
#pragma mark - UITabBarControllerDelegate
- (1)、- (BOOL)tabBarController:(UITabBarController )tabBarController shouldSelectViewController:(UIViewController )viewController;该代理方法的返回值设置该UITabBarItem是否可选择,返回YES代表可选择;返回NO代表不可选择;
- (2)、- (void)tabBarController:(UITabBarController )tabBarController didSelectViewController:(UIViewController )viewController;当选中UITabBarItem时调用该方法;
- (3)、- (void)tabBarController:(UITabBarController )tabBarController willBeginCustomizingViewControllers:(NSArray )viewControllers;在将要开始编辑的时候调用带方法;
- (4)、- (void)tabBarController:(UITabBarController )tabBarController willEndCustomizingViewControllers:(NSArray )viewControllers changed:(BOOL)changed;在将要结束编辑的时候调用该方法;
- (5)、- (void)tabBarController:(UITabBarController )tabBarController didEndCustomizingViewControllers:(NSArray )viewControllers changed:(BOOL)changed;在已经结束编辑的时候调用该方法;
3、在StoryBoard中使用UITabBarController
待续。
二十一、页控件(UIPageControl)与页控制器(UIPageViewController)
页控件(UIPageControl)是一个比较简单的控件,该控件由N各小圆点组成,每个圆点代表一个页面,当前页面以高亮的圆点显示。而页控制器(UIPageViewController)则可用于方便地实现“翻页”效果;
1、UIPageControl与UIScrollView结合使用
UIPageControl继承了UIControl基类,默认属于活动控件,它可以与用户交互,并激发Value Changed事件处理方法;UIPageControl的属性如下:
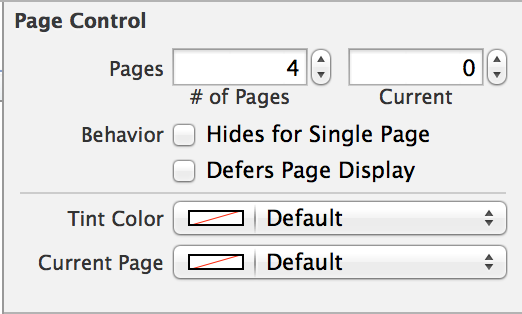

(1)、Page:设置总页数和当前第几页;
例如:pc.numberOfPages = 5;(2)、Behavior:该包括两个复选框
①、Hides for Single Page:当只有一个隐藏该控件;
例如:pc.hidesForSinglePage = YES;②、Defers Page Display:延迟显示当前页;
例如:pc.defersCurrentPageDisplay = YES;
(3)、Tint Color:设置小圆点的颜色;
例如:pc.pageIndicatorTintColor = [UIColor blackColor];(4)、Current Page:设置高亮圆点的颜色;
例如:pc.currentPage = 1; pc.currentPageIndicatorTintColor = [UIColor purpleColor];
例如:
MyRootViewController.m的实现部分
#import "MyRootViewController.h"
#import "FKPageViewController.h"
@interface MyRootViewController (){
    UIScrollView* _scrollView;
    NSMutableArray* viewControllers;
    UIPageControl* pageControl;
    NSArray* contentList;
    NSArray* coverList;
}
@end
@implementation MyRootViewController
- (void)viewDidLoad {
[super viewDidLoad];
contentList = [NSArray arrayWithObjects:@"疯狂Android讲义",@"疯狂Ajax讲义",@"疯狂XML讲义",@"疯狂HTML5/CSS3/JavaScript讲义", nil];
coverList = [NSArray arrayWithObjects:@"1.png",@"2.png",@"3.png",@"4.png", nil];
NSUInteger numberPages = contentList.count;
//程序将会采用延迟加载的方式来创建FKPageController控制器
//因此此处只向数组中添加一些null作为占位符
//等到程序需要时才真正创建FKPageController控制器
viewControllers = [[NSMutableArray alloc]init];
for (NSUInteger i = 0; i < numberPages; i ++) {
[viewControllers addObject:[NSNull null]];
}
//创建UIScrollView对象
_scrollView = [[UIScrollView alloc]initWithFrame:[[UIScreen mainScreen] bounds]];
//设置背景
_scrollView.backgroundColor = [UIColor grayColor];
_scrollView.pagingEnabled = YES;
//设置UIScrollView的contentSize——就是它的可滚动区域的大小
_scrollView.contentSize = CGSizeMake(CGRectGetWidth(_scrollView.frame)*numberPages, CGRectGetHeight(_scrollView.frame));
_scrollView.showsHorizontalScrollIndicator = NO;
_scrollView.showsVerticalScrollIndicator = NO;
_scrollView.scrollsToTop = NO;
//设置该控制器作为UIScrollView的委托对象
_scrollView.delegate = self;
[self.view addSubview:_scrollView];
//创建UIPageControl控件
pageControl = [[UIPageControl alloc]initWithFrame:CGRectMake(0, CGRectGetWidth(_scrollView.frame) - 80, CGRectGetWidth(_scrollView.frame), 80)];
//设置UIPageControl的圆点的颜色
pageControl.pageIndicatorTintColor = [UIColor grayColor];
//设置UIPageControl的高亮圆点的颜色
pageControl.currentPageIndicatorTintColor = [UIColor redColor];
//设置UIPageControl控件当前显示第几页
pageControl.currentPage = 0;
//设置UIPageControl控件总共包含多少页
pageControl.numberOfPages = numberPages;
pageControl.hidesForSinglePage = YES;
//为pageControl的Value Changed事件绑定事件处理方法
[pageControl addTarget:self action:@selector(changePage:) forControlEvents:UIControlEventValueChanged];
[self.view addSubview:pageControl];
//初始化时默认只需加载、显示第一页的View
[self loadScrollViewWithPage:0];
//为了避免“翻页”时才加载下一页导致删除,同时把下一页的view也加载出来
[self loadScrollViewWithPage:1];
}
//自定义方法,用于加载UIScrollPage的指定页对应的控制器
- (void)loadScrollViewWithPage:(NSUInteger)page{
//如果超出总页数,方法直接返回
if (page >= contentList.count) {
return;
}
//获取page索引处的控制器
FKPageViewController* controller = [viewControllers objectAtIndex:page];
if ((NSNull *)controller == [NSNull null]) {
//创建FKPaheViewController对象
controller = [[FKPageViewController alloc]initWithPageNumber:page];
//用FKPaheViewController对象替换page索引处原来的对象
[viewControllers replaceObjectAtIndex:page withObject:controller];
}
//将controller控制器对应的view添加到UIScrollView中
if (controller.view.superview == nil) {
CGRect frame = _scrollView.frame;
frame.origin.x = CGRectGetWidth(frame)*page;
frame.origin.y = 0;
//设置该控制器对应的View的大小和位置
controller.view.frame = frame;
//设置controller控制器的bookLabel控件的文本
controller.bookLabel.text = [contentList objectAtIndex:page];
controller.bookImage.image = [UIImage imageNamed:[coverList objectAtIndex:page]];
//将controller控制器添加为当前控制器的子控制器
[self addChildViewController:controller];
//将controller控制器对应的View添加到UIScrollView中
[_scrollView addSubview:controller.view];
}
}
//来自UIScrollViewDelegate的方法,当用户滚动的UIScrollView后激发该方法
- (void)scrollViewDidEndDecelerating:(UIScrollView *)scrollView{
//获取UIScrollView控件的宽度,也就是页面的宽度
CGFloat pageWidth = CGRectGetWidth(scrollView.frame);
//用UIScrollView水平滚动的距离减去页面宽度的一半,除以页面宽度的结果再加1,即可得到当前处于第几页
NSUInteger page = floor((scrollView.contentOffset.x -pageWidth/2)/pageWidth) + 1;
//控制UIPageController显示当前处于第page页
pageControl.currentPage = page;
//为了避免“翻页”时才加载下一页导致删除,同时把上一页、下一页的view也加载出来
[self loadScrollViewWithPage:page - 1];
[self loadScrollViewWithPage:page];
[self loadScrollViewWithPage:page + 1];
}
- (void)changePage:(UIPageControl *)sender{
NSInteger page = [sender currentPage];
//创建一个CGRect对象,该CGRect区域代表该UIScrollView将要显示的页
CGRect bounds = _scrollView.bounds;
bounds.origin.x = CGRectGetWidth(bounds) * page;
bounds.origin.y = 1;
//控制UIScrollView滚动到指定区域
[_scrollView scrollRectToVisible:bounds animated:YES];
//为了避免“翻页时才加载上一页 下一页导致闪烁
//因此加载当前页的view时,也把上一页,下一页的View加载出来
[self loadScrollViewWithPage:page - 1];
[self loadScrollViewWithPage:page];
[self loadScrollViewWithPage:page + 1];
}
@endFKPageViewController.h的声明部分
#import <UIKit/UIKit.h>
@interface FKPageViewController : UIViewController
@property (nonatomic, strong)UILabel* label;
@property (nonatomic, strong)UILabel* bookLabel;
@property (nonatomic, strong)UIImageView* bookImage;
- (id)initWithPageNumber:(NSInteger)pageNumber;
@end
FKPageViewController.m的实现部分
#import "FKPageViewController.h"
@interface FKPageViewController ()
@end
@implementation FKPageViewController
- (id)initWithPageNumber:(NSInteger)pageNumber{
    self = [super init];
    if (self) {
        self.label = [[UILabel alloc]initWithFrame:CGRectMake(240, 10, 80, 30)];
        _label.backgroundColor = [UIColor clearColor];
        _label.textColor = [UIColor redColor];
        _label.text = [NSString stringWithFormat:@"第【%ld】页",pageNumber + 1];
        [self.view addSubview:_label];
        self.bookLabel = [[UILabel alloc]initWithFrame:CGRectMake(0, 30, CGRectGetWidth(self.view.frame), 60)];
        _bookLabel.textAlignment = NSTextAlignmentCenter;
        _bookLabel.numberOfLines = 2;
        _bookLabel.font = [UIFont systemFontOfSize:24];
        _bookLabel.backgroundColor = [UIColor clearColor];
        _bookLabel.textColor = [UIColor blueColor];
        [self.view addSubview:_bookLabel];
        self.bookImage = [[UIImageView alloc]initWithFrame:CGRectMake(0, 90, CGRectGetWidth(self.view.frame), 320)];
        _bookImage.contentMode = UIViewContentModeScaleAspectFit;
        [self.view addSubview:_bookImage];
    }
    return self;
}
- (void)viewDidLoad {
    [super viewDidLoad];
}
@end
2、使用UIPageViewController
UIPageViewController可以开发出类似于图书分页的效果,该控件允许配置的选项并不多,只要为该控件指定翻页方向、翻页方式,是否支持双面等属性即可。
程序如果使用UIPageViewController控件,最关键在于配置dataSource属性,该属性必须指定一个为实现UIPageViewControllerDelegate协议的对象,该对象必须实现如下方法:
#pragma mark - UIPageViewControllerDataSource
- (1)、- (UIViewController )pageViewController:(UIPageViewController )pageViewController viewControllerBeforeViewController:(UIViewController *)viewController;当用户通过UIPageViewController向前翻页时,程序将会调用该方法返回UIViewController作为前一个页面的视图控制器;
- (2)、- (UIViewController )pageViewController:(UIPageViewController )pageViewController viewControllerAfterViewController:(UIViewController *)viewController;当用户通过UIPageViewController向后翻页时,程序将会调用该方法返回UIViewController作为后一个页面的视图控制器;
例如:
在AppDelegate中设置
FKPageController* pageZero = [[FKPageController alloc]initWithPageNumber:0];
//创建一个NSDictionary对象,作为创建UIPageViewController的选项
//该选项只支持两个key;
//UIPageViewControllerOptionSpineLocationKey:指定翻页效果中“书脊”的位置
//UIPageViewControllerOptionInterPageSpacingKey:指定两个页面之间的间距
NSDictionary* options = [NSDictionary dictionaryWithObjectsAndKeys:[NSNumber numberWithInt:UIPageViewControllerSpineLocationMid],@"UIPageViewControllerSpineLocationKey",[NSNumber numberWithFloat:0],@"UIPageViewControllerOptionInterPageSpacingKey", nil];
//创建UIPageViewController
//1.设置页面过度效果:此处使用书页卷动的翻页效果
//2.设置页面的翻页方向:此处使用水平翻页
UIPageViewController* pageViewController = [[UIPageViewController alloc]initWithTransitionStyle:UIPageViewControllerTransitionStylePageCurl navigationOrientation:UIPageViewControllerNavigationOrientationHorizontal options:options];
//设置使用支持双面
pageViewController.doubleSided = NO;
//为UIPageViewController设置delegate
pageViewController.dataSource = self;
//设置UIPageViewController管理的视图控制器
//指向向前翻页
[pageViewController setViewControllers:@[pageZero] direction:UIPageViewControllerNavigationDirectionForward animated:YES completion:nil];
//设置程序窗口的跟视图控制器为pageViewController
self.window.rootViewController = pageViewController;
#pragma mark - UIPageViewControllerDataSource
- (FKPageController *)pageViewController:(UIPageViewController *)pageViewController viewControllerBeforeViewController:(FKPageController *)viewController{
    //如果当前pageIndex大于0,将pageIndex-1作为参数创建FKPageViewController
    if (viewController.pageNumber > 0) {
        NSUInteger index = viewController.pageNumber;
        return [[FKPageController alloc]initWithPageNumber:index - 1];
    }
    return nil;
}
//当用户控制UIPageViewController向后翻页时调用该方法
- (FKPageController *)pageViewController:(UIPageViewController *)pageViewController viewControllerAfterViewController:(FKPageController *)viewController{
    //将pageNumber+1作为参数创建FKPageController
    NSUInteger index = viewController.pageNumber;
    return [[FKPageController alloc]initWithPageNumber:index + 1];
}
FKPageController.h的声明部分
#import <UIKit/UIKit.h>
@interface FKPageController : UIViewController
@property (nonatomic, strong)UILabel* label;
@property (nonatomic, strong)UILabel* bookLabel;
@property (nonatomic, strong)UIImageView* bookImage;
@property (nonatomic ,assign)NSInteger pageNumber;
- (id)initWithPageNumber:(NSInteger)pageNumber;
@end
FKPageController.m的实现部分
@interface FKPageController (){
    NSArray* contentList;
    NSArray* coverList;
}
@end
@implementation FKPageController
- (id)initWithPageNumber:(NSInteger)pageNumber{
    contentList = [NSArray arrayWithObjects:@"疯狂Android讲义",@"疯狂Ajax讲义",@"疯狂XML讲义",@"疯狂HTML5/CSS3/JavaScript讲义", nil];
    coverList = [NSArray arrayWithObjects:@"1.png",@"2.png",@"3.png",@"4.png", nil];
    self.pageNumber = pageNumber;
    NSLog(@"pageNumber = %ld",pageNumber);
    self = [super init];
    if (self) {
        //设置背景
        self.view.backgroundColor = [UIColor grayColor];
        //创建UILabel控件
        self.label = [[UILabel alloc]initWithFrame:CGRectMake(220, 10, 100, 30)];
        _label.backgroundColor = [UIColor clearColor];
        _label.textColor = [UIColor redColor];
        _label.text = [NSString stringWithFormat:@"第【%ld】页",pageNumber + 1];
        [self.view addSubview:_label];
        //创建UILabel控件
        self.bookLabel = [[UILabel alloc]initWithFrame:CGRectMake(0, 30, CGRectGetWidth(self.view.frame), 60)];
        _bookLabel.textAlignment = NSTextAlignmentCenter;
        _bookLabel.numberOfLines = 2;
        _bookLabel.font = [UIFont systemFontOfSize:24];
        _bookLabel.backgroundColor = [UIColor clearColor];
        _bookLabel.textColor = [UIColor blueColor];
        _bookLabel.text = [contentList objectAtIndex:pageNumber%4];
        [self.view addSubview:_bookLabel];
        //创建UIImageView控件
        self.bookImage = [[UIImageView alloc]initWithFrame:CGRectMake(0, 90, CGRectGetWidth(self.view.frame), 320)];
        _bookImage.contentMode = UIViewContentModeScaleAspectFit;
        _bookImage.image = [UIImage imageNamed:[coverList objectAtIndex:pageNumber%4]];
        [self.view addSubview:_bookImage];
    }
    return self;
}
二十二、iPad应用开发
1、使用iPad专用控件:UISplitViewController
UISplitViewController是iPad的专用的视图控制器,当iPad处于横向模式时,UISplitViewController的左侧将会显示320点宽的侧栏,该侧栏通常用于显示页面的导航栏;而UISplitViewController的右侧通常显示导航栏对应的详情。
如果iPad切换为纵向模式,UISplitViewController的显示方式略有不同,原来位于左右的导航栏不在固定显示在左边,而是需要用户单击某个按钮来激活它,此时将会使用一个浮动窗口(popover)来显示导航栏。
UISplitViewController用于管理左右两个UIViewController。当iPad屏幕转为纵向,左侧导航栏隐藏时,以及iPad屏幕转为横向、左侧导航栏显示时,UISplitViewController会分别激发delegate的如下两个方法;
- (1)、- (void)splitViewController:(UISplitViewController )svc willHideViewController:(UIViewController )aViewController withBarButtonItem:(UIBarButtonItem )barButtonItem forPopoverController:(UIPopoverController )pc NS_DEPRECATED_IOS(2_0, 8_0, “Use splitViewController:willChangeToDisplayMode: and displayModeButtonItem instead”);当左侧导航栏将要隐藏时激发该方法;
- (2)、- (void)splitViewController:(UISplitViewController )svc willShowViewController:(UIViewController )aViewController invalidatingBarButtonItem:(UIBarButtonItem *)barButtonItem NS_DEPRECATED_IOS(2_0, 8_0, “Use splitViewController:willChangeToDisplayMode: and displayModeButtonItem instead”);当左侧导航栏将要显示时激发该方法;
2、使用UIPopoverController实现浮动窗口
待续


 2195
2195


 被折叠的 条评论
为什么被折叠?
被折叠的 条评论
为什么被折叠?
 到【灌水乐园】发言


