


 郁闷啊,郁闷,纠结了N天的问题结果一句<Loader delegate="true" />就搞定了,天啊,地啊,我的青春了
 果然我解决问题的能力还是太弱了
 苦逼的不是没创造能力,不是没技术,而且debug N久都没结果
WebSocket
WebSocket 规范的目标是在浏览器中实现和服务器端双向通信。双向通信可以拓展浏览器上的应用类型,例如实时的数据推送(股票行情)、游戏、聊天等。
原理
WebSocket protocol 是HTML5一种新的协议(protocol)。它是实现了浏览器与服务器全双工通信(full-duplex)。
现很多网站为了实现即时通讯(real-time),所用的技术都是轮询(polling)。轮询是在特定的的时间间隔(time interval)(如每1秒),由浏览器对服务器发出HTTP request,然后由服务器返回最新的数据给客服端的浏览器。这种传统的HTTP request d的模式带来很明显的缺点 – 浏览器需要不断的向服务器发出请求(request),然而HTTP request 的header是非常长的,里面包含的数据可能只是一个很小的值,这样会占用很多的带宽。
而最比较新的技术去做轮询的效果是Comet – 用了AJAX。但这种技术虽然可达到全双工通信,但依然需要发出请求(reuqest)。
在 WebSocket API,浏览器和服务器只需要要做一个握手的动作,然后,浏览器和服务器之间就形成了一条快速通道。两者之间就直接可以数据互相传送。在此WebSocket 协议中,为我们实现即时服务带来了两大好处:
1. Header
互相沟通的Header是很小的-大概只有 2 Bytes
2. Server Push
服务器可以主动传送数据给客户端
3握手协议
在实现websocket连线过程中,需要通过浏览器发出websocket连线请求,然后服务器发出回应,这个过程通常称为“握手” (handshaking)。
PS1:握手协议在后期的版本中,会标明版本编号,下面的例子属于早期的协定之一,对于新版的 chrome 和 Firefox 皆不适用。
PS2:后期的版本大多属于功能上的扩充,例如使用第7版的握手协议同样也适用于第8版的握手协议。
例子:
浏览器请求
GET /demo HTTP/1.1
Host: 你的网址.com
Connection: Upgrade
Sec-WebSocket-Key2: 12998 5 Y3 1 .P00
Upgrade: WebSocket
Sec-WebSocket-Key1: 4 @1 46546xW%0l 1 5
Origin: http://你的网址.com
^n:ds[4U
服务器回应
HTTP/1.1 101
WebSocket Protocol Handshake
Upgrade: WebSocket
Connection: Upgrade
Sec-WebSocket-Origin: http://你的网址.com
Sec-WebSocket-Location: ws://你的网址.com/demo
Sec-WebSocket-Protocol: sample
8jKS’y:G*Co,Wxa-
4浏览器
实现了websocket的浏览器:
|
Chrome
|
Supported in version 4+
|
|
Firefox
|
Supported in version 4+
|
|
Internet Explorer
|
Supported in version 10+
|
|
Opera
|
Supported in version 10+
|
|
Safari
|
Supported in version 5+
|
5服务器
在服务器端,也出现了一些实现websocket协议的项目:
jetty 7.0.1 包含了一个初步的实现
resin 包含有websocket 实现
pywebsocket, apache http server 扩展
apache tomcat 7.0.27 版本
Nginx 1.3.13 版本
websocket api在浏览器端的广泛实现似乎只是一个时间问题了, 值得注意的是服务器端没有标准的api, 各个实现都有自己的一套api, 并且jcp也没有类似的提案, 所以使用websocket开发服务器端有一定的风险.可能会被锁定在某个平台上或者将来被迫升级.
 咳咳,以上这大坨来自百度百科,欲知详细请自行查找
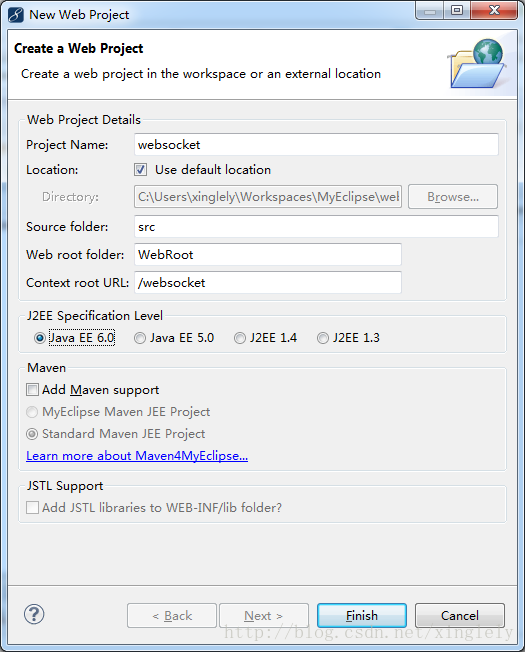
 好了,准备开发环境:java sdk7,Myeclipse10,Tomcat7.47
 下载好了自行安装,我不管了
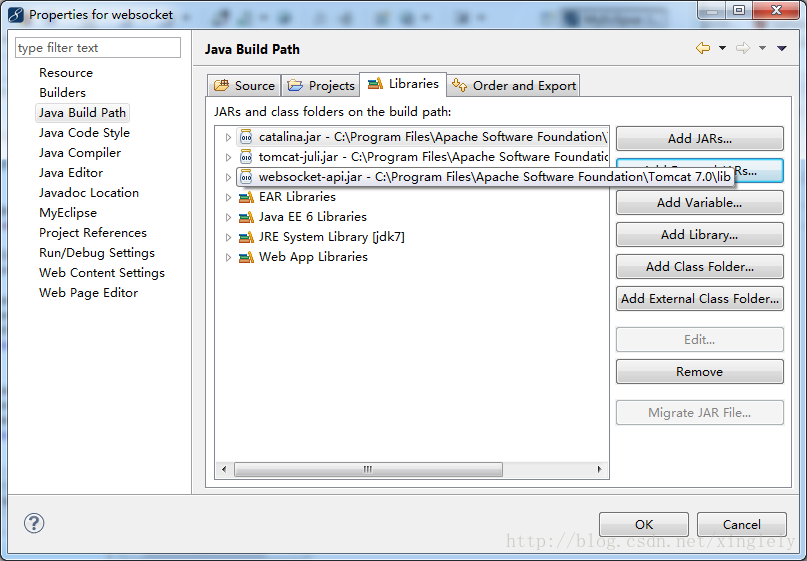
打开MyEclipse新建一个JSP工程,然后导入catalina.jar,websocket-api.jar
 什么,你觉得不爽,那你就多导几个吧,反正不要钱,也没人强奸你!
什么,你觉得不爽,那你就多导几个吧,反正不要钱,也没人强奸你!
Ok,接下来,新建一个类
WebsocketConfig ,有关抽象类ServerApplicationConfig请查看javaEE7 api
 这个很重要,你知道吗,我不哆嗦,你往下看
这个很重要,你知道吗,我不哆嗦,你往下看
package com.websocket;

import java.util.HashSet;
import java.util.Set;

import javax.websocket.Endpoint;
import javax.websocket.server.ServerApplicationConfig;
import javax.websocket.server.ServerEndpointConfig;

public class WebsocketConfig implements ServerApplicationConfig{

	@Override
	public Set<Class<?>> getAnnotatedEndpointClasses(Set<Class<?>> scanned) {
		// TODO Auto-generated method stub
		System.out.println("******getAnnotatedEndpointClasses******");
		// Deploy all WebSocket endpoints defined by annotations in the examples
        // web application. Filter out all others to avoid issues when running
        // tests on Gump
		//这主要是扫描类的包,如果前缀为"com.websocket."就抓住她,然后做什么,你懂的
		Set<Class<?>> res=new HashSet<>();
		for(Class<?> cs:scanned){
			if(cs.getPackage().getName().startsWith("com.websocket.")){
				res.add(cs);
			}
		}
		return res;
	}

	@Override
	public Set<ServerEndpointConfig> getEndpointConfigs(
			Set<Class<? extends Endpoint>> scanned) {
		// TODO Auto-generated method stub
		System.out.println("******getEndpointConfigs******");
		Set<ServerEndpointConfig> res=new HashSet<>();
		/*
	   //使用Programmatic api的服务器地址

		if (scanned.contains(EchoEndpoint.class)) {
            res.add(ServerEndpointConfig.Builder.create(
                    EchoEndpoint.class,
                    "/websocket/echoProgrammatic").build());
        }
        */
		return res;
	}

}
好了,现在我们来建立一个简单chat的ServerEndpoint,据说有两种方式:1、使用@ ServerEndpoint 2、采用继承的方式
我们先来第一种,新建一个类chat1
package com.websocket.chat;

import java.io.IOException;
import java.util.Set;
import java.util.concurrent.CopyOnWriteArraySet;
import java.util.concurrent.atomic.AtomicInteger;

import javax.websocket.OnClose;
import javax.websocket.OnMessage;
import javax.websocket.OnOpen;
import javax.websocket.Session;
import javax.websocket.server.ServerEndpoint;
import util.HTMLFilter;

@ServerEndpoint(value="/chat01")
//用了这个之后,你的服务地址为ws://localhost:port/projectName/chat01

public class chat_1 {
    private static final AtomicInteger connectionIds = new AtomicInteger(0);
    private static final Set<chat_1> connections =
            new CopyOnWriteArraySet<chat_1>();

    private final String nickname;
    private Session session;

    public chat_1() {
        nickname = "游客ID:" + connectionIds.getAndIncrement();
    }


    @OnOpen
    public void start(Session session) {
        this.session = session;
        connections.add(this);
        String message = String.format("嗨嗨,姑娘们,来接客了: %s %s", nickname, "has joined.");
        broadcast(message);
    }


    @OnClose
    public void end() {
        connections.remove(this);
        String message = String.format("客官慢走,嘿嘿,还没付钱呢: %s %s",
                nickname, "has disconnected.");
        broadcast(message);
    }


    @OnMessage
    public void receive(String message) {
        // Never trust the client
        String filteredMessage = String.format("您有新消息:%s: %s",
                nickname, HTMLFilter.filter(message.toString()));
        broadcast(filteredMessage);
    }


    private static void broadcast(String msg) {
        for (chat_1 client : connections) {
            try {
                client.session.getBasicRemote().sendText(msg);
            } catch (IOException e) {
                connections.remove(client);
                try {
                    client.session.close();
                } catch (IOException e1) {
                    // Ignore
                }
                String message = String.format("* %s %s",
                        client.nickname, "has been disconnected.");
                broadcast(message);
            }//try
        }//for
    }//void broadcast(String msg)
}
/*
 * 你可能已经注意到我们从 javax.websocket包中引入了一些类。
@ServerEndpoint 注解是一个类层次的注解,它的功能主要是将目
前的类定义成一个websocket服务器端。注解的值将被用于监听用户连
接的终端访问URL地址。
onOpen 和 onClose 方法分别被@OnOpen和@OnClose 所注解。
这两个注解的作用不言自明:他们定义了当一个新用户连接和断开的时候所调
用的方法。
onMessage 方法被@OnMessage所注解。这个注解定义了当服务器接
收到客户端发送的消息时所调用的方法。注意:这个方法可能包含一个
javax.websocket.Session可选参数(在我们的例子里就是
session参数)。如果有这个参数,容器将会把当前发送消息客户端的连接
Session注入进去。
 */
index.jsp
<%@ page language="java" import="java.util.*" pageEncoding="ISO-8859-1"%>
<%
String path = request.getContextPath();
String basePath = request.getScheme()+"://"+request.getServerName()+":"+request.getServerPort()+path+"/";
%>

<!DOCTYPE HTML PUBLIC "-//W3C//DTD HTML 4.01 Transitional//EN">
<html>
  <head>
    <base href="<%=basePath%>">

    <title>My JSP 'index.jsp' starting page</title>
	<meta http-equiv="pragma" content="no-cache">
	<meta http-equiv="cache-control" content="no-cache">
	<meta http-equiv="expires" content="0">
	<meta http-equiv="keywords" content="keyword1,keyword2,keyword3">
	<meta http-equiv="description" content="This is my page">
	<!--
	<link rel="stylesheet" type="text/css" href="styles.css">
	-->
  </head>

  <body>
<li><a href="chat01.xhtml">chat01</a></li></body></html><li><a href="chat02.xhtml">chat02</a></li>

/*
 *  Licensed to the Apache Software Foundation (ASF) under one or more
 *  contributor license agreements.  See the NOTICE file distributed with
 *  this work for additional information regarding copyright ownership.
 *  The ASF licenses this file to You under the Apache License, Version 2.0
 *  (the "License"); you may not use this file except in compliance with
 *  the License.  You may obtain a copy of the License at
 *
 *      http://www.apache.org/licenses/LICENSE-2.0
 *
 *  Unless required by applicable law or agreed to in writing, software
 *  distributed under the License is distributed on an "AS IS" BASIS,
 *  WITHOUT WARRANTIES OR CONDITIONS OF ANY KIND, either express or implied.
 *  See the License for the specific language governing permissions and
 *  limitations under the License.
 */
package websocket.echo;

import java.io.IOException;

import javax.websocket.Endpoint;
import javax.websocket.EndpointConfig;
import javax.websocket.MessageHandler;
import javax.websocket.RemoteEndpoint;
import javax.websocket.Session;

public class EchoEndpoint extends Endpoint {

    @Override
    public void onOpen(Session session, EndpointConfig endpointConfig) {
        RemoteEndpoint.Basic remoteEndpointBasic = session.getBasicRemote();
        session.addMessageHandler(new EchoMessageHandler(remoteEndpointBasic));
    }

    private static class EchoMessageHandler
            implements MessageHandler.Whole<String> {

        private final RemoteEndpoint.Basic remoteEndpointBasic;

        private EchoMessageHandler(RemoteEndpoint.Basic remoteEndpointBasic) {
            this.remoteEndpointBasic = remoteEndpointBasic;
        }

        @Override
        public void onMessage(String message) {
            try {
                if (remoteEndpointBasic != null) {
                    remoteEndpointBasic.sendText(message);
                }
            } catch (IOException e) {
                // TODO Auto-generated catch block
                e.printStackTrace();
            }
        }
    }
}
 我就不演示了,其它这些在Tomcat目录下的examples都能找到


 8030
8030

 被折叠的 条评论
为什么被折叠?
被折叠的 条评论
为什么被折叠?
 到【灌水乐园】发言


