


*本篇文章已授权微信公众号 guolin_blog (郭霖)独家发布
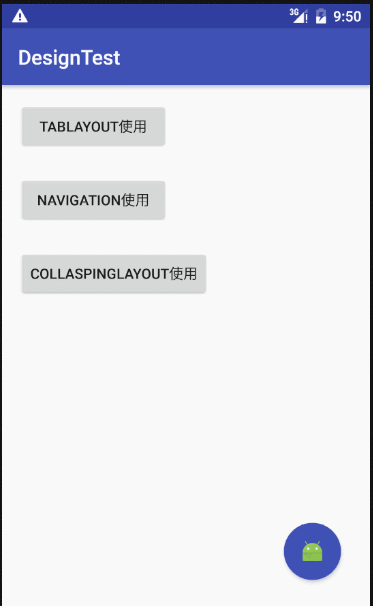
Material Design 设计风格非常受欢迎,那么支持其效果的Design Support Library(Android 2.1 API level 7及其以上)库又有哪些控件呢。主要包括SnackBar、Navigation View、FloatActionbutton、CoordinatorLayout、CollapsingToolBarLayout等。我在Git上看见一个非常炫的效果
谷歌官网介绍:http://android-developers.blogspot.com.es/2012/05/android-design-support-library.html
把该项目的Git附上,觉得有用的自行下载看源码:https://github.com/frogermcs/InstaMaterial,现在来一一介绍Design系列控件。这里还有极客学院整理的关于Material Design的文档:
http://wiki.jikexueyuan.com/project/material-design/components/snackbars-and-toasts.html
1.SnackBar
SnackBar是带有动画效果的快速提示栏,它显示在屏幕底部,是用来代替Toast的一个全新控件,它基本上继承了Toast的属性和方法,用户可以点击按钮执行对应的操作,Snackbar支持滑动消失,如果没设任何操作,那么到时间自动消失。
SnackBar的构造:
// 参数分别是父容器,提示信息,持续时间
public static Snackbar make(@NonNull View view, @NonNull CharSequence text,@Duration int duration)
SnackBar的常用方法:
// 用于给SnackBar设定一个Action,点击之后会回调OnclickListener中的Onclick方法
public Snackbar setAction(CharSequence text, final View.OnClickListener listener)
// 用于设定Action的字体颜色
public Snackbar setActionTextColor(@ColorInt int color)
// 设定提示的字体
public Snackbar setText(@NonNull CharSequence message)
// 展示SnackBar
public void show()
// 清除SnackBar
public void dismiss()
// 设置回调,比如OnDismissed或者OnShown
public Snackbar setCallback(Callback callback)
- <android.support.percent.PercentRelativeLayout
- xmlns:android="http://schemas.android.com/apk/res/android"
- xmlns:tools="http://schemas.android.com/tools"
- xmlns:app="http://schemas.android.com/apk/res-auto"
- android:id="@+id/activity_main"
- android:layout_width="match_parent"
- android:layout_height="match_parent"
- tools:context="com.example.administrator.singleinstance.MainActivity">
- <Button
- android:layout_width="0dp"
- android:layout_height="0dp"
- android:id="@+id/btn"
- android:onClick="click"
- android:layout_centerInParent="true"
- app:layout_widthPercent="25%"
- app:layout_heightPercent="10%"
- android:text="取消"
- />
- <android.support.design.widget.CoordinatorLayout
- android:id="@+id/coor"
- android:layout_width="0dp"
- android:layout_alignParentBottom="true"
- app:layout_widthPercent="100%"
- android:layout_height="wrap_content">
- </android.support.design.widget.CoordinatorLayout>
- </android.support.percent.PercentRelativeLayout>

<android.support.percent.PercentRelativeLayout
    xmlns:android="http://schemas.android.com/apk/res/android"
    xmlns:tools="http://schemas.android.com/tools"
    xmlns:app="http://schemas.android.com/apk/res-auto"
    android:id="@+id/activity_main"
    android:layout_width="match_parent"
    android:layout_height="match_parent"
    tools:context="com.example.administrator.singleinstance.MainActivity">

    <Button
        android:layout_width="0dp"
        android:layout_height="0dp"
        android:id="@+id/btn"
        android:onClick="click"
        android:layout_centerInParent="true"
        app:layout_widthPercent="25%"
        app:layout_heightPercent="10%"
        android:text="取消"
        />

    <android.support.design.widget.CoordinatorLayout
        android:id="@+id/coor"
        android:layout_width="0dp"
        android:layout_alignParentBottom="true"
        app:layout_widthPercent="100%"
        android:layout_height="wrap_content">

    </android.support.design.widget.CoordinatorLayout>

</android.support.percent.PercentRelativeLayout>- public void click(View view) {
- Snackbar.make(coordinatorLayout, "确定取消吗?", Snackbar.LENGTH_LONG)
- .setAction("确定", new View.OnClickListener() {
- @Override
- public void onClick(View view) {
- Toast.makeText(MainActivity.this, "已经取消", Toast.LENGTH_SHORT).show();
- }
- })
- .setCallback(new myOnClick())
- .show();
- }
- /**
- * 滑动消失回调
- */
- public static final int DISMISS_EVENT_SWIPE = 0;
- /**
- * 点击消失回调
- */
- public static final int DISMISS_EVENT_ACTION = 1;
- /**
- * 超时回调
- */
- public static final int DISMISS_EVENT_TIMEOUT = 2;
- /**
- *调用Dismiss消失回调
- */
- public static final int DISMISS_EVENT_MANUAL = 3;
- /**
- * 再次出现消失SnackBar回调
- */
- public static final int DISMISS_EVENT_CONSECUTIVE = 4;
- class myOnClick extends Snackbar.Callback {
- @Override
- public void onDismissed(Snackbar snackbar, int event) {
- super.onDismissed(snackbar, event);
- switch (event) {
- case DISMISS_EVENT_SWIPE:
- Logger.i("DISMISS_EVENT_SWIPE");
- break;
- case DISMISS_EVENT_ACTION:
- Logger.i("DISMISS_EVENT_ACTION");
- break;
- case DISMISS_EVENT_TIMEOUT:
- Logger.i("DISMISS_EVENT_TIMEOUT");
- break;
- case DISMISS_EVENT_MANUAL:
- Logger.i("DISMISS_EVENT_MANUAL");
- break;
- case DISMISS_EVENT_CONSECUTIVE:
- Logger.i("DISMISS_EVENT_CONSECUTIVE");
- break;
- }
- }
- }
public void click(View view) {
        Snackbar.make(coordinatorLayout, "确定取消吗?", Snackbar.LENGTH_LONG)
                .setAction("确定", new View.OnClickListener() {
                    @Override
                    public void onClick(View view) {
                        Toast.makeText(MainActivity.this, "已经取消", Toast.LENGTH_SHORT).show();
                    }
                })
                .setCallback(new myOnClick())
                .show();

    }

    /**
     * 滑动消失回调
     */
    public static final int DISMISS_EVENT_SWIPE = 0;
    /**
     * 点击消失回调
     */
    public static final int DISMISS_EVENT_ACTION = 1;
    /**
     * 超时回调
     */
    public static final int DISMISS_EVENT_TIMEOUT = 2;
    /**
     *调用Dismiss消失回调
     */
    public static final int DISMISS_EVENT_MANUAL = 3;
    /**
     * 再次出现消失SnackBar回调
     */
    public static final int DISMISS_EVENT_CONSECUTIVE = 4;

    class myOnClick extends Snackbar.Callback {
        @Override
        public void onDismissed(Snackbar snackbar, int event) {
            super.onDismissed(snackbar, event);
            switch (event) {
                case DISMISS_EVENT_SWIPE:
                    Logger.i("DISMISS_EVENT_SWIPE");
                    break;
                case DISMISS_EVENT_ACTION:
                    Logger.i("DISMISS_EVENT_ACTION");
                    break;
                case DISMISS_EVENT_TIMEOUT:
                    Logger.i("DISMISS_EVENT_TIMEOUT");
                    break;
                case DISMISS_EVENT_MANUAL:
                    Logger.i("DISMISS_EVENT_MANUAL");
                    break;
                case DISMISS_EVENT_CONSECUTIVE:
                    Logger.i("DISMISS_EVENT_CONSECUTIVE");
                    break;
            }
        }
}http://www.jianshu.com/p/cd1e80e64311
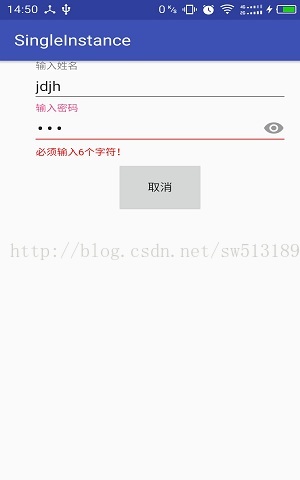
2.TextInputLayout
TextInputLayout主要作用是作为EditText的容器,从而为EditText默认生成一个浮动的label,当用户点击了EditText之后,EditText中设置的Hint字符串会自动移到EditText的左上角。使用非常简单这有个例子写的不错:http://www.jcodecraeer.com/a/basictutorial/2015/0821/3338.html
getEditText()得到控件中包含的 EditText 控件setError(CharSequence error)设置错误信息并显示在 EditText 下方 应用场景:比如用户输错了密码或者用户名等-
setHint(CharSequence hint)设置提示信息 -
setErrorEnabled(boolean enabled)设置setError(CharSequence error)这个函数是否可用 记住哦:这个函数一定要在setError(CharSequence error)这个函数之后执行哦!
- <android.support.percent.PercentRelativeLayout
- xmlns:android="http://schemas.android.com/apk/res/android"
- xmlns:tools="http://schemas.android.com/tools"
- xmlns:app="http://schemas.android.com/apk/res-auto"
- android:id="@+id/activity_main"
- android:layout_width="match_parent"
- android:layout_height="match_parent"
- tools:context="com.example.administrator.singleinstance.MainActivity">
- <android.support.design.widget.TextInputLayout
- android:id="@+id/input"
- app:layout_widthPercent="80%"
- android:layout_height="wrap_content"
- android:layout_centerHorizontal="true"
- app:errorEnabled="true"
- app:errorTextAppearance="@style/TextAppearance.Design.Error">
- <EditText
- android:layout_width="match_parent"
- android:layout_height="match_parent"
- android:imeOptions="actionGo"
- android:inputType="text"
- android:hint="输入姓名"
- android:lines="1"
- />
- </android.support.design.widget.TextInputLayout>
- <android.support.design.widget.TextInputLayout
- android:id="@+id/input2"
- android:layout_below="@+id/input"
- app:layout_widthPercent="80%"
- android:layout_height="wrap_content"
- android:layout_centerHorizontal="true"
- app:errorEnabled="true"
- app:errorTextAppearance="@style/TextAppearance.Design.Error">
- <EditText
- android:layout_width="match_parent"
- android:layout_height="match_parent"
- android:imeOptions="actionGo"
- android:inputType="textPassword"
- android:hint="输入密码"
- android:lines="1"
- />
- </android.support.design.widget.TextInputLayout>
- </android.support.percent.PercentRelativeLayout>
<android.support.percent.PercentRelativeLayout
    xmlns:android="http://schemas.android.com/apk/res/android"
    xmlns:tools="http://schemas.android.com/tools"
    xmlns:app="http://schemas.android.com/apk/res-auto"
    android:id="@+id/activity_main"
    android:layout_width="match_parent"
    android:layout_height="match_parent"
    tools:context="com.example.administrator.singleinstance.MainActivity">

    <android.support.design.widget.TextInputLayout
        android:id="@+id/input"
        app:layout_widthPercent="80%"
        android:layout_height="wrap_content"
        android:layout_centerHorizontal="true"
        app:errorEnabled="true"
        app:errorTextAppearance="@style/TextAppearance.Design.Error">
        <EditText
            android:layout_width="match_parent"
            android:layout_height="match_parent"
            android:imeOptions="actionGo"
            android:inputType="text"
            android:hint="输入姓名"
            android:lines="1"
            />

    </android.support.design.widget.TextInputLayout>
    <android.support.design.widget.TextInputLayout
        android:id="@+id/input2"
        android:layout_below="@+id/input"
        app:layout_widthPercent="80%"
        android:layout_height="wrap_content"
        android:layout_centerHorizontal="true"
        app:errorEnabled="true"
        app:errorTextAppearance="@style/TextAppearance.Design.Error">
        <EditText
            android:layout_width="match_parent"
            android:layout_height="match_parent"
            android:imeOptions="actionGo"
            android:inputType="textPassword"
            android:hint="输入密码"
            android:lines="1"
            />

    </android.support.design.widget.TextInputLayout>
</android.support.percent.PercentRelativeLayout>- public void TextInputLayout(){
- textInputLayout = (TextInputLayout) findViewById(R.id.input);
- textInputLayout2 = (TextInputLayout) findViewById(R.id.input2);
- textInputLayout2.getEditText().addTextChangedListener(new TextWatcher() {
- @Override
- public void beforeTextChanged(CharSequence charSequence, int i, int i1, int i2) {
- }
- @Override
- public void onTextChanged(CharSequence charSequence, int i, int i1, int i2) {
- if (charSequence.length() < 4){
- textInputLayout2.setError("必须输入6个字符!");
- textInputLayout2.setErrorEnabled(true);
- }else {
- textInputLayout2.setErrorEnabled(false);}
- }
- @Override
- public void afterTextChanged(Editable editable) {
- }
- });
- textInputLayout.getEditText().addTextChangedListener(new TextWatcher() {
- @Override
- public void beforeTextChanged(CharSequence charSequence, int i, int i1, int i2) {
- }
- @Override
- public void onTextChanged(CharSequence charSequence, int i, int i1, int i2) {
- if (charSequence.length() < 4){
- textInputLayout.setError("必须输入4个字符!");
- textInputLayout.setErrorEnabled(true);
- }else {
- textInputLayout.setErrorEnabled(false);}
- }
- @Override
- public void afterTextChanged(Editable editable) {
- }
- });
- }
public void TextInputLayout(){
        textInputLayout = (TextInputLayout) findViewById(R.id.input);
        textInputLayout2 = (TextInputLayout) findViewById(R.id.input2);
        textInputLayout2.getEditText().addTextChangedListener(new TextWatcher() {
            @Override
            public void beforeTextChanged(CharSequence charSequence, int i, int i1, int i2) {

            }

            @Override
            public void onTextChanged(CharSequence charSequence, int i, int i1, int i2) {
                if (charSequence.length() < 4){
                    textInputLayout2.setError("必须输入6个字符!");
                    textInputLayout2.setErrorEnabled(true);
                }else {
                    textInputLayout2.setErrorEnabled(false);}
            }

            @Override
            public void afterTextChanged(Editable editable) {

            }
        });
        textInputLayout.getEditText().addTextChangedListener(new TextWatcher() {
            @Override
            public void beforeTextChanged(CharSequence charSequence, int i, int i1, int i2) {

            }

            @Override
            public void onTextChanged(CharSequence charSequence, int i, int i1, int i2) {
                if (charSequence.length() < 4){
                    textInputLayout.setError("必须输入4个字符!");
                    textInputLayout.setErrorEnabled(true);
                }else {
                    textInputLayout.setErrorEnabled(false);}
            }

            @Override
            public void afterTextChanged(Editable editable) {

            }
        });
    }
3.TabLayout
TabLayout控件用于应用中轻松的添加Tab分组功能,总共有两种类型可选。1.固定的Tabs:对应的xml配置中的 app:tabMode="fixed"
2.可滑动的Tabs:对应xml配置中的 app:tabMode="scrollable"。
TabLayout,它就可以完成TabPageIndicator的效果,而且还是官方的,最好的是它可以兼容到2.2以上版本,包括2.2。接下来就简单使用一下。
先来布局:
- <?xml version="1.0" encoding="utf-8"?>
- <RelativeLayout xmlns:android="http://schemas.android.com/apk/res/android"
- xmlns:tools="http://schemas.android.com/tools"
- xmlns:app="http://schemas.android.com/apk/res-auto"
- android:id="@+id/activity_tab_layout"
- android:layout_width="match_parent"
- android:layout_height="match_parent"
- tools:context="com.example.administrator.designtest.TabLayoutActivity">
- <android.support.v4.view.ViewPager
- android:id="@+id/viewpager"
- android:layout_below="@+id/tablayout_top"
- android:layout_width="match_parent"
- android:layout_height="match_parent">
- </android.support.v4.view.ViewPager>
- <android.support.design.widget.TabLayout
- android:id="@+id/tablayout_top"
- app:tabTextColor="#000"
- app:tabSelectedTextColor="#fff"
- android:background="@color/colorPrimary"
- android:layout_width="match_parent"
- android:layout_height="wrap_content"
- app:tabMode="fixed"
- app:tabGravity="fill">
- </android.support.design.widget.TabLayout>
- </RelativeLayout>
<?xml version="1.0" encoding="utf-8"?>
<RelativeLayout xmlns:android="http://schemas.android.com/apk/res/android"
    xmlns:tools="http://schemas.android.com/tools"
    xmlns:app="http://schemas.android.com/apk/res-auto"
    android:id="@+id/activity_tab_layout"
    android:layout_width="match_parent"
    android:layout_height="match_parent"
    tools:context="com.example.administrator.designtest.TabLayoutActivity">

    <android.support.v4.view.ViewPager
        android:id="@+id/viewpager"
        android:layout_below="@+id/tablayout_top"
        android:layout_width="match_parent"
        android:layout_height="match_parent">
    </android.support.v4.view.ViewPager>

    <android.support.design.widget.TabLayout
        android:id="@+id/tablayout_top"
        app:tabTextColor="#000"
        app:tabSelectedTextColor="#fff"
        android:background="@color/colorPrimary"
        android:layout_width="match_parent"
        android:layout_height="wrap_content"
        app:tabMode="fixed"
        app:tabGravity="fill">

    </android.support.design.widget.TabLayout>
</RelativeLayout>
- public class ViewPagerAdapter extends FragmentPagerAdapter {
- private List<BlankFragment>fragmentList;
- private List<String>titleList;
- public ViewPagerAdapter(FragmentManager fm, List<BlankFragment> fragmentList, List<String> titleList) {
- super(fm);
- this.fragmentList = fragmentList;
- this.titleList = titleList;
- }
- @Override
- public Fragment getItem(int position) {
- return fragmentList.get(position);
- }
- @Override
- public int getCount() {
- return fragmentList.size();
- }
- @Override
- public CharSequence getPageTitle(int position) {
- return titleList.get(position);
- }
- }
public class ViewPagerAdapter extends FragmentPagerAdapter {
    private List<BlankFragment>fragmentList;
    private List<String>titleList;
    public ViewPagerAdapter(FragmentManager fm, List<BlankFragment> fragmentList, List<String> titleList) {
        super(fm);
        this.fragmentList = fragmentList;
        this.titleList = titleList;
    }

    @Override
    public Fragment getItem(int position) {
        return fragmentList.get(position);
    }

    @Override
    public int getCount() {
        return fragmentList.size();
    }

    @Override
    public CharSequence getPageTitle(int position) {
        return titleList.get(position);
    }
}
- public class BlankFragment extends Fragment {
- @Override
- public View onCreateView(LayoutInflater inflater, ViewGroup container,
- Bundle savedInstanceState) {
- return inflater.inflate(R.layout.fragment_blank, container, false);
- }
- }
public class BlankFragment extends Fragment {
    @Override
    public View onCreateView(LayoutInflater inflater, ViewGroup container,
                             Bundle savedInstanceState) {
        return inflater.inflate(R.layout.fragment_blank, container, false);
    }
}
- public class TabLayoutActivity extends AppCompatActivity {
- ViewPager viewPager;
- TabLayout tabLayout;
- List<BlankFragment>fragmentList;
- List<String>stringList;
- @Override
- protected void onCreate(Bundle savedInstanceState) {
- super.onCreate(savedInstanceState);
- setContentView(R.layout.activity_tab_layout);
- viewPager = (ViewPager) findViewById(R.id.viewpager);
- tabLayout = (TabLayout) findViewById(R.id.tablayout_top);
- //添加fragment
- fragmentList = new ArrayList<>();
- fragmentList.add(new BlankFragment());
- fragmentList.add(new BlankFragment());
- fragmentList.add(new BlankFragment());
- fragmentList.add(new BlankFragment());
- //添加标题
- stringList = new ArrayList<>();
- stringList.add("热门新闻");
- stringList.add("热门推荐");
- stringList.add("本月热榜");
- stringList.add("今日热榜");
- //添加tab
- tabLayout.addTab(tabLayout.newTab().setText("热门新闻"));
- tabLayout.addTab(tabLayout.newTab().setText("热门推荐"));
- tabLayout.addTab(tabLayout.newTab().setText("本月热榜"));
- tabLayout.addTab(tabLayout.newTab().setText("今日热榜"));
- //适配器
- ViewPagerAdapter viewPagerAdapter = new ViewPagerAdapter(getSupportFragmentManager(),fragmentList,stringList);
- //建立联系
- viewPager.setAdapter(viewPagerAdapter);
- tabLayout.setupWithViewPager(viewPager,true);
- }
- }
public class TabLayoutActivity extends AppCompatActivity {

    ViewPager viewPager;
    TabLayout tabLayout;

    List<BlankFragment>fragmentList;
    List<String>stringList;

    @Override
    protected void onCreate(Bundle savedInstanceState) {
        super.onCreate(savedInstanceState);
        setContentView(R.layout.activity_tab_layout);
        viewPager = (ViewPager) findViewById(R.id.viewpager);
        tabLayout = (TabLayout) findViewById(R.id.tablayout_top);
        //添加fragment
        fragmentList = new ArrayList<>();
        fragmentList.add(new BlankFragment());
        fragmentList.add(new BlankFragment());
        fragmentList.add(new BlankFragment());
        fragmentList.add(new BlankFragment());
        //添加标题
        stringList = new ArrayList<>();
        stringList.add("热门新闻");
        stringList.add("热门推荐");
        stringList.add("本月热榜");
        stringList.add("今日热榜");
        //添加tab
        tabLayout.addTab(tabLayout.newTab().setText("热门新闻"));
        tabLayout.addTab(tabLayout.newTab().setText("热门推荐"));
        tabLayout.addTab(tabLayout.newTab().setText("本月热榜"));
        tabLayout.addTab(tabLayout.newTab().setText("今日热榜"));
        //适配器
        ViewPagerAdapter viewPagerAdapter = new ViewPagerAdapter(getSupportFragmentManager(),fragmentList,stringList);
        //建立联系
        viewPager.setAdapter(viewPagerAdapter);
        tabLayout.setupWithViewPager(viewPager,true);
    }
}
- public void setupWithViewPager(@Nullable final ViewPager viewPager, boolean autoRefresh) {
- setupWithViewPager(viewPager, autoRefresh, false);
- }
- private void setupWithViewPager(@Nullable final ViewPager viewPager, boolean autoRefresh,
- boolean implicitSetup) {
- ......
- //这里需要先设置viewpager的adapter,在关联,不然这里判空不会走正常逻辑
- if (adapter != null) {
- // Now we'll populate ourselves from the pager adapter, adding an observer if
- // autoRefresh is enabled
- setPagerAdapter(adapter, autoRefresh);
- }
- if (mAdapterChangeListener == null) {
- mAdapterChangeListener = new AdapterChangeListener();
- }
- //设置自动刷新
- mAdapterChangeListener.setAutoRefresh(autoRefresh);
- viewPager.addOnAdapterChangeListener(mAdapterChangeListener);
- setScrollPosition(viewPager.getCurrentItem(), 0f, true);
- ......
- mSetupViewPagerImplicitly = implicitSetup;
- }
public void setupWithViewPager(@Nullable final ViewPager viewPager, boolean autoRefresh) {
        setupWithViewPager(viewPager, autoRefresh, false);
    }

    private void setupWithViewPager(@Nullable final ViewPager viewPager, boolean autoRefresh,
            boolean implicitSetup) {
        ......
		//这里需要先设置viewpager的adapter,在关联,不然这里判空不会走正常逻辑
            if (adapter != null) {
                // Now we'll populate ourselves from the pager adapter, adding an observer if
                // autoRefresh is enabled
                setPagerAdapter(adapter, autoRefresh);
            }

            if (mAdapterChangeListener == null) {
                mAdapterChangeListener = new AdapterChangeListener();
            }
			//设置自动刷新
            mAdapterChangeListener.setAutoRefresh(autoRefresh);
            viewPager.addOnAdapterChangeListener(mAdapterChangeListener);


            setScrollPosition(viewPager.getCurrentItem(), 0f, true);

		......

        mSetupViewPagerImplicitly = implicitSetup;
    }
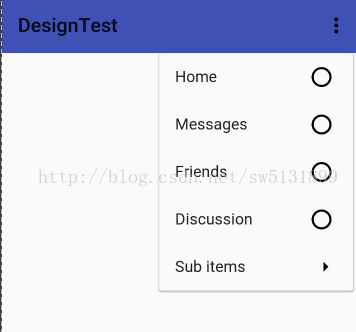
4.NavigationView
以前做侧边栏的有SlideMenu三方库,这里不详细介绍了,想要了解的给个链接: http://blog.csdn.net/luck_apple/article/details/9207811。现在有了NavigationView官方提供的,当然都渐渐使用这个了。官网地址也给出来,有空的可以去瞅瞅: http://www.google.com/design/spec/patterns/navigation-drawer.html使用导航视图需要传入一组参数,一个可选的头部布局,以及一个用于构建导航选项的菜单,完成这些步骤以后只需给导航选项添加响应事件的监听器就可以了。
在使用NavigationView时需要提前准备好两个xml文件,一个是头布局,一个是menu布局。menu的一些属性值是干嘛的,我相信有的猿友不是很清楚、下面简单介绍一下。
4.1 menu属性值介绍
元素(ELEMENTS):
<menu>
必须的。它必须是根节点,其中要包含<item>、<group>元素。
属性(ATTRIBUTES):
xmlns:android
它定义了XML的命名空间,必须是:http://schemas.android.com/apk/res/android
<item>
它定义一个菜单项,可以包含一个<menu>元素作为子菜单。它必须是<menu>、<group>元素的子元素。
属性(ATTRIBUTES):
android:id
定义资源ID,它是个唯一值,使用“@+id/name”格式可以给这个菜单项创建一个新的资源ID,“+”号指示要创建一个新的ID。
android:title
字符串资源,它用字符串资源或原始的字符串来定义菜单的标题。
android:titleCondensed
字符串资源。它用字符串资源或原始的字符串来定义一个简要的标题,以便在普通的标题太长时来使用。
android:icon
可绘制资源,它定义了一个菜单项所要使用的图标。
android:onClick
方法名。在这个菜单项被点击时,会调用这个方法。在Activity中,这个方法必须用public关键字来声明,并且只接受一个MenuItem对象,这个对象指明了被点击的菜单项。这个方法会优先标准的回调方法:onOptionsItemSelected()。
警告:如果要使用ProGuard(或类似的工具)来混淆代码,就要确保不要重名这个属性所指定的方法,因为这样能够破坏功能。
这个属性在API级别11中被引入。
android:showAsAction
关键词。它定义这个项目作为操作栏中的操作项的显示时机和方式。只用Activity包含了一个ActionBar对象时,菜单项才能够作为操作项来显示。这个属性在API级别11中被引入,有效值如下:
| 值 | 说明 |
| ifRoom | 如果有针对这个项目的空间,则只会把它放到操作栏中 |
| withText | 操作项也要包含文本(通过android:title属性来定义的)。可以把这个值与其他的Flag设置放到一起,通过管道符“|”来分离它们。 |
| never | 这个项目不会放到操作栏中 |
| always | 始终包这个项目放到操作栏中。要避免使用这个设置,除非在操作栏中始终显示这个项目是非常关键的。设置多个项目作为始终显示的操作项会导致操作栏中其他的UI溢出。 |
| icollapseActiionView | 它定义了跟这个操作项关联的可折叠的操作View对象(用android:actionViewLayout来声明)。这个关键词在API级别14中被引入。 |
这个属性在API级别11中被引入。
android:actionViewLayout
它引用一个布局资源,这个布局要用于操作窗口。更多的信息请参照“操作栏”开发指南。这个属性在API级别11中被引入。(http://blog.csdn.net/fireofstar/article/details/7358393)
android:actionViewClass
类名。它定义了操作窗口要使用的View对象的完整的类名。例如,“android.widget.SearchView”说明操作窗口要使用的SearchView类。
警告:如果要使用ProGuard(或类似的工具)来混淆代码,就要确保不要重名这个属性所指定的方法,因为这样能够破坏功能。
这个属性在API级别11中被引入。
android:actionProviderClass
类名,它是操作项目所使用的ActionProvider类的完整的类名。例如,“android.widget.ShareActionProvider”说明要使用ShareActionProvider类。
警告:如果要使用ProGuard(或类似的工具)来混淆代码,就要确保不要重名这个属性所指定的方法,因为这样能够破坏功能。
这个属性在API级别14中被引入。
android:alphabeticShortcut
字符,定义一个字符快捷键
android:numericShortcut
数字值,定义一个数字快捷键
android:checkable
布尔值,如果菜单项是可以复选的,那么就设置为true。
android:checked
布尔值,如果复选菜单项默认是被选择的,那么就设置为true。
android:visible
布尔值,如果菜单项默认是可见的,那么就设置为true。
android:enabled
布尔值,如果菜单项目默认是可用的,那么就设置为true。
android:menuCategory
关键词。它的值对应了定义菜单项优先级的CATEGORE_*常量,有效值如下:
| 值 | 说明 |
| 菜单项是容器的一部分 | |
| system | 菜单项是由系统提供的。 |
| secondary | 提供给用户的辅助选择的菜单项(很少使用) |
| alternative | 基于当前显示的数据来选择操作的菜单项。 |
android:orderInCategory
整数值,它定义菜单项在菜单组中的重要性的顺序。
<group>
它定义了一个菜单组(它是一个具有共同特征的菜单项的组合,如菜单项的可见性、可用性或可复选性)。它要包含多个<item>元素,而且必须是<menu>元素的子元素。
属性(ATTRIBUTES):
android:id
资源ID。它是资源的唯一标识。使用“@+id/name”格式给菜单项创建一个新的资源ID。“+”号指示应该给这个元素创建一个新的资源ID。
android:checkableBeharior
关键词。针对菜单组的可复选行为的类型。有效值如下:
| 值 | 说明 |
| none | 没有可复选性 |
| all | 组内的所有的项目都被复选(使用复选框) |
| single | 仅有一个项目能够被复选(使用单选按钮) |
android:visible
布尔值,如果菜单组是可见的,就设置为true。
android:enabled
布尔值,如果菜单组是可用的,就设置为true。
android:menuCategory
关键词。它的值对应了Menu类的CATEGORY_*常量,定义了菜单组的优先级。有效值如下:
| 值 | 说明 |
| container | 菜单组是容器的一部分 |
| system | 菜单组是由系统提供的。 |
| secondary | 提供给用户的辅助选择的菜单组(很少使用) |
| alternative | 基于当前显示的数据来选择操作的菜单组。 |
android:orderInCategory
整数值,它定义了分类中菜单项目的默认顺序。差不多就这些了,在res文件夹下创建一个名为menu的文件夹存放menu的xml文件。取名为draw_view.xml。
- <menu xmlns:app="http://schemas.android.com/apk/res-auto"
- xmlns:android="http://schemas.android.com/apk/res/android">
- <group android:checkableBehavior="single">
- <item
- android:id="@+id/nav_home"
- android:icon="@drawable/center_image_collection"
- android:title="Home"/>
- <item
- android:id="@+id/nav_messages"
- android:icon="@drawable/center_message"
- android:title="Messages"/>
- <item
- android:id="@+id/nav_friends"
- android:icon="@drawable/center_reading_collection"
- android:title="Friends"/>
- <item
- android:id="@+id/nav_discussion"
- android:icon="@drawable/center_night_mode"
- android:title="Discussion"/>
- </group>
- <item android:title="Sub items">
- <menu>
- <item
- android:id="@+id/sub1"
- android:icon="@drawable/center_setting"
- android:title="Sub item 1"
- />
- <item
- android:id="@+id/sub2"
- android:icon="@drawable/center_movie_collection"
- android:title="Sub item 2"
- />
- </menu>
- </item>
- </menu>
<menu xmlns:app="http://schemas.android.com/apk/res-auto"
    xmlns:android="http://schemas.android.com/apk/res/android">
    <group android:checkableBehavior="single">
        <item
            android:id="@+id/nav_home"
            android:icon="@drawable/center_image_collection"
            android:title="Home"/>
        <item
            android:id="@+id/nav_messages"
            android:icon="@drawable/center_message"
            android:title="Messages"/>
        <item
            android:id="@+id/nav_friends"
            android:icon="@drawable/center_reading_collection"
            android:title="Friends"/>
        <item
            android:id="@+id/nav_discussion"
            android:icon="@drawable/center_night_mode"
            android:title="Discussion"/>
    </group>
    <item android:title="Sub items">
        <menu>
            <item
                android:id="@+id/sub1"
                android:icon="@drawable/center_setting"
                android:title="Sub item 1"
                />
            <item
                android:id="@+id/sub2"
                android:icon="@drawable/center_movie_collection"
                android:title="Sub item 2"
                />
        </menu>
    </item>
</menu>
- <LinearLayout
- xmlns:android="http://schemas.android.com/apk/res/android"
- android:orientation="vertical"
- android:layout_width="match_parent"
- android:layout_height="192dp"
- android:paddingTop="30dp"
- android:paddingLeft="16dp"
- android:background="@color/colorPrimaryDark"
- android:theme="@style/ThemeOverlay.AppCompat.Dark"
- android:gravity="center|left">
- <ImageView
- android:id="@+id/avatar"
- android:layout_width="64dp"
- android:layout_height="64dp"
- android:scaleType="centerCrop"
- android:src="@drawable/a"
- />
- <TextView
- android:layout_width="wrap_content"
- android:layout_height="wrap_content"
- android:layout_marginTop="10dp"
- android:textAppearance="@style/TextAppearance.AppCompat.Body1"
- android:text="鬼刀z六极之首"
- android:id="@+id/textView" />
- </LinearLayout>
<LinearLayout
    xmlns:android="http://schemas.android.com/apk/res/android"
    android:orientation="vertical"
    android:layout_width="match_parent"
    android:layout_height="192dp"
    android:paddingTop="30dp"
    android:paddingLeft="16dp"
    android:background="@color/colorPrimaryDark"
    android:theme="@style/ThemeOverlay.AppCompat.Dark"
    android:gravity="center|left">

    <ImageView
        android:id="@+id/avatar"
        android:layout_width="64dp"
        android:layout_height="64dp"
        android:scaleType="centerCrop"
        android:src="@drawable/a"
        />

    <TextView
        android:layout_width="wrap_content"
        android:layout_height="wrap_content"
        android:layout_marginTop="10dp"
        android:textAppearance="@style/TextAppearance.AppCompat.Body1"
        android:text="鬼刀z六极之首"
        android:id="@+id/textView" />


</LinearLayout>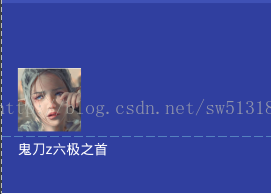
好了,成功了一半,那么现在需要在主xml文件中布局,使用navigationView最外层是需要DrawerLayout的。
- <android.support.v4.widget.DrawerLayout xmlns:android="http://schemas.android.com/apk/res/android"
- xmlns:tools="http://schemas.android.com/tools"
- xmlns:app="http://schemas.android.com/apk/res-auto"
- android:id="@+id/activity_navigation"
- android:layout_width="match_parent"
- android:layout_height="match_parent"
- android:fitsSystemWindows="true"
- tools:context="com.example.administrator.designtest.NavigationActivity">
- <LinearLayout
- android:layout_width="match_parent"
- android:layout_height="wrap_content"
- android:orientation="vertical">
- <android.support.v7.widget.Toolbar
- android:id="@+id/id_toolbar"
- android:layout_width="match_parent"
- android:layout_height="?attr/actionBarSize"
- android:background="?attr/colorPrimary"
- app:layout_scrollFlags="scroll|enterAlways"
- app:popupTheme="@style/ThemeOverlay.AppCompat.Light"
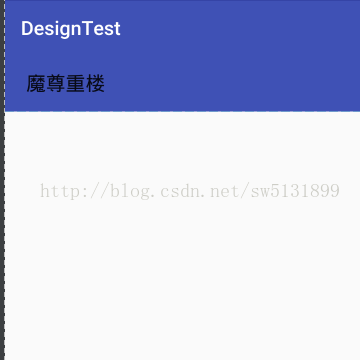
- app:title=" 魔尊重楼" />
- <FrameLayout
- android:id="@+id/content"
- android:layout_width="match_parent"
- android:layout_height="match_parent">
- </FrameLayout>
- </LinearLayout>
- <android.support.percent.PercentRelativeLayout
- android:fitsSystemWindows="true"
- android:layout_gravity="start"
- android:layout_width="match_parent"
- android:layout_height="match_parent">
- <android.support.design.widget.NavigationView
- android:id="@+id/nav_view"
- android:layout_width="0dp"
- app:layout_widthPercent="80%"
- android:layout_height="match_parent"
- app:headerLayout="@layout/nav_header"
- app:menu="@menu/draw_view">
- </android.support.design.widget.NavigationView>
- </android.support.percent.PercentRelativeLayout>
- </android.support.v4.widget.DrawerLayout>
<android.support.v4.widget.DrawerLayout xmlns:android="http://schemas.android.com/apk/res/android"
    xmlns:tools="http://schemas.android.com/tools"
    xmlns:app="http://schemas.android.com/apk/res-auto"
    android:id="@+id/activity_navigation"
    android:layout_width="match_parent"
    android:layout_height="match_parent"
    android:fitsSystemWindows="true"
    tools:context="com.example.administrator.designtest.NavigationActivity">

    <LinearLayout
        android:layout_width="match_parent"
        android:layout_height="wrap_content"
        android:orientation="vertical">

        <android.support.v7.widget.Toolbar
            android:id="@+id/id_toolbar"
            android:layout_width="match_parent"
            android:layout_height="?attr/actionBarSize"
            android:background="?attr/colorPrimary"
            app:layout_scrollFlags="scroll|enterAlways"
            app:popupTheme="@style/ThemeOverlay.AppCompat.Light"
            app:title=" 魔尊重楼" />

        <FrameLayout
            android:id="@+id/content"
            android:layout_width="match_parent"
            android:layout_height="match_parent">

        </FrameLayout>
    </LinearLayout>

    <android.support.percent.PercentRelativeLayout
        android:fitsSystemWindows="true"
        android:layout_gravity="start"
        android:layout_width="match_parent"
        android:layout_height="match_parent">
        <android.support.design.widget.NavigationView
            android:id="@+id/nav_view"
            android:layout_width="0dp"
            app:layout_widthPercent="80%"
            android:layout_height="match_parent"
            app:headerLayout="@layout/nav_header"
            app:menu="@menu/draw_view">

        </android.support.design.widget.NavigationView>
    </android.support.percent.PercentRelativeLayout>


</android.support.v4.widget.DrawerLayout>
- public class NavigationActivity extends AppCompatActivity {
- Toolbar toolbar;
- DrawerLayout drawerLayout;
- NavigationView navigationView;
- @Override
- protected void onCreate(Bundle savedInstanceState) {
- super.onCreate(savedInstanceState);
- setContentView(R.layout.activity_navigation);
- toolbar = (Toolbar) findViewById(R.id.id_toolbar);
- drawerLayout = (DrawerLayout) findViewById(R.id.activity_navigation);
- navigationView = (NavigationView) findViewById(R.id.nav_view);
- //<activity android:name=".NavigationActivity" android:theme="@style/AppThemeNoActionBar"></activity>
- //<style name="AppThemeNoActionBar" parent="Theme.AppCompat.Light.NoActionBar">
- //初始化toolbar,这里得使用NoActionBar的主题,使用ToolBar替换系统自带的ActionBar达到自己的需求
- setSupportActionBar(toolbar);
- ActionBar actionBar = getSupportActionBar();
- //关联图标和侧滑栏
- actionBar.setHomeAsUpIndicator(R.drawable.center_image_collection);
- //设置actionBar和侧滑栏关联
- actionBar.setDisplayHomeAsUpEnabled(true);
- //初始化drawerlayout和navigationview
- if (navigationView != null){
- //设置监听回调
- navigationView.setNavigationItemSelectedListener(new NavigationView.OnNavigationItemSelectedListener() {
- @Override
- public boolean onNavigationItemSelected(@NonNull MenuItem item) {
- //根据选中不同的选项来进行不同的操作
- switch (item.getItemId()){
- case R.id.nav_home:
- getSupportFragmentManager().beginTransaction().replace(R.id.content,BlankFragment.newInstance("主页")).commit();
- toolbar.setTitle("主页");
- break;
- case R.id.nav_friends:
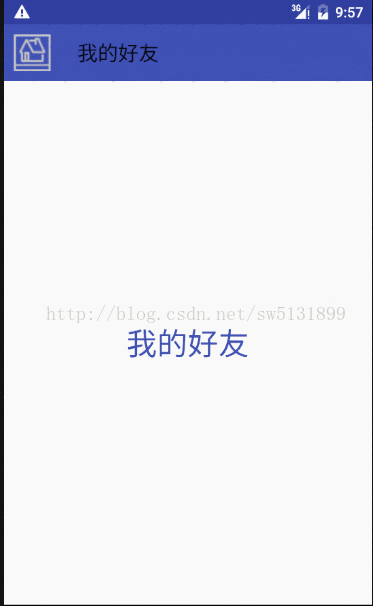
- getSupportFragmentManager().beginTransaction().replace(R.id.content,BlankFragment.newInstance("我的好友")).commit();
- toolbar.setTitle("我的好友");
- break;
- case R.id.nav_discussion:
- getSupportFragmentManager().beginTransaction().replace(R.id.content,BlankFragment.newInstance("热文论坛")).commit();
- toolbar.setTitle("热文论坛");
- break;
- case R.id.nav_messages:
- getSupportFragmentManager().beginTransaction().replace(R.id.content,BlankFragment.newInstance("我的消息")).commit();
- toolbar.setTitle("我的消息");
- break;
- case R.id.sub1:
- getSupportFragmentManager().beginTransaction().replace(R.id.content,BlankFragment.newInstance("子项1")).commit();
- toolbar.setTitle("子项1");
- break;
- case R.id.sub2:
- getSupportFragmentManager().beginTransaction().replace(R.id.content,BlankFragment.newInstance("子项2")).commit();
- toolbar.setTitle("子项2");
- break;
- }
- //设置选项选中效果
- item.setChecked(true);
- //选了侧边栏选项之后,关闭侧边栏
- drawerLayout.closeDrawers();
- //这里返回true有选中的效果,源码中有解释
- return true;
- }
- });
- }
- }
- @Override
- public boolean onOptionsItemSelected(MenuItem item) {
- switch (item.getItemId()){
- //点击左上角的菜单选项,这是在actionBar.setHomeAsUpIndicator(R.drawable.center_image_collection);这儿设置的。
- case android.R.id.home:
- //点击之后打开侧滑栏
- drawerLayout.openDrawer(GravityCompat.START);
- return true;
- }
- return super.onOptionsItemSelected(item);
- }
- }
public class NavigationActivity extends AppCompatActivity {

    Toolbar toolbar;
    DrawerLayout drawerLayout;
    NavigationView navigationView;

    @Override
    protected void onCreate(Bundle savedInstanceState) {
        super.onCreate(savedInstanceState);
        setContentView(R.layout.activity_navigation);
        toolbar = (Toolbar) findViewById(R.id.id_toolbar);
        drawerLayout = (DrawerLayout) findViewById(R.id.activity_navigation);
        navigationView = (NavigationView) findViewById(R.id.nav_view);
        //<activity android:name=".NavigationActivity" android:theme="@style/AppThemeNoActionBar"></activity>
        //<style name="AppThemeNoActionBar" parent="Theme.AppCompat.Light.NoActionBar">
        //初始化toolbar,这里得使用NoActionBar的主题,使用ToolBar替换系统自带的ActionBar达到自己的需求
        setSupportActionBar(toolbar);
        ActionBar actionBar = getSupportActionBar();
        //关联图标和侧滑栏
        actionBar.setHomeAsUpIndicator(R.drawable.center_image_collection);
        //设置actionBar和侧滑栏关联
        actionBar.setDisplayHomeAsUpEnabled(true);
        //初始化drawerlayout和navigationview
        if (navigationView != null){
            //设置监听回调
            navigationView.setNavigationItemSelectedListener(new NavigationView.OnNavigationItemSelectedListener() {
                @Override
                public boolean onNavigationItemSelected(@NonNull MenuItem item) {
                    //根据选中不同的选项来进行不同的操作
                    switch (item.getItemId()){
                        case R.id.nav_home:
                            getSupportFragmentManager().beginTransaction().replace(R.id.content,BlankFragment.newInstance("主页")).commit();
                            toolbar.setTitle("主页");
                            break;
                        case R.id.nav_friends:
                            getSupportFragmentManager().beginTransaction().replace(R.id.content,BlankFragment.newInstance("我的好友")).commit();
                            toolbar.setTitle("我的好友");
                            break;
                        case R.id.nav_discussion:
                            getSupportFragmentManager().beginTransaction().replace(R.id.content,BlankFragment.newInstance("热文论坛")).commit();
                            toolbar.setTitle("热文论坛");
                            break;
                        case R.id.nav_messages:
                            getSupportFragmentManager().beginTransaction().replace(R.id.content,BlankFragment.newInstance("我的消息")).commit();
                            toolbar.setTitle("我的消息");
                            break;
                        case R.id.sub1:
                            getSupportFragmentManager().beginTransaction().replace(R.id.content,BlankFragment.newInstance("子项1")).commit();
                            toolbar.setTitle("子项1");
                            break;
                        case R.id.sub2:
                            getSupportFragmentManager().beginTransaction().replace(R.id.content,BlankFragment.newInstance("子项2")).commit();
                            toolbar.setTitle("子项2");
                            break;
                    }
                    //设置选项选中效果
                    item.setChecked(true);
                    //选了侧边栏选项之后,关闭侧边栏
                    drawerLayout.closeDrawers();
                    //这里返回true有选中的效果,源码中有解释
                    return true;
                }
            });
        }

    }

    @Override
    public boolean onOptionsItemSelected(MenuItem item) {
        switch (item.getItemId()){
            //点击左上角的菜单选项,这是在actionBar.setHomeAsUpIndicator(R.drawable.center_image_collection);这儿设置的。
            case android.R.id.home:
                //点击之后打开侧滑栏
                drawerLayout.openDrawer(GravityCompat.START);
                return true;
        }
        return super.onOptionsItemSelected(item);
    }
}
一些详细的介绍都写在了注释里,若还是有什么不懂的,可以参考这篇博客:http://blog.csdn.net/lamp_zy/article/details/50126531,介绍的比较详细。NavigationView就到这儿了。下一个Design库里的。
5.FloatingActionButton
浮动操作按钮实在Material Design准则中新引入的组件。用于强调当前屏幕最重要,高频率的一些操作。
FloatingActionButton正常显示的情况下有个填充的颜色,有个阴影;点击的时候会有一个rippleColor,并且阴影的范围可以增大,那么问题来了:
-
这个填充色以及rippleColor如何自定义呢?
默认的颜色取的是,theme中的colorAccent,所以你可以在style中定义colorAccent。
colorAccent 对应EditText编辑时、RadioButton选中、CheckBox等选中时的颜色。详细请参考:Android 5.x Theme 与 ToolBar 实战
rippleColor默认取的是theme中的colorControlHighlight。
我们也可以直接用过属性定义这两个的颜色:
- 1
- 2
- 1
- 2
-
立体感有没有什么属性可以动态指定?
和立体感相关有两个属性,elevation和pressedTranslationZ,前者用户设置正常显示的阴影大小;后者是点击时显示的阴影大小。大家可以自己设置尝试下。
在5.x的设备上运行,你会发现一些问题(测试系统5.0):
- 木有阴影
记得设置app:borderWidth="0dp"。
- 按上述设置后,阴影出现了,但是竟然有矩形的边界(未设置margin时,可以看出)
需要设置一个margin的值。在5.0之前,会默认就有一个外边距(不过并非是margin,只是效果相同)。
so,良好的实践是:
- 添加属性
app:borderWidth="0dp" - 对于5.x设置一个合理的margin
- <android.support.design.widget.FloatingActionButton
- android:id="@+id/floatingaction"
- android:onClick="designClick"
- android:layout_width="wrap_content"
- android:layout_height="wrap_content"
- app:elevation="3dp"
- app:rippleColor="@color/colorAccent"
- app:borderWidth="0dp"
- android:backgroundTint="@color/colorPrimary"
- app:pressedTranslationZ="6dp"
- android:layout_margin="12dp"
- android:src="@mipmap/ic_launcher"
- android:layout_alignParentBottom="true"
- android:layout_alignParentRight="true"
- />
 <android.support.design.widget.FloatingActionButton
        android:id="@+id/floatingaction"
        android:onClick="designClick"
        android:layout_width="wrap_content"
        android:layout_height="wrap_content"
        app:elevation="3dp"
        app:rippleColor="@color/colorAccent"
        app:borderWidth="0dp"
        android:backgroundTint="@color/colorPrimary"
        app:pressedTranslationZ="6dp"
        android:layout_margin="12dp"
        android:src="@mipmap/ic_launcher"
        android:layout_alignParentBottom="true"
        android:layout_alignParentRight="true"
        />
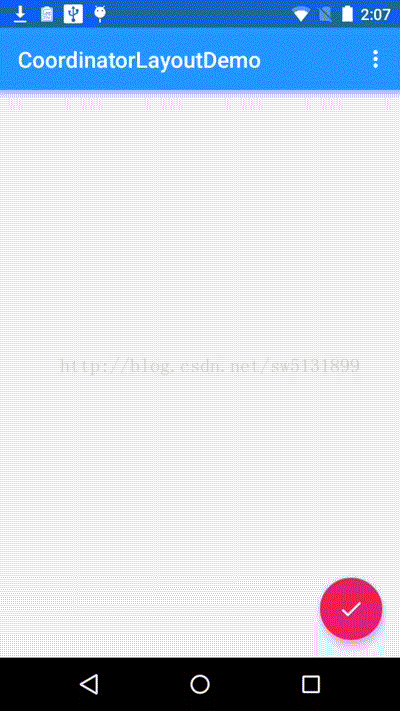
6.CoordinatorLayout
CoordinatorLayout是Design引入的一个功能强大的布局,本质上是一个增强的FrameLayout,它可以使得不同组件之间直接相互作用,并协调动画效果。我们可以定义CoordinatorLayout内部的视图组件如何相互作用并发生变化。例如刚才的FloatingActionButton 和 SnackBar,为了实现SnackBar出现时FAB能够上移,我们可以使用CoordinatorLayout为父容器。
- <android.support.design.widget.CoordinatorLayout
- android:id="@+id/coordinator"
- android:layout_height="match_parent"
- android:layout_width="match_parent"
- android:layout_alignParentBottom="true">
- <android.support.design.widget.FloatingActionButton
- android:id="@+id/floatingaction"
- android:onClick="designClick"
- android:layout_width="wrap_content"
- android:layout_height="wrap_content"
- app:elevation="3dp"
- app:rippleColor="@color/colorAccent"
- app:borderWidth="0dp"
- android:backgroundTint="@color/colorPrimary"
- app:pressedTranslationZ="6dp"
- android:layout_margin="12dp"
- android:src="@mipmap/ic_launcher"
- android:layout_gravity="right|bottom"
- />
- </android.support.design.widget.CoordinatorLayout>
<android.support.design.widget.CoordinatorLayout
        android:id="@+id/coordinator"
        android:layout_height="match_parent"
        android:layout_width="match_parent"
        android:layout_alignParentBottom="true">
        <android.support.design.widget.FloatingActionButton
            android:id="@+id/floatingaction"
            android:onClick="designClick"
            android:layout_width="wrap_content"
            android:layout_height="wrap_content"
            app:elevation="3dp"
            app:rippleColor="@color/colorAccent"
            app:borderWidth="0dp"
            android:backgroundTint="@color/colorPrimary"
            app:pressedTranslationZ="6dp"
            android:layout_margin="12dp"
            android:src="@mipmap/ic_launcher"
            android:layout_gravity="right|bottom"
            />
    </android.support.design.widget.CoordinatorLayout>
- Snackbar.make(coordinatorLayout,"点击了floatingActionButton",Snackbar.LENGTH_LONG).show();
Snackbar.make(coordinatorLayout,"点击了floatingActionButton",Snackbar.LENGTH_LONG).show();
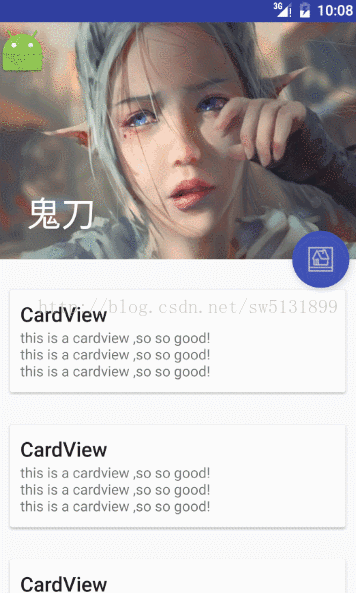
7.CollapsingToolbarLayout
CollapsingToolbarLayout控件可以实现当屏幕内容滚动时收缩Toolbar的效果,通常配合AppBarLayout一起使用。
先看看toolbar的一些区域划分
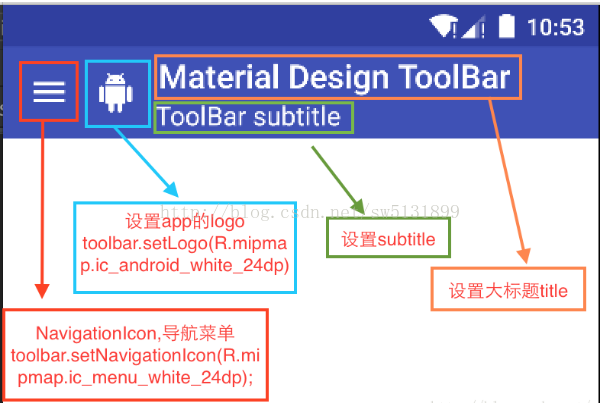
有了这图就知道我们该设置toolbar里的什么位置了。
CollapsingToolbarLayout 提供以下属性和方法是用:
1. Collapsing title:ToolBar的标题,当CollapsingToolbarLayout全屏没有折叠时,title显示的是大字体,在折叠的过程中,title不断变小到一定大小的效果。你可以调用setTitle(CharSequence)方法设置title。
2. Content scrim:ToolBar被折叠到顶部固定时候的背景,你可以调用setContentScrim(Drawable)方法改变背景或者 在属性中使用 app:contentScrim=”?attr/colorPrimary”来改变背景。
3. Status bar scrim:状态栏的背景,调用方法setStatusBarScrim(Drawable)。还没研究明白,不过这个只能在Android5.0以上系统有效果。
4. Parallax scrolling children:CollapsingToolbarLayout滑动时,子视图的视觉差,可以通过属性app:layout_collapseParallaxMultiplier=”0.6”改变。值de的范围[0.0,1.0],值越大视察越大。
5. CollapseMode :子视图的折叠模式,在子视图设置,有两种“pin”:固定模式,在折叠的时候最后固定在顶端;“parallax”:视差模式,在折叠的时候会有个视差折叠的效果。我们可以在布局中使用属性app:layout_collapseMode=”parallax”来改变。
CoordinatorLayout 还提供了一个 layout_anchor 的属性,连同 layout_anchorGravity 一起,可以用来放置与其他视图关联在一起的悬浮视图(如 FloatingActionButton)
使用CollapsingToolbarLayout实现折叠效果,需要注意3点 。
1. AppBarLayout的高度固定
2. CollapsingToolbarLayout的子视图设置layout_collapseMode属性
3. 关联悬浮视图设置app:layout_anchor,app:layout_anchorGravity属性
那么先写一个xml。
- <android.support.design.widget.CoordinatorLayout
- xmlns:android="http://schemas.android.com/apk/res/android"
- xmlns:tools="http://schemas.android.com/tools"
- xmlns:app="http://schemas.android.com/apk/res-auto"
- android:id="@+id/activity_collasping"
- android:layout_width="match_parent"
- android:layout_height="match_parent"
- android:fitsSystemWindows="true"
- tools:context="com.example.administrator.designtest.CollaspingActivity">
- <android.support.design.widget.AppBarLayout
- android:id="@+id/appbar"
- android:theme="@style/ThemeOverlay.AppCompat.Dark.ActionBar"
- android:fitsSystemWindows="true"
- android:layout_width="match_parent"
- android:layout_height="wrap_content">
- <android.support.design.widget.CollapsingToolbarLayout
- android:id="@+id/collasping_toolbar"
- android:layout_width="match_parent"
- android:layout_height="match_parent"
- android:fitsSystemWindows="true"
- app:contentScrim="?attr/colorPrimary"
- app:title="鬼刀"
- app:layout_collapseParallaxMultiplier="0.6"
- app:layout_scrollFlags="scroll|exitUntilCollapsed">
- <ImageView
- android:id="@+id/backdrop"
- android:background="@drawable/a"
- android:layout_width="match_parent"
- android:layout_height="256dp"
- android:fitsSystemWindows="true"
- android:scaleType="centerCrop"
- app:layout_collapseMode="parallax"/>
- <android.support.v7.widget.Toolbar
- android:id="@+id/toolbar"
- app:navigationIcon="@mipmap/ic_launcher"
- android:layout_width="match_parent"
- android:layout_height="?attr/actionBarSize"
- app:layout_collapseMode="pin"
- app:titleTextColor="#fff"
- android:popupTheme="@style/ThemeOverlay.AppCompat.Light">
- </android.support.v7.widget.Toolbar>
- </android.support.design.widget.CollapsingToolbarLayout>
- </android.support.design.widget.AppBarLayout>
- <android.support.v4.widget.NestedScrollView
- android:layout_width="match_parent"
- android:layout_height="match_parent"
- app:layout_behavior="@string/appbar_scrolling_view_behavior">
- <LinearLayout
- android:layout_width="match_parent"
- android:layout_height="match_parent"
- android:orientation="vertical"
- android:paddingTop="14dp">
- <android.support.v7.widget.CardView
- android:layout_width="match_parent"
- android:layout_height="100dp"
- android:background="@drawable/music_board"
- android:layout_margin="16dp">
- <LinearLayout
- android:orientation="vertical"
- android:padding="10dp"
- android:layout_width="match_parent"
- android:layout_height="wrap_content">
- <TextView
- android:layout_width="match_parent"
- android:layout_height="wrap_content"
- android:text="CardView"
- android:textAppearance="@style/TextAppearance.AppCompat.Title" />
- <TextView
- android:layout_width="match_parent"
- android:layout_height="wrap_content"
- android:text="this is a cardview ,so so good!\nthis is a cardview ,so so good!\nthis is a cardview ,so so good!" />
- </LinearLayout>
- </android.support.v7.widget.CardView>
- </LinearLayout>
- </android.support.v4.widget.NestedScrollView>
- <android.support.design.widget.FloatingActionButton
- app:layout_anchor="@id/appbar"
- app:layout_anchorGravity="bottom|right|end"
- android:src="@drawable/center_image_collection"
- android:backgroundTint="@color/colorPrimary"
- app:borderWidth="0dp"
- android:layout_margin="12dp"
- app:rippleColor="@color/colorPrimaryDark"
- app:elevation="6dp"
- app:pressedTranslationZ="12dp"
- android:layout_width="wrap_content"
- android:layout_height="wrap_content" />
- </android.support.design.widget.CoordinatorLayout>
<android.support.design.widget.CoordinatorLayout
    xmlns:android="http://schemas.android.com/apk/res/android"
    xmlns:tools="http://schemas.android.com/tools"
    xmlns:app="http://schemas.android.com/apk/res-auto"
    android:id="@+id/activity_collasping"
    android:layout_width="match_parent"
    android:layout_height="match_parent"
    android:fitsSystemWindows="true"
    tools:context="com.example.administrator.designtest.CollaspingActivity">

    <android.support.design.widget.AppBarLayout
        android:id="@+id/appbar"
        android:theme="@style/ThemeOverlay.AppCompat.Dark.ActionBar"
        android:fitsSystemWindows="true"
        android:layout_width="match_parent"
        android:layout_height="wrap_content">
        <android.support.design.widget.CollapsingToolbarLayout
            android:id="@+id/collasping_toolbar"
            android:layout_width="match_parent"
            android:layout_height="match_parent"
            android:fitsSystemWindows="true"
            app:contentScrim="?attr/colorPrimary"
            app:title="鬼刀"
            app:layout_collapseParallaxMultiplier="0.6"
            app:layout_scrollFlags="scroll|exitUntilCollapsed">

            <ImageView
                android:id="@+id/backdrop"
                android:background="@drawable/a"
                android:layout_width="match_parent"
                android:layout_height="256dp"
                android:fitsSystemWindows="true"
                android:scaleType="centerCrop"
                app:layout_collapseMode="parallax"/>

            <android.support.v7.widget.Toolbar
                android:id="@+id/toolbar"
                app:navigationIcon="@mipmap/ic_launcher"
                android:layout_width="match_parent"
                android:layout_height="?attr/actionBarSize"
                app:layout_collapseMode="pin"
                app:titleTextColor="#fff"
                android:popupTheme="@style/ThemeOverlay.AppCompat.Light">

            </android.support.v7.widget.Toolbar>
        </android.support.design.widget.CollapsingToolbarLayout>
    </android.support.design.widget.AppBarLayout>


    <android.support.v4.widget.NestedScrollView
        android:layout_width="match_parent"
        android:layout_height="match_parent"
        app:layout_behavior="@string/appbar_scrolling_view_behavior">

        <LinearLayout
            android:layout_width="match_parent"
            android:layout_height="match_parent"
            android:orientation="vertical"
            android:paddingTop="14dp">

            <android.support.v7.widget.CardView
                android:layout_width="match_parent"
                android:layout_height="100dp"
                android:background="@drawable/music_board"
                android:layout_margin="16dp">

                <LinearLayout
                    android:orientation="vertical"
                    android:padding="10dp"
                    android:layout_width="match_parent"
                    android:layout_height="wrap_content">

                    <TextView
                        android:layout_width="match_parent"
                        android:layout_height="wrap_content"
                        android:text="CardView"
                        android:textAppearance="@style/TextAppearance.AppCompat.Title" />

                    <TextView
                        android:layout_width="match_parent"
                        android:layout_height="wrap_content"
                        android:text="this is a cardview ,so so good!\nthis is a cardview ,so so good!\nthis is a cardview ,so so good!" />

                </LinearLayout>

            </android.support.v7.widget.CardView>
        </LinearLayout>

    </android.support.v4.widget.NestedScrollView>
    <android.support.design.widget.FloatingActionButton
        app:layout_anchor="@id/appbar"
        app:layout_anchorGravity="bottom|right|end"
        android:src="@drawable/center_image_collection"
        android:backgroundTint="@color/colorPrimary"
        app:borderWidth="0dp"
        android:layout_margin="12dp"
        app:rippleColor="@color/colorPrimaryDark"
        app:elevation="6dp"
        app:pressedTranslationZ="12dp"
        android:layout_width="wrap_content"
        android:layout_height="wrap_content" />

</android.support.design.widget.CoordinatorLayout>
这里的FloatingActionButton会随着AppBarLayout移动,是因为设置了
app:layout_anchor="@id/appbar"
app:layout_anchorGravity="bottom|right|end"
8.BottomSheetBehavior
BottomSheetBehavior可以轻松实现底部动作条功能,底部动作条的引入需要在布局添加app:layout_behavior属性,并将这个布局作为CoordianatorLayout的子View。这个可以用于一些从下面弹出选项的操作。
| 方法 | 用途 |
|---|---|
| setPeekHeight | 偷看的高度;哈,这么理解,就是默认显示后View露头的高度 |
| getPeekHeight | @see setPeekHeight() |
| setHideable | 设置是否可以隐藏,如果为true,表示状态可以为STATE_HIDDEN |
| isHideable | @see setHideable() |
| setState | 设置状态;设置不同的状态会影响BottomSheetView的显示效果 |
| getState | 获取状态 |
| setBottomSheetCallback | 设置状态改变回调 |
举一个简单的运用
- <android.support.design.widget.CoordinatorLayout
- android:id="@+id/coordinator"
- android:layout_below="@+id/design_bottom_sheet"
- android:layout_height="match_parent"
- android:layout_width="match_parent">
- <LinearLayout
- android:id="@+id/bottom_sheet"
- android:orientation="vertical"
- android:background="#e8e8e8"
- app:behavior_peekHeight="0dp"
- app:behavior_hideable="true"
- android:layout_marginTop="10dp"
- android:layout_width="match_parent"
- android:layout_height="200dp"
- app:layout_behavior="@string/bottom_sheet_behavior">
- <android.support.v7.widget.RecyclerView
- android:id="@+id/recyclerview"
- android:layout_width="match_parent"
- android:layout_height="wrap_content">
- </android.support.v7.widget.RecyclerView>
- </LinearLayout>
- <android.support.design.widget.FloatingActionButton
- android:id="@+id/floatingaction"
- android:onClick="designClick"
- android:layout_width="wrap_content"
- android:layout_height="wrap_content"
- app:elevation="3dp"
- app:rippleColor="@color/colorAccent"
- app:layout_anchor="@id/bottom_sheet"
- app:layout_anchorGravity="right|top"
- app:borderWidth="0dp"
- android:backgroundTint="@color/colorPrimary"
- app:pressedTranslationZ="6dp"
- android:layout_margin="10dp"
- android:src="@mipmap/ic_launcher"
- />
- </android.support.design.widget.CoordinatorLayout>
 <android.support.design.widget.CoordinatorLayout
        android:id="@+id/coordinator"
        android:layout_below="@+id/design_bottom_sheet"
        android:layout_height="match_parent"
        android:layout_width="match_parent">

        <LinearLayout
            android:id="@+id/bottom_sheet"
            android:orientation="vertical"
            android:background="#e8e8e8"
            app:behavior_peekHeight="0dp"
            app:behavior_hideable="true"
            android:layout_marginTop="10dp"
            android:layout_width="match_parent"
            android:layout_height="200dp"
            app:layout_behavior="@string/bottom_sheet_behavior">

            <android.support.v7.widget.RecyclerView
                android:id="@+id/recyclerview"
                android:layout_width="match_parent"
                android:layout_height="wrap_content">

            </android.support.v7.widget.RecyclerView>

        </LinearLayout>

        <android.support.design.widget.FloatingActionButton
            android:id="@+id/floatingaction"
            android:onClick="designClick"
            android:layout_width="wrap_content"
            android:layout_height="wrap_content"
            app:elevation="3dp"
            app:rippleColor="@color/colorAccent"
            app:layout_anchor="@id/bottom_sheet"
            app:layout_anchorGravity="right|top"
            app:borderWidth="0dp"
            android:backgroundTint="@color/colorPrimary"
            app:pressedTranslationZ="6dp"
            android:layout_margin="10dp"
            android:src="@mipmap/ic_launcher"
            />

</android.support.design.widget.CoordinatorLayout>- public class MainActivity extends AppCompatActivity {
- CoordinatorLayout coordinatorLayout;
- RecyclerView recyclerview;
- RecyclerView.Adapter<MyViewHolder>adapter;
- List<String>texts;
- BottomSheetBehavior<View> behavior;
- @Override
- protected void onCreate(Bundle savedInstanceState) {
- super.onCreate(savedInstanceState);
- setContentView(R.layout.activity_main);
- coordinatorLayout = (CoordinatorLayout) findViewById(R.id.coordinator);
- recyclerview = (RecyclerView) findViewById(R.id.recyclerview);
- texts = new ArrayList<>();
- texts.add("测试1");
- texts.add("测试2");
- texts.add("测试3");
- texts.add("测试4");
- texts.add("测试5");
- texts.add("测试5");
- texts.add("测试5");
- //创建适配器
- adapter = new RecyclerView.Adapter<MyViewHolder>() {
- @Override
- public MyViewHolder onCreateViewHolder(ViewGroup parent, int viewType) {
- return new MyViewHolder(LayoutInflater.from(MainActivity.this).inflate(R.layout.item,parent,false));
- }
- @Override
- public void onBindViewHolder(MyViewHolder holder, final int position) {
- holder.getTextView(R.id.text).setText(texts.get(position));
- holder.getTextView(R.id.text).setOnClickListener(new View.OnClickListener() {
- @Override
- public void onClick(View view) {
- Toast.makeText(MainActivity.this, "点击了"+position, Toast.LENGTH_SHORT).show();
- }
- });
- }
- @Override
- public int getItemCount() {
- return texts.size();
- }
- };
- //初始化recyclerview
- recyclerview.setAdapter(adapter);
- recyclerview.setHasFixedSize(true);
- recyclerview.setItemAnimator(new DefaultItemAnimator());
- recyclerview.setLayoutManager(new LinearLayoutManager(this));
- //配置bottomSheet
- View bottomSheet = findViewById(R.id.bottom_sheet);
- behavior = BottomSheetBehavior.from(bottomSheet);
- //设置监听bottomSheet的状态
- behavior.setBottomSheetCallback(new BottomSheetBehavior.BottomSheetCallback() {
- @Override
- public void onStateChanged(@NonNull View bottomSheet, int newState) {
- Log.i("tag00","新状态:"+newState);
- }
- @Override
- public void onSlide(@NonNull View bottomSheet, float slideOffset) {
- Log.i("tag00","拖动操作:"+slideOffset);
- }
- });
- }
- //所有点击事件
- public void designClick(View view){
- switch (view.getId()){
- case R.id.tabLayout:
- startActivity(new Intent(this,TabLayoutActivity.class));
- break;
- case R.id.navigation:
- startActivity(new Intent(this,NavigationActivity.class));
- break;
- case R.id.collasping:
- startActivity(new Intent(this,CollaspingActivity.class));
- break;
- case R.id.floatingaction:
- Snackbar.make(coordinatorLayout,"点击了floatingActionButton",Snackbar.LENGTH_LONG).show();
- break;
- //点击BottomSheet使用,改变状态
- case R.id.design_bottom_sheet:
- int state = behavior.getState();
- if (state == BottomSheetBehavior.STATE_EXPANDED) {
- behavior.setState(BottomSheetBehavior.STATE_HIDDEN);
- }else{
- behavior.setState(BottomSheetBehavior.STATE_EXPANDED);
- }
- break;
- }
- }
- //用于展示弹窗的list
- public class MyViewHolder extends RecyclerView.ViewHolder{
- private SparseArray<View> array;
- public MyViewHolder(View itemView) {
- super(itemView);
- array = new SparseArray<>();
- }
- private <T extends View> T findViewById(int viewId){
- View view = array.get(viewId);
- if (view == null){
- view = itemView.findViewById(viewId);
- array.put(viewId,view);
- }
- return (T) view;
- }
- private View findView(int viewId){
- return findViewById(viewId);
- }
- public TextView getTextView(int viewid){
- return (TextView)findView(viewid);
- }
- }
- }
public class MainActivity extends AppCompatActivity {

    CoordinatorLayout coordinatorLayout;
    RecyclerView  recyclerview;
    RecyclerView.Adapter<MyViewHolder>adapter;
    List<String>texts;
    BottomSheetBehavior<View> behavior;


    @Override
    protected void onCreate(Bundle savedInstanceState) {
        super.onCreate(savedInstanceState);
        setContentView(R.layout.activity_main);
        coordinatorLayout = (CoordinatorLayout) findViewById(R.id.coordinator);
        recyclerview = (RecyclerView) findViewById(R.id.recyclerview);
        texts = new ArrayList<>();
        texts.add("测试1");
        texts.add("测试2");
        texts.add("测试3");
        texts.add("测试4");
        texts.add("测试5");
        texts.add("测试5");
        texts.add("测试5");
        //创建适配器
        adapter = new RecyclerView.Adapter<MyViewHolder>() {
            @Override
            public MyViewHolder onCreateViewHolder(ViewGroup parent, int viewType) {
                return new MyViewHolder(LayoutInflater.from(MainActivity.this).inflate(R.layout.item,parent,false));
            }

            @Override
            public void onBindViewHolder(MyViewHolder holder, final int position) {
                holder.getTextView(R.id.text).setText(texts.get(position));
                holder.getTextView(R.id.text).setOnClickListener(new View.OnClickListener() {
                    @Override
                    public void onClick(View view) {
                        Toast.makeText(MainActivity.this, "点击了"+position, Toast.LENGTH_SHORT).show();
                    }
                });

            }

            @Override
            public int getItemCount() {
                return texts.size();
            }
        };
        //初始化recyclerview
        recyclerview.setAdapter(adapter);
        recyclerview.setHasFixedSize(true);
        recyclerview.setItemAnimator(new DefaultItemAnimator());
        recyclerview.setLayoutManager(new LinearLayoutManager(this));
        //配置bottomSheet
        View bottomSheet =  findViewById(R.id.bottom_sheet);
        behavior = BottomSheetBehavior.from(bottomSheet);
        //设置监听bottomSheet的状态
        behavior.setBottomSheetCallback(new BottomSheetBehavior.BottomSheetCallback() {
            @Override
            public void onStateChanged(@NonNull View bottomSheet, int newState) {
                Log.i("tag00","新状态:"+newState);
            }

            @Override
            public void onSlide(@NonNull View bottomSheet, float slideOffset) {
                Log.i("tag00","拖动操作:"+slideOffset);
            }
        });
    }

    //所有点击事件
    public void designClick(View view){
        switch (view.getId()){
            case R.id.tabLayout:
                startActivity(new Intent(this,TabLayoutActivity.class));
                break;
            case R.id.navigation:
                startActivity(new Intent(this,NavigationActivity.class));
                break;
            case R.id.collasping:
                startActivity(new Intent(this,CollaspingActivity.class));
                break;
            case R.id.floatingaction:
                Snackbar.make(coordinatorLayout,"点击了floatingActionButton",Snackbar.LENGTH_LONG).show();
                break;
            //点击BottomSheet使用,改变状态
            case R.id.design_bottom_sheet:
                int state = behavior.getState();
                if (state == BottomSheetBehavior.STATE_EXPANDED) {
                    behavior.setState(BottomSheetBehavior.STATE_HIDDEN);
                }else{
                    behavior.setState(BottomSheetBehavior.STATE_EXPANDED);
                }
                break;
        }
    }

    //用于展示弹窗的list
    public class MyViewHolder extends RecyclerView.ViewHolder{
       private SparseArray<View> array;

        public MyViewHolder(View itemView) {
            super(itemView);
            array = new SparseArray<>();
        }

        private <T extends View> T findViewById(int viewId){
            View view = array.get(viewId);
            if (view == null){
                view = itemView.findViewById(viewId);
                array.put(viewId,view);
            }
            return (T) view;
        }

        private View findView(int viewId){
            return findViewById(viewId);
        }

        public TextView getTextView(int viewid){
            return (TextView)findView(viewid);
        }
    }

}
最后给一个我看的比较详细的BottomSheetBehavior介绍,还介绍了它的一些扩展。感兴趣的可以去看看:
http://blog.csdn.net/qjay_dev/article/details/51289267
大致就是这么多了,还有其他未涉及的,可以去找度娘了。
参考:《Android高级进阶》
http://android-developers.blogspot.com.es/2012/05/android-design-support-library.html 谷歌官网
http://wiki.jikexueyuan.com/project/material-design/components/snackbars-and-toasts.html 极客学院
http://www.jianshu.com/p/cd1e80e64311 作者:简明
http://www.jcodecraeer.com/a/basictutorial/2015/0821/3338.html 作者:泡在网上的日子
http://blog.csdn.net/luck_apple/article/details/9207811 作者:luck_apple
http://blog.csdn.net/qjay_dev/article/details/51289267 作者:JarQ
感谢【动脑学院】老司机的赞助!


 270
270


 被折叠的 条评论
为什么被折叠?
被折叠的 条评论
为什么被折叠?
 到【灌水乐园】发言


