


转载自:http://blog.csdn.net/radic_feng/article/details/6740438
我们期望能像在产品代码中一样,在测试用例中使用的bean也由Spring Context来管理,这样既可以充分利用Spring IOC的优势,同时又使得测试代码更像产品代码,有更好的测试效果。那么怎么能在运行测试用例时自动启动Spring Contex,从而向测试用例中注入beant呢?本文提供使用JUnit和TestNG两个测试框架启动Spring Context的步骤。
JUnit框架
JUnit对Spring有天然的支持,只需添加两条Annotation就可以启动Spring Context了,示例代码如下:
- @ContextConfiguration("/META-INF/spring/integration/inbound-gateway-config.xml")
- @RunWith(SpringJUnit4ClassRunner.class)
- public class InboundGatewayTests {
- @Autowired
- private SimpleWebServiceInboundGateway gateway;
- }
仅仅添加@ContextConfiguration,指定Spring Context配置文件的位置以及@RunWith,即可使用指定配置文件中定义的bean。
摘自:http://wei5201.iteye.com/blog/848418
基类
@RunWith(SpringJUnit4ClassRunner.class)  //使用junit4进行测试
@ContextConfiguration
({"/app*.xml","/spring/app*.xml","/spring/service/app*.xml"}) //加载配置文件
public class BaseJunit4Test {
}public class UserAssignServiceTest extends BaseJunit4Test{
@Resource //自动注入,默认按名称
private UserAssignService userAssignService;
@Test //标明是测试方法
@Transactional //标明此方法需使用事务
@Rollback(false) //标明使用完此方法后事务不回滚,true时为回滚
public void testInsertUserAssign() {
for(int i=0;i<10;i++){
UserAssign u=new UserAssign();
u.setAmount("7");
u.setCity(2);
u.setProvince(1);
u.setCompany("宜信");
u.setCreate_date(DateUtil.getCurrentTimeSecond());
u.setCreator(0);
u.setEmail("1133@163.com");
u.setOper_date(DateUtil.getCurrentTimeSecond());
u.setPosition("工人");
u.setOperator(0);
u.setQudao("2");
u.setTelephone("13013701997");
u.setUsername("张"+i);
userAssignService.insertUserAssign(u);
Assert.assertNotNull(u.getId());
}
}
}TestNG框架
如果你的Eclipse还没有安装TestNG插件,请参考安装文档。
与JUnit不同,TestNG没有提供@RunWith注解。TestNG的测试用例需要继承org.springframework.test.context.testng.AbstractTestNGSpringContextTests或org.springframework.test.context.testng.AbstractTestNGSpringContextTests来启动SpringContext,示例代码如下:
- @ContextConfiguration(locations={"/WEB-INF/accountContext.xml"})
- public class TestDao extends AbstractTestNGSpringContextTests {
- @Autowired
- JdbcTemplate jdbcTemplate;
- @Test
- public void init() throws ServletException {
- try {
- jdbcTemplate.execute("create table contacts (name varchar(45),email varchar(45),phone varchar(45))");
- List list = jdbcTemplate.queryForList("select * from contacts");
- } catch (Exception e) {
- e.printStackTrace(System.out);
- }
- }
- }
以下讲解有关@ContextConfiguration参数的设置:
1. 不指定Context文件,@ContextConfiguration
Spring的ContextLoader会判断是否需要加载context,如果需要,默认加载器(GenericXmlContextLoader )会根据用例类名生成一个Spring Context配置文件的名字,例如,如果测试用例为com.example.MyTest,则GenericXmlContextLoader会从“classpath:/com/example/MyTest-context.xml”中加载Context。
2.指定多个Context文件,比如@ContextConfiguration("/META-INF/spring/integration/inbound-gateway-config.xml")
3.指定多个Context文件,比如@ContextConfiguration(locations={"/applicationContext.xml", "/applicationContext-test.xml"})
ContextLoader会从classpath的根目录加载以上文件。
4. 继承关系对Context文件加载的影响,inheritLocations的使用。
- @RunWith(SpringJUnit4ClassRunner.class)
- @ContextConfiguration(locations={"/base-context.xml"})
- public class BaseTest {
- // class body...
- }
- @ContextConfiguration(locations={"/extended-context.xml"})
- public class ExtendedTest extends BaseTest {
- // class body...
- }
在以上代码中ExtendedTest会加载“/base-context.xml” 和“/extended-context.xml”两个文件,因为inheritLocations的默认值是true。
通过以上解释,我们可以看到Spring Context文件是基于classpath来定位的。在Eclipse下,classpath的设定往往和build环境下不同,怎么将build环境下的Context文件设定到@ContextConfiguration中呢?步骤如下:
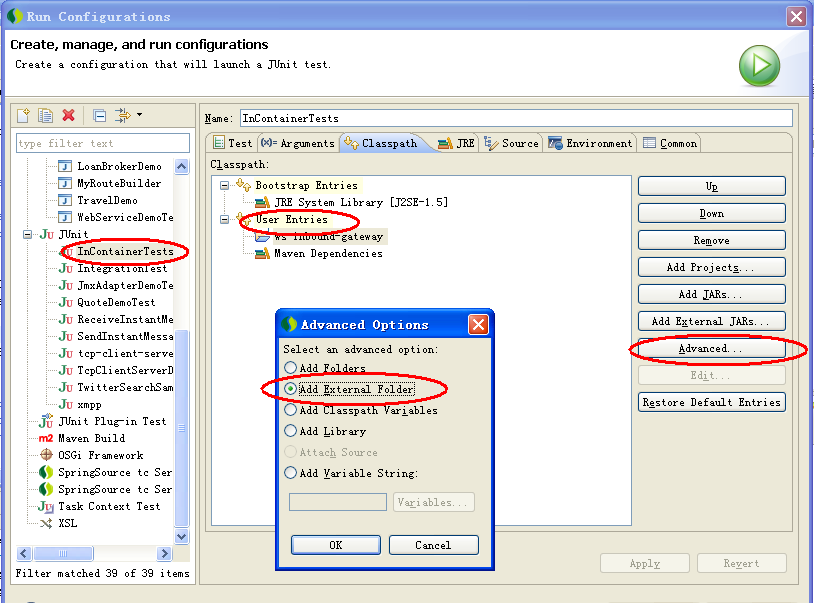
- 点击Run->Run Configurations...
- 选择你要运行的测试用例的运行配置项,比如InContainerTests,然后点击User Entries,然后点击Advanced,在弹出的窗口中选择Add External Folder,点击确定后可以选择任意目录。你可以基于Context文件相对于该目录的位置配置@ContextConfiguration中的参数。


 2251
2251


 被折叠的 条评论
为什么被折叠?
被折叠的 条评论
为什么被折叠?
 到【灌水乐园】发言


