


- 欢迎同样喜欢动效的工程师/UI设计师/产品加入我们
- iOS动效特攻队–>QQ群:547897182
- iOS动效特攻队–>熊熊:648070256
之前看了一个别人做的汉堡动画的动效,非常有意思,然后在花瓣网上找了一个差不多的,自己尝试着做了一下。
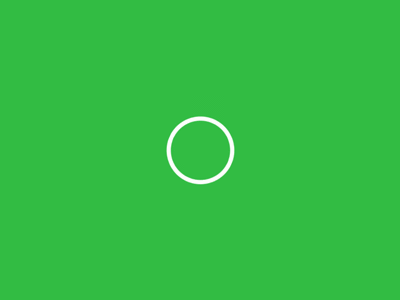
花瓣网上找的动效
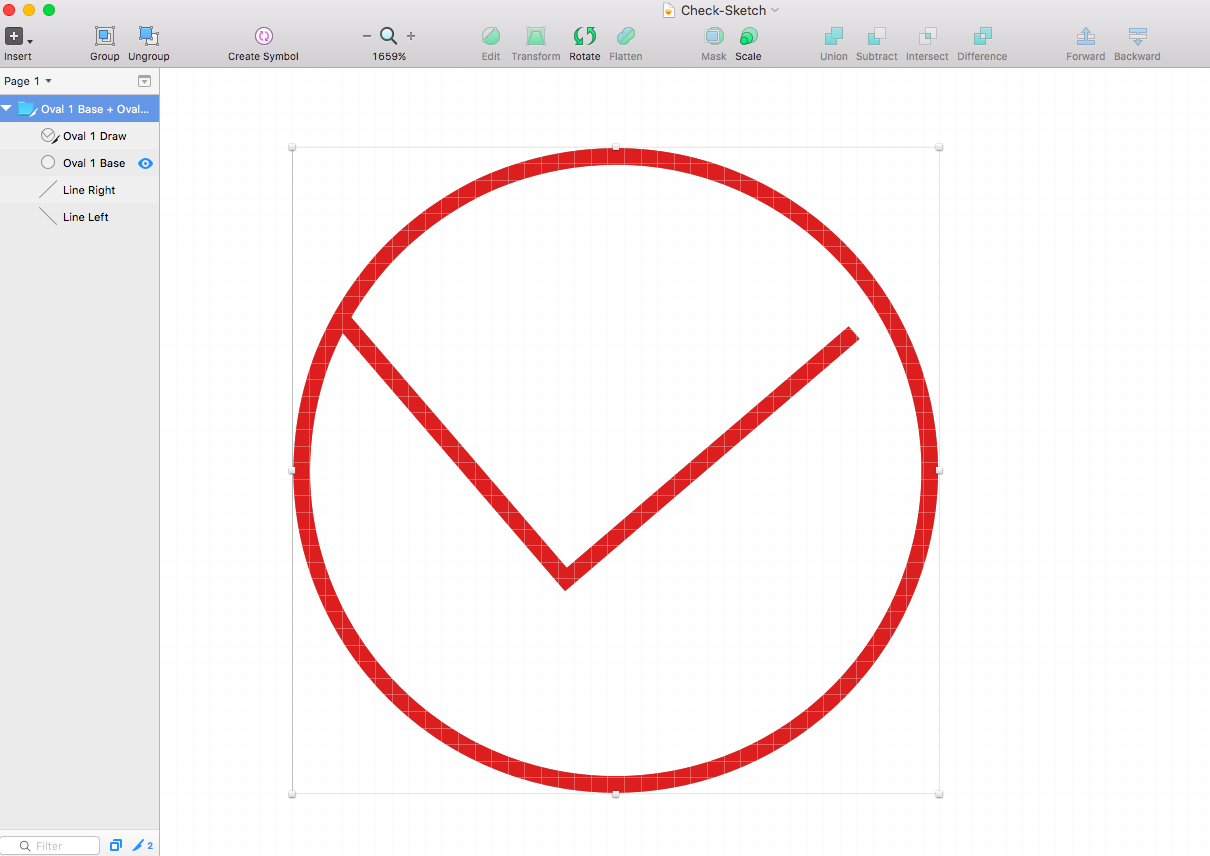
最终代码实现的效果
gitHub地址:https://github.com/BearRan/CheckBtnAnimation

说一下,这个动效主要用的就是路径动效,都是在CGPath上操作的。虾面开始讲解制作过程。
准备工作
两个必备软件
Sketch用户绘制需要的图形和路径
Sketch链接: http://pan.baidu.com/s/1i4mLxGx 密码: 5d2b
将Sketch绘制的图形导出sag格式的文件,通过PaintCode转换成路径代码
PaintCode链接: http://pan.baidu.com/s/1dDLPi5F 密码: ftpt
本文关于的Sketch和PaintCode的讲解视频,本人亲自录的。
bilibili播放地址(可以刷弹幕,欢迎吐槽)
http://www.bilibili.com/video/av4231373/
土豆播放地址
http://www.tudou.com/programs/view/SFqCW0p-plc/
开动!
1,用Sketch绘制图形,一个圆圈和里面的勾,注意,勾和圆圈的路径要连起来的。具体的Sketch使用教程就不说了,自己问度娘。我也是自己慢慢摸索出来的。
实在不会的我这里有一个我做好的sketch文件,下载下来直接打开就行,可以参考一下http://download.csdn.net/detail/xiongbaoxr/9461562
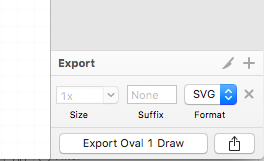
2,将Sketch绘制的图形以SVG格式导出,Sketch界面右下角就能看到
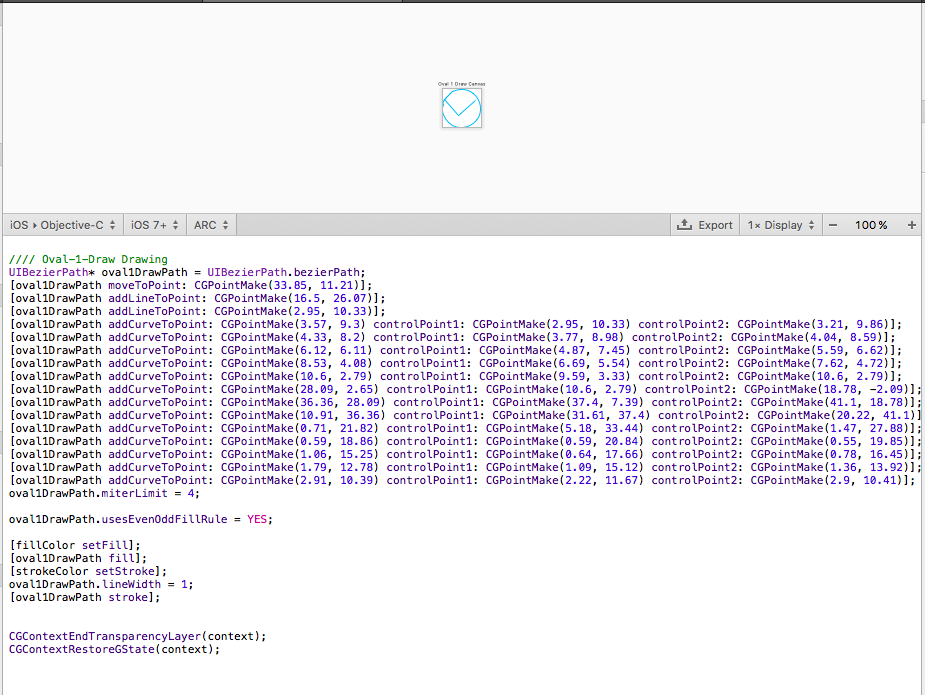
3,将SVG文件拖到PaintCode,就会自动生成路径代码
4,现在开始代码部分
先新建一个UIButton类,先贴出代码,代码不是很多,虾面开始一一解释
#import "CheckBtn.h"
#import "CALayer+CheckBtnLayer.h"

static CGFloat checkStrokeStart     = 0.038;
static CGFloat checkStrokeEnd       = 0.195;
static CGFloat circleStrokeStart    = 0.28;
static CGFloat circleStrokeEnd      = 1;

@interface CheckBtn ()
{
    CAShapeLayer *checkShapeLayer;
}

@end

@implementation CheckBtn

- (instancetype)initWithFrame:(CGRect)frame
{
    self = [super initWithFrame:frame];
    if (!self) {
        self = nil;
    }

    self.layer.borderWidth = 3.0f;
    self.layer.cornerRadius = self.frame.size.width/2.0;
    self.layer.borderColor = [[UIColor whiteColor] colorWithAlphaComponent:0.3].CGColor;

    checkShapeLayer = [CAShapeLayer layer];
    checkShapeLayer.path = [self checkPath];
    checkShapeLayer.lineWidth = 3.0f;
    checkShapeLayer.lineCap = kCALineCapRound;
    checkShapeLayer.lineJoin = kCALineJoinRound;
    checkShapeLayer.strokeColor = [UIColor whiteColor].CGColor;
    checkShapeLayer.fillColor = [UIColor clearColor].CGColor;
    checkShapeLayer.actions = [[NSDictionary alloc] initWithObjectsAndKeys:
                     [NSNull null],@"strokeStart",[NSNull null],@"strokeEnd", nil];

    [self.layer addSublayer:checkShapeLayer];

    self.showCheck = NO;

    return self;
}


@synthesize showCheck = _showCheck;
- (void)setShowCheck:(BOOL)showCheck
{
    _showCheck = showCheck;

    CABasicAnimation *strokeStart = [CABasicAnimation animationWithKeyPath:@"strokeStart"];
    CABasicAnimation *strokeEnd = [CABasicAnimation animationWithKeyPath:@"strokeEnd"];

    if (self.showCheck) {

        strokeStart.toValue = [NSNumber numberWithFloat:checkStrokeStart];
        strokeStart.duration = 0.4;
        strokeStart.timingFunction = [CAMediaTimingFunction functionWithControlPoints:0.25 :0.4 :0.3 :1.6];

        strokeEnd.toValue = [NSNumber numberWithFloat:checkStrokeEnd];
        strokeEnd.duration = 0.5;
        strokeEnd.timingFunction = [CAMediaTimingFunction functionWithControlPoints:0.15 :0.6 :0.6 :1];
    }else{

        strokeStart.toValue = [NSNumber numberWithFloat:circleStrokeStart];
        strokeStart.duration = 0.4;
        strokeStart.timingFunction = [CAMediaTimingFunction functionWithControlPoints:0.25 :-0.4 :0.58 :0.88];

        strokeEnd.toValue = [NSNumber numberWithFloat:circleStrokeEnd];
        strokeEnd.duration = 0.55;
        strokeEnd.timingFunction = [CAMediaTimingFunction functionWithControlPoints:0.25 :-0.08 :0.64 :0.1];
    }

    [checkShapeLayer ocb_applyAnimation:strokeStart];
    [checkShapeLayer ocb_applyAnimation:strokeEnd];
}

- (CGPathRef)checkPath
{
    UIBezierPath* oval1DrawPath = UIBezierPath.bezierPath;
    [oval1DrawPath moveToPoint: CGPointMake(33.85, 11.21)];
    [oval1DrawPath addLineToPoint: CGPointMake(16.5, 26.07)];
    [oval1DrawPath addLineToPoint: CGPointMake(2.95, 10.33)];
    [oval1DrawPath addCurveToPoint: CGPointMake(3.57, 9.3) controlPoint1: CGPointMake(2.95, 10.33) controlPoint2: CGPointMake(3.21, 9.86)];
    [oval1DrawPath addCurveToPoint: CGPointMake(4.33, 8.2) controlPoint1: CGPointMake(3.77, 8.98) controlPoint2: CGPointMake(4.04, 8.59)];
    [oval1DrawPath addCurveToPoint: CGPointMake(6.12, 6.11) controlPoint1: CGPointMake(4.87, 7.45) controlPoint2: CGPointMake(5.59, 6.62)];
    [oval1DrawPath addCurveToPoint: CGPointMake(8.53, 4.08) controlPoint1: CGPointMake(6.69, 5.54) controlPoint2: CGPointMake(7.62, 4.72)];
    [oval1DrawPath addCurveToPoint: CGPointMake(10.6, 2.79) controlPoint1: CGPointMake(9.59, 3.33) controlPoint2: CGPointMake(10.6, 2.79)];
    [oval1DrawPath addCurveToPoint: CGPointMake(28.09, 2.65) controlPoint1: CGPointMake(10.6, 2.79) controlPoint2: CGPointMake(18.78, -2.09)];
    [oval1DrawPath addCurveToPoint: CGPointMake(36.36, 28.09) controlPoint1: CGPointMake(37.4, 7.39) controlPoint2: CGPointMake(41.1, 18.78)];
    [oval1DrawPath addCurveToPoint: CGPointMake(10.91, 36.36) controlPoint1: CGPointMake(31.61, 37.4) controlPoint2: CGPointMake(20.22, 41.1)];
    [oval1DrawPath addCurveToPoint: CGPointMake(0.71, 21.82) controlPoint1: CGPointMake(5.18, 33.44) controlPoint2: CGPointMake(1.47, 27.88)];
    [oval1DrawPath addCurveToPoint: CGPointMake(0.59, 18.86) controlPoint1: CGPointMake(0.59, 20.84) controlPoint2: CGPointMake(0.55, 19.85)];
    [oval1DrawPath addCurveToPoint: CGPointMake(1.06, 15.25) controlPoint1: CGPointMake(0.64, 17.66) controlPoint2: CGPointMake(0.78, 16.45)];
    [oval1DrawPath addCurveToPoint: CGPointMake(1.79, 12.78) controlPoint1: CGPointMake(1.09, 15.12) controlPoint2: CGPointMake(1.36, 13.92)];
    [oval1DrawPath addCurveToPoint: CGPointMake(2.91, 10.39) controlPoint1: CGPointMake(2.22, 11.67) controlPoint2: CGPointMake(2.9, 10.41)];

    CGPathRef pathRef = oval1DrawPath.CGPath;
    return pathRef;
}
4.1 创建半透明白色圆环作为基底
self.layer.borderWidth = 3.0f;
self.layer.cornerRadius = self.frame.size.width/2.0;
self.layer.borderColor = [[UIColor whiteColor] colorWithAlphaComponent:0.3].CGColor;
4.2 新建一个CAShaperLayer对象CAShapeLayer *checkShapeLayer; 配置checkShapeLayer的参数
checkShapeLayer = [CAShapeLayer layer];
checkShapeLayer.path = [self checkPath]; //这里的checkPath就是之前我们生成的path路径
checkShapeLayer.lineWidth = 3.0f;//线宽
checkShapeLayer.lineCap = kCALineCapRound;//layer边缘的样式
checkShapeLayer.lineJoin = kCALineJoinRound;//layer衔接部分的样式
checkShapeLayer.strokeColor = [UIColor whiteColor].CGColor;//layer描边的颜色,
checkShapeLayer.fillColor = [UIColor clearColor].CGColor;//layer填充的颜色,注意,这和stroke不一样
checkShapeLayer.actions = [[NSDictionary alloc] initWithObjectsAndKeys:
                     [NSNull null],@"strokeStart",[NSNull null],@"strokeEnd", nil];//layer增加动画事件

[self.layer addSublayer:checkShapeLayer];
4.3 后面设定按钮点击动画
4.3.1 这四个参数分别是“Check”和“Circle”这两种不同形状时的strokeStart和strokeEnd的位置,有效值为0~1
static CGFloat checkStrokeStart     = 0.038;
static CGFloat checkStrokeEnd       = 0.195;
static CGFloat circleStrokeStart    = 0.28;
static CGFloat circleStrokeEnd      = 1;
4.3.2 创建CABasicAnimation strokeStart和strokeEnd,为什么 @”strokeStart”和@”strokeEnd”能创建动画,官方文档上说了,这两个属性是Animation的,可以创建动画的,建议大家看看CAShapeLayer的官方文档,不长,而且容易看懂。
strokeStart.toValue 动画的最终位置
strokeStart.duration 动画之行的时长
strokeStart.timingFunction = [CAMediaTimingFunction functionWithControlPoints:0.25 :0.4 :0.3 :1.6];动画的步速
这是一种通过贝塞尔曲线的方式来调整速度的方式,比如先快后慢,或者先慢后快。看下面的文章就容易理解了。
参考文章
http://netcetera.org/camtf-playground.html
https://isux.tencent.com/ios-easing-tween-animation.html
@synthesize showCheck = _showCheck;
- (void)setShowCheck:(BOOL)showCheck
{
    _showCheck = showCheck;

    CABasicAnimation *strokeStart = [CABasicAnimation animationWithKeyPath:@"strokeStart"];
    CABasicAnimation *strokeEnd = [CABasicAnimation animationWithKeyPath:@"strokeEnd"];

    if (self.showCheck) {

        strokeStart.toValue = [NSNumber numberWithFloat:checkStrokeStart];
        strokeStart.duration = 0.4;
        strokeStart.timingFunction = [CAMediaTimingFunction functionWithControlPoints:0.25 :0.4 :0.3 :1.6];

        strokeEnd.toValue = [NSNumber numberWithFloat:checkStrokeEnd];
        strokeEnd.duration = 0.5;
        strokeEnd.timingFunction = [CAMediaTimingFunction functionWithControlPoints:0.15 :0.6 :0.6 :1];
    }else{

        strokeStart.toValue = [NSNumber numberWithFloat:circleStrokeStart];
        strokeStart.duration = 0.4;
        strokeStart.timingFunction = [CAMediaTimingFunction functionWithControlPoints:0.25 :-0.4 :0.58 :0.88];

        strokeEnd.toValue = [NSNumber numberWithFloat:circleStrokeEnd];
        strokeEnd.duration = 0.55;
        strokeEnd.timingFunction = [CAMediaTimingFunction functionWithControlPoints:0.25 :-0.08 :0.64 :0.1];
    }

    [checkShapeLayer ocb_applyAnimation:strokeStart];
    [checkShapeLayer ocb_applyAnimation:strokeEnd];
}
在CALayer的基础上扩展的一个方法,
animation.fromValue = [self.presentationLayer valueForKey:animation.keyPath];从动画演示层presentationLayer 获取之前的状态,并且设定为fromValue
再设定toValue,和animation开始执行动画
- (void)ocb_applyAnimation:(CABasicAnimation *)animation
{
    if (animation.fromValue == nil) {
        animation.fromValue = [self.presentationLayer valueForKey:animation.keyPath];
    }

    [self addAnimation:animation forKey:animation.keyPath];
    [self setValue:animation.toValue forKey:animation.keyPath];
}
这样,一个有趣的动效就完成了。做的过程中遇到不懂的问度娘或者看官方文档都行,官方文档对这一块的解释都比较清楚,能看懂。欢迎有同样喜欢动效的程序员和设计师加入我。QQ:648070256


 233
233


 被折叠的 条评论
为什么被折叠?
被折叠的 条评论
为什么被折叠?
 到【灌水乐园】发言


