官方文档介绍地址:
一、firewall介绍
CentOS 7中防火墙是一个非常的强大的功能,在CentOS 6.5中在iptables防火墙中进行了升级了。
1、官方介绍
The dynamic firewall daemon firewalld provides a dynamically managed firewall with support for network “zones” to assign a level of trust to a network and its associated connections and interfaces. It has support for IPv4 and IPv6 firewall settings. It supports Ethernet bridges and has a separation of runtime and permanent configuration options. It also has an interface for services or applications to add firewall rules directly.
2、什么是区域Zone:
网络区域定义了网络连接的可信等级。这是一个 一对多的关系,这意味着一次连接可以仅仅是一个区域的一部分,而一个区域可以用于很多连接。
3、哪个区域可用?
由firewalld 提供的区域按照从不信任到信任的顺序排序。
4、区域的分类?
Firewalls can be used to separate networks into different zones based on the level of trust the user has decided to place on the devices and traffic within that network. NetworkManager informs firewalld to which zone an interface belongs. An interface’s assigned zone can be changed by NetworkManager or via the firewall-config tool which can open the relevant NetworkManager window for you.
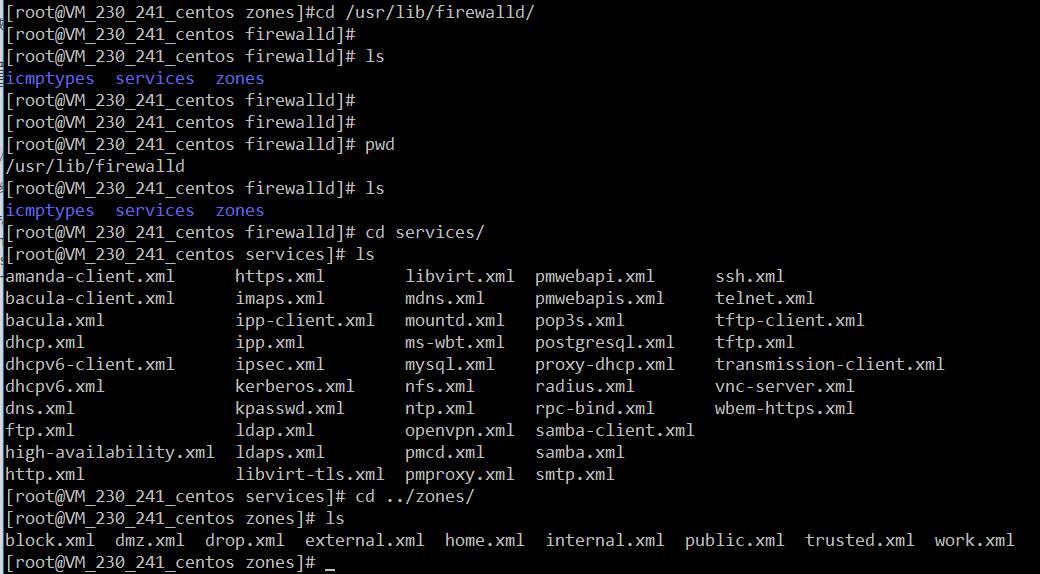
The zone settings in /etc/firewalld/ are a range of preset settings which can be quickly applied to a network interface. They are listed here with a brief explanation:
drop
Any incoming network packets are dropped, there is no reply. Only outgoing network connections are possible.
block
Any incoming network connections are rejected with an icmp-host-prohibited message for IPv4 and icmp6-adm-prohibited for IPv6. Only network connections initiated from within the system are possible.
public
For use in public areas. You do not trust the other computers on the network to not harm your computer. Only selected incoming connections are accepted.
external
For use on external networks with masquerading enabled especially for routers. You do not trust the other computers on the network to not harm your computer. Only selected incoming connections are accepted.
dmz
For computers in your demilitarized zone that are publicly-accessible with limited access to your internal network. Only selected incoming connections are accepted.
work
For use in work areas. You mostly trust the other computers on networks to not harm your computer. Only selected incoming connections are accepted.
home
For use in home areas. You mostly trust the other computers on networks to not harm your computer. Only selected incoming connections are accepted.
internal
For use on internal networks. You mostly trust the other computers on the networks to not harm your computer. Only selected incoming connections are accepted.
trusted
All network connections are accepted.
It is possible to designate one of these zones to be the default zone. When interface connections are added to NetworkManager, they are assigned to the default zone. On installation, the default zone in firewalld is set to be the public zone.
注:具体内容,请参见官方文档介绍!
二、firewall配置
The configuration for firewalld is stored in various XML files in /usr/lib/firewalld/ and /etc/firewalld/.
This allows a great deal of flexibility as the files can be edited, written to, backed up, used as templates for other installations and so on.
注意:以下firewalld 的操作只有重启之后才有效:service firewalld restart 重启
1、系统配置目录
/usr/lib/firewalld/services目录中存放定义好的网络服务和端口参数,系统参数,不能修改。
2、用户配置目录
/etc/firewalld/3、如何自定义添加端口
用户可以通过修改配置文件的方式添加端口,也可以通过命令的方式添加端口,注意,修改的内容会在/etc/firewalld/ 目录下的配置文件中还体现。
- 3.1、命令的方式添加端口
firewall-cmd --permanent --add-port=9527/tcp 参数介绍:
1、firewall-cmd:是Linux提供的操作firewall的一个工具;
2、--permanent:表示设置为持久;
3、--add-port:标识添加的端口;
另外,firewall中有Zone的概念,可以将具体的端口制定到具体的zone配置文件中。
例如:添加8010端口
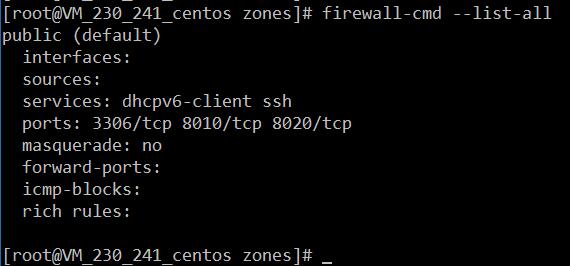
firewall-cmd --zone=public --permanent --add-port=8010/tcp--zone=public:指定的zone为public;添加结果如下:
如果–zone=dmz 这样设置的话,会在dmz.xml文件中新增一条。
- 3.2、修改配置文件的方式添加端口
<?xml version="1.0" encoding="utf-8"?>
<zone>
  <short>Public</short>
  <description>For use in public areas.</description>
  <rule family="ipv4">
    <source address="122.10.70.234"/>
    <port protocol="udp" port="514"/>
    <accept/>
  </rule>
  <rule family="ipv4">
    <source address="123.60.255.14"/>
    <port protocol="tcp" port="10050-10051"/>
    <accept/>
  </rule>
 <rule family="ipv4">
    <source address="192.249.87.114"/> 放通指定ip,指定端口、协议
    <port protocol="tcp" port="80"/>
    <accept/>
  </rule>
<rule family="ipv4"> 放通任意ip访问服务器的9527端口
    <port protocol="tcp" port="9527"/>
    <accept/>
  </rule>
</zone>
上述的一个配置文件可以很好的看出:
1、添加需要的规则,开放通源ip为122.10.70.234,端口514,协议tcp;
2、开放通源ip为123.60.255.14,端口10050-10051,协议tcp;/3、开放通源ip为任意,端口9527,协议tcp;
三、firewall常用命令
1、重启、关闭、开启firewalld.service服务
service firewalld restart 重启
service firewalld start 开启
service firewalld stop 关闭
2、查看firewall服务状态
systemctl status firewall 3、查看firewall的状态
firewall-cmd --state4、查看防火墙规则
firewall-cmd --list-all 
四、CentOS切换为iptables防火墙
切换到iptables首先应该关掉默认的firewalld,然后安装iptables服务。
1、关闭firewall:
service firewalld stop
systemctl disable firewalld.service #禁止firewall开机启动
2、安装iptables防火墙
yum install iptables-services #安装3、编辑iptables防火墙配置
vi /etc/sysconfig/iptables #编辑防火墙配置文件下边是一个完整的配置文件:
Firewall configuration written by system-config-firewall

Manual customization of this file is not recommended.

*filter

:INPUT ACCEPT [0:0]

:FORWARD ACCEPT [0:0]

:OUTPUT ACCEPT [0:0]

-A INPUT -m state --state ESTABLISHED,RELATED -j ACCEPT

-A INPUT -p icmp -j ACCEPT

-A INPUT -i lo -j ACCEPT

-A INPUT -m state --state NEW -m tcp -p tcp --dport 22 -j ACCEPT

-A INPUT -m state --state NEW -m tcp -p tcp --dport 80 -j ACCEPT

-A INPUT -m state --state NEW -m tcp -p tcp --dport 3306 -j ACCEPT

-A INPUT -j REJECT --reject-with icmp-host-prohibited

-A FORWARD -j REJECT --reject-with icmp-host-prohibited

COMMIT
:wq! #保存退出
service iptables start #开启
systemctl enable iptables.service #设置防火墙开机启动
个人微信公众号,欢迎扫码订阅:


 163
163

 被折叠的 条评论
为什么被折叠?


