 React Native入门:创建第一个ListView示例


 本文介绍了如何在React Native中使用ListView展示重复数据。通过添加ListView声明、设置布局参数、初始化数据接口和修改数据请求,最终实现ListView的运行效果。
使用下面的命令
 ### 改变布局
 ### 加载网络数据
数据来源
### 加载网络数据
数据来源

$ npm install -g react-native-cli
$ react-native init AwesomeProject$ cd AwesomeProject/
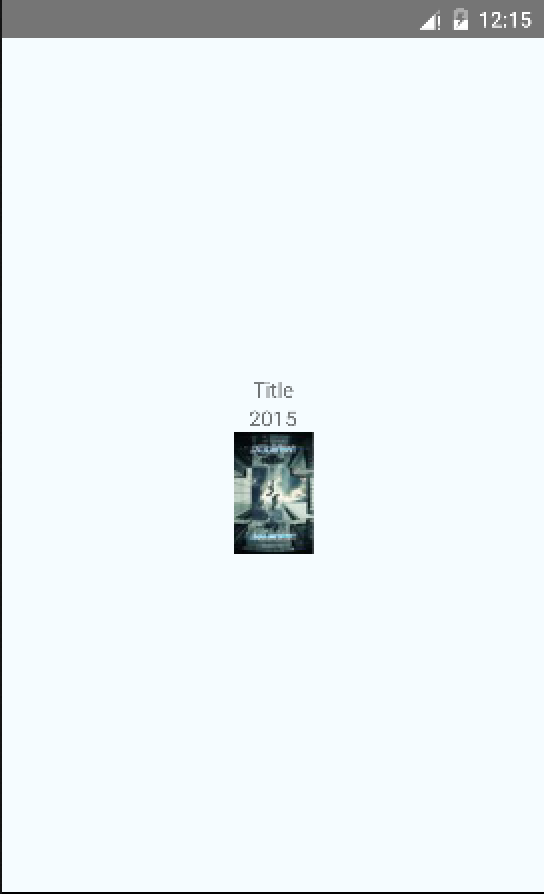
$ react-native run-androidvar MOCKED_MOVIES_DATA = [
{title: 'Title', year: '2015', posters: {thumbnail: 'http://i.imgur.com/UePbdph.jpg'}},
];var {
AppRegistry,
Image,
StyleSheet,
Text,
View,
} = React;render: function() {
var movie = MOCKED_MOVIES_DATA[0];
return (
<View style={styles.container}>
<Text>{movie.title}</Text>
<Text>{movie.year}</Text>
<Image
source={{uri: movie.posters.thumbnail}}
style={styles.thumbnail}
/>
</View>
);
}var styles = StyleSheet.create({
container: {
flex: 1,
justifyContent: 'center',
alignItems: 'center',
backgroundColor: '#F5FCFF',
},
thumbnail: {
width: 53,
height: 81,
},
});var styles = StyleSheet.create({
container: {
flex: 1,
flexDirection: 'row',
justifyContent: 'center',
alignItems: 'center',
backgroundColor: '#F5FCFF',
},
rightContainer: {
flex: 1,
},
title: {
fontSize: 20,
marginBottom: 8,
textAlign: 'center',
},
year: {
textAlign: 'center',
},
thumbnail: {
width: 53,
height: 81,
},
});render: function() {
var movie = MOCKED_MOVIES_DATA[0];
return (
<View style={styles.container}>
<Image
source={{uri: movie.posters.thumbnail}}
style={styles.thumbnail}
/>
<View style={styles.rightContainer}>
<Text style={styles.title}>{movie.title}</Text>
<Text style={styles.year}>{movie.year}</Text>
</View>
</View>
);
},var REQUEST_URL = 'https://raw.githubusercontent.com/facebook/react-native/master/docs/MoviesExample.json';getInitialState: function() {
return {
movies: null,
};
},componentDidMount: function() {
this.fetchData();
},
fetchData: function() {
fetch(REQUEST_URL)
.then((response) => response.json())
.then((responseData) => {
this.setState({
movies: responseData.movies,
});
})
.done();
},render: function() {
if (!this.state.movies) {
return this.renderLoadingView();
}
var movie = this.state.movies[0];
return this.renderMovie(movie);
},
renderLoadingView: function() {
return (
<View style={styles.container}>
<Text>
Loading movies...
</Text>
</View>
);
},
renderMovie: function(movie) {
return (
<View style={styles.container}>
<Image
source={{uri: movie.posters.thumbnail}}
style={styles.thumbnail}
/>
<View style={styles.rightContainer}>
<Text style={styles.title}>{movie.title}</Text>
<Text style={styles.year}>{movie.year}</Text>
</View>
</View>
);
},
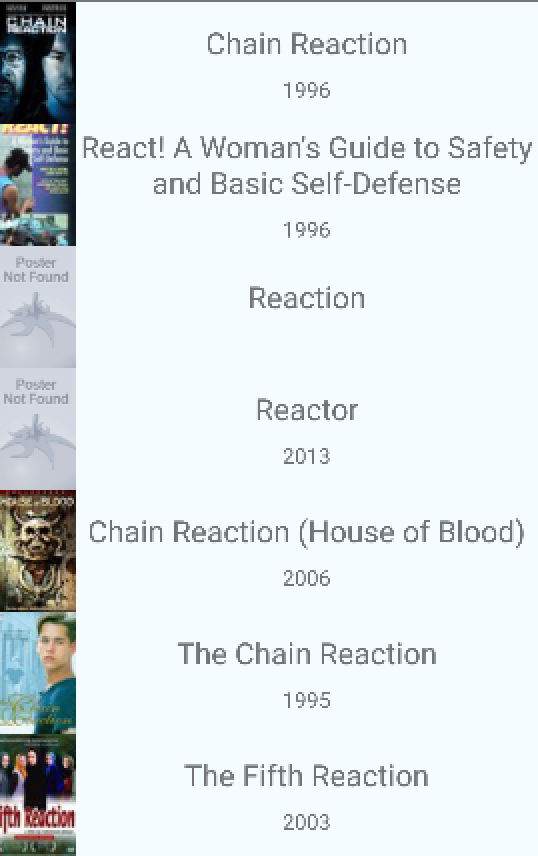
ListView
当数据是重复多条时,我们需要用ListView显示。添加ListView的声明
var {
  AppRegistry,
  Image,
  ListView,
  StyleSheet,
  Text,
  View,
} = React;
添加布局参数
listView: {
    paddingTop: 20,
    backgroundColor: '#F5FCFF',
  },
修改布局
render: function() {
    if (!this.state.loaded) {
      return this.renderLoadingView();
    }

    return (
      <ListView
        dataSource={this.state.dataSource}
        renderRow={this.renderMovie}
        style={styles.listView}
      />
    );
  },
dataSource 是ListView的数据接口,在getInitialState 中初始化
getInitialState: function() {
    return {
      dataSource: new ListView.DataSource({
        rowHasChanged: (row1, row2) => row1 !== row2,
      }),
      loaded: false,
    };
  },
修改数据请求
fetchData: function() {
    fetch(REQUEST_URL)
      .then((response) => response.json())
      .then((responseData) => {
        this.setState({
          dataSource: this.state.dataSource.cloneWithRows(responseData.movies),
          loaded: true,
        });
      })
      .done();
  },
最终的运行结果
Done.


 1104
1104

 被折叠的 条评论
为什么被折叠?
被折叠的 条评论
为什么被折叠?
 到【灌水乐园】发言


