


我在上一篇文件中Android应用程序安装过程浅析粗略分析了一下Android应用程序安装过程,其中有一步说到了apk包的解析,但是没有详细分析,这里我们就来粗略分析一下包的解析过程。
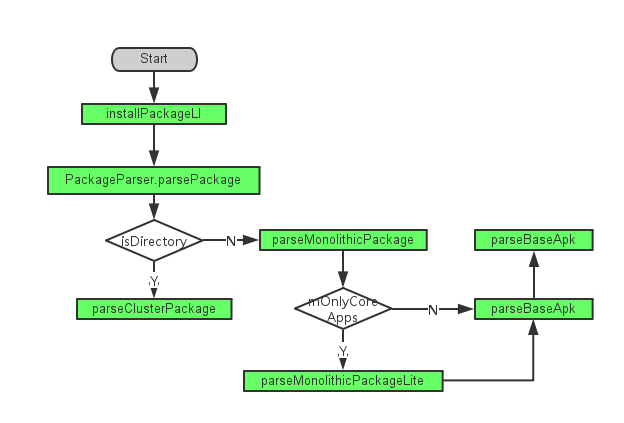
流程图
执行过程
从上面的流程图可以看到,包的解析过程比安装过程执行步骤少很多,也简单一点。那我们就来详细的一步一步的进行剖析一下,我们从外部调用该方法开始分析:
private void installPackageLI(InstallArgs args, PackageInstalledInfo res) {
    final int installFlags = args.installFlags;
    final String installerPackageName = args.installerPackageName;
    final String volumeUuid = args.volumeUuid;
    final File tmpPackageFile = new File(args.getCodePath());
    final boolean forwardLocked = ((installFlags & PackageManager.INSTALL_FORWARD_LOCK) != 0);
    final boolean onExternal = (((installFlags & PackageManager.INSTALL_EXTERNAL) != 0)
            || (args.volumeUuid != null));
    boolean replace = false;
    int scanFlags = SCAN_NEW_INSTALL | SCAN_UPDATE_SIGNATURE;
    if (args.move != null) {
        // moving a complete application; perfom an initial scan on the new install location
        scanFlags |= SCAN_INITIAL;
    }
    // Result object to be returned
    res.returnCode = PackageManager.INSTALL_SUCCEEDED;

    if (DEBUG_INSTALL) Slog.d(TAG, "installPackageLI: path=" + tmpPackageFile);
    // Retrieve PackageSettings and parse package
    final int parseFlags = mDefParseFlags | PackageParser.PARSE_CHATTY
            | (forwardLocked ? PackageParser.PARSE_FORWARD_LOCK : 0)
            | (onExternal ? PackageParser.PARSE_EXTERNAL_STORAGE : 0);
    PackageParser pp = new PackageParser();
    pp.setSeparateProcesses(mSeparateProcesses);
    pp.setDisplayMetrics(mMetrics);

    final PackageParser.Package pkg;
    try {
        pkg = pp.parsePackage(tmpPackageFile, parseFlags);
    } catch (PackageParserException e) {
        res.setError("Failed parse during installPackageLI", e);
        return;
    }

    // Mark that we have an install time CPU ABI override.
    pkg.cpuAbiOverride = args.abiOverride;

    String pkgName = res.name = pkg.packageName;
    if ((pkg.applicationInfo.flags&ApplicationInfo.FLAG_TEST_ONLY) != 0) {
        if ((installFlags & PackageManager.INSTALL_ALLOW_TEST) == 0) {
            res.setError(INSTALL_FAILED_TEST_ONLY, "installPackageLI");
            return;
        }
    }

    try {
        pp.collectCertificates(pkg, parseFlags);
        pp.collectManifestDigest(pkg);
    } catch (PackageParserException e) {
        res.setError("Failed collect during installPackageLI", e);
        return;
    }
    .......
}
可以看到在解析之前先构造了一个PackageParser,之后设置了mSeparateProcesses与mMetrics属性,mSeparateProcesses是一个数组,表示的独立的进程名列表,这个参数是在PackageManagerService的构造函数中调用的,以后会分析一下该函数是在什么地方调用的,这里就先看看mSeparateProcesses的获取过程:
String separateProcesses = SystemProperties.get("debug.separate_processes");
if (separateProcesses != null && separateProcesses.length() > 0) {
    if ("*".equals(separateProcesses)) {
        mDefParseFlags = PackageParser.PARSE_IGNORE_PROCESSES;
        mSeparateProcesses = null;
        Slog.w(TAG, "Running with debug.separate_processes: * (ALL)");
    } else {
        mDefParseFlags = 0;
        mSeparateProcesses = separateProcesses.split(",");
        Slog.w(TAG, "Running with debug.separate_processes: "
                + separateProcesses);
    }
} else {
    mDefParseFlags = 0;
    mSeparateProcesses = null;
}从系统属性中读取debug.separate_processes属性,如果改属性返回值不为空,表示设置了该属性,否则系统未设置改属性,如果值等于则mSeparateProcesses为空,如果不为,则逗号分隔该字符串,解析每个独立的进程名,那个debug.separate_processes究竟有什么用?是干什么的?我们来看看官方给出的解释:
Add android.separate_processes property you can use to force application components to run in their own process. There are two ways you can use this:
setprop debug.separate_processes - This will apply to every process in every package.
setprop debug.separate_processes “com.google.process.content,com.google.android.samples” - This will impact only the code whose manifest involves one of the given processes (here com.google.process.content com.google.android.samples)
– either as the manifest package name, or listed as an explicit android:process tag. Note that using this option will either split a process into parts (corresponding to the packages inside of it)or combine multiple processes into one (if they come from the same package). That is, it forces all impacted components to run in the process for their own .apk, regardless of what android:process attributes specify.
可以知道该属性可以强制使应用程序组件运行在他自己的进程,主要作为调试用。
mMetrics是一个描述界面显示,尺寸,分辨率,密度的类。我们说完了这两个参数,我们来看看parsePackage(tmpPackageFile, parseFlags);tmpPackageFile是包的存放路径,parseFlags为解析标识,返回值一个Package对象。我们来看看parsePackage函数:
public Package parsePackage(File packageFile, int flags) throws PackageParserException {
    if (packageFile.isDirectory()) {
        return parseClusterPackage(packageFile, flags);
    } else {
        return parseMonolithicPackage(packageFile, flags);
    }
}
如果传入的是一个文件目录,则表示有多个apk需要解析,否则单个apk需要解析,这我们就只看单个的解析,因为多个最终还是会一个一个调用单个解析。我们来根进单个解析代码看看执行逻辑:
public Package parseMonolithicPackage(File apkFile, int flags) throws PackageParserException {
    if (mOnlyCoreApps) {
        final PackageLite lite = parseMonolithicPackageLite(apkFile, flags);
        if (!lite.coreApp) {
            throw new PackageParserException(INSTALL_PARSE_FAILED_MANIFEST_MALFORMED,
                    "Not a coreApp: " + apkFile);
        }
    }

    final AssetManager assets = new AssetManager();
    try {
        final Package pkg = parseBaseApk(apkFile, assets, flags);
        pkg.codePath = apkFile.getAbsolutePath();
        return pkg;
    } finally {
        IoUtils.closeQuietly(assets);
    }
}
首先判断是不是mOnlyCoreApps,mOnlyCoreApps该标识表明解析只考虑应用清单属性有效的应用,主要是为了创建一个最小的启动环境,如果该标识为true则轻量级解析,调用parseMonolithicPackageLite来进行解析,返回一个PackageLite对象。我们就先看轻量级解析等会在返回看全部解析:
private static PackageLite parseMonolithicPackageLite(File packageFile, int flags)
        throws PackageParserException {
    final ApkLite baseApk = parseApkLite(packageFile, flags);
    final String packagePath = packageFile.getAbsolutePath();
    return new PackageLite(packagePath, baseApk, null, null, null);
}
parseMonolithicPackageLite内部又调用了parseApkLite函数并且返回一个ApkLite对象,根据返回的ApkLite对象和包的局对路径构造了一个PackageLite对象作为返回值。我们看看parseApkLite函数:
public static ApkLite parseApkLite(File apkFile, int flags)
        throws PackageParserException {
    final String apkPath = apkFile.getAbsolutePath();

    AssetManager assets = null;
    XmlResourceParser parser = null;
    try {
        assets = new AssetManager();
        assets.setConfiguration(0, 0, null, 0, 0, 0, 0, 0, 0, 0, 0, 0, 0, 0, 0, 0,
                Build.VERSION.RESOURCES_SDK_INT);

        int cookie = assets.addAssetPath(apkPath);
        if (cookie == 0) {
            throw new PackageParserException(INSTALL_PARSE_FAILED_NOT_APK,
                    "Failed to parse " + apkPath);
        }

        final DisplayMetrics metrics = new DisplayMetrics();
        metrics.setToDefaults();

        final Resources res = new Resources(assets, metrics, null);
        parser = assets.openXmlResourceParser(cookie, ANDROID_MANIFEST_FILENAME);

        final Signature[] signatures;
        if ((flags & PARSE_COLLECT_CERTIFICATES) != 0) {
            // TODO: factor signature related items out of Package object
            final Package tempPkg = new Package(null);
            collectCertificates(tempPkg, apkFile, 0);
            signatures = tempPkg.mSignatures;
        } else {
            signatures = null;
        }

        final AttributeSet attrs = parser;
        return parseApkLite(apkPath, res, parser, attrs, flags, signatures);

    } catch (XmlPullParserException | IOException | RuntimeException e) {
        throw new PackageParserException(INSTALL_PARSE_FAILED_UNEXPECTED_EXCEPTION,
                "Failed to parse " + apkPath, e);
    } finally {
        IoUtils.closeQuietly(parser);
        IoUtils.closeQuietly(assets);
    }
}
函数里首先初始化了一个AssetManager对象,一个DisplayMetrics对象,一个Resources,并且调用collectCertificates函数获取了应用的签名信息,这些对象都是后续解析中需要用到的,因此将这些参数传递给解析函数,解析完成后关闭资源管理器与解析器,这里主要是轻量级解析,只解析了包名,安装位置等少量信息,我们来看看解析过程:
private static ApkLite parseApkLite(String codePath, Resources res, XmlPullParser parser,
        AttributeSet attrs, int flags, Signature[] signatures) throws IOException,
        XmlPullParserException, PackageParserException {
    final Pair<String, String> packageSplit = parsePackageSplitNames(parser, attrs, flags);

    int installLocation = PARSE_DEFAULT_INSTALL_LOCATION;
    int versionCode = 0;
    int revisionCode = 0;
    boolean coreApp = false;
    boolean multiArch = false;
    boolean extractNativeLibs = true;

    for (int i = 0; i < attrs.getAttributeCount(); i++) {
        final String attr = attrs.getAttributeName(i);
        if (attr.equals("installLocation")) {
            installLocation = attrs.getAttributeIntValue(i,
                    PARSE_DEFAULT_INSTALL_LOCATION);
        } else if (attr.equals("versionCode")) {
            versionCode = attrs.getAttributeIntValue(i, 0);
        } else if (attr.equals("revisionCode")) {
            revisionCode = attrs.getAttributeIntValue(i, 0);
        } else if (attr.
最低0.47元/天 解锁文章


 1010
1010


 被折叠的 条评论
为什么被折叠?
被折叠的 条评论
为什么被折叠?
 到【灌水乐园】发言


