http://mrfu.me/2016/02/27/Glide_Loading_Images_into_Notifications_and_AppWidgets/
加载图片到 Notifications
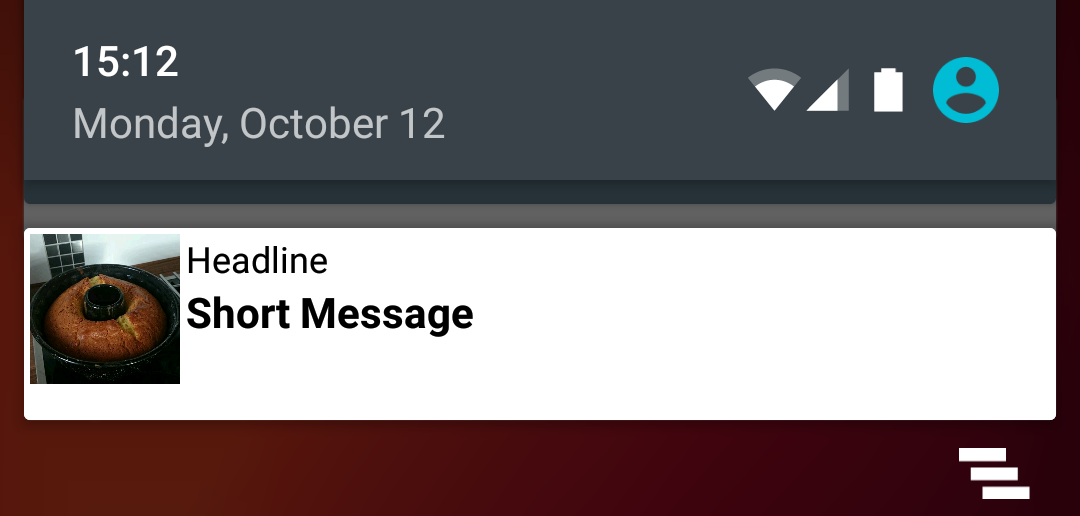
通知栏图标对用户来说是重要的上下文。用 NotificationCompat.Builder 来直接设置大的通知图片,但是图像必须以 Bitmap 的形式。如果图片在手机上已经是可用的,这并没什么问题。然而,如果图片斌不在设备上并且需要从网上加载的话,使用标准的方式来处理就变得不可能了。
让 Glide 来做吧。上篇博客中,我们看了如何用 SimpleTarget 将图片以 Bitmap 的形式下载下来。理论上说,你可以利用这种方式去加载图片到你的通知栏中。但这并不是必须的,因为 Glide 提供了一个更加方便舒适的方式:NotificationTarget。
NotificationTarget
所以,让我们来看代码。现在你知道 Glide target 是如何工作的了,因此我们不会再去用它了。为了显示一张大图片在通知栏,你可以使用 RemoteViews 并显示一个自定义的通知栏。
我们自定义的通知栏比较简单:
自定义布局remoteview_notification.xml
<?xml version="1.0" encoding="utf-8"?>
<LinearLayout
    xmlns:android="http://schemas.android.com/apk/res/android"
    android:layout_width="match_parent"
    android:layout_height="wrap_content"
    android:background="@android:color/white"
    android:orientation="vertical">
    <LinearLayout
        android:layout_width="match_parent"
        android:layout_height="wrap_content"
        android:orientation="horizontal"
        android:padding="2dp">
        <ImageView
            android:id="@+id/remoteview_notification_icon"
            android:layout_width="50dp"
            android:layout_height="50dp"
            android:layout_marginRight="2dp"
            android:layout_weight="0"
            android:scaleType="centerCrop"/>
        <LinearLayout
            android:layout_width="0dp"
            android:layout_height="wrap_content"
            android:layout_weight="1"
            android:orientation="vertical">
            <TextView
                android:id="@+id/remoteview_notification_headline"
                android:layout_width="match_parent"
                android:layout_height="wrap_content"
                android:ellipsize="end"
                android:singleLine="true"
                android:textSize="12sp"/>
            <TextView
                android:id="@+id/remoteview_notification_short_message"
                android:layout_width="match_parent"
                android:layout_height="wrap_content"
                android:ellipsize="end"
                android:paddingBottom="2dp"
                android:singleLine="true"
                android:textSize="14sp"
                android:textStyle="bold"/>
        </LinearLayout>
    </LinearLayout>
</LinearLayout>
下面的代码用了上面的布局文件为我们创建了一个自定义通知。
final RemoteViews rv = new RemoteViews(context.getPackageName(), R.layout.remoteview_notification);

rv.setImageViewResource(R.id.remoteview_notification_icon, R.mipmap.future_studio_launcher);

rv.setTextViewText(R.id.remoteview_notification_headline, "Headline");
rv.setTextViewText(R.id.remoteview_notification_short_message, "Short Message");

// build notification
NotificationCompat.Builder mBuilder =
    new NotificationCompat.Builder(context)
        .setSmallIcon(R.mipmap.future_studio_launcher)
        .setContentTitle("Content Title")
        .setContentText("Content Text")
        .setContent(rv)
        .setPriority( NotificationCompat.PRIORITY_MIN);

final Notification notification = mBuilder.build();

// set big content view for newer androids
if (android.os.Build.VERSION.SDK_INT >= 16) {
    notification.bigContentView = rv;
}

NotificationManager mNotificationManager = (NotificationManager) context.getSystemService(Context.NOTIFICATION_SERVICE);
mNotificationManager.notify(NOTIFICATION_ID, notification);
这个代码片段为我们创建了三个重要的对象, notification 和 RemoteViews 以及常量 NOTIFICATION_ID。我们会需要这些去创建一个通知 target。
private NotificationTarget notificationTarget;

...

notificationTarget = new NotificationTarget(
    context,
    rv,
    R.id.remoteview_notification_icon,
    notification,
    NOTIFICATION_ID);
最后,我们要调用 Glide,正如我们之前博客所做的,将 target 作为 .into() 的参数。
Glide
    .with( context.getApplicationContext() ) // safer!
    .load( eatFoodyImages[3] )
    .asBitmap()
    .into( notificationTarget );
App Widgets
让我们来看另一个 Glide target。 应用小部件一直以来都是 Android 的一部分。如果你的 App 提供了小部件并且包含图像,这部分应该会让你感兴趣的。 Glide 的AppWidgetTarget 能显著的让你非常简单的实现。
来看看一个简单的 AppWidgetProvider 实例:
public class FSAppWidgetProvider extends AppWidgetProvider {

    private AppWidgetTarget appWidgetTarget;

    @Override
    public void onUpdate(Context context, AppWidgetManager appWidgetManager,
                         int[] appWidgetIds) {

        RemoteViews rv = new RemoteViews(context.getPackageName(), R.layout.custom_view_futurestudio);

        appWidgetTarget = new AppWidgetTarget( context, rv, R.id.custom_view_image, appWidgetIds );

        Glide
                .with( context.getApplicationContext() ) // safer!
                .load( GlideExampleActivity.eatFoodyImages[3] )
                .asBitmap()
                .into( appWidgetTarget );

        pushWidgetUpdate(context, rv);
    }

    public static void pushWidgetUpdate(Context context, RemoteViews rv) {
        ComponentName myWidget = new ComponentName(context, FSAppWidgetProvider.class);
        AppWidgetManager manager = AppWidgetManager.getInstance(context);
        manager.updateAppWidget(myWidget, rv);
    }
}
几行重要的代码声明了 appWidgetTarget 对象以及 Glide 的建造者。这里的好处是,你不需要去定制 AppWidgetTarget 并重写任何 AppWidgetTarget 方法。Glide 都自动帮你做好了。太棒了!
关注我的公众号,轻松了解和学习更多技术


 776
776

 被折叠的 条评论
为什么被折叠?


