


使用TextInputLayout可以轻松的实现带友好提示的输入框,并且带有Material Design的动画提示,下面我们来看下使用过程.
导入Gradle
TextInputLayout在Design包下
compile 'com.android.support:design:24.0.0-beta1'为每个TextInputLayout包裹一个EditText
TextInputLayout其实就是输入框的布局文件,只接受一个子View,必须是EditView
完整布局文件如下:
<?xml version="1.0" encoding="utf-8"?>
<LinearLayout xmlns:android="http://schemas.android.com/apk/res/android"
xmlns:tools="http://schemas.android.com/tools"
android:layout_width="match_parent"
android:layout_height="match_parent"
android:background="#eeeeee"
android:orientation="vertical"
android:paddingLeft="3dp"
android:paddingRight="3dp"
tools:context="com.example.yangtianrui.textinputlayout.MainActivity">
<RelativeLayout
android:layout_width="wrap_content"
android:layout_height="wrap_content"
android:layout_weight="0.5">
<TextView
android:layout_width="match_parent"
android:layout_height="wrap_content"
android:layout_centerInParent="true"
android:gravity="center"
android:text="Welcome"
android:textColor="#777777"
android:textSize="45sp" />
</RelativeLayout>
<LinearLayout
android:layout_width="match_parent"
android:layout_height="wrap_content"
android:layout_weight="0.5"
android:orientation="vertical">
<!-- 输入框的布局文件,只接受一个子View,必须是EditView -->
<android.support.design.widget.TextInputLayout
android:id="@+id/id_til_user_wrapper"
android:layout_width="match_parent"
android:layout_height="wrap_content">
<EditText
android:id="@+id/id_et_username"
android:layout_width="match_parent"
android:layout_height="wrap_content"
android:inputType="textCapCharacters" />
</android.support.design.widget.TextInputLayout>
<android.support.design.widget.TextInputLayout
android:id="@+id/id_til_pwd_wrapper"
android:layout_width="match_parent"
android:layout_height="wrap_content"
android:layout_marginTop="15dp">
<EditText
android:id="@+id/id_et_password"
android:layout_width="match_parent"
android:layout_height="wrap_content"
android:inputType="textPassword" />
</android.support.design.widget.TextInputLayout>
<android.support.design.widget.TextInputLayout
android:id="@+id/id_til_verify_wrapper"
android:layout_width="match_parent"
android:layout_height="wrap_content">
<EditText
android:id="@+id/id_et_verify"
android:layout_width="match_parent"
android:layout_height="wrap_content"
android:inputType="textPassword" />
</android.support.design.widget.TextInputLayout>
<Button
android:id="@+id/id_btn_login"
android:layout_width="match_parent"
android:layout_height="wrap_content"
android:layout_marginTop="4dp"
android:text="login" />
</LinearLayout>
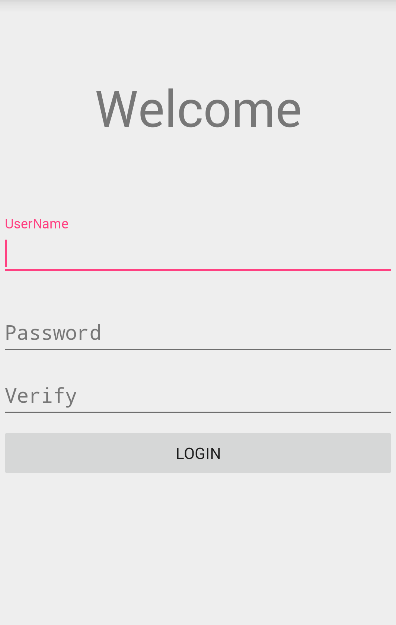
</LinearLayout>设置Hint(友好的上下文提示)
只需要给TextInputLayout的对象设置Hint属性就好了,会自动生成Material Design 动画效果.
// 设置Hint实现浮动提示
mTilPwd.setHint("Password");
mTilUser.setHint("UserName");
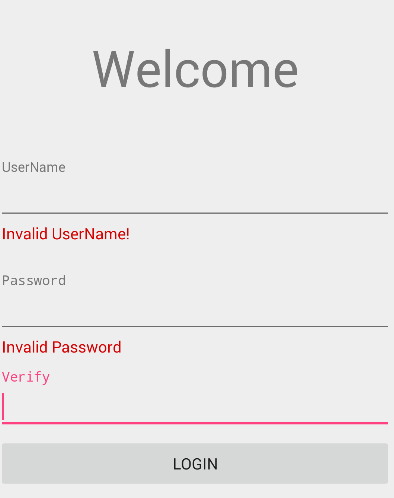
mTilVerify.setHint("Verify");设置Error提示
有两个方法设置Error提示,使用setErrorable(true),设置为显示错误提示,setError()显示错误信息,使用setError(null),关闭错误信息
// 对错误消息进行处理
isCorrect = true;
// 表示没有错误
mTilPwd.setError(null);
mTilUser.setError(null);
if (!validate(userName)) {
    mTilUser.setError("Invalid UserName!");
    isCorrect = false;
}
if (!validate(password) || !verifyPwd(password, verify)) {
    mTilPwd.setError("Invalid Password");
    isCorrect = false;
}
// 输入正确
if (isCorrect) {
    // 关闭错误提醒功能
    mTilUser.setErrorEnabled(false);
    mTilPwd.setErrorEnabled(false);
    doLogin(userName, password);
}
错误提示
Bmob 后端云实现注册
直接使用BmobUser即可,调用signup方法并实现回调
/**
 * 将用户信息注册到Bmob后台
 */
private void doLogin(String userName, String password) {
    BmobUser user = new BmobUser();
    user.setUsername(userName);
    user.setPassword(password);
//        user.setEmail("sendi@163.com");
    user.signUp(this, new SaveListener() {
        @Override
        public void onSuccess() {
            Toast.makeText(MainActivity.this, "注册成功!", Toast.LENGTH_SHORT).show();
        }

        @Override
        public void onFailure(int i, String s) {
            Toast.makeText(MainActivity.this, s, Toast.LENGTH_SHORT).show();
        }
    });
}
完整代码
public class MainActivity extends AppCompatActivity {

    private TextInputLayout mTilUser;
    private TextInputLayout mTilPwd;
    private TextInputLayout mTilVerify;
    private Button mBtnLogin;
    private boolean isCorrect = true; // 输入正确

    @Override
    protected void onCreate(Bundle savedInstanceState) {
        super.onCreate(savedInstanceState);
        setContentView(R.layout.activity_main);
        Bmob.initialize(this, "887fb8cdafa392424a938a99673a2088"); // 你的App ID
        mTilPwd = (TextInputLayout) findViewById(R.id.id_til_pwd_wrapper);
        mTilUser = (TextInputLayout) findViewById(R.id.id_til_user_wrapper);
        mTilVerify = (TextInputLayout) findViewById(R.id.id_til_verify_wrapper);
        mBtnLogin = (Button) findViewById(R.id.id_btn_login);

        // 设置Hint实现浮动提示
        mTilPwd.setHint("Password");
        mTilUser.setHint("UserName");
        mTilVerify.setHint("Verify");
        // 进行错误处理
        mBtnLogin.setOnClickListener(new View.OnClickListener() {
            @Override
            public void onClick(View v) {
                // 隐藏系统键盘
                if (getCurrentFocus() != null) {
                    InputMethodManager manager = (InputMethodManager) getSystemService(INPUT_METHOD_SERVICE);
                    manager.hideSoftInputFromWindow(getCurrentFocus().getWindowToken()
                            , InputMethodManager.HIDE_NOT_ALWAYS);
                }
                // 获取输入的数值
                String userName = mTilUser.getEditText().getText().toString();
                String password = mTilPwd.getEditText().getText().toString();
                String verify = mTilVerify.getEditText().getText().toString();
                // 对错误消息进行处理
                isCorrect = true;
                // 表示没有错误
                mTilPwd.setError(null);
                mTilUser.setError(null);
                if (!validate(userName)) {
                    mTilUser.setError("Invalid UserName!");
                    isCorrect = false;
                }
                if (!validate(password) || !verifyPwd(password, verify)) {
                    mTilPwd.setError("Invalid Password");
                    isCorrect = false;
                }
                // 输入正确
                if (isCorrect) {
                    // 关闭错误提醒功能
                    mTilUser.setErrorEnabled(false);
                    mTilPwd.setErrorEnabled(false);
                    doLogin(userName, password);
                }
            }
        });
    }

    /**
     * 将用户信息注册到Bmob后台
     */
    private void doLogin(String userName, String password) {
        BmobUser user = new BmobUser();
        user.setUsername(userName);
        user.setPassword(password);
//        user.setEmail("sendi@163.com");
        user.signUp(this, new SaveListener() {
            @Override
            public void onSuccess() {
                Toast.makeText(MainActivity.this, "注册成功!", Toast.LENGTH_SHORT).show();
            }

            @Override
            public void onFailure(int i, String s) {
                Toast.makeText(MainActivity.this, s, Toast.LENGTH_SHORT).show();
            }
        });
    }


    /**
     * 验证规则
     */
    private boolean validate(String content) {
        return content.length() > 6;
    }

    /**
     * 验证密码
     */
    private boolean verifyPwd(String pwd, String verify) {
        return pwd.equals(verify);
    }

}


 125
125

 被折叠的 条评论
为什么被折叠?
被折叠的 条评论
为什么被折叠?
 到【灌水乐园】发言


