参考文档:
Oracle® Fusion Middleware Installation Guide for Oracle WebLogic Server
12c Release 1 (12.1.1)
Part Number E24492-03
安装前系统的准备
System Requirements
| Component | Requirement |
|---|---|
| Platform configuration | A supported configuration of hardware, operating system, JDK, and database specific to the product you are installing. For the most up-to-date information about other prerequisites and recommendations, such as recommended versions of the JDK, see the Oracle Fusion Middleware Supported System Configurations page at |
| JDK | The installation program requires a Java run-time environment (JRE) to run. A JRE is bundled in the Windows 32-bit and Linux x86 installation programs, as well as in some UNIX installation programs (those with file names ending in ----〉bin and exe文件包含了jre环境 For other platforms, the installation program does not install a JDK. File names for these installation programs end in Note: It is important that you use a JDK because the installation process assigns values to -----〉其他通用的jar安装文件,服务器必须先安装jdk,设定JAVA_HOME,和path包含java |
WebLogic Server Installation User
The user account you use when installing WebLogic Server is important. Please review the following information before deciding which user account to use:
-
If you are using the Generic Package installer or the Linux 64-bit installer, Oracle recommends that you set the
umaskto027on your system prior to installation. This ensures that WebLogic Server file permissions will be set properly during installation. Use the following command:umask 027You must enter this command in the same terminal window from which you plan to run the WebLogic Server installer.
-
When installing WebLogic Server on a UNIX or Linux operating system, do not run the installation program as the root user.
-
When using a WebLogic Server Upgrade installer to upgrade an existing WebLogic Server installation on Linux or UNIX operating systems, you must run the Upgrade installer using the same user ID as was used to perform the initial WebLogic Server installation.
-
On Windows systems, if you want the option to create the Start menu shortcuts in the All Users folder, or in the Local User's Start menu folder, you must use an account that hasadministrator privileges --(系统管理员权限)when you log in to the target system. SeeAdministrator Privileges, for more information.
安装目录介绍
The following illustration shows the basic Middleware home and Middleware products directory structure. Additional directories and files are also located in the Middleware home directory, as described inTable 2-4. The user_projects directory is not present until you create your first WebLogic domain.
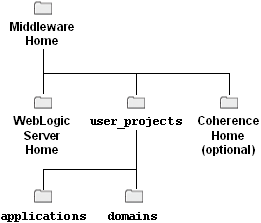
Table 2-4 Directory Description for Middleware Home
| Directory or file | Description |
|---|---|
| jdk | This directory contains the software for the Sun JDK if it is installed with your software. The JDK provides the Java run-time environment (JRE) and tools for compiling and debugging Java applications. |
| jrockit_ (Windows and Linux only) | This directory contains the software for the JRockit JDK installed with your software. The JDK provides the Java run-time environment (JRE) and tools for compiling and debugging Java applications. |
| logs | This directory contains a history file, which has information about installation and uninstallation for the Middleware home directory.-----〉安装和卸载日志 |
| modules | This directory contains the modules installed in the home directory. |
| utils | This directory contains utilities that are used to support the installation of all products installed in this home directory. For more information on installing patches and patch sets, seeOracle Smart Update Installing Patches and Maintenance Packs. |
| wlserver_version | The WebLogic Server home directory. |
| coherence_version | The Coherence home directory. |
| .home | This file contains the information about the Middleware home directory. |
| ocm.rsp | This response file contains information about the Oracle Configuration Manager (OCM) installation. |
| registry.xml | This registry file contains a persistent record of all WebLogic products installed on the target system. This registry contains product-related information, such as version number, patch set level, patch level, and location of the product installation directories. It also contains the name of the installed JDK(s) and the Java home. Note: Do not edit this file manually. Doing so may cause operating problems for the currently installed WebLogic products, or result in installation problems when future products or maintenance upgrades are installed. |
| registry.dat | This is an encrypted version of the |
| domain-registry.xml | This registry file contains the location of all domains currently registered with this WebLogic Server installation. Whenever you add a new domain, it is registered in this file. |
Notes:
Once you create WebLogic domains and applications, the Middleware home directory also contains a directory in which they are stored (the default location isuser_projects). This directory contains applications anddomains sub-directories. The applications directory contains a sub-directory for each application you create, and thedomains directory contains a sub-directory for each domain you create.
You may want to create all domains for your environment outside of the Middleware home directory. This makes it easier for you to remove an existing installation, or upgrade to a newer version of WebLogic Server, without having to recreate your domains and applications.
Creating Multiple Home Directories-----创建多个weblogic middleware home
Although in most situations, a single Middleware home directory is sufficient, it is possible to create more than one Middleware home directory. For example, you need to maintain multiple Middleware home directories in the following situations:
-
You prefer to maintain separate development and production environments, with a separate product stack for each. With two directories, you can update your development environment without modifying the production environment until you are ready to do so.
-
You want to maintain two different versions of WebLogic Server at the same time. For example, you may want to install a new version of WebLogic Server while keeping your existing version of WebLogic Server intact. In this case, you must install each WebLogic Server version in its own Middleware home directory.
Note:-----两个不同版本的weblogic server版本
You do not have to create a second Middleware home directory when using an Upgrade installer to upgrade an existing WebLogic Server installation to the current patch release. For example, if you are upgrading from WebLogic Server 10.3.1 to WebLogic Server 10.3.6 using an Upgrade installer, when running the WebLogic Server 10.3.6 Upgrade installer, you must select the Middleware home directory in which WebLogic Server 10.3.1 resides.
-
The
registry.xmlfile in your WebLogic Server installation is corrupted. -
After installation, the shared modules directory would contain multiple versions of one or more of the same third-party products.
Generating a Verbose Installation Log
If you launch the installation from the command line or from a script, you can specify the-log option to generate a verbose installation log. The installation log stores messages (informational, warning, error, and fatal) about events that occur during the installation process. This type of file can be especially useful for silent installations.
Note:
You may see a few warning messages in the installation log. However, unless a fatal (irrecoverable) error occurs, the installation program completes the installation successfully. The installation user interface indicates the success or failure of each installation attempt, and the installation log file includes an entry indicating that the installation was successful.
To create a verbose log file during installation, include the -log=full_path_to_log_file option in the command line.
For example, to create a verbose log file for the WebLogic Server Package installer for Windows, enter:
wls1034_win32.exe -log=C:\logs\server_install.log
The path must specify a file. You cannot create a folder simply by including a name for it in a pathname; your path should specify only existing folders. If your path includes a nonexistent folder when you execute the command, the installation program does not create the log file.
weblogic 安装
Running the Installation Program in Graphical Mode---图像安装
This chapter describes how to start the installation program in graphical mode in different environments. It also describes the sequence of screens that may appear in the installation process.
Note:
In order to run the installation program in graphical mode, the console attached to the machine on which you are installing the software must support a Java-based GUI. All consoles for Windows systems support Java-based GUIs, but not all consoles for UNIX systems do. If you attempt to start the installation program in graphical mode on a system that cannot support graphical display, the installation program automatically starts in console mode.
This chapter contains the following sections:
Starting the Installation Program in Graphical Mode
The following sections describe how to start the installation program in graphical mode in different environments:
-
Starting the Installation Program in Graphical Mode on Windows
-
Starting .bin Installation Programs in Graphical Mode on UNIX Machines
Starting the Installation Program in Graphical Mode on Windows
To start the installation program in graphical mode on a Windows platform, follow these steps.
-
Log in to the Windows system.
-
Go to the directory that contains the installation program.
-
Double-click the installation file.
For example, the name of the installation program for the WebLogic Server Package installer for Windows 32-bit is
wls1036_win32.exe.The installation program begins to install the software.
See Installation Screens for a description of each installation program screen.
Starting .bin Installation Programs in Graphical Mode on UNIX Machines
To start the graphical-mode installation process with .bin installation files, follow these steps.
-
Log in to the target UNIX system.
-
Go to the directory that contains the installation program.
-
Launch the installation by entering the following commands:
chmod a+xfile_name.bin./file_name.binfile_name.binis the name of your installation program. For example, for WebLogic Server 12.1.1, the name of the Package installer file for Solaris iswls1211_solaris32.bin.Note:
If you plan to install the Server Examples, you must include the following parameter in the installation command. Otherwise, the installation may take longer than expected.
-Djava.security.egd=file:/dev/./urandomThe installation program begins to install the software.
See Installation Screens for a description of each installation program screen.
Starting .jar installation Programs in Graphical Mode
To start the installation program in graphical mode for installation files with names ending in.jar, perform the following steps.
Notes:
If you are installing WebLogic Server on a 64-bit platform, see Installing WebLogic Server on 64-Bit Platforms Using a 64-Bit JDK, for more information.
If you are installing WebLogic Server on a UNIX or Linux operating system, you must include the following parameter in the installation command if you plan to install the Server Examples. Otherwise, the installation may take longer than expected.
-Djava.security.egd=file:/dev/./urandom
-
Log in to the target system.
-
Add the directory of the appropriate JDK to the
PATHvariable definition on the target system. For example, on UNIX or Linux systems, add thebindirectory to the beginning of thePATHvariable:PATH=$JAVA_HOME/bin:$PATH; export PATH -
Go to the directory where you downloaded the installation program.
-
Launch the installation program by entering the following command (this example shows the Generic installer):
java -jar wls1036_generic.jarThe installation program begins to install the software.
See Installation Screens for a description of each installation program screen.
Installing WebLogic Server on 64-Bit Platforms Using a 64-Bit JDK---JDK的位数决定了weblogic
If you are installing WebLogic Server on a 64-bit platform using a .jar installation program:
-
Add the directory of the appropriate JDK to the
PATHvariable definition on the target system. For example, on UNIX, add thebindirectory of the appropriate 64-bit JDK to the beginning of thePATHvariable definition on the target system:JAVA_HOME=path_to_64-bit_JDK; export JAVA_HOMEPATH=$JAVA_HOME/bin:$PATH; export PATH -
(UNIX or Linux only) Include the
-d64flag in the installation command when using a 32/64-bit hybrid JDK (such as for the HP-PA, HPIA, and Solaris64 platforms). For example, if installing in graphical mode using the Package installer:java -d64 -jar wlsversion_generic.jar -
Run the
java -versioncommand (orjava -d64 -versioncommand on UNIX or Linux platforms using a 32/64-bit hybrid JDK) to ensure that yourJAVA_HOMErefers to a 64-bit JDK. -
If you are using the Sun 64-bit JDK, use the following command to install WebLogic Server:
java -Xmx1024m -jar wlsversion_generic.jar
Running the Installation Program in Console Mode
This chapter describes how to run the WebLogic Server installer in console mode in different operating system environments.
When installing WebLogic Server in console mode, respond to the prompts in each section by entering the number associated with your choice or by pressing Enter to accept the default. To exit the installation process, enterexit (or x) in response to any prompt. To review or change your selection, enterprevious (or p) at the prompt. To proceed to the following window, enternext (or n).
Note:
In the sample console text and directory path names provided in this section, Windows conventions (such as backslashes in path names) are used, for example,C:\Oracle\MW_HOME\wlserver_version. When entering path names on a UNIX system, be sure to use UNIX conventions. For example, use forward slashes in path names, such as C:/Oracle/MW_HOME/wlserver_version.
This chapter contains the following sections:
Starting the Installation Program in Console Mode
This section describes how to start the installation program in console mode in different environments. It contains the following sections:
Starting the Installation Program in Console Mode on Windows
To start the installation program in console mode on a Windows platform, follow these steps:
-
Log in to the target Windows system.
-
Open a command prompt window.
-
Go to the directory that contains the installation program.
-
Launch the installation by entering the name of the installation program.
For example, to start the WebLogic Server Package installer for Windows in console mode, enter
wls1036_win32.exe -mode=console
Note:
You can include the -log=full_path_to_log_file option in the command line to create a verbose installation log.
For more information, see Generating a Verbose Installation Log.
After a few moments, the installation program begins to install the software. Proceed toInstalling WebLogic Server in Console Mode, to continue.
Starting .bin Installation Programs in Console Mode
To start the installation program in console mode using a .bin installation file, follow these steps:
-
Log in to the target UNIX system.
-
Go to the directory that contains the installation program.
-
Launch the installation by entering the following commands:
chmod a+xfile_name.bin./file_name.bin-mode=console
file_name.bin is the name of your installation program. For example, for WebLogic Server 12.1.1, the name of the Package installer file for Solaris iswls1211_solaris32.bin.
Note:
If you plan to install the Server Examples, you must include the following parameter in the installation command. Otherwise, the installation may take longer than expected.
-Djava.security.egd=file:/dev/./urandom
After a few moments, the installation program begins to install the software. Proceed toInstalling WebLogic Server in Console Mode, to continue.
Starting .jar Installation Programs in Console Mode
To start the installation program in console mode using a .jar installation file, follow these steps.
Note:
If you are installing WebLogic Server on a 64-bit platform, see Installing WebLogic Server on 64-Bit Platforms Using a 64-Bit JDK, for more information.
If you are installing WebLogic Server on a UNIX or Linux operating system, you must include the following parameter in the installation command if you plan to install the Server Examples. Otherwise, the installation may take longer than expected.
-Djava.security.egd=file:/dev/./urandom
-
Log in to the target system.
-
Add the directory of the appropriate JDK to the
PATHvariable definition on the target system. For example, on UNIX or Linux systems, add thebindirectory to the beginning of thePATHvariable:PATH=$JAVA_HOME/bin:$PATH; export PATH -
Go to the directory where you downloaded the installation program.
-
Launch the installation by entering the following command:
java -jarfile_name.jar -mode=consolefile_name.jaris the name of the installation file.
After a few moments, the installation program begins to install the software. Proceed toInstalling WebLogic Server in Console Mode, to continue.
Installing WebLogic Server on 64-Bit Platforms Using a 64-Bit JDK
If you are installing WebLogic Server on a 64-bit platform using a .jar installation program:
-
Add the directory of the appropriate JDK to the
PATHvariable definition on the target system. For example, on UNIX, add thebindirectory of the appropriate 64-bit JDK to the beginning of thePATHvariable definition on the target system:JAVA_HOME=path_to_64-bit_JDK; export JAVA_HOMEPATH=$JAVA_HOME/bin:$PATH; export PATH -
(UNIX or Linux only) Include the
-d64flag in the installation command when using a 32/64-bit hybrid JDK (such as for the HP-PA, HPIA, and Solaris64 platforms). For example, if installing in graphical mode using the Package installer:java -d64 -jar wlsversion_generic.jar -mode=console -
Run the
java -versioncommand (orjava -d64 -versioncommand on UNIX or Linux platforms using a 32/64-bit hybrid JDK) to ensure that yourJAVA_HOMErefers to a 64-bit JDK. -
If you are using the Sun 64-bit JDK, use the following command to install WebLogic Server:
java -Xmx1024m -jar wlsversion_generic.jar -mode=console
weblogic server安装之后
This chapter describes common post-installation tasks and information, including how to use QuickStart and how create a WebLogic domain. It also describes how to determine your JDK version, the Node Manager service, Windows shortcuts, upgrading, and patch installation. It also includes a section on how to configure domains to use the latest JRockit version.
The following sections are included in this chapter:
Using QuickStart
When the product installation is completed using graphical-mode installation, the QuickStart application is launched automatically by default. If you do not want to run QuickStart at the completion of the installation process, you can clear theRun QuickStart check box in the Install Complete screen. QuickStart is not invoked for console-mode or silent-mode installations.
QuickStart is designed to help first-time users evaluate, learn, and use WebLogic Server.
For example, the QuickStart application for WebLogic Server provides quick access to the following tasks:
-
Getting started with WebLogic Server
-
Starting the WebLogic Server samples domain
-
Upgrading WebLogic domains to the current version
-
Accessing documentation online
After installation, you can launch QuickStart as follows:
-
On Windows systems, choose Start > Programs > Oracle WebLogic > QuickStart.
-
On UNIX systems:
-
Log in to the target UNIX system.
-
Go to the
/common/quickstartsubdirectory of your installation. For example:cd /MW_HOME/wlserver_12.1/common/quickstart -
Enter the following command:
sh quickstart.sh
-
Determining Which JDK Version You Are Using
You can determine which version of the JDK you are using by issuing a command, as follows:
-
Open a command prompt window and go to the appropriate directory:
Windows system:
WL_HOME\server\binUNIX system:
WL_HOME/server/bin -
Make sure that your environment is set up properly by entering the following command at the prompt:
Windows:
setWLSenv.cmdUNIX:
. ./setWLSenv.sh -
Enter the following command at the prompt:
java -versionIf you are using JRockit,
JRockit(R)is displayed in the output.
Creating a WebLogic Domain
After you install WebLogic Server, you can create a WebLogic domain. There are several ways to create a WebLogic domain:
-
Use the Fusion Middleware Configuration Wizard to create a domain using one or more domain templates.
If you are installing other Fusion Middleware products, such as SOA or WebCenter, this is the recommended method. For example, after you complete the SOA product installation, it includes domains templates that make it easy for you to create a WebLogic domain for SOA that contains the required domain resources, such as an Administration Server, Managed Servers, clusters, and JDBC resources.
If you are not installing other Fusion Middleware products, you can create a new domain by using the starter domain template,
wls_starter.jar, which is available in the following folder.WL_HOME\common\templates\domainsThe
wls_starter.jartemplate contains the default domain configuration settings and an application that provides a welcome page to help you get started.For more information about creating a WebLogic domain by using an existing domain template, see"Creating a WebLogic Domain" in Creating Domains Using the Configuration Wizard.
-
Use the WebLogic Scripting Tool to create a domain. See "Creating WebLogic Domains Offline" in Oracle WebLogic Scripting Tool.
-
Use the
unpackcommand to create a domain. You can use this command to create a WebLogic domain from the command line, by using a template that is compatible with your current installation. See"The unpack Command" in Creating Templates and Domains Using the Pack and Unpack Commands.Note:
You cannot use
unpackto extend an existing domain.
Installing and Uninstalling the Node Manager Service
On Windows machines, if you did not install the Node Manager Windows Service when you initially installed WebLogic Server, you can use the following steps to install it:
-
Log in to the machine with Administrator privileges.
-
Open a DOS command prompt window.
-
Change to the
WL_HOME\server\bindirectory, whereWL_HOMEis the WebLogic Server home directory (C:\Oracle\Middleware\wlserver_12.1by default). -
Enter the following command:
installNodeMgrSvc.cmd -
After a few seconds, the following message is displayed:
Oracle WebLogic NodeManager (C_Oracle_Middleware_wlserver_12.1) installed.
The service is installed using the default Node Manager listen port (
5556). If this listen port is already in use, the program prompts you to enter a different listen port.
Note:
If the Node Manager Windows Service is already installed, the following message is displayed instead:
CreateService failed - The specified service already exists.
If you want to uninstall the Node Manager Windows Service, use the following steps:
-
Log in to the machine with Administrator privileges.
-
Open a DOS command prompt window.
-
Change to the
WL_HOME\server\bindirectory, whereWL_HOMEis the WebLogic Server home directory (C:\Oracle\Middleware\wlserver_12.1by default). -
Enter the following command:
uninstallNodeMgrSvc.cmd -
After a few seconds, the following message is displayed:
Oracle WebLogic NodeManager (C_Oracle_Middleware_wlserver_12.1) removed.
Understanding the Windows Shortcuts
When you install your software on a Windows system, the installation program automatically creates shortcut entries on the Start Menu.
Note:
If the user performing the installation has Administrator privileges, the shortcut entries can be created in theAll Users Start menu folder or in the Local User Start menu folder. For more information, see Administrator Privileges.
The options in the Start > Programs > Oracle WebLogic menu vary, according to the components you installed.
-
WebLogic Server 12cR1—Contains a shortcut for launching the default WebLogic domain, examples, tools, and online documentation.
-
The WebLogic Server domain enables you to run pre-built WebLogic Server code samples, deploy Java EE applications, and quickly serve JSPs or HTML pages. You can also use this domain as a place to test your applications during development.
-
If you installed the Server Examples, the Examples folder contains shortcuts for starting and stopping the example servers, as well as a shortcut to launch the WebLogic Server Code Examples documentation.
-
The Tools folder contains shortcuts to launch the WebLogic Server tools (Configuration Wizard, Domain Template Builder, Domain Upgrade Wizard, Node Manager, and WebLogic Scripting Tool).
-
-
Online Documentation—Provides a link to the online documentation.
-
QuickStart—Starts the QuickStart application designed to assist first-time users with evaluating, learning, and using the software.
-
Smart Update—Launches the Smart Update program, which you can use to install patches that you downloaded from My Oracle Support.
-
Uninstall Oracle WebLogic—Launches the uninstallation program. For more information, seeChapter 7, "Uninstalling the Software."
Note:
After you create domains, the name of the directory in which your domain directories are stored is also displayed on theOracle WebLogic menu. The default is user_projects. This menu entry allows you to start and stop the Administration Server, or start the Administration Console, for a given domain.
Upgrading WebLogic Server
If you are upgrading your WebLogic Server installation from an earlier version (for example from a 9.x release to a 10.x release), seeUpgrade Guide for Oracle WebLogic Server. This document explains how to upgrade the entire WebLogic Server environment, including applications, the WebLogic domains in which they are deployed, and any application data associated with the domain. This may include external resources, such as database servers, firewalls, load balancers, and LDAP servers.
Installing Patches
Oracle Smart Update is a standalone Java application that is automatically installed in the Middleware homeutils/bsu directory. Smart Update simplifies the process of applying patches to your WebLogic Server installation. When support makes a patch available for an installed version of WebLogic Server, you download the patch from My Oracle Support and then use Oracle Smart Update to apply it to your installation. Smart Update organizes all available updates for you, and has several features that allow a great deal of customizing in the way various patches are applied and managed in your environment.For information about using Smart Update, see Oracle Smart Update Installing Patches and Maintenance Packs.
Note:
As of WebLogic Server 10.3.4, you can no longer use Smart Update to download and install WebLogic Server patch set releases.
Note:
If you also need to install patches for other Fusion Middleware 11g Release 1 products, such as SOA or WebCenter, that are installed in your WebLogic Server environment, refer to theOracle Fusion Middleware Patching Guide before installing WebLogic Server patches or updating your WebLogic Server installation.
卸载weblogic server
This chapter describes how to uninstall or reinstall WebLogic Server, and how to revert to a previous WebLogic Server installation.
It includes the following sections:
Uninstalling the Software
The following sections describe how to uninstall your software or individual components on Windows and UNIX systems. You can uninstall the software using graphical, console, or silent mode.
You can uninstall individual components of your product distribution, or the entire installation. Dependency checking in the uninstall program ensures that the appropriate components are uninstalled.
The uninstall program does not remove the home directory associated with the installation, the JDK, or any user-created WebLogic domains. Only the components that were installed by the installation program can be removed. If you choose to uninstall the entire product, the uninstallation program also removes the product directory associated with the installationunless any of the following is true:
-
The product directory contains user-created configuration or application files. The uninstallation program does not delete user-created configuration files, application files, or domains.
-
The complete installation was not uninstalled. If an individual component is uninstalled, only the installation directory for that component is removed; the installation directories for other components are unaffected.
-
The uninstall program was invoked from within the product directory structure—specifically, from the
uninstallerdirectory.
Uninstalling Your Software in Graphical Mode
To run the uninstall program in graphical-mode, your console must support Java-based GUIs. If the uninstallation program determines that your system cannot support Java-based GUIs, it automatically starts running in console mode.
Use the following procedure to uninstall the complete product installation, or individual components, in graphical mode:
-
Shut down any servers that are running. If any of these servers is configured as a Windows service, you should stop the service(s) before uninstalling the software.
-
Start the uninstall program as described in Table 7-1.
Table 7-1 Starting the Uninstall Program in Graphical Mode
Platform Procedure Windows
Choose Start > Programs >Oracle WebLogic > Uninstall Oracle WebLogic.
The Oracle Uninstaller Welcome screen is displayed.
UNIX
-
Go to the following directory:
MW_HOME\utils\uninstallwhere
MW_HOMErepresents the Middleware home directory in which you installed the product you are uninstalling. -
Enter
uninstall.shat the prompt.The Oracle Uninstaller Welcome screen is displayed.
Note: If your system supports a graphical user interface, the uninstall program starts in graphical mode. If your system does not support a graphical user interface, the uninstall program starts in console mode. If console mode is started, see Uninstalling Your Software in Console Mode, for instructions.
-
-
Click Next to start the uninstall program.
The Choose Components screen is displayed.
-
Select the components to uninstall by selecting or clearing the appropriate check boxes, By default, all installed components are selected, indicating that they will be removed.
-
After selecting the components to uninstall, click Next.
Caution:
Once you click Next, you cannot abort the uninstallation process.
-
Optionally, click Details to view the log file that lists the uninstalled components.
-
Click Done in the Uninstalling Oracle Products screen to exit the uninstallation program.
Uninstalling Your Software in Console Mode
Use the following procedure to uninstall the complete product installation, or individual components, using the command-line interface:
-
Shut down any servers that are running. If any of these servers are configured as a Windows service, you should stop the service(s) before uninstalling the software.
-
Start the uninstall program as described in Table 7-2.
Table 7-2 Starting the Uninstall Program in Console Mode
Platform Procedure Windows
-
Open a command prompt window and go to the following directory:
MW_HOME\utils\uninstallwhere
MW_HOMErepresents the Middleware home directory in which you installed WebLogic Server. -
Enter the following command at the prompt:
uninstall -mode=console
The
Welcometext is displayed.UNIX
-
Go to the following directory:
MW_HOME/utils/uninstallwhere
MW_HOMErepresents the Middleware home directory in which you installed WebLogic Server. -
At the prompt, enter the following command:
sh uninstall.sh -mode=console
The
Welcometext is displayed.
-
-
Enter
nextor press Enter to proceed to the next panel of the uninstallation program.Note:
Instead of typing complete words when you want to enter
exit,previous, andnext, you can use the one-letter shortcuts,x,p, andn, respectively.The
Choose Products and Components to uninstallprompt is displayed. -
Select the components you want to uninstall. By default, all installed components are selected, indicating that they will be removed.
To leave a component installed on your system, enter the numeric code for that component on the command line, exactly as it appears within the brackets. Dependency checking is performed to ensure that you do not uninstall a component that is required by another component.
-
Enter
nextor press Enter to proceed with the uninstallation process.Caution:
Once you enter
next, you cannot abort the uninstallation process. -
When the uninstallation process is complete, enter
exitor press Enter to complete the uninstallation and exit the uninstallation program.
Uninstalling Your Software in Silent Mode
When you uninstall the software in silent mode, the complete software installation is uninstalled. You cannot uninstall individual components.
When you run the uninstallation program in silent mode, it leaves behind the same files and directories as when you run the uninstall program in graphical and console modes, including:
-
The home directory, including the
logsandutilssubdirectories -
The JDK, if it was installed with your product
-
Domain directories, including those in
user_projects -
Any other file that was created or modified after your software was installed.
You can manually delete these files.
Although you can use silent-mode to manually uninstall your software, silent-mode uninstall is intended for use in scripts. You can use the commands inTable 7-3 in scripts.
Use the following procedure to uninstall your Products software in silent mode:
-
Shut down any servers that are running. If you configured any of the servers as a Windows service, you must stop the service(s) before uninstalling the software.
-
Start the uninstallation program as described in Table 7-3.
Table 7-3 Starting the Uninstallation Program in Silent Mode
| Platform | Procedure |
|---|---|
| Windows |
|
| UNIX |
|
Note:
When you run the uninstallation program in silent mode, no messages are displayed indicating that the uninstallation is in progress or has completed successfully, even if errors are encountered.
You can include the -log=full_path_to_log_file option in the command line to create a verbose installation log. For example:
uninstall -mode=silent -log=C:\logs\weblogic_uninstall.log
Reinstalling Your Software
You cannot reinstall the same version of a product on top of a previously installed version of the same product, in the same home directory or in the same file location. However, you can add products and product components to an existing installation. For example, you can install Core Application Server, Administration Console, and Configuration Wizard Upgrade Framework during one installation, and add WebLogic JDBC Drivers and Server Examples during a separate installation.
To reinstall the same version of a product component or an entire product distribution in the same location, you must first uninstall the previous installation.
If you try to install a complete copy of a product in a home directory that contains a complete installation, an error message is displayed. ClickOK (or enter OK, if in console mode) to return to theChoose Middleware Home Directory screen (or panel).
At the prompt, choose one of the following options:
-
To continue installing the software using a different home directory, select an existing home directory that does not contain a previous installation, or create a home directory.
-
Exit the installation program. To reinstall your software in the same home, you must uninstall the previous installation.
You can start the uninstall program appropriate for your platform, as described in the following sections:
Then, install the software as described in one of the following chapters:
附件
Oracle WebLogic Server Installation Screens
This appendix contains screenshots and descriptions for all of the WebLogic Server installation screens.
Welcome

Description of the illustration welcome.gif
The Welcome screen is displayed each time you start the installer.
Choose Middleware Home Directory
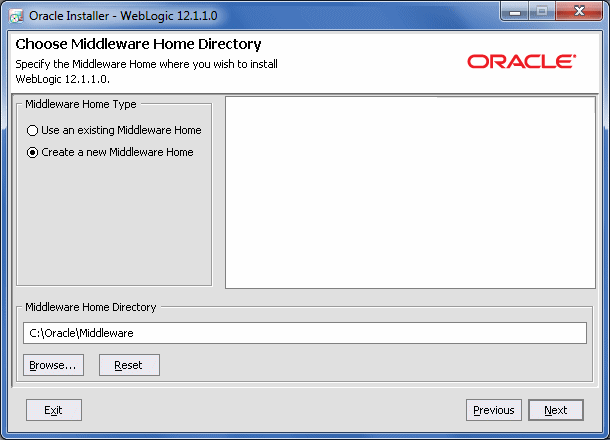
Description of the illustration mw_home.gif
Specify the Middleware home directory that will serve as the central support directory for all Fusion Middleware products installed on the target system, including WebLogic Server. The default Middleware home directory isC:\Oracle\Middleware. Each Fusion MIddleware product will be installed in its own product directory in the Middleware home directory.
-
If you already have a Middleware home directory on your system, you can select that directory (recommended) or create another Middleware home directory.
-
If you choose to create a directory by typing a new directory name in the Middleware Home Directory field, the installation program automatically creates one for you. You can also clickBrowse and select an existing directory from theMiddleware Home Directory screen.
For more details about the Middleware home directory, see Choosing a Middleware Home Directory.
Register for Security Updates
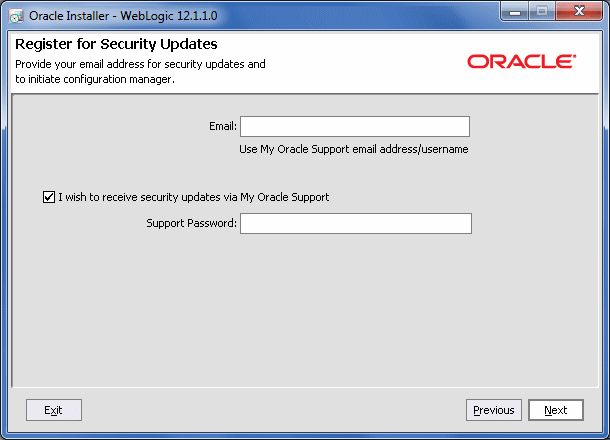
Description of the illustration ocm.gif
Specify whether you want to register the Oracle WebLogic Server installation with My Oracle Support. By registering, Oracle Support notifies you immediately of any security updates that are specific to your installation.
If you want to register your installation, enter your My Oracle Support email address and your My Oracle Support password.
If you want to decline registration, deselect the I wish to receive security updates via My Oracle Support check box. An Are You Sure? dialog box appears. Click Yes to continue.
Note:
If you are using a Generic installer (JAR file) to install WebLogic Server, and $JAVA_HOME points to a JDK that is later than JDK 1.60_05, you cannot deselect theI wish to receive security updates via My Oracle Support check box. In this case, if you do not want to install security updates:
-
Leave the Email and Support Password fields blank, and click Next. AnEmail Address Not Specified dialog box appears.
-
Click Yes. An Are You Sure? dialog box appears.
-
Click Yes to continue with the installation.
If you have not registered with Oracle Support, go to the My Oracle Support Web site,https://support.oracle.com/CSP/ui/flash.html, and register to obtain a My Oracle Support account.
Choose Install Type
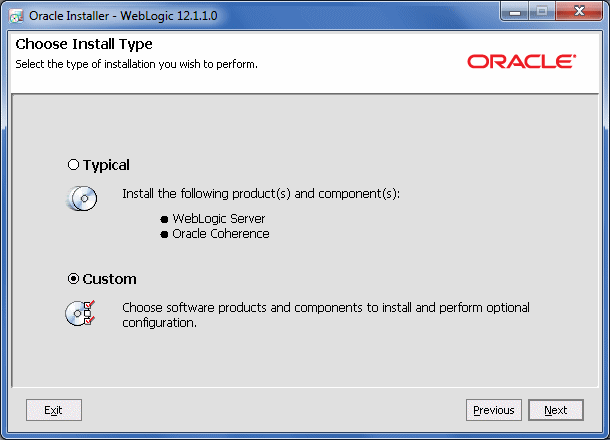
Description of the illustration custom.gif
Select the installation type.
-
Typical—All the software components included in your installation program are installed on your system. Typical installation does not include the Server Examples.
-
Custom—You select the software components to be installed. On Windows systems, you also have the option to install Oracle WebLogic Server Node Manager as a Windows service. If you want to install the Server Examples, you must selectCustom.
For more information, see Choosing the Type of Installation.
Choose Products and Components
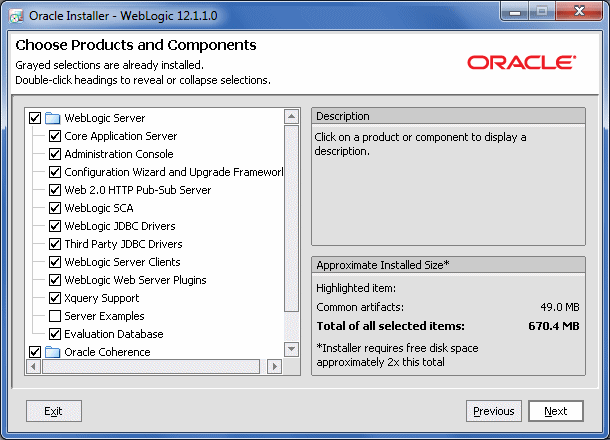
Description of the illustration first-choose.gif
Specify the components to be installed by selecting or clearing the appropriate check boxes.
When you select or clear a component at the folder level, all subcomponents are selected or cleared accordingly.
If any components are installed on your system, the corresponding check boxes appear dimmed.
This screen also displays the description and the approximate installed size of the selected component.
Note:
When you select components, the installation program checks for dependencies between the components and automatically modifies the list of selected components to ensure that dependencies for selected components are also selected.
For details about the components available for installation on your system, seeInstallable Product Components.
JDK Selection
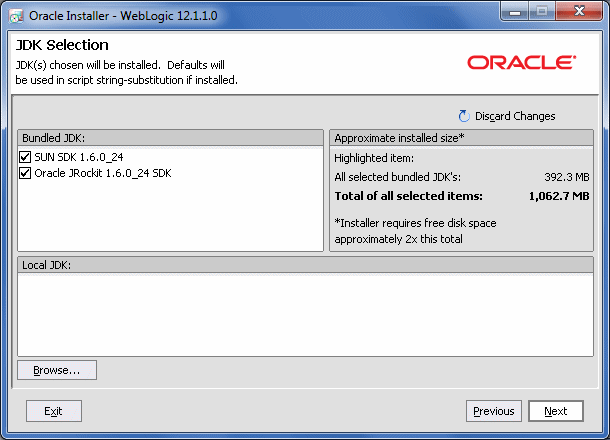
Description of the illustration sdk.gif
This screen displays a list of JDKs. This list differs depending on the specific installer you are using. For example,.jar installers do not include SDKs. If you are upgrading from a previous version, the list contains JDKs that are available for (and common across) previous installations of all the selected WebLogic Server components.
Select the JDK or JDKs that you want to install with the product.
You can also browse for and select a local JDK (at least 1.6.0_05) installed on your machine.
This screen also displays the approximate installed size of the highlighted JDK, the total installed size of all the selected JDKs, and the total installed size of all the components.
Note:
Sun has addressed multiple Java security vulnerabilities affecting the following Sun Java Runtime Environments.
-
JDK and JRE 6 Update 10 and earlier
-
JDK and JRE 5.0 Update 16 and earlier
If you have already installed any of the above versions of JDK, you must upgrade it to the latest version of Sun Java Runtime Environment by selecting the latest JDK version in the installer.
Choose Product Installation Directories
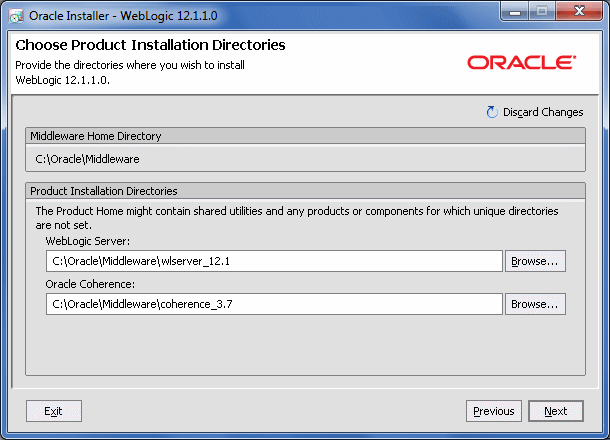
Description of the illustration prod-install.gif
You can accept the default product directories or specify new directories for each product you are installing. The product directories that are listed on this screen depend on the products you selected for installation. You may have to specify up to three installation directories, one each for Oracle WebLogic Server, and Oracle Coherence.
If you choose to create a directory, the installation program automatically creates one for you.
If you go back to the Choose Middleware Home Directory screen to change the Middleware home directory, the following changes occur based on the type of changes you make to the home directory:
-
If you accept the default product installation directory in the Choose Product Installation Directory screen, then the old installation directory is retained in theChoose Middleware Home Directory screen.
For example, the default installation directory for Oracle WebLogic Server is
MW_HOME\wlserver_12.1. -
If you enter a new product installation directory in the Choose Product Installation Directory screen, the directory name is modified to this new name in theChoose Middleware Home Directory screen.
-
If you specify the installation directory in the Choose Product Installation Directory screen, and if the directory you specify is outside of the existing Middleware home, the existing installation directory is retained.
For more information, see Choosing Product Installation Directories.
Confirm Product Installation Directory
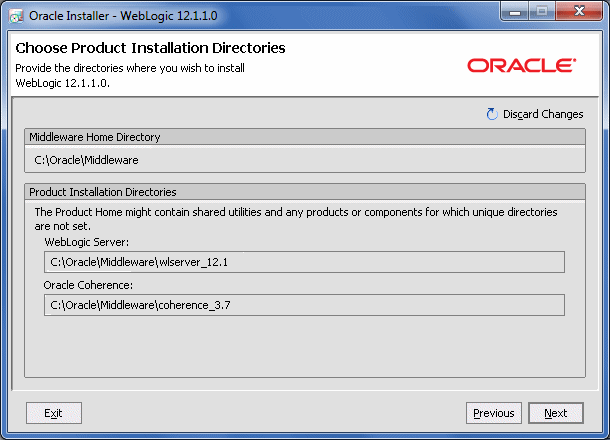
Description of the illustration confirm_dirs.gif
If you are adding components to an existing product installation, confirm the product installation directory. These are the directories in which you previously installed WebLogic Server or Oracle Coherence.
The selected components are installed in the product installation directory you specified during the initial installation.
Install Windows Service
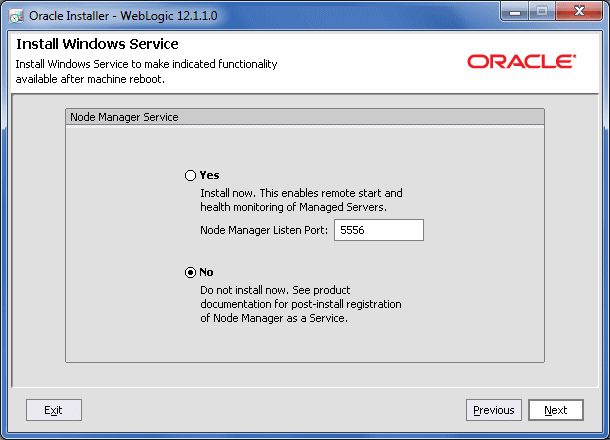
Description of the illustration nodemgr.gif
Choose whether you want to install the Windows services indicated, specifically the Oracle WebLogic Server Node Manager service. Node Manager is used to monitor, start, and stop server instances in a WebLogic domain.
If you select Yes, enter the Node Manager Listen Port in the appropriate field. The default is 5556.
Note:
If the Listen Port number you specify is being used by a running application, the installation program prompts you to enter a different Node Manager Listen Port value.
Choose Shortcut Location
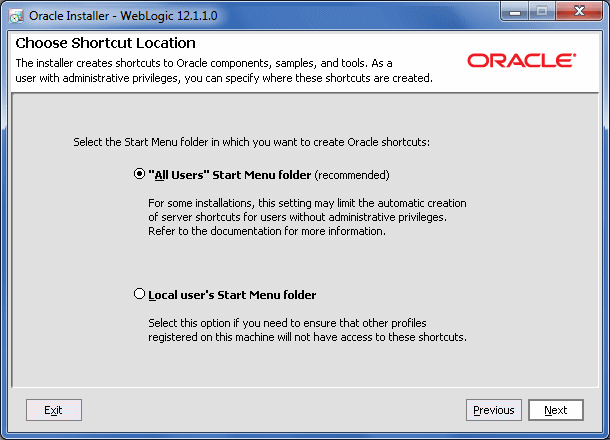
Description of the illustration shortcut.gif
Select from the following options:
-
All Users Start menu folder
Select this option to provide all users registered on the machine with access to the installed software. However, only users with administrator privileges can create shortcuts in the All Users folder. Therefore, if a user without administrator privileges uses the Configuration Wizard to create WebLogic domains, Start menu shortcuts to the domains are not created. In this case, users can manually create shortcuts in their localStart menu folders, if desired. Press
ALT+Aon the keyboard to select the All Users Start Menu. -
Local User's Start menu folder
Selecting this option ensures that other users registered on this machine do not have access to the Start menu entries for this installation. Press
ALT+Lon the keyboard to select the Local User's start menu.
Installation Summary
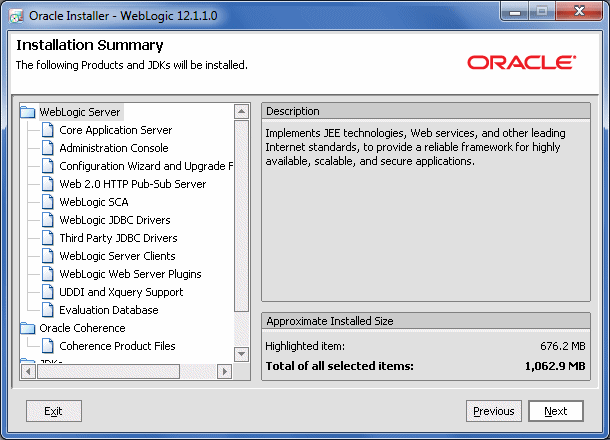
Description of the illustration summary.gif
This screen displays a list of product components and JDKs to be installed. It also displays the description and the approximate installed size of each product component, JDKs, and the total size of all the selected items.
Status

Description of the illustration install.gif
This screen shows the progress of the installation. When the progress bar reaches 100%, the installation is complete.
Installation Complete
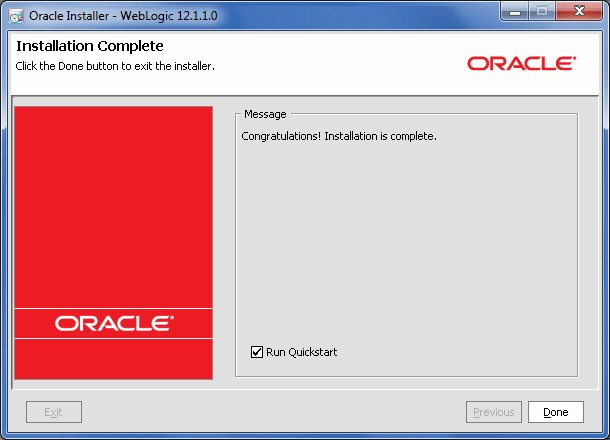
Description of the illustration complete.gif
In this screen you see a dialog box with the message "Congratulations! Installation is Complete."
If you want to run the QuickStart application, leave the Run QuickStart check box selected. QuickStart is designed to assist first-time users in evaluating, learning, and using the software. It provides quick access to the sample domains, information for upgrading your applications, and the online documentation.
Clear the Run QuickStart check box if you do not want to launch QuickStart.
This appendix lists all of the available WebLogic Server installers. Refer to Product Distribution, for information about the Oracle Web sites from which you can download installers.
Table C-1 Available Installers
| Filename | Description |
|---|---|
| wls1211_generic.jar | For installations on any supported platform on which Java is already installed. Includes WebLogic Server and Coherence. Does not include JDKs. |
| wls1211_linux32.bin | For installations on Linux x86 32-bit machines. Includes WebLogic Server, Coherence, Sun SDK 1.6_29, and Oracle JRockit 1.6_29. |
| wls1211_solaris32.bin | For installations on Solaris 32-bit machines. Includes WebLogic Server, Coherence, Sun SDK 1.6_29, and Oracle JRockit 1.6_29. |
| wls1211_win32.exe | For installations on Windows 32-bit machines. Includes WebLogic Server, Coherence, Sun SDK 1.6_29, and Oracle JRockit 1.6_29. |
| wls1211_dev.zip | Development-only installer that extracts a complete WebLogic Server installation which contains all of the necessary artifacts for developing applications on WebLogic Server. This installer is not for production use. It can be installed on Windows, Linux, or Mac OS X machines. See Appendix B, "Development-Only Installation," for more information. |
| wls1211_dev_supplemental.zip | Contains additional files that supplement the development-only installer (wls1036_dev.zip). SeeAppendix B, "Development-Only Installation," for more information. |
Using WebLogic Server with JDK 7
WebLogic Server does not ship with JDK 7. This appendix describes the steps you need to perform to use WebLogic Server with JDK 7. It also describes issues that you may encounter when using WebLogic Server with JDK 7.
Prior to installing JDK 7 for use with WebLogic Server, review the following issues that you may encounter when using JDK 7:
-
In some cases, the new JVM requires more PermGen space, which can cause PermGen errors. If this occurs, use one of the following two options to resolve the issue:
-
If you are using the
javacommand to start WebLogic Server, include the following option in the command:-XX:MaxPermSize=350m -
If you are using
startWebLogic.sh(UNIX) orstartWebLogic.cmd(Windows) to start WebLogic Server, prior to issuing the command, set theMEM_ARGSenvironment variable as follows:UNIX:
USER_MEM_ARGS="-Xms32m -Xmx200m -XX:MaxPermSize=350m"export USER_MEM_ARGSWindows:
set USER_MEM_ARGS=-Xms32m -Xmx200m -XX:MaxPermSize=350m
-
-
Classes may have been removed that are from the internal package
sun.*, or that have been marked as deprecated in a previous version of the JVM. If an application uses these removed methods, aClassNotFoundexception will occur. -
JDBC 4.1 methods are not currently supported in WebLogic Server with JDK 7. Calls to these methods will result in an
SQLExceptionindicating that the method is not supported.
Before installing WebLogic Server, perform the following steps:
-
Download the appropriate JDK 7 for your platform from the following URL:
http://www.oracle.com/technetwork/java/javase/downloads/java-se-jdk-7-download-432154.html -
Install the JDK.
-
Set
JAVA_HOMEto point to the installed JDK 7. -
Set
PATHto point to$JAVA_HOME/bin. -
When installing WebLogic Server: select a Custom installation. For the JDK selection, deselect the bundled JDK entries and under the Local JDK section browse and select the JAVA_HOME directory.
-
On the Choose Install Type screen, select theCustom option.
-
On the JDK Selection screen, deselect the bundled JDK entries, and then under theLocal JDK section, browse to and select the
JAVA_HOMEdirectory.
-
-
After installing WebLogic Server, copy the following files from
WL_HOME/modulestoJAVA_HOME/jre/lib/endorsed, whereWL_HOMEis the WebLogic Server installation home directory:javax.annotation_1.0.0.0_1-0.jarjavax.xml.bind_2.1.1.jarjavax.xml.ws_2.1.1.jar


 1927
1927


 被折叠的 条评论
为什么被折叠?


