


目标
通过实例和图片理解UIView的contentStretch属性
方法
- 通过一个图片建立一个简单的UIImageView
- 设置它的contentStretch属性
- 修改它的frame属性
- 观察
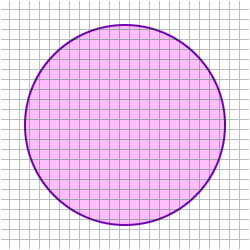
测试用的图片:
新建一个 UIImageView:
UIImageView *imageView = [[UIImageView alloc] initWithImage:[UIImage imageNamed:@"grid.png"]];
保存它的一些属性值备用
CGSize imageSize;
 imageSize.width = imageView.frame.size.width;
 imageSize.height = imageView.frame.size.height;

 CGSize stretchSize;
 stretchSize.width = 50.0;
 stretchSize.height = 100.0;
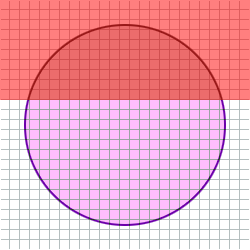
水平拉伸
设置 contentStretch 属性(一般为 0.0 到 1.0之间):
imageView.contentStretch = CGRectMake(0.0, 0.0, stretchSize.width/imageSize.width, stretchSize.height/imageSize.height);
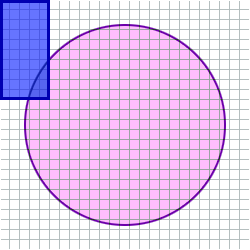
水平拉伸:
imageView.frame = CGRectMake(10.0, 10.0, imageSize.width*1.2, imageSize.height);
这时拉伸的区域如下:
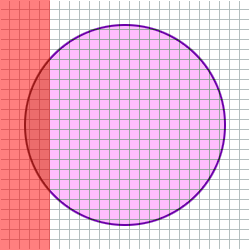
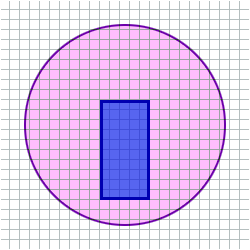
垂直拉伸
使用同样的 contentStretch, 图片被垂直拉伸:
imageView.frame = CGRectMake(0.0, 0.0, imageSize.width, imageSize.height*1.2);
这时拉伸的区域如下:
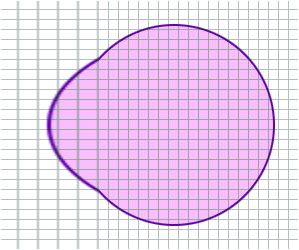
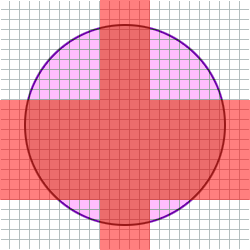
两个方向同时拉伸:
使用下面的 contentStretch值:
imageView.contentStretch = CGRectMake(100.0/imageSize.width, 100.0/imageSize.height, stretchSize.width/imageSize.width, stretchSize.height/imageSize.height);
水平和垂直同时拉伸:
imageView.frame = CGRectMake(0.0, 0.0, 450.0, 450.0);

实际拉伸的区域是:
不要泄露内存:
[imageView release];
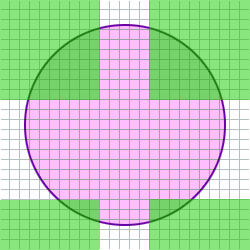
结论
对于给定的 contentStretch:
有一个“拉伸”区域:
和一个“固定”区域:
相关代码:
https://gist.github.com/8038667a374da0f6a24d#file_content_stretch_test.m
图片:
http://f.cl.ly/items/050w3k342y032F0E3n29/grid.png
原文地址:http://j0ris.tumblr.com/post/7345178587/uiview-contentstretch


 3333
3333


 被折叠的 条评论
为什么被折叠?
被折叠的 条评论
为什么被折叠?
 到【灌水乐园】发言


