


---------------------- ASP.Net+Android+IOS开发、.Net培训、期待与您交流! ----------------------
1.前言
在现今多核处理器满天飞的的时代,单线程是不能发挥多核处理器性能的,多线程是发挥多核处理器性能的最佳方式。若果没有多线程,打个比方,如果一个人去银行取钱,那么这个人要等到排在他前面的所有人取完钱才能开始取钱,全国每天去银行取钱的人非常多,那他大概要排队几个月,这搁谁身上都受不了的。
并发不仅能提高处理器的利用率,而且可以提高程序的响应速度,和吞吐量,总之多线程有单线程很多不拥有的优势。
但是并发也有小麻烦,因为你无法预防一个线程在访问一个变量的同时而另一个线程也在访问这个变量所造成的不可预测的结果。
现在C++语言在C++11时提供了多线程的支持,但是C++11以前的并发是完全基于操作系统的编程,,PHP也是一样,编写一个多线程程序相对很复杂,对比Java本身就提供了对并发的支持,虽然也是基于系统的,但是相对C++/C,PHP来说要简单很多的。
2.第一个多线程程序
在Java中创建线程有两种方式:
方式一: 继承Thread类
class MyThread extends Thread{}class MyThread implements Runnable一般推荐使用方式二,方式二的灵活性更好
创建好类后只要重写/实现run()方法,这就是一个完整的线程类了,只要把要执行的任务放在run()中就好了
启动线程的方式:
Thread t = new Thread(new MyThread()).start();但是手动调用run()并不是启动线程,只是普通的方法调用。
好了有了这些就可以写一个自己的第一个多线程类了:
public class ThreadProblem {
	public static void main(String[] args){
		ThreadProblem test = new ThreadProblem();
		myThread thread = test.new myThread();
		for(int i=0; i<5; i++){
			new Thread(thread).start();
		}
	}

	class myThread implements Runnable{
        int count = 10;
		public void run() {
			while(true){
				if(count >= 0){
					count -- ;
					try{
						Thread.sleep(200);
					}catch(InterruptedException e){
						e.printStackTrace();
					}
					System.out.println("当前count值 : " + count);
				}else{
					break;
				}
			}
		}

	}

}运行这段代码后的结果为:
当前count值 : 5
当前count值 : 5
当前count值 : 5
当前count值 : 2
当前count值 : 1
当前count值 : 0
当前count值 : 0
当前count值 : 0
当前count值 : -1
当前count值 : -1
当前count值 : -1
这结果和我想要的结果很不服,显然,这肯定出问题了,这个问题就是并发编程里面最常见的问题,就是线程不安全。
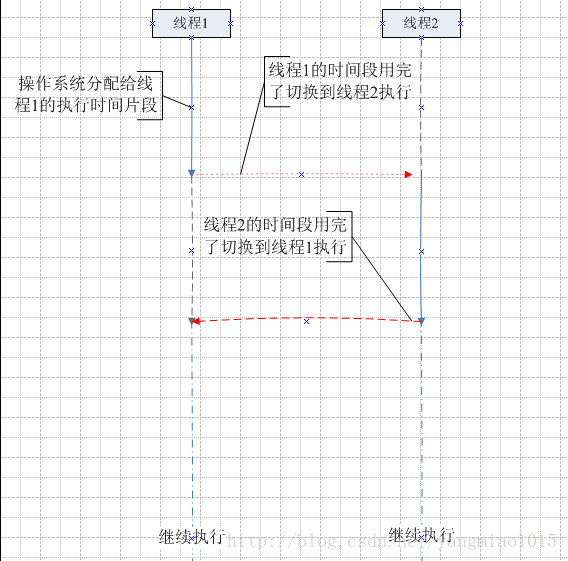
造成这个问题的原因是详细讲很复杂,简单讲就是:操作系统为我们创建的线程分配CPU资源,也就是占用时间,时间一到,就切换到其他线程执行,问题就这样来了,当一个线程正在执行count++时,(在Java 中自增操作不是原子性,相比C++中这个操作是原子性的), 而此时count自增的值还没有赋给count时,就切换到其他线程了,而其他线程在读取该数据时就不正确了,术语叫“脏数据”。
现成的执行过程:
解决这个问题的方式有有好几种:
1.让每个操作都是原子性的,首先你得可以编写适用于现代微处理器的高性能JVM。(来自Java 编程思想)
2.采用支持并发的硬件。(来自Java 并发编程实战)
3.Java 提供的线程同步
小生是菜鸟,第一点和第二点都不会,而且仅仅只是会第三点中的皮毛。
3.定时器
java.util.Timer类可以定时的做些事情,或者过多少时间定时的做什么事情
schedule(task, time) 安排在指定的时间执行指定的任务。
schedule(task, delay) 安排指定的任务在指定的时间开始进行重复的固定延迟执行。
schedule(task, firstTime, period) 安排在指定延迟后执行指定的任务。
schedule(task, delay, period) 安排指定的任务从指定的延迟后开始进行重复的固定延迟执行。
例子:
Timer timer = new Timer();
        timer.schedule(new TimerTask(){

			public void run() {
				System.out.println("Task.....");
			}

        }, 1000);     // 过一秒钟后执行任务
        timer.cancel();
        timer.schedule(new TimerTask(){

			public void run() {
				System.out.println("Task...");
			}

        }, 2000, 1000);  // 第一次过两秒钟执行任务,以后每过一秒执行任务
4.线程同步
1.synchronized
Java中提供了一个内置锁 :
synchronized(obj){}线面就用同步代码块让上面的程序执行正确:
public class SychronizedThread {
	public static void main(String[] args){
		SychronizedThread test = new SychronizedThread();
		myThread thread = test.new myThread();
		for(int i=0; i<5; i++){
			new Thread(thread).start();
		}
	}

	class myThread implements Runnable{
        int count = 10;
		public void run() {
			while(true){
				synchronized(this){	//改变在这 开始
				if(count > 0){
					count -- ;
					try{
						Thread.sleep(200);
					}catch(InterruptedException e){
						e.printStackTrace();
					}
					System.out.println("当前count值 : " + count);
				}else{
					break;
				}
			}  //结束
		    }
		}
	}
}2.Lock
JDK5.0 后提供了一个显示锁 Lock,Lock提供一种无条件的,可轮询的,定时的以及可中断的加锁条件。(来自 Java 并发编程实战)
常见用法如下:
Lock lock = new ReentrantLock();
lock.lock();
try{
}finally{
    lock.unlock();
}
public class LockTest {
	public static void main(String[] args) {
		LockTest test = new LockTest();
		myThread thread = test.new myThread();
		for (int i = 0; i < 5; i++) {
			new Thread(thread).start();
		}
	}

	class myThread implements Runnable {
		int count = 10;

		public void run() {
			while (true) {
				lock.lock();   // 在这上锁
				try {
					if (count >= 0) {
						try {
							Thread.sleep(200);
						} catch (InterruptedException e) {
							e.printStackTrace();
						}
						System.out.println("当前count值 : " + count--);
					} else {
						break;
					}
				} finally {
					lock.unlock();  //一定要在finally块中解锁,否则所无法释放所造成的结果很难找到
				}
			}
		}

	}

	private Lock lock = new ReentrantLock();   //声明

}
3.Executor
JDK 5.0的并发类库中执行器Executor会为你管理线程。
ExecutorService 是具有服务生命周期的Executor
ExecutorService 的shutdown()方法: 阻止新任务提交给这个Executor,并且等待Executor中所有任务完成后会尽快退出。
ExecutorService 的shutDownNNow()方法: 试图停止所有正在执行的活动任务,暂停处理正在等待的任务,并返回等待执行的任务列表。
CachedThreadPool : 在程序执行过程中会创建与所需数量相等的数量的线程,在他回收线程的时候停止创建新的线程。
FixedThreadPool :一次性创建固定数量的线程
SingleThreadExecutor :相当于线程数量为1的FixedThreadPool
创建方法:通过Executors的静态方法创建:
Executors.newSingleThreadExecutor();
		Executors.newCachedThreadPool();
		Executors.newFixedThreadPool(10);
4.线程间的协作
Object上有wait(),notify(),notifyAll()方法,JDK5.0的并发类库提供了有await(),signal(),signalAll()方法的Condition对象
wait()方法使你可以等待某个条件发生变化,而这个变化超出了当前方法的能力范围。
sleep()也是让线程等待,只是没有让线程挂起。
wait()方法和sleep()方法的区别: wait()方法会释放锁,而sleep()方法不会释放锁
下面就来一个线程间相互写作的小例子: 生产者与消费线程间的协作:
当生产者生产的物品超过100时等待消费者消费,并且唤醒所有等待中的消费者,当物品数量=0时,消费者等待,并且唤醒所有等待中的生产者。
用内置锁synchronized(同步代码块)实现代码如下:
用到的资源类:
public class Source {

	public int increment() {
		return count++;
	}

	public int decrement() {
		return count--;
	}

	public Source() {
	}

	public Source(String name, int count) {
		this.name = name;
		this.count = count;
	}

	public String getName() {
		return name;
	}

	public void setName(String name) {
		this.name = name;
	}

	public int getCount() {
		return count;
	}

	public void setCount(int count) {
		this.count = count;
	}

	private String name;
	private int count;
}
生产者线程类::
class Producer implements Runnable {

	private Source source;

	public Producer(Source source) {
		this.source = source;
	}

	public void run() {
		while (true) {
			synchronized (source) {
				if (source.getCount() < 100) {
					System.out.println(Thread.currentThread().getName()
							+ " 生产了 : " + source.increment() + "个"
							+ source.getName());
					try{
						Thread.sleep(100);
					}catch(InterruptedException e){
						e.printStackTrace();
					}
					source.notifyAll();
				} else {
					try {
						source.notifyAll();
						source.wait();
					} catch (InterruptedException e) {
						e.printStackTrace();
					}
				}
			}
		}
	}

}
消费者线程类:
class Custmer implements Runnable {
	private Source source;

	public Custmer(Source source) {
		this.source = source;
	}

	public void run() {
		while (true) {
			synchronized (source) {
				if (source.getCount() > 0) {
					System.out.println(Thread.currentThread().getName()	+ " 消费第 : " + source.decrement() + " 个"	+ source.getName());
					try{
						Thread.sleep(100);
					}catch(InterruptedException e){
						e.printStackTrace();
					}
					source.notifyAll();
				} else {
					source.notifyAll();
					try {
						source.wait();
					} catch (InterruptedException e) {
						e.printStackTrace();
					}
				}
			}
		}

	}

}
测试代码:
public static void main(String[] args) {
		ExecutorService threadPool = Executors.newCachedThreadPool();
		final Source source = new Source("北京烤鸭", 50);

		for (int i = 0; i < 2; i++) { // 2个生产者
			threadPool.execute(new Producer(source));
		}

		for (int i = 0; i < 2; i++) { // 2个消费者
			threadPool.execute(new Custmer(source));
		}
	}
运行结果:
pool-1-thread-1 生产了 : 50个北京烤鸭
pool-1-thread-4 消费第 : 51 个北京烤鸭
pool-1-thread-4 消费第 : 50 个北京烤鸭
pool-1-thread-4 消费第 : 49 个北京烤鸭
pool-1-thread-3 消费第 : 48 个北京烤鸭
pool-1-thread-3 消费第 : 47 个北京烤鸭
pool-1-thread-3 消费第 : 46 个北京烤鸭
pool-1-thread-3 消费第 : 45 个北京烤鸭
pool-1-thread-3 消费第 : 44 个北京烤鸭
pool-1-thread-2 生产了 : 43个北京烤鸭
pool-1-thread-2 生产了 : 44个北京烤鸭
pool-1-thread-2 生产了 : 45个北京烤鸭
用显示锁Lock实现的代码如下:
生产者线程类代码:
class ProducerThread implements Runnable {
	private Source source;

	public ProducerThread(Source source) {
		this.source = source;
	}

	public void run() {
		while (true) {
			WakeUp_Lock.lock.lock();
			try {
				if (source.getCount() < 100) {
					System.out.println(Thread.currentThread().getName()
							+ " 生产了 : " + source.increment() + "个"
							+ source.getName());
					WakeUp_Lock.customer.signalAll();
					try{
						Thread.sleep(20);
					}catch(InterruptedException e){
						e.printStackTrace();
					}
				} else {
					WakeUp_Lock.customer.signalAll();
					try {
						WakeUp_Lock.producer.await();
					} catch (InterruptedException e) {
						e.printStackTrace();
					}
				}
			} finally {
				WakeUp_Lock.lock.unlock();
			}
		}
	}

}class CustomerThread implements Runnable {
private Source source;
public CustomerThread(Source source) {
this.source = source;
}
public void run() {
while (true) {
WakeUp_Lock.lock.lock();
try {
if (source.getCount() > 0) {
System.out.println(Thread.currentThread().getName()
+ " 消费第 : " + source.decrement() + " 个"
+ source.getName());
WakeUp_Lock.producer.signalAll();
try{
Thread.sleep(100);
}catch(InterruptedException e){
e.printStackTrace();
}
} else {
WakeUp_Lock.producer.signalAll();
try {
WakeUp_Lock.customer.await();
} catch (InterruptedException e) {
e.printStackTrace();
}
}
} finally {
WakeUp_Lock.lock.unlock();
}
}
}
}还有:
public class WakeUp_Lock {

	public static void main(String[] args){
		ExecutorService threadPool = Executors.newCachedThreadPool();
		Source source = new Source("周黑鸭",50);
		for(int i=0; i<5; i++){
			threadPool.execute(new CustomerThread(source));
		}
		for(int i=0; i<3; i++){
			threadPool.execute(new ProducerThread(source));
		}
	}

	public static Lock lock = new ReentrantLock();
	public static Condition producer = lock.newCondition();  // 将生产者绑定到producer Conditiond对象上
	public static Condition customer = lock.newCondition();  // 将消费者绑定到customer Condition对象上
}
运行结果和上面一样。
5死锁
造成死锁的原因是对资源的恶性竞争引起的,经典的例子是则学家吃饭问题,这里就不多说了。
死锁的种类很多如:顺序死锁,动态的顺序死锁,在写作对象之间发生的死锁和资源死锁等等
我这里准备了一个顺序的死锁例子:
完整代码:
public class DeadLockTest {

	public static void main(String[] args) {
		DeadLockTest test = new DeadLockTest();
       ThreadA a = test.new ThreadA();
       ThreadB b = test.new ThreadB();
       new Thread(a).start();
       new Thread(b).start();
	}

	class ThreadA implements Runnable {

		public void run() {
           synchronized (A) {  //线程ThreadA已经获取A锁
        	   System.out.println("线程ThreadA已经获取A锁,试图获取B锁...");
        	   synchronized (B) {   // 试图获取B锁
				   System.out.println("已经获取B锁");
			}

		}
		}

	}

	class ThreadB implements Runnable {

		public void run() {
            synchronized (B) {  //线程ThreadB已经持有A锁
            	System.out.println("线程ThreadB 已经获取B锁试图获取A锁....");
				synchronized (A) { // 试图获取B锁
					System.out.println("已经获取A锁");
				}
			}
		}

	}

	private final Object A = new Object();
	private final Object B = new Object();
}
运行结果:
线程ThreadA已经获取A锁,试图获取B锁...
线程ThreadB 已经获取B锁试图获取A锁....
程序一直卡在这永远不会往下执行了。
死锁不可能完全的杜绝,到时预防死锁有些建议:
1.尽量的减少潜在加锁交互数量
2.将获取锁需要遵循的条件写入文档,并遵循这些条件。
6.读写锁
JDK 5.0以后还提供了一个显示锁:读写锁
ReentrantReadWriteLock接口存在两个锁: 读锁和写锁
读锁:在读锁上的操作将使用共享的获取方法(readLock.lock())和释放方法(readLock.unLock())。
写锁: 在写锁上的操作将使用独占的获取方法(writeLock.lock())和释放方法(writeLock.unlock())。
下面看一个例子, 缓存系统。
系统特点:
如果当前系统没有与对应的数据时会产生一个数据,有的话直接取出来,并且系统是读写安全的,支持多线程访问!
源代码:
public class CacheSystem {

	public static void main(String[] args) {
		final CacheSystem cache = new CacheSystem();
		ExecutorService threadPool = Executors.newCachedThreadPool();
		for (int i = 0; i < 3; i++) {
			threadPool.execute(new Runnable() {

				public void run() {
					while(true){
				    String key = new Random().nextInt(10) + "";
                    System.out.println(Thread.currentThread().getName() + " key: " + key + " value : " + cache.getData(key));
                    try{
                    	Thread.sleep(500);
                    }catch(InterruptedException e){
                    	e.printStackTrace();
                    }
					}
				}

			});
		}
		threadPool.shutdown();
	}

	public Object getData(String key) {
		readLock.lock();
		value = map.get(key);
		if (value == null) {
			readLock.unlock();
			writeLock.lock();
			if (map.get(key) == null) {
				value = "data" + key;
				map.put(key, value);
			} else {
				value = map.get(key);
			}
			readLock.lock(); // 当持有写锁的同时持有读锁时,锁会升级为更新锁
			writeLock.unlock();
		}
		readLock.unlock();
		return value;
	}

	private Object value;
	private ReentrantReadWriteLock rwl = new ReentrantReadWriteLock();
	private Lock readLock = rwl.readLock(); //读锁
	private Lock writeLock = rwl.writeLock(); // 写锁
	private Map<String, Object> map = new ConcurrentHashMap<String, Object>(); // JDK5.0提供的并发安全的容器
}
7.JDK5.0并法库提供的工具类
1.CountDownLatch :一般被用来同步一个或多个任务,强制它们等待由其他任务执行的一组操作完成。
例子:
public class TestCountDownLatch {

	public static void main(String[] args) {
		final CountDownLatch light = new CountDownLatch(1);
		final CountDownLatch superCar = new CountDownLatch(3);
		for (int i = 0; i < 3; i++) {
			new Thread(new Runnable() {
				@Override
				public void run() {
					try {
						Thread.sleep(new Random().nextInt(5) * 1000);
						System.out.println(Thread.currentThread().getName()
								+ "号运动员准备就绪正在等待出发信号");
						superCar.countDown();
						light.await();
						System.out.println(Thread.currentThread().getName()
								+ "出发!");
					} catch (Exception e) {
						e.printStackTrace();
					}
				}

			}).start();

		}

		try {
			int count = 5;
			System.out.println("信号灯正在等待运动员的就绪...");
			superCar.await();
			System.out.println("收到所有运动员准备就绪,比赛即将开始!");
			while (count != 0) {
				System.out.println("还有" + count + "秒开始比赛");
				Thread.sleep(1000);
				count--;
			}
			System.out.println("所有选手:出发!");
			light.countDown();

		} catch (Exception e) {
			e.printStackTrace();
		}

	}

}列子:
public class TestCyclicBerrier {

	public static void main(String[] args) {

		final CyclicBarrier barrier = new CyclicBarrier(6);
		for (int i = 0; i < 6; i++) {
			new Thread(new Runnable() {
				@Override
				public void run() {
					try {
						Thread.sleep(new Random().nextInt(5) * 1000);
						System.out.println(barrier.getNumberWaiting() == 5 ? "线程都到齐了,一起走啦"
								: "第" + (barrier.getNumberWaiting() + 1)
										+ "个线程来了");
						barrier.await();
					} catch (Exception e) {
						e.printStackTrace();
					}
				}
			}).start();
		}
	}

}
3.Semaphore : 计数信号量
正常的锁,在任何时候都只允许一个任务访问同一资源,而技术信号量允许n个任务同时访问这个资源。
例子:
public class TestSemaphore {


	public static void main(String [] args) throws Exception{


		final Semaphore semaphore = new Semaphore(1);

		for(int i=0; i<10; i++){
			new Thread(new Runnable(){
				@Override
				public void run() {
					try {
						semaphore.acquire();
						System.out.println(Thread.currentThread().getName() + "已经获得了资源");
						Thread.sleep(new Random().nextInt(5) * 1000);
		                System.out.println(Thread.currentThread().getName() + "即将释放信号锁了");
		                semaphore.release();
					} catch (Exception e) {
						e.printStackTrace();
					}
				}
			}).start();

		}


	}


}
8.线程的生命周期
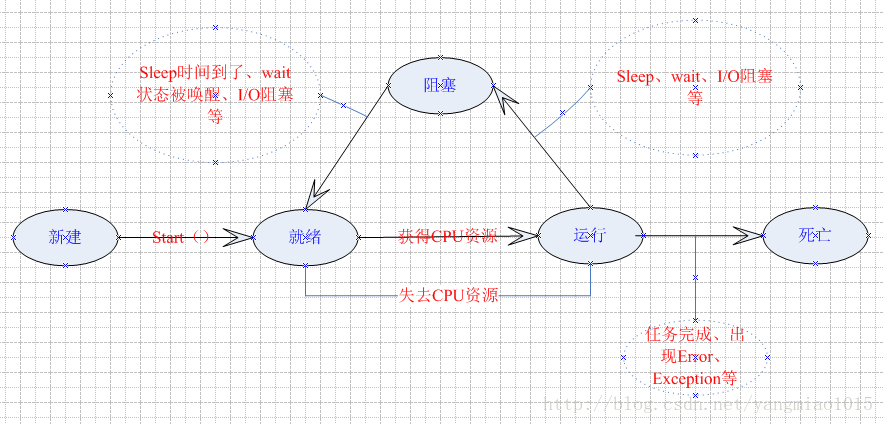
一个线程可以处于物种状态(有的说四种状态)
1.新建(New) :当线程被创建时
2.就绪(Runnable): 在这种状态下,只要调度器把时间片分给线程,县城就可以运行。
3.运行:(Running): 在CPU时间片段中的线程
4.阻塞(Blocked): 线程能够运行,但某个条件阻止他运行。
5.死亡(Dead): 处于死亡或终止状态的线程是不可以再调度的。
状态图:
9.线程范围内的数据共享
线程范围内的数据共享就是一个个数会跟当前线程绑定,不同的线程取到的数据会不同。
public class ThreadScopeShareData {

	public static void main(String[] args){

		for(int i=0; i<3; i++){
			new Thread(new Runnable(){
				public void run() {
					while(true){
					new A().putData(new Random().nextInt());
					System.out.println("B : getData : " +  new B().getData());
					try{
						Thread.sleep(3000);
					}catch(InterruptedException e){
						e.printStackTrace();
					}
					}
				}

			}).start();
		}
		for(int i=0; i<3; i++){
			new Thread(new Runnable(){

				public void run() {
				  while(true){
                  new B().putData(new Random().nextInt());
                  System.out.println("A getData : " + new A().getData());
                  try{
						Thread.sleep(3000);
					}catch(InterruptedException e){
						e.printStackTrace();
					}
				  }
				}
			}).start();
		}


	}

	public final static Map<Thread,Object> map = new ConcurrentHashMap<Thread,Object>();

}

class A {

	public Object getData(){
		return ThreadScopeShareData.map.get(Thread.currentThread());
	}

	public void putData(Object data){
		ThreadScopeShareData.map.put(Thread.currentThread()," A :"+ Thread.currentThread().getName() + data);
	}

}

class B{
	public Object getData(){
		return ThreadScopeShareData.map.get(Thread.currentThread());
	}

	public void putData(Object data){
		ThreadScopeShareData.map.put(Thread.currentThread(), " B :"+ Thread.currentThread().getName() + " " + data);

	}
}
JDK提供了一个类: ThreadLocal,起作用和上面的类差不多,现在是用ThreadLocal完成的上面类完成的功能:
public class ThreadScopeShareData_ThreadLocal {

	public static void main(String[] args){
		for(int i=0; i<3; i++){
			new Thread(new Runnable(){
				public void run() {
					while(true){
					new A().putData(new Random().nextInt());
					System.out.println("B : getData : " +  new B().getData());
					try{
						Thread.sleep(3000);
					}catch(InterruptedException e){
						e.printStackTrace();
					}
					}
				}

			}).start();
		}
		for(int i=0; i<3; i++){
			new Thread(new Runnable(){

				public void run() {
				  while(true){
                  new B().putData(new Random().nextInt());
                  System.out.println("A getData : " + new A().getData());
                  try{
						Thread.sleep(3000);
					}catch(InterruptedException e){
						e.printStackTrace();
					}
				  }
				}
			}).start();
		}


	}

	public final static ThreadLocal<Object> local = new ThreadLocal<Object>();
}

class A1 {

	public Object getData(){
		return ThreadScopeShareData_ThreadLocal.local.get();
	}

	public void putData(Object data){
		ThreadScopeShareData_ThreadLocal.local.set(" A :"+ Thread.currentThread().getName() + data);
	}

}

class B1{
	public Object getData(){
		return ThreadScopeShareData_ThreadLocal.local.get();
	}

	public void putData(Object data){
		ThreadScopeShareData_ThreadLocal.local.set(" B :"+ Thread.currentThread().getName() + " " + data);

	}
}
10.从任务中产生返回值
JDK 5.0后提供了Callable接口,它允许在任务中产生返回值
public class RuntaskAndReturn {

	public static void main(String[] args) throws Exception{
		ExecutorService threadPool  = Executors.newCachedThreadPool();
		List<Future<String>> futures = new ArrayList<Future<String>>();
		for(int i=0; i<50; i++){
			futures.add(threadPool.submit(new runandget()));
		}

		for(Future<String> future : futures){
			System.out.println(future.get());
		}

		threadPool.shutdown();

	}

}

class runandget implements Callable<String>{
	public String call() throws Exception {
		int result = new Random().nextInt(5000);
		try{
			Thread.sleep(result);
		}catch(InterruptedException e){
			e.printStackTrace();
		}
		return result + "";
	}
}
例子:
11.原子类
AtomicInteger、AtomicLong、AtomicReference,它们的操作时原子性的,使用该类可以避免使用synchronized关键字:
AtomicInteger的例子:
public class AtomicVariableTest {

	public static void main(String[] args) {

		ExecutorService threadPool = Executors.newCachedThreadPool();
		final AtomicVariableTest test = new AtomicVariableTest();
		for (int i = 0; i < 3; i++) {
			threadPool.execute(test.new decrement());
		}
        threadPool.shutdown();

	}

	 class decrement implements Runnable{

		public void run() {
			while (true) {
				int result = decrementAndGet();
				if (result >= 0) {
					System.out.println("aInteger value : " + result);
					try {
						Thread.sleep(50);
					} catch (Exception e) {
						e.printStackTrace();
					}
				} else {
					break;
				}
			}
		}

	}

	private static int decrementAndGet(){
		return aInteger.decrementAndGet();
	}

	private static final AtomicInteger aInteger = new AtomicInteger(100);

}
12.join、yield、后台线程和优先级
join:一个线程可以在其他线程上调用join方法,起作用时等待一段时间直到第二个线程执行完毕后再继续执行。
yield:一个线程的任务运行的产不多了,可以让别的线程使用CPU了。
后台线程:程序在运行时在后台提供的一种通用服务的线程。
后台线程的例子:
public class DaemonThreadTest {

	public static void main(String[] args) throws Exception {

		for (int i = 0; i < 10; i++) {
			Thread t = new Thread(new Runnable() {
				public void run() {
					while (true) {
						try {
							Thread.sleep(1000);
						} catch (InterruptedException e) {
							e.printStackTrace();
						}
						System.out.println(Thread.currentThread().getName()
								+ " <--->  " + new Random().nextInt(5));
					}
				}

			});
			t.setDaemon(true);
			t.start();
		}

		Thread.sleep(5000);

	}

}
优先级:线程的优先级将该线程的重要性传递给调度器,优先级高的比优先级低的仅仅是执行的频率高了,并不代表优先级低的线程得不到执行,一般不建议设置此项。(Thread.setPriotity())
13.终结任务
1. 取消任务一般通过改变状态来中接任务是比较好的,最好不要用stop.
public class StopThreadTest {

	public static void main(String[] args)throws Exception{
		ExecutorService threadPool = Executors.newCachedThreadPool();
		ThreadStop stop = new ThreadStop();
		stop.setFlag(true);
		for(int i=0; i<2; i++){
			threadPool.execute(stop);
		}

		Thread.sleep(5000);
		stop.setFlag(false);
		threadPool.shutdown();
	}

}

class ThreadStop implements Runnable{

	private boolean flag;   // 判断任务是否继续的标志


	public synchronized boolean isFlag() {
		return flag;
	}


	public synchronized void setFlag(boolean flag) {
		this.flag = flag;
	}


	public void run() {
        int count = 10000;
		while(isFlag()){     // 判断标志
			try{
				Thread.sleep(200);
			}catch(InterruptedException e){
				e.printStackTrace();
			}
			System.out.println(Thread.currentThread().getName() + " count : " + count --);
		}


	}

}
这个程序在所有程序运行5秒后被终结
还有一种是: 在线程中断时终结任务:
class ShutDownTask implements Runnable{

	public void run() {

		try{
			Thread.sleep(50000);
		}catch(InterruptedException e){
          System.out.println("任务已经终结了");
		}
		System.out.println("任务完成");
	}

}
2.在任务即将结束时可以做些事情
Runtime类中有一个方法:
addShutdownHook(Thread t)
该方法可以在主线程(虚拟机)要退出时可以处理最后的事情,如翻邮件,写日志,关闭资源等,这里的退出不一定是正常退出,例如异常导致的也可以使用。
使用例子:
public static void main(String[] args)throws Exception{
		System.out.println("主线程还有5秒就要退出了");
		Thread.sleep(5000);
		Runtime runtime = Runtime.getRuntime();
		runtime.addShutdownHook(new Thread(new Runnable(){

			public void run() {
               System.out.println("主线程已经即将推出,这是善后线程");
			}

		}));
	}
14.小结
同步是为了解决线程安全问题,在没必要是用同步的时候就不要用。
关于synchronized(内置锁)和Lock(显示锁),在竞争不激烈的时候,内置锁速度比显示锁快,但是竞争大的时候,显示锁要明显比内置锁块!
所以一定要使用同步的情况下,竞争激烈用显示锁,竞争不激烈就用内置锁。


 14万+
14万+


 被折叠的 条评论
为什么被折叠?
被折叠的 条评论
为什么被折叠?
 到【灌水乐园】发言


