


概述
WebApplicationContext是专门为web应用准备的,它允许从相对于Web根目录的路径中装载资源配置文件完成初始化工作。
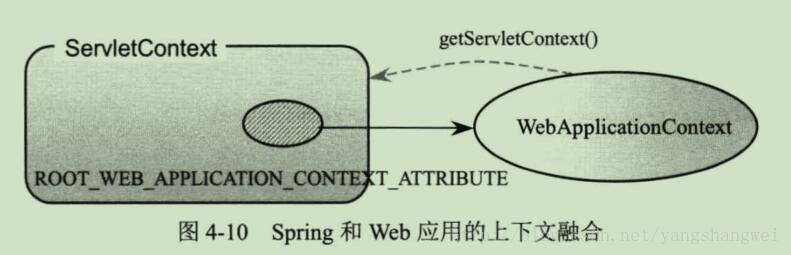
从WebApplication中可以获取ServletContext的引用,整个Web应用上线文对象作为属性放在到ServletContext中,以便Web应用能访问Spring应用上下文。
Spring专门为此提供了一个工具类WebApplicationContextUtils,通过该类的getWebApplicationContext(ServletContext sc)方法,可以从ServletContext中获取WebApplicationContext实例。
Web应用环境下Bean的作用域
在非Web环境下,Bean只有single和prototype两种作用域。
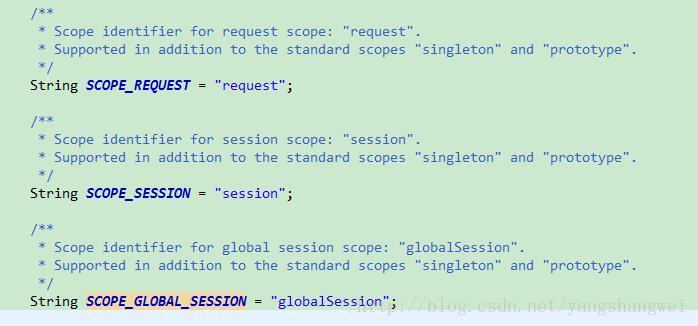
WebApplicationContext为Bean添加了3个新的作用域
- request
- session
- globalSession
WebApplicationContext类体系结构
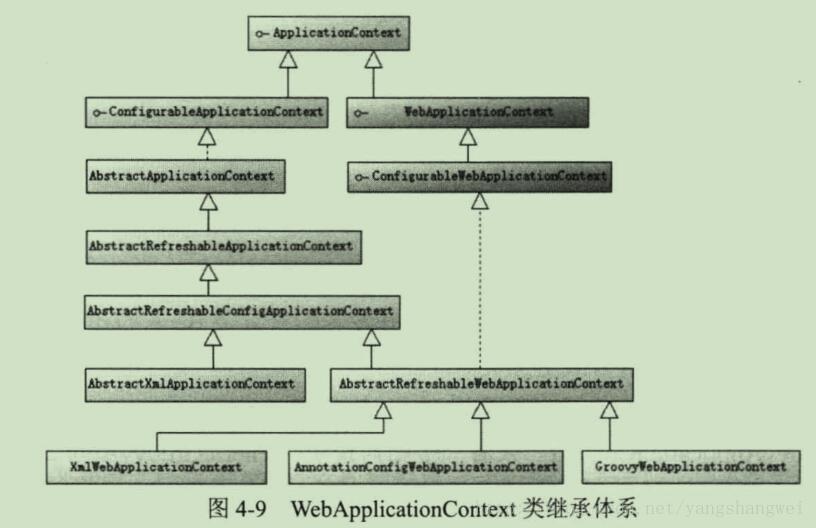
由类继承图可以看出,WebApplicationContext扩展了ApplicationContext。
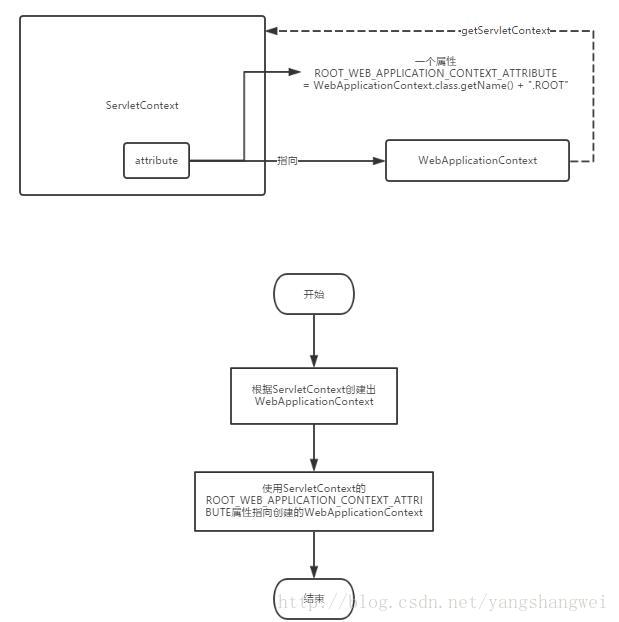
WebApplicationContext定义了一个常
ROOT_WEB_APPLICATION_CONTEXT_ATTRIBUTE,在上线文启动的时候。
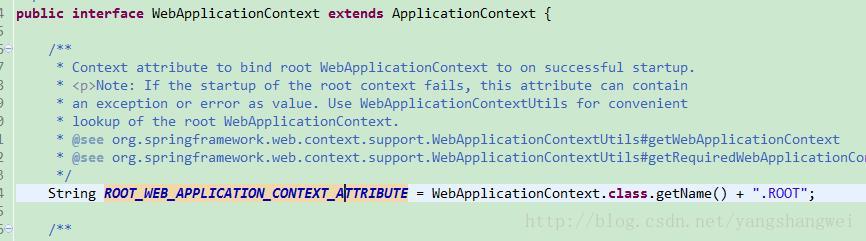
WebApplicationContext实例即以此为键放在ServletContext的属性列表中,可以通过下面的语句从Web容器中获取WebApplicationContext
WebApplicationContext wac = (WebApplicationContext)servletContext.getAttribute(WebApplicationContext.ROOT_WEB_APPLICATION_CONTEXT_ATTRIBUTE)正式WebApplicationUtils工具类getWebApplicationContext(ServletContext sc)方法的内部实现。
这样Spring的Web应用上下文和Web容器的上下文应用就可以实现互访,二者实现了融合。
ConfigurableWebApplication
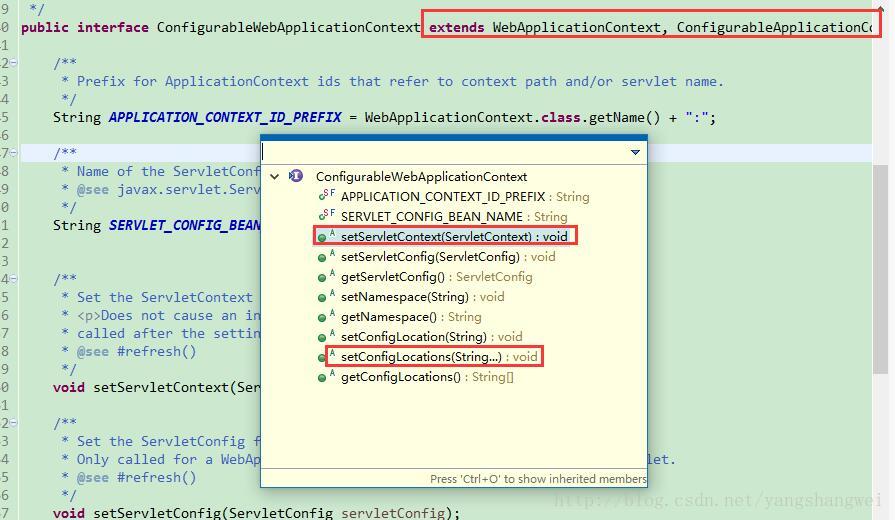
ConfigurableWebApplicationContext 扩展了WebApplicaiton, 它允许通过配置的方式实例化WebApplicationContext,其中两个重要的方法:
void setServletContext(ServletContext servletContext);为Spring设置Web应用上下文,以便二者整合。
void setConfigLocations(String... configLocations);
设置Spring配置文件地址,如/WEB-INF/smart-dao.xml ,/WEB-INF/smart-service.xml ,配置文件地址是相对于web根目录的地址。
但用户也可以使用带有资源前缀类型的地址 如 classpath:/com/smart/beans.xml
WebApplicationContext初始化
WebApplicationContext的初始化方式,不同于BeanFactory、ApplicationContext, WebApplicationContext需要ServletContext实例,也就是说必须拥有Web容器的前提下才能完成启动。
通常情况下,在web.xml中配置自启动的Servlet或者定义Web容器监听器(ServletContextListener),借助二者中的任何一个,就可以完成Spring Web应用上下文的启动工作。
注意:
所有的版本的Web容器都可以定义自启动的Servlet,但是只有Servlet2.3及以上版本的Web容器才支持Web容器监听器
Spring分别提供了用于启动WebApplicationContext的Servlet和Web容器监听器:
- org.springframework.web.context.ContextLoaderServlet(spring3.0及以后版本中已删除)
- org.springframework.web.context.ContextLoaderListener
3.0之后的版本只能选择ContextLoaderListener实现,并在web.xml中配置完成。
使用ContextLoaderLisetener启动WebApplicationContext
<!--(1) 从类路径下加载Spring配置文件,classpath关键字-->
    <context-param>
        <param-name>contextConfigLocation</param-name>
        <param-value>classpath:spring-context.xml</param-value>
    </context-param>

    <!--(2)负责启动Spring容器的监听器,它将引用(1)处的上下文参数获得Spring配置文件的地址 -->
    <listener>
        <listener-class>
        org.springframework.web.context.ContextLoaderListener
        </listener-class>
    </listener>
ContextLoaderListener通过Web容器上下文参数contextConfigLocation获取Spring配置文件的位置,可以自动多个配置文件,用逗号 空格 或者冒号分开均可。
对于未带资源类型前缀的配置文件路径,WebApplicationContext默认这些路径相对于Web的根路径部署。当然也可以采用带资源类型前缀的路径配置,如 classpath:spring-context.xml .
WebApplicationContext中的日志文件的两种配置方式
由于WebApplicationContext启动需要使用日志功能
两种配置方式:
- 将Log4J的配置文件放在类路径class下,这时Log4J引擎可以顺利启动。
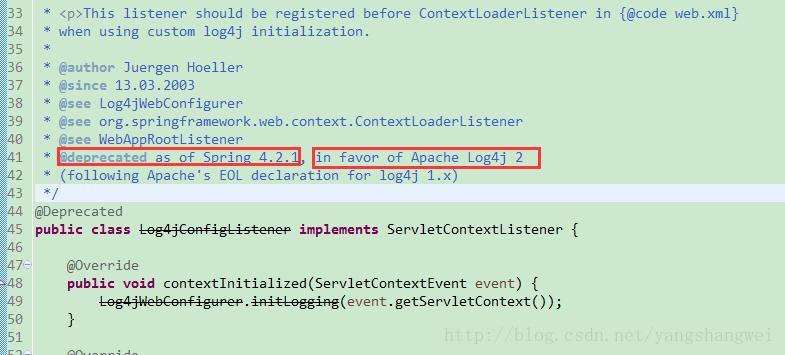
放在其他位置,必须在web.xml中通过Log4jConfigListener加载
(Log4jConfigListener在 Spring 4.2.1及以后被废弃)
Apache Log4j 2 : https://logging.apache.org/log4j/2.x/
Apache Log4j 2 is an upgrade to Log4j that provides significant improvements over its predecessor, Log4j 1.x, and provides many of the improvements available in Logback while fixing some inherent problems in Logback’s architecture.
<!--(1) 从类路径下加载Spring配置文件,classpath关键字-->
    <context-param>
        <param-name>contextConfigLocation</param-name>
        <param-value>classpath:spring-context.xml</param-value>
    </context-param>

    <!-- 如果log4j并没有放到类路径的根目录下,比如放在了/WEB-INF/log4j.properties,需要在web.xml中加载 如下 -->
    <context-param>
        <param-name>log4jConfigLocation</param-name>
        <param-value>/WEB-INF/log4j.properties</param-value>
    </context-param>

     <listener>
         <listener-class>org.springframework.web.util.Log4jConfigListener</listener-class>
     </listener>

    <!--(2)负责启动Spring容器的监听器,它将引用(1)处的上下文参数获得Spring配置文件的地址 -->
    <listener>
        <listener-class>
            org.springframework.web.context.ContextLoaderListener
        </listener-class>
    </listener>
经验证,可以正确加载启动
如何在项目中使用Log4j 2
具体查看另外一篇博文 Spring-Spring Web项目中配置使用Log4j 2
使用JavaConfig(Java注解)的方式启动
<?xml version="1.0" encoding="UTF-8"?>
<web-app
    xmlns="http://java.sun.com/xml/ns/javaee"
    xmlns:xsi="http://www.w3.org/2001/XMLSchema-instance"
    xsi:schemaLocation="http://java.sun.com/xml/ns/javaee
          http://java.sun.com/xml/ns/javaee/web-app_3_0.xsd"
    version="3.0">
    <display-name>Archetype Created Web Application</display-name>
    <!--通过指定context参数,让Spring使用AnnotationConfigWebApplicationContext而非XmlWebApplicationContext启动容器-->
    <context-param>
        <param-name>contextClass</param-name>
        <param-value>org.springframework.web.context.support.AnnotationConfigWebApplicationContext</param-value>
    </context-param>

    <!--指定标注了@Configuration的配置类,多个类,使用逗号或者空格分隔-->
    <context-param>
        <param-name>contextConfigLocation</param-name>
        <param-value>com.xgj.AppConfig1,com.xgj.AppConfig2</param-value>
    </context-param>

     <!-- ContextLoaderListener监听器根据上面的配置使用
     AnnotationConfigWebApplicationContext根据contextConfigLocation指定的类启动Spring容器-->

    <listener>
        <listener-class>rg.springframework.web.context.ContextLoaderListener</listener-class>
    </listener>


</web-app>
使用Groovy DSL配置Bean信息
web.xml 如下
<?xml version="1.0" encoding="UTF-8"?>
<web-app version="2.5"
         xmlns="http://java.sun.com/xml/ns/javaee"
         xmlns:xsi="http://www.w3.org/2001/XMLSchema-instance"
         xsi:schemaLocation="http://java.sun.com/xml/ns/javaee
    http://java.sun.com/xml/ns/javaee/web-app_2_5.xsd">
    <!--通过指定context参数,让Spring使用GroovyWebApplicationContext而非
    XmlWebApplicationContext或AnnotationConfigWebApplicationContext启动容器 -->
    <context-param>
        <param-name>contextClass</param-name>
        <param-value>
            org.springframework.web.context.support.GroovyWebApplicationContext
        </param-value>
    </context-param>

    <!-- 指定标注了Groovy的配置文件-->
    <context-param>
        <param-name>contextConfigLocation</param-name>
        <param-value>
            classpath:conf/spring-mvc.groovy
        </param-value>
    </context-param>

    <!-- ContextLoaderListener监听器将根据上面配置使用
         AnnotationConfigWebApplicationContext根据contextConfigLocation
         指定的配置类启动Spring容器-->
    <listener>
        <listener-class>
            org.springframework.web.context.ContextLoaderListener
        </listener-class>
    </listener>

</web-app>
spring-mvc.groovy
import org.hibernate.validator.HibernateValidator
import org.springframework.context.support.ReloadableResourceBundleMessageSource
import org.springframework.validation.beanvalidation.LocalValidatorFactoryBean
import org.springframework.web.servlet.i18n.CookieLocaleResolver
import org.springframework.web.servlet.i18n.LocaleChangeInterceptor
import org.springframework.web.servlet.view.InternalResourceViewResolver

beans {
    xmlns context: "http://www.springframework.org/schema/context"
    xmlns mvc: "http://www.springframework.org/schema/mvc"

    context.'component-scan'('base-package': "com.smart")
    mvc.'annotation-driven'('validator': "validator")

    validator(LocalValidatorFactoryBean) {
        providerClass = HibernateValidator.class
        validationMessageSource = ref("messageSource")
    }

    messageSource(ReloadableResourceBundleMessageSource) {
        basenames = ["classpath:messages", "classpath:org/hibernate/validator/ValidationMessages"]
        defaultEncoding = "UTF-8"
        cacheSeconds = 60
    }


    viewResolver(InternalResourceViewResolver) {
        prefix = "/WEB-INF/jsp/"
        suffix = ".jsp"
    }

    mvc.interceptors() {
        localeChangeInterceptor(LocaleChangeInterceptor) {
            paramName = "language"
        }
    }

    cookieLocaleResolver(CookieLocaleResolver) {
        cookieName = "language"
        cookieMaxAge = "3600"
        defaultLocale = "zh_CN"
    }


}


 8297
8297

 被折叠的 条评论
为什么被折叠?
被折叠的 条评论
为什么被折叠?
 到【灌水乐园】发言


