


 本文介绍两种实现顶部标题栏弹窗的方法:一种使用PopupWindow,另一种使用Activity。通过详细代码示例展示了如何创建类似微信顶部弹窗的效果。
转载请注明出处:http://blog.csdn.net/yangyu20121224/article/details/9093821
博主在这篇文章中将会继续围绕顶部标题栏专题来进行实例讲解,今天要讲解的主题是分别使用PopupWindow和Activity两种不同的方式来实现仿微信顶部标题栏弹窗的这样一个效果。
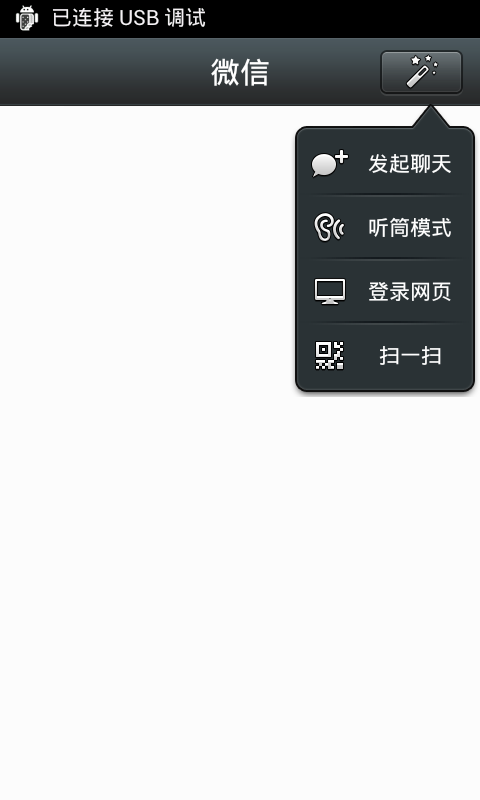
一、实现效果图
这里为了演示方便,我将两种方法放在一个应用程序中演示,这个是主界面
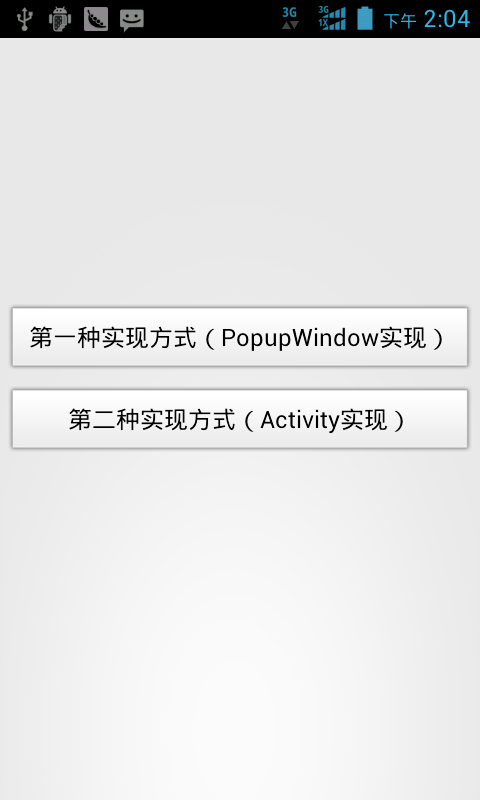
虽然两种实现的方式不一样,但是最终的效果图都是差不多的

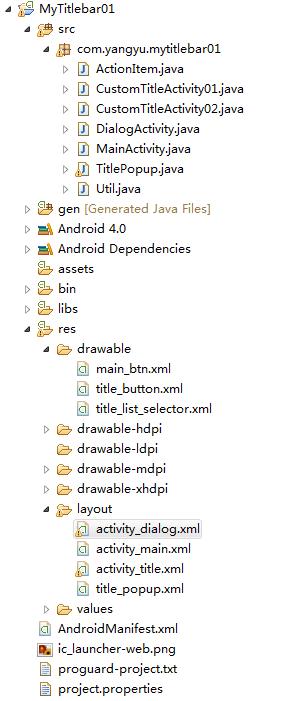
二、项目结构图
三、详细的编码实现
3.1 主界面的实现
为了演示方便,我这里把两种实现方式分成两个Activity界面放在了主Activity界面中。
1、主布局资源文件,activity_main.xml:
<RelativeLayout xmlns:android="http://schemas.android.com/apk/res/android"
    xmlns:tools="http://schemas.android.com/tools"
    android:layout_width="match_parent"
    android:layout_height="match_parent" >

    <Button
        android:id="@+id/main_btn01"
        android:layout_width="fill_parent"
        android:layout_height="44dp"
        android:layout_above="@+id/main_btn02"
        android:layout_margin="5dp"
        android:background="@drawable/main_btn"
        android:text="第一种实现方式(PopupWindow实现)"
        android:textSize="16dp" />

    <Button
        android:id="@+id/main_btn02"
        android:layout_width="fill_parent"
        android:layout_height="44dp"
        android:layout_centerVertical="true"
        android:layout_margin="5dp"
        android:background="@drawable/main_btn"
        android:text="第二种实现方式(Activity实现)"
        android:textSize="16dp" />

</RelativeLayout><?xml version="1.0" encoding="utf-8"?>
<selector xmlns:android="http://schemas.android.com/apk/res/android">
<item android:drawable="@drawable/btn_back_pre" android:state_pressed="true"/>
<item android:drawable="@drawable/btn_back_nor"/>
</selector>package com.yangyu.mytitlebar01;
import android.app.Activity;
import android.content.Intent;
import android.os.Bundle;
import android.view.View;
import android.view.View.OnClickListener;
import android.widget.Button;
/**
* @author yangyu
* 功能描述:主Activity类,程序的入口类
*/
public class MainActivity extends Activity implements OnClickListener {
//定义按钮
private Button mainBtn01,mainBtn02;
@Override
protected void onCreate(Bundle savedInstanceState) {
super.onCreate(savedInstanceState);
setContentView(R.layout.activity_main);
initView();
}
/**
* 初始化组件
*/
private void initView(){
//得到按钮并设置监听事件
mainBtn01 = (Button)findViewById(R.id.main_btn01);
mainBtn02 = (Button)findViewById(R.id.main_btn02);
mainBtn01.setOnClickListener(this);
mainBtn02.setOnClickListener(this);
}
@Override
public void onClick(View v) {
switch (v.getId()) {
case R.id.main_btn01:
startActivity(new Intent(MainActivity.this,CustomTitleActivity01.class));
break;
case R.id.main_btn02:
startActivity(new Intent(MainActivity.this,CustomTitleActivity02.class));
break;
default:
break;
}
}
}
3.2 第一种实现方式(PopupWindow)
第一种实现方式主要是通过点击按钮来弹出一个PopupWindow菜单来实现的,步骤如下:
1、标题栏的布局资源文件,这个资源文件在第二种实现方式中也会使用到,activity_main.xml:
<?xml version="1.0" encoding="utf-8"?>
<LinearLayout xmlns:android="http://schemas.android.com/apk/res/android"
    android:layout_width="fill_parent"
    android:layout_height="fill_parent"
    android:background="#fcfcfc"
    android:orientation="vertical" >

    <RelativeLayout
        android:id="@+id/title"
        android:layout_width="fill_parent"
        android:layout_height="45dp"
        android:background="@drawable/title_bar"
        android:gravity="center_vertical" >

        <TextView
            android:layout_width="wrap_content"
            android:layout_height="wrap_content"
            android:layout_centerInParent="true"
            android:text="微信"
            android:textColor="#ffffff"
            android:textSize="20sp" />

        <ImageButton
            android:id="@+id/title_btn"
            android:layout_width="67dp"
            android:layout_height="wrap_content"
            android:layout_alignParentRight="true"
            android:layout_centerVertical="true"
            android:layout_marginRight="5dp"
            android:background="@drawable/title_button"
            android:onClick="btnmainright"
            android:src="@drawable/title_btn_function" />
    </RelativeLayout>

</LinearLayout><?xml version="1.0" encoding="utf-8"?>
<LinearLayout xmlns:android="http://schemas.android.com/apk/res/android"
android:layout_width="wrap_content"
android:layout_height="wrap_content"
android:background="@drawable/title_function_bg"
android:orientation="vertical" >
<ListView
android:id="@+id/title_list"
android:layout_width="120dp"
android:layout_height="fill_parent"
android:cacheColorHint="#00000000"
android:divider="@drawable/mm_title_functionframe_line"
android:listSelector="@drawable/title_list_selector"
android:padding="3dp"
android:scrollingCache="false" />
</LinearLayout><?xml version="1.0" encoding="utf-8"?>
<selector xmlns:android="http://schemas.android.com/apk/res/android">
<item android:drawable="@drawable/mm_title_functionframe_pressed" android:state_focused="true"></item>
<item android:drawable="@drawable/mm_title_functionframe_pressed" android:state_pressed="true"/>
<item android:drawable="@drawable/mm_title_functionframe_pressed" android:state_selected="true"></item>
<item android:drawable="@android:color/transparent"></item>
</selector><?xml version="1.0" encoding="UTF-8"?>
<selector xmlns:android="http://schemas.android.com/apk/res/android">
<item android:drawable="@drawable/mm_title_btn_focused" android:state_focused="true"/>
<item android:drawable="@drawable/mm_title_btn_pressed" android:state_pressed="true"/>
<item android:drawable="@drawable/mm_title_btn_pressed" android:state_selected="true"/>
<item android:drawable="@drawable/mm_title_btn_normal"/>
</selector>package com.yangyu.mytitlebar01;
import android.content.Context;
/**
* @author yangyu
* 功能描述:常量工具类
*/
public class Util {
/**
* 得到设备屏幕的宽度
*/
public static int getScreenWidth(Context context) {
return context.getResources().getDisplayMetrics().widthPixels;
}
/**
* 得到设备屏幕的高度
*/
public static int getScreenHeight(Context context) {
return context.getResources().getDisplayMetrics().heightPixels;
}
/**
* 得到设备的密度
*/
public static float getScreenDensity(Context context) {
return context.getResources().getDisplayMetrics().density;
}
/**
* 把密度转换为像素
*/
public static int dip2px(Context context, float px) {
final float scale = getScreenDensity(context);
return (int) (px * scale + 0.5);
}
}
package com.yangyu.mytitlebar01;

import android.content.Context;
import android.graphics.drawable.Drawable;

/**
 * @author yangyu
 *	功能描述:弹窗内部子类项(绘制标题和图标)
 */
public class ActionItem {
	//定义图片对象
	public Drawable mDrawable;
	//定义文本对象
	public CharSequence mTitle;

	public ActionItem(Drawable drawable, CharSequence title){
		this.mDrawable = drawable;
		this.mTitle = title;
	}

	public ActionItem(Context context, int titleId, int drawableId){
		this.mTitle = context.getResources().getText(titleId);
		this.mDrawable = context.getResources().getDrawable(drawableId);
	}

	public ActionItem(Context context, CharSequence title, int drawableId) {
		this.mTitle = title;
		this.mDrawable = context.getResources().getDrawable(drawableId);
	}
}
package com.yangyu.mytitlebar01;

import java.util.ArrayList;

import android.content.Context;
import android.graphics.Rect;
import android.graphics.drawable.BitmapDrawable;
import android.view.Gravity;
import android.view.LayoutInflater;
import android.view.View;
import android.view.ViewGroup;
import android.view.ViewGroup.LayoutParams;
import android.widget.AdapterView;
import android.widget.AdapterView.OnItemClickListener;
import android.widget.BaseAdapter;
import android.widget.ListView;
import android.widget.PopupWindow;
import android.widget.TextView;

/**
 * @author yangyu
 *	功能描述:标题按钮上的弹窗(继承自PopupWindow)
 */
public class TitlePopup extends PopupWindow {
	private Context mContext;

	//列表弹窗的间隔
	protected final int LIST_PADDING = 10;

	//实例化一个矩形
	private Rect mRect = new Rect();

	//坐标的位置(x、y)
	private final int[] mLocation = new int[2];

	//屏幕的宽度和高度
	private int mScreenWidth,mScreenHeight;

	//判断是否需要添加或更新列表子类项
	private boolean mIsDirty;

	//位置不在中心
	private int popupGravity = Gravity.NO_GRAVITY;

	//弹窗子类项选中时的监听
	private OnItemOnClickListener mItemOnClickListener;

	//定义列表对象
	private ListView mListView;

	//定义弹窗子类项列表
	private ArrayList<ActionItem> mActionItems = new ArrayList<ActionItem>();

	public TitlePopup(Context context){
		//设置布局的参数
		this(context, LayoutParams.WRAP_CONTENT, LayoutParams.WRAP_CONTENT);
	}

	public TitlePopup(Context context, int width, int height){
		this.mContext = context;

		//设置可以获得焦点
		setFocusable(true);
		//设置弹窗内可点击
		setTouchable(true);
		//设置弹窗外可点击
		setOutsideTouchable(true);

		//获得屏幕的宽度和高度
		mScreenWidth = Util.getScreenWidth(mContext);
		mScreenHeight = Util.getScreenHeight(mContext);

		//设置弹窗的宽度和高度
		setWidth(width);
		setHeight(height);

		setBackgroundDrawable(new BitmapDrawable());

		//设置弹窗的布局界面
		setContentView(LayoutInflater.from(mContext).inflate(R.layout.title_popup, null));

		initUI();
	}

	/**
	 * 初始化弹窗列表
	 */
	private void initUI(){
		mListView = (ListView) getContentView().findViewById(R.id.title_list);

		mListView.setOnItemClickListener(new OnItemClickListener() {
			@Override
			public void onItemClick(AdapterView<?> arg0, View arg1, int index,long arg3) {
				//点击子类项后,弹窗消失
				dismiss();

				if(mItemOnClickListener != null)
					mItemOnClickListener.onItemClick(mActionItems.get(index), index);
			}
		});
	}

	/**
	 * 显示弹窗列表界面
	 */
	public void show(View view){
		//获得点击屏幕的位置坐标
		view.getLocationOnScreen(mLocation);

		//设置矩形的大小
		mRect.set(mLocation[0], mLocation[1], mLocation[0] + view.getWidth(),mLocation[1] + view.getHeight());

		//判断是否需要添加或更新列表子类项
		if(mIsDirty){
			populateActions();
		}

		//显示弹窗的位置
		showAtLocation(view, popupGravity, mScreenWidth - LIST_PADDING - (getWidth()/2), mRect.bottom);
	}

	/**
	 * 设置弹窗列表子项
	 */
	private void populateActions(){
		mIsDirty = false;

		//设置列表的适配器
		mListView.setAdapter(new BaseAdapter() {
			@Override
			public View getView(int position, View convertView, ViewGroup parent) {
				TextView textView = null;

				if(convertView == null){
					textView = new TextView(mContext);
					textView.setTextColor(mContext.getResources().getColor(android.R.color.white));
					textView.setTextSize(14);
					//设置文本居中
					textView.setGravity(Gravity.CENTER);
					//设置文本域的范围
					textView.setPadding(0, 10, 0, 10);
					//设置文本在一行内显示(不换行)
					textView.setSingleLine(true);
				}else{
					textView = (TextView) convertView;
				}

				ActionItem item = mActionItems.get(position);

				//设置文本文字
				textView.setText(item.mTitle);
				//设置文字与图标的间隔
				textView.setCompoundDrawablePadding(10);
				//设置在文字的左边放一个图标
                textView.setCompoundDrawablesWithIntrinsicBounds(item.mDrawable, null , null, null);

                return textView;
			}

			@Override
			public long getItemId(int position) {
				return position;
			}

			@Override
			public Object getItem(int position) {
				return mActionItems.get(position);
			}

			@Override
			public int getCount() {
				return mActionItems.size();
			}
		}) ;
	}

	/**
	 * 添加子类项
	 */
	public void addAction(ActionItem action){
		if(action != null){
			mActionItems.add(action);
			mIsDirty = true;
		}
	}

	/**
	 * 清除子类项
	 */
	public void cleanAction(){
		if(mActionItems.isEmpty()){
			mActionItems.clear();
			mIsDirty = true;
		}
	}

	/**
	 * 根据位置得到子类项
	 */
	public ActionItem getAction(int position){
		if(position < 0 || position > mActionItems.size())
			return null;
		return mActionItems.get(position);
	}

	/**
	 * 设置监听事件
	 */
	public void setItemOnClickListener(OnItemOnClickListener onItemOnClickListener){
		this.mItemOnClickListener = onItemOnClickListener;
	}

	/**
	 * @author yangyu
	 *	功能描述:弹窗子类项按钮监听事件
	 */
	public static interface OnItemOnClickListener{
		public void onItemClick(ActionItem item , int position);
	}
}
package com.yangyu.mytitlebar01;

import android.app.Activity;
import android.os.Bundle;
import android.view.View;
import android.view.View.OnClickListener;
import android.view.ViewGroup.LayoutParams;
import android.widget.ImageButton;

/**
 * @author yangyu
 *	功能描述:第一种实现方式,PopupWindow实现方式
 */
public class CustomTitleActivity01 extends Activity {
	//定义标题栏上的按钮
	private ImageButton titleBtn;

	//定义标题栏弹窗按钮
	private TitlePopup titlePopup;

	@Override
	protected void onCreate(Bundle savedInstanceState) {
		super.onCreate(savedInstanceState);
		setContentView(R.layout.activity_title);

		initView();

		initData();
	}

	/**
	 * 初始化组件
	 */
	private void initView(){
		//实例化标题栏按钮并设置监听
		titleBtn = (ImageButton) findViewById(R.id.title_btn);
		titleBtn.setOnClickListener(new OnClickListener() {
			@Override
			public void onClick(View v) {
				titlePopup.show(v);
			}
		});

		//实例化标题栏弹窗
		titlePopup = new TitlePopup(this, LayoutParams.WRAP_CONTENT, LayoutParams.WRAP_CONTENT);
	}

	/**
	 * 初始化数据
	 */
	private void initData(){
		//给标题栏弹窗添加子类
		titlePopup.addAction(new ActionItem(this, "发起聊天", R.drawable.mm_title_btn_compose_normal));
		titlePopup.addAction(new ActionItem(this, "听筒模式", R.drawable.mm_title_btn_receiver_normal));
		titlePopup.addAction(new ActionItem(this, "登录网页", R.drawable.mm_title_btn_keyboard_normal));
		titlePopup.addAction(new ActionItem(this, "扫一扫",  R.drawable.mm_title_btn_qrcode_normal));
	}

}
3.2 第二种实现方式(Activity)
第二种实现方式主要是通过再定义一个Activity来调用实现的,要想实现一个Activity点击按钮实现另一个Activity的弹窗
效果,就要在AndroidManifest.xml清单文件中注册一个新的Activity,然后给它调用系统的样式来实现这种效果。
<activity
            android:name="DialogActivity"
            android:theme="@android:style/Theme.Translucent.NoTitleBar" >
        </activity>
1、定义另一个Activity布局文件,activity_dialog.xml:
<?xml version="1.0" encoding="UTF-8"?>
<RelativeLayout xmlns:android="http://schemas.android.com/apk/res/android"
    android:layout_width="fill_parent"
    android:layout_height="fill_parent" >

    <RelativeLayout
        android:layout_width="fill_parent"
        android:layout_height="fill_parent"
        android:layout_marginTop="50dp" >

        <LinearLayout
            android:id="@+id/main_dialog_layout"
            android:layout_width="wrap_content"
            android:layout_height="wrap_content"
            android:layout_alignParentRight="true"
            android:layout_alignParentTop="true"
            android:background="@drawable/title_function_bg"
            android:orientation="vertical" >

            <LinearLayout
                android:id="@+id/llayout01"
                android:layout_width="fill_parent"
                android:layout_height="wrap_content"
                android:layout_marginLeft="5dp"
                android:layout_marginRight="5dp"
                android:layout_marginTop="5dp"
                android:background="@drawable/title_list_selector" >

                <ImageView
                    android:id="@+id/imageView1"
                    android:layout_width="wrap_content"
                    android:layout_height="wrap_content"
                    android:layout_gravity="center_vertical"
                    android:layout_marginLeft="8dp"
                    android:src="@drawable/mm_title_btn_compose_normal" />

                <TextView
                    android:layout_width="wrap_content"
                    android:layout_height="wrap_content"
                    android:padding="8dp"
                    android:text="发起聊天"
                    android:textColor="#fff"
                    android:textSize="16sp" />
            </LinearLayout>

            <ImageView
                android:id="@+id/imageView5"
                android:layout_width="wrap_content"
                android:layout_height="wrap_content"
                android:src="@drawable/mm_title_functionframe_line" />

            <LinearLayout
                android:id="@+id/llayout02"
                android:layout_width="fill_parent"
                android:layout_height="wrap_content"
                android:layout_marginLeft="5dp"
                android:layout_marginRight="5dp"
                android:background="@drawable/title_list_selector" >

                <ImageView
                    android:id="@+id/imageView2"
                    android:layout_width="wrap_content"
                    android:layout_height="wrap_content"
                    android:layout_gravity="center_vertical"
                    android:layout_marginLeft="8dp"
                    android:src="@drawable/mm_title_btn_receiver_normal" />

                <TextView
                    android:layout_width="wrap_content"
                    android:layout_height="wrap_content"
                    android:padding="8dp"
                    android:text="听筒模式"
                    android:textColor="#fff"
                    android:textSize="16sp" />
            </LinearLayout>

            <ImageView
                android:id="@+id/imageView5"
                android:layout_width="wrap_content"
                android:layout_height="wrap_content"
                android:src="@drawable/mm_title_functionframe_line" />

            <LinearLayout
                android:id="@+id/llayout03"
                android:layout_width="fill_parent"
                android:layout_height="wrap_content"
                android:layout_marginLeft="5dp"
                android:layout_marginRight="5dp"
                android:background="@drawable/title_list_selector" >

                <ImageView
                    android:id="@+id/imageView3"
                    android:layout_width="wrap_content"
                    android:layout_height="wrap_content"
                    android:layout_gravity="center_vertical"
                    android:layout_marginLeft="8dp"
                    android:src="@drawable/mm_title_btn_keyboard_normal" />

                <TextView
                    android:layout_width="wrap_content"
                    android:layout_height="wrap_content"
                    android:padding="8dp"
                    android:text="登录网页"
                    android:textColor="#fff"
                    android:textSize="16sp" />
            </LinearLayout>

            <ImageView
                android:id="@+id/imageView5"
                android:layout_width="wrap_content"
                android:layout_height="wrap_content"
                android:src="@drawable/mm_title_functionframe_line" />

            <LinearLayout
                android:id="@+id/llayout04"
                android:layout_width="fill_parent"
                android:layout_height="wrap_content"
                android:layout_marginBottom="3dp"
                android:layout_marginLeft="5dp"
                android:layout_marginRight="5dp"
                android:background="@drawable/title_list_selector" >

                <ImageView
                    android:id="@+id/imageView4"
                    android:layout_width="wrap_content"
                    android:layout_height="wrap_content"
                    android:layout_gravity="center_vertical"
                    android:layout_marginLeft="8dp"
                    android:src="@drawable/mm_title_btn_qrcode_normal" />

                <TextView
                    android:layout_width="wrap_content"
                    android:layout_height="wrap_content"
                    android:padding="13dp"
                    android:text="扫一扫"
                    android:textColor="#fff"
                    android:textSize="16sp" />
            </LinearLayout>
        </LinearLayout>
    </RelativeLayout>

</RelativeLayout>package com.yangyu.mytitlebar01;
import android.app.Activity;
import android.os.Bundle;
import android.view.MotionEvent;
import android.view.View;
import android.view.View.OnClickListener;
import android.widget.LinearLayout;
/**
* @author yangyu
* 功能描述:弹出Activity界面
*/
public class DialogActivity extends Activity implements OnClickListener{
private LinearLayout layout01,layout02,layout03,layout04;
@Override
protected void onCreate(Bundle savedInstanceState) {
super.onCreate(savedInstanceState);
setContentView(R.layout.activity_dialog);
initView();
}
/**
* 初始化组件
*/
private void initView(){
//得到布局组件对象并设置监听事件
layout01 = (LinearLayout)findViewById(R.id.llayout01);
layout02 = (LinearLayout)findViewById(R.id.llayout02);
layout03 = (LinearLayout)findViewById(R.id.llayout03);
layout04 = (LinearLayout)findViewById(R.id.llayout04);
layout01.setOnClickListener(this);
layout02.setOnClickListener(this);
layout03.setOnClickListener(this);
layout04.setOnClickListener(this);
}
@Override
public boolean onTouchEvent(MotionEvent event){
finish();
return true;
}
@Override
public void onClick(View v) {
}
}
package com.yangyu.mytitlebar01;

import android.app.Activity;
import android.content.Intent;
import android.os.Bundle;
import android.view.View;
import android.view.View.OnClickListener;
import android.widget.ImageButton;

/**
 * @author yangyu
 *	功能描述:第二种实现方式,Activity实现方式
 */
public class CustomTitleActivity02 extends Activity {
	//定义标题栏上的按钮
	private ImageButton titleBtn;

	@Override
	protected void onCreate(Bundle savedInstanceState) {
		super.onCreate(savedInstanceState);
		setContentView(R.layout.activity_title);

		initView();
	}

	/**
	 * 初始化组件
	 */
	private void initView(){
		//实例化标题栏按钮并设置监听
		titleBtn = (ImageButton) findViewById(R.id.title_btn);
		titleBtn.setOnClickListener(new OnClickListener() {
			@Override
			public void onClick(View v) {
				startActivity(new Intent(CustomTitleActivity02.this,DialogActivity.class));
			}
		});
	}

}
两种弹窗的实现方式基本上就讲完了,有什么问题可以跟博主留言。


 1057
1057

 被折叠的 条评论
为什么被折叠?
被折叠的 条评论
为什么被折叠?
 到【灌水乐园】发言


