


最近因工作需要,在JS中调用.net的webservice,于是整合了一个小事例希望有需要的人看到并且能帮到你
首选第一步是创建一个.net的webservice,这个简单就不多说了,我这里的webservice文件明叫WebService1.asmx代码如下
namespace WebApplication1
{
/// <summary>
/// WebService1 的摘要说明
/// </summary>
[WebService(Namespace = "http://tempuri.org/")]
[WebServiceBinding(ConformsTo = WsiProfiles.BasicProfile1_1)]
[System.ComponentModel.ToolboxItem(true)]
// 若要允许使用 ASP.NET AJAX 从脚本中调用此 Web 服务,请取消对下行的注释。
[System.Web.Script.Services.ScriptService]
public class WebService1 : System.Web.Services.WebService
{
[WebMethod]
[SoapRpcMethod(Use = SoapBindingUse.Literal, Action = "http://tempuri.org/HelloWorld", RequestNamespace = "http://tempuri.org/HelloWorld",
ResponseNamespace = "http://tempuri.org/HelloWorld")]
public string HelloWorld(string name,string password)
{
if (name != null && !name.Equals("") && password!=null && !password.Equals(""))
{
if (name.Equals("admin") && password.Equals("admin"))
{
return "登录成功";
}
else
{
return "用户名或密码错误";
}
}
else
return "没有接收到参数";
}
[WebMethod]
[SoapRpcMethod(Use = SoapBindingUse.Literal, Action = "http://tempuri.org/HelloWorld2", RequestNamespace = "http://tempuri.org/HelloWorld2",
ResponseNamespace = "http://tempuri.org/HelloWorld2")]
public string HelloWorld2()
{
return "Hello World2";
}
}
}
为了做个对比,我写了两个方法HelloWorld(用户名,密码)和HelloWorld2(),里面代码很简单就不做介绍了
这样webservice部分就完成了,当然要测试下是否能在浏览器访问到WebService1.asmx,如果成功的话就会出现这个页面
我们可以看到上面出现了两个连接HelloWorld,HelloWorld2,点击进入HelloWorld会出现以下页面
在这个页面中可以输入name,password进行测试。我们也可以找到以下这段代码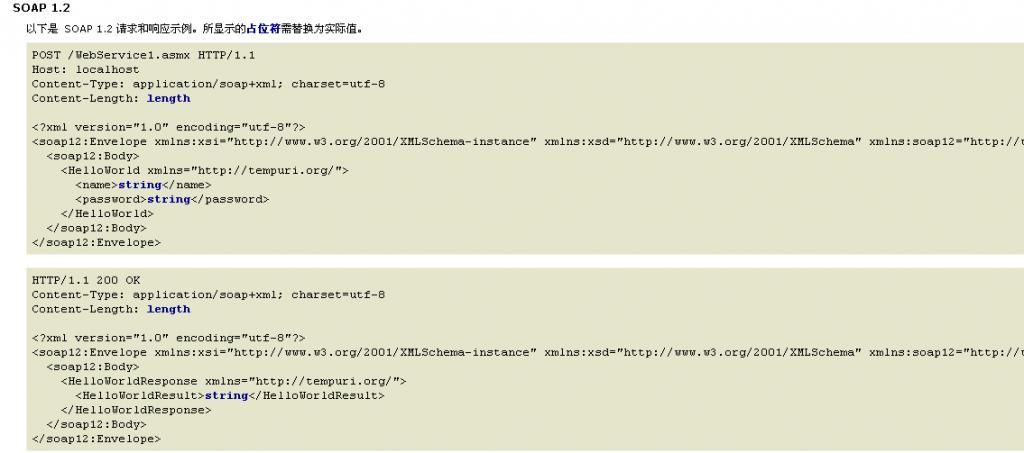
这段代码很重要,第一段是请求,第二段是返回,第一部分的
<HelloWorld xmlns="http://tempuri.org">
<name>string</name>
<password>string</password>
</HelloWorld>
name和password是参数名称,里面的string是参数类型
第二部分中的
<HelloWorldResponse xmlns="http://tempuri.org/">
<HelloWorldResult>string</HelloWorldResult>
</HelloWorldResponse>是返回数据的描述
OK,WebService部分就介绍到这里,下面进入AJAX调用部分(就用一个简单的html测试)
下面贴出JS代码
<script>
var xmlHttp;
//创建xmlHttp对象
function createXMLHttpRequest() {
if (window.ActiveXObject) {
xmlHttp = new ActiveXObject("Microsoft.XMLHTTP");
}
else if (window.XMLHttpRequest) {
xmlHttp = new XMLHttpRequest();
}
}
function sendRequest(url,HttpMethod) {
if (!HttpMethod){
HttpMethod = "POST";
}
createXMLHttpRequest();//调用创建xmlHttp对象函数
alert("开始调用webService");
xmlHttp.open(HttpMethod, url, false);
xmlHttp.setRequestHeader("Content-Type","application/soap+xml");
var data;
data = '<?xml version="1.0" encoding="utf-8"?>';
data = data + '<soap12:Envelope xmlns:xsi="http://www.w3.org/2001/XMLSchema-instance" xmlns:xsd="http://www.w3.org/2001/XMLSchema"
xmlns:soap12="http://www.w3.org/2003/05/soap-envelope">';
data = data + '<soap12:Body>';
data = data + '<HelloWorld xmlns="http://tempuri.org/" >';
data = data+'<name>admin</name><password>admin</password></HelloWorld>';//这里设置参数值,我这里默认admin,你们可以动态从页面获取
data = data + '</soap12:Body>';
data = data + '</soap12:Envelope>';
alert(data);//这里data拼接的是C代码段的第一步部分
xmlHttp.send(data); //发送数据参数 关键的一步
xmlHttp.onreadystatechange = processReqChange;//调用进程监视函数
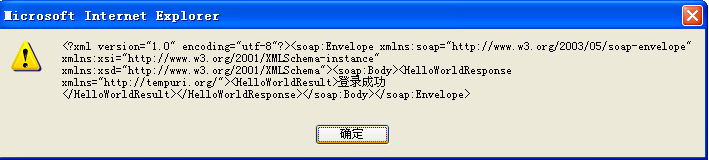
//alert(xmlHttp.responseText);//这里可以看到接收到是C代码段第二部分(见最后一个图)
jxXML(xmlHttp.responseText);//因为得到的是XML数据,所以要解析,你们可以直接用responseXML的方式获取解析
}
function processReqChange() {
// 监视数据传递。
if (xmlHttp.readyState == 4) {
if (xmlHttp.status == 200) {
alert(xmlHttp.responseText); // connect OK 执行输出函数out()
} else { //抛出错误
alert("无法正常连接服务器,错误:/n" +
xmlHttp.statusText+":"+xmlHttp.status);
}
}
}
//解析返回的XML数据(xmlText为字符串)
function jxXML(xmlText)
{
var xmlDoc;
if (window.ActiveXObject) { // For IE
xmlDoc = new ActiveXObject("Microsoft.XMLDOM");
xmlDoc.async="false";
xmlDoc.loadXML(xmlText);
} else { // For Mozilla, Firefox, Opera, etc.
var parser = new DOMParser();
xmlDoc = parser.parseFromString(xmlText,"text/xml");
}
var returnResult = xmlDoc.getElementsByTagName("HelloWorldResponse");
alert(returnResult[0].childNodes[0].text);
}
</script>
sendRequest("http://localhost:2563/WebService1.asmx","POST");//调用请求函数
第一次写,如有写的不好的地方还请大家多多包含


 127
127


 被折叠的 条评论
为什么被折叠?
被折叠的 条评论
为什么被折叠?
 到【灌水乐园】发言


