


简言:
frameworks/base/services/java/com/android/server/
系统框架服务目录下,可以看到名为Watchdog.java文件,这是一个软件看门狗的实现,其主要目的为检测系统锁的持有情况,若发生超时持有锁情况,则视为系统锁死,将作出终止或者继续等待等处理。
而最近我还是遇到系统在开机启动时一直停留在开机动画界面,从trace上看,系统不幸发生死锁了。为何系统有看门狗,狗狗却没有发现死锁呢?带着问题,来watchdog(WTD)走一遭吧。
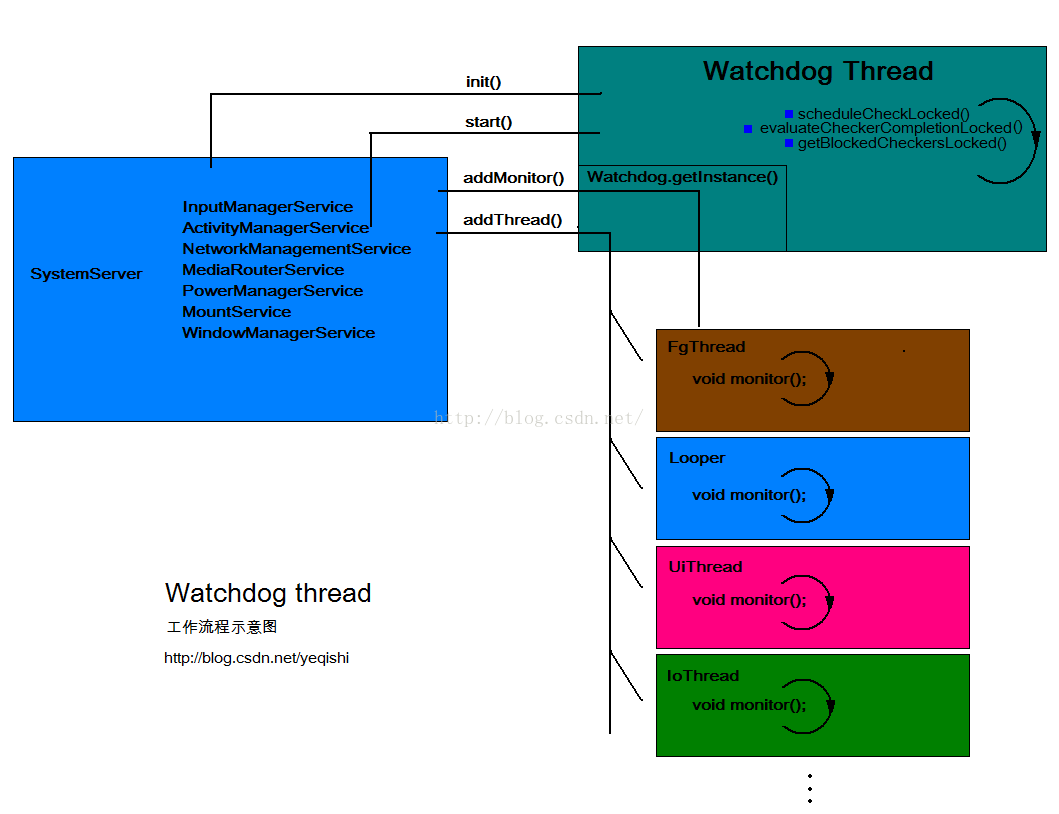
下图是我用画板来做的WTD工作流程示意图,借助图示来分析:
Step1:
首先看下WTD的定义:Watchdog.java
public class Watchdog extends Thread {
    // WTD通过懒汉式单例来实例化并保证对象唯一性<
    static Watchdog sWatchdog;
    public static Watchdog getInstance() {
        if (sWatchdog == null) {
            sWatchdog = new Watchdog();
        }
        return sWatchdog;
    }
    // 构造函数中,默认添加了四个主线程到WTD检测服务中
    // 但原生的Android并没有在每个主线程上都添加了监听器
    // 只有mMonitorChecker上添加了监听器Monitor,监听器里实现了扫描检测锁情况的具体步骤
    private Watchdog() {
        super("watchdog");
        // Initialize handler checkers for each common thread we want to check.  Note
        // that we are not currently checking the background thread, since it can
        // potentially hold longer running operations with no guarantees about the timeliness
        // of operations there.

        // The shared foreground thread is the main checker.  It is where we
        // will also dispatch monitor checks and do other work.
        mMonitorChecker = new HandlerChecker(FgThread.getHandler(), "foreground thread", DEFAULT_TIMEOUT);
        mHandlerCheckers.add(mMonitorChecker);
        // Add checker for main thread.  We only do a quick check since there
        // can be UI running on the thread.
        mHandlerCheckers.add(new HandlerChecker(new Handler(Looper.getMainLooper()), "main thread", DEFAULT_TIMEOUT));
        // Add checker for shared UI thread.
        mHandlerCheckers.add(new HandlerChecker(UiThread.getHandler(), "ui thread", DEFAULT_TIMEOUT));
        // And also check IO thread.
        mHandlerCheckers.add(new HandlerChecker(IoThread.getHandler(), "i/o thread", DEFAULT_TIMEOUT));
    }
Step2:
WTD的构造函数中出现了一个重要的类HandlerChecker,
    public final class HandlerChecker implements Runnable{
        private final Handler mHandler;      // 监视器所在线程
        private final String mName;          // 线程名
        private final long mWaitMax;         // 最大等待阈值,超出则视为锁死
                                             // 运行在线程上的监视器
        private final ArrayList<Monitor> mMonitors = new ArrayList<Monitor>();
        private boolean mCompleted;          // 检测状态:完成、进行中
        private Monitor mCurrentMonitor;     // 当前检测的监视器
        private long mStartTime;             // 本轮检测开始时间,用于判断超时的相对起始时间点

        HandlerChecker(Handler handler, String name, long waitMaxMillis) {
            mHandler = handler;
            mName = name;
            mWaitMax = waitMaxMillis;
            mCompleted = true;
        }
        public void addMonitor(Monitor monitor) {
            mMonitors.add(monitor);
        }

        public void scheduleCheckLocked() {
            if (mMonitors.size() == 0 && mHandler.getLooper().isIdling()) {
                // If the target looper is or just recently was idling, then
                // there is no reason to enqueue our checker on it since that
                // is as good as it not being deadlocked.  This avoid having
                // to do a context switch to check the thread.  Note that we
                // only do this if mCheckReboot is false and we have no
                // monitors, since those would need to be executed at this point.
                mCompleted = true;
                return;
            }

            if (!mCompleted) {
                // we already have a check in flight, so no need
                return;
            }

            mCompleted = false;
            mCurrentMonitor = null;
            mStartTime = SystemClock.uptimeMillis();
            // 这里是WTD检测锁重要的实现方法,依靠向对应线程发送启动Monitor函数检测锁的超时情况,示意图中示意了几个线程中的Monitor执行过程
            mHandler.postAtFrontOfQueue(this);
        }

        public boolean isOverdueLocked() {
            return (!mCompleted) && (SystemClock.uptimeMillis() > mStartTime + mWaitMax);
        }

        public int getCompletionStateLocked() {
            if (mCompleted) {
                return COMPLETED;
            } else {
                long latency = SystemClock.uptimeMillis() - mStartTime;
                if (latency < mWaitMax/2) {
                    return WAITING;
                } else if (latency < mWaitMax) {
                    return WAITED_HALF;
                }
            }
            return OVERDUE;
        }

        @Override
        public void run() {
            final int size = mMonitors.size();
            for (int i = 0 ; i < size ; i++) {
                synchronized (Watchdog.this) {
                    mCurrentMonitor = mMonitors.get(i);
                }
                mCurrentMonitor.monitor();
            }

            synchronized (Watchdog.this) {
                mCompleted = true;
                mCurrentMonitor = null;
            }
        }
    }
Step3:
接着回到上面看下WTD的工作内容,我们对WTD几个主要的接口函数功能描述:
addMonitor:添加监视器到mMonitorChecker上,它运行在FgThread线程上
addThread:创建对应线程的MonitorChecker,并添加到mMonitorCheckers中
    /* This handler will be used to post message back onto the main thread */
    final ArrayList<HandlerChecker> mHandlerCheckers = new ArrayList<HandlerChecker>();
    final HandlerChecker mMonitorChecker;
    public void addMonitor(Monitor monitor) {
        synchronized (this) {
            if (isAlive()) {
                throw new RuntimeException("Monitors can't be added once the Watchdog is running");
            }
            mMonitorChecker.addMonitor(monitor);
        }
    }

    public void addThread(Handler thread, String name, long timeoutMillis) {
        synchronized (this) {
            if (isAlive()) {
                throw new RuntimeException("Threads can't be added once the Watchdog is running");
            }
            mHandlerCheckers.add(new HandlerChecker(thread, name, timeoutMillis));
        }
    }
接着看WTD线程运行时run函数,是一个while死循环,保证持续监测状态。如示意图所示,WTD run函数实体中主要有以下三个函数实现,简要描述各自的作用
scheduleCheckLocked:从对应线程上启动监视器Monitor
evaluateCheckerCompletionLocked:计算监视器完成状态,如果有监视器存在锁等待状态,将发生超时结果
getBlockedCheckersLocked:获取超时状态监视器,用于之后的打印堆栈信息,方便分析处理
    @Override
    public void run() {
        boolean waitedHalf = false;
        while (true) {
                // Make sure we (re)spin the checkers that have become idle within
                // this wait-and-check interval
                for (int i=0; i<mHandlerCheckers.size(); i++) {
                    HandlerChecker hc = mHandlerCheckers.get(i);
                    hc.scheduleCheckLocked();
                }
                ...
                final int waitState = evaluateCheckerCompletionLocked();
                if (waitState == COMPLETED) {
                    // The monitors have returned; reset
                    waitedHalf = false;
                    continue;
                } else if (waitState == WAITING) {
                    // still waiting but within their configured intervals; back off and recheck
                    continue;
                } else if (waitState == WAITED_HALF) {
                    if (!waitedHalf) {
                        // We've waited half the deadlock-detection interval.  Pull a stack
                        // trace and wait another half.
                        ArrayList<Integer> pids = new ArrayList<Integer>();
                        pids.add(Process.myPid());
                        ActivityManagerService.dumpStackTraces(true, pids, null, null,
                                NATIVE_STACKS_OF_INTEREST);
                        waitedHalf = true;
                    }
                    continue;
                }
                // something is overdue!
                blockedCheckers = getBlockedCheckersLocked();
                subject = describeCheckersLocked(blockedCheckers);
                allowRestart = mAllowRestart;
Step4:
接着来看WTD的实例化和启动:SystemServer.java
class ServerThread {
    ...
    public void initAndLoop() {
        // Create a handler thread just for the window manager to enjoy.
        HandlerThread wmHandlerThread = new HandlerThread("WindowManager");
        wmHandlerThread.start();
        Handler wmHandler = new Handler(wmHandlerThread.getLooper());
        wmHandler.post(new Runnable() {
            @Override
            public void run() {
                //Looper.myLooper().setMessageLogging(new LogPrinter(
                //        android.util.Log.DEBUG, TAG, android.util.Log.LOG_ID_SYSTEM));
                android.os.Process.setThreadPriority(
                        android.os.Process.THREAD_PRIORITY_DISPLAY);
                android.os.Process.setCanSelfBackground(false);

                // For debug builds, log event loop stalls to dropbox for analysis.
                if (StrictMode.conditionallyEnableDebugLogging()) {
                    Slog.i(TAG, "Enabled StrictMode logging for WM Looper");
                }
            }
        });

            ...
            Slog.i(TAG, "Init Watchdog");
            Watchdog.getInstance().init(context, battery, power, alarm,
                    ActivityManagerService.self());
            Watchdog.getInstance().addThread(wmHandler, "WindowManager thread");
            ...
            wm.systemReady();
            power.systemReady(twilight, dreamy);
            pm.systemReady();
            display.systemReady(safeMode, onlyCore);
            ...
            // We now tell the activity manager it is okay to run third party
            // code.  It will call back into us once it has gotten to the state
            // where third party code can really run (but before it has actually
            // started launching the initial applications), for us to complete our
            // initialization.
            ActivityManagerService.self().systemReady(new Runnable() {
            public void run() {
                Slog.i(TAG, "Making services ready");
                ...
                Watchdog.getInstance().start();// WTD线程在这里启动
                ...
            }
    }
}

public class SystemServer {
    private static final String TAG = "SystemServer";
    public static void main(String[] args) {
        ...
        ServerThread thr = new ServerThread();
        thr.initAndLoop();
    }
}

./am/ActivityManagerService.java
    public void systemReady(final Runnable goingCallback) {
        synchronized(this) {
            if (mSystemReady) {
                if (goingCallback != null) goingCallback.run();
                return;
            }
SystemServer的流程清楚的表明了WTD以及各系统服务的实例化过程,WTD在SystemServer中实例化,在AMS的systemReady函数中启动运行。
Step5:
WTD在实际使用中如果应用,新增的服务如何加入到WTD检测中?可以参考如下示例:
./wm/WindowManagerService.java
    private WindowManagerService(Context context, PowerManagerService pm,
            DisplayManagerService displayManager, InputManagerService inputManager,
            boolean haveInputMethods, boolean showBootMsgs, boolean onlyCore) {
        // Add ourself to the Watchdog monitors.
        Watchdog.getInstance().addMonitor(this);
    }
    // Called by the heartbeat to ensure locks are not held indefnitely (for deadlock detection).
    @Override
    public void monitor() {
        synchronized (mWindowMap) { }
    }
即在服务中使用addMonitor()的方法将当前服务句柄添加WTD中,服务需要实现monitor()接口以满足WTD回调。
备注:
在添加监视器到WTD中时,可以选择合适的线程进行监视,目前我没有发现有特别的不同,不过对应的服务添加到自身所有线程上应该恰当,但添加到其他线程上也不会影响系统正常运行。在原生的Android4.4上面,实际上只有主线程FgThread有监视器,其他线程都是空的,所以google在WTD上只是提供了一套思路,大家可以自行完善。
下一篇将介绍实际遇到的死锁以及看门狗出现的问题及改造。


 998
998


 被折叠的 条评论
为什么被折叠?
被折叠的 条评论
为什么被折叠?
 到【灌水乐园】发言


