


在最开始也是最容易忘记的(至少对于我),我们要遵守百度推送的协议,只有遵守了百度推送的协议才可以使用它来完成我们想要的效果,也就是在@interface AppDelegate ()后面写上 <BPushDelegate>。
首先 在AppDelegate中didFinishLaunchingWithOptions方面里面配置一些代码,如果你这样做了,那么恭喜你,你已经成功注册百度推送通知了。
- (BOOL)application:(UIApplication *)application didFinishLaunchingWithOptions:(NSDictionary *)launchOptions
{// 初始化百度 Push 服务
[BPush setupChannel:launchOptions];
//成为百度推送的代理(别忘了实现它的代理方法,不过你不实现的话,程序也会提醒你的)
[application setApplicationIconBadgeNumber:0];
// 注册方式:
if ([[[UIDevice currentDevice] systemVersion] floatValue] >= 8.0) {
[[UIApplication sharedApplication] registerUserNotificationSettings:[UIUserNotificationSettings
settingsForTypes:(UIUserNotificationTypeSound |
UIUserNotificationTypeAlert |
UIUserNotificationTypeBadge)
categories:nil]];
[[UIApplication sharedApplication] registerForRemoteNotifications];
}
else {
[[UIApplication sharedApplication]registerForRemoteNotificationTypes:UIRemoteNotificationTypeAlert|
UIRemoteNotificationTypeBadge|
UIRemoteNotificationTypeSound];
}
// 同理判断消息推送是否打开也有变化
UIRemoteNotificationType types;
if ([[[UIDevice currentDevice] systemVersion] floatValue] >= 8.0)
types = [[UIApplication sharedApplication] currentUserNotificationSettings].types;
else
types = [[UIApplication sharedApplication] enabledRemoteNotificationTypes];
}
其次,你可以在收到推送通知的didRegisterForRemoteNotificationsWithDeviceToken方法里面打印一下你需要的一些信息。
- (void)application:(UIApplication *)application didRegisterForRemoteNotificationsWithDeviceToken:(NSData *)deviceToken
{
NSString *str = [[NSString alloc] initWithData:deviceToken encoding:NSUTF8StringEncoding];
NSLog(@"----------------test:%@",str);
[BPush registerDeviceToken: deviceToken];
[BPush bindChannel];
NSLog(@"Register device token: %@\n openudid: %@", deviceToken, [OpenUDID value]);
}
接下来就要实现协议方法了(协议方法里面也是可以获取到一些我们需要的信息,反正我当时是么有用到)
- (void) onMethod:(NSString*)method response:(NSDictionary*)data {
NSLog(@"On method:%@", method);
// NSLog(@"data:%@", [data description]);
NSDictionary* res = [[NSDictionary alloc] initWithDictionary:data];
if ([BPushRequestMethod_Bind isEqualToString:method]) {
NSString *appid = [res valueForKey:BPushRequestAppIdKey];
NSString *userid = [res valueForKey:BPushRequestUserIdKey];
NSString *channelid = [res valueForKey:BPushRequestChannelIdKey];
//NSString *requestid = [res valueForKey:BPushRequestRequestIdKey];
int returnCode = [[res valueForKey:BPushRequestErrorCodeKey] intValue];
if (returnCode == BPushErrorCode_Success) {
self.viewController.appidText = appid;
self.viewController.useridText = userid;
self.viewController.channelidText = channelid;
NSLog(@"--appid :%@--userid :%@--channelid :%@",appid,userid,channelid);
// 在内存中备份,以便短时间内进入可以看到这些值,而不需要重新bind
self.appId = appid;
self.channelId = channelid;
self.userId = userid;
}
} else if ([BPushRequestMethod_Unbind isEqualToString:method]) {
int returnCode = [[res valueForKey:BPushRequestErrorCodeKey] intValue];
if (returnCode == BPushErrorCode_Success) {
self.viewController.appidText = nil;
self.viewController.useridText = nil;
self.viewController.channelidText = nil;
}
}
}
最后,就是对我们收到的推送通知出来了,相信大家都知道怎么处理了吧。
//推送消息处理
- (void)application:(UIApplication *)application didReceiveRemoteNotification:(NSDictionary *)userInfo {
NSLog(@"Receive Notify: %@", [userInfo JSONString]);
if (application.applicationState == UIApplicationStateActive) {
// NSString *type = [[[userInfo objectForKey:@"description"] objectForKey:@"custom_content"] objectForKey:@"type"];
NSString * title = [[userInfo objectForKey:@"aps"] objectForKey:@"alert"];
UIAlertView *view = [[UIAlertView alloc] initWithTitle:@"****提示" message:title delegate:self cancelButtonTitle:@"知道了" otherButtonTitles:nil, nil];
view.tag = 6000;
[view show];
}
[BPush handleNotification:userInfo];
NSLog(@"--+++++++++Receive notification: %@",[userInfo JSONString]);
}
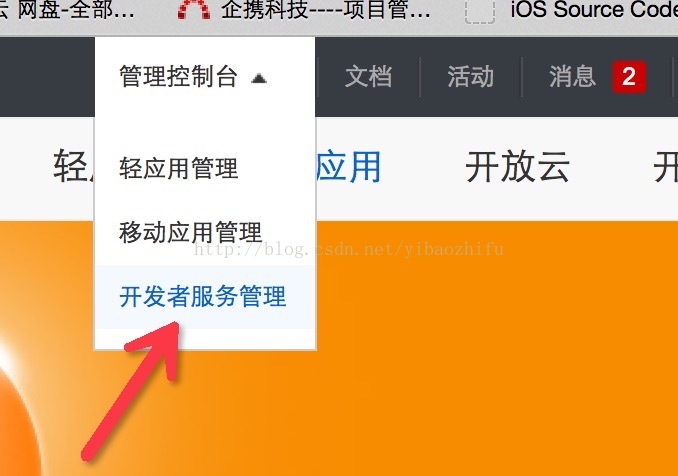
好了,到此为止工程里面的配置信息已全部完成,剩下的就是去百度开发者中心注册并且成为其中一员,只有这样我们才可以使用百度推送。如果你还不知道接下来的步骤的话你直接百度“百度开发者平台”即可。然后进入网页,如果登录账号(这个必须你所在公司提供给你,因为注册申请账号需要的一些东西咱没有),好了,接下来我配置一些图片,这样或许大家会更明白更容易做一些。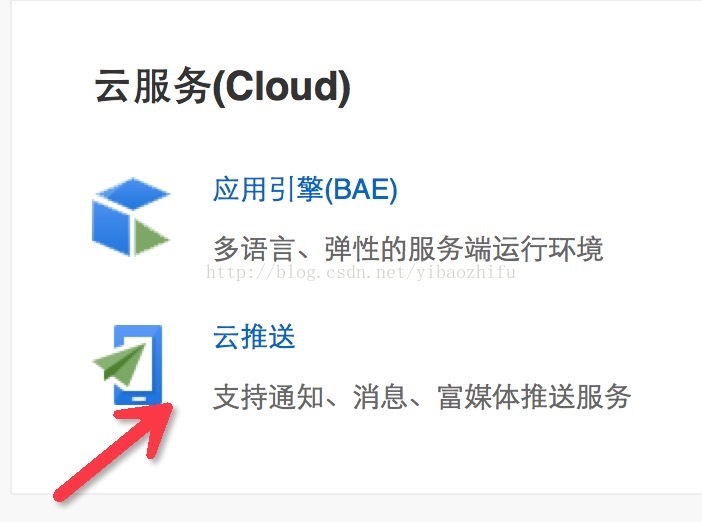


 3万+
3万+


 被折叠的 条评论
为什么被折叠?
被折叠的 条评论
为什么被折叠?
 到【灌水乐园】发言


