


已经基本了解了dojo中tree的使用,现在做一些比较经典的应用。
先截个图,展示一下总体的目标:
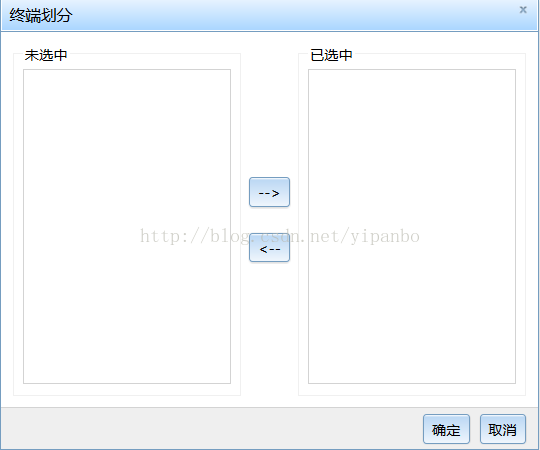
大致就是左边是一棵树,右边是一棵树,然后用户可以方便的选择。
好了,现在分步来实现,先是这个框架,代码:
<!DOCTYPE HTML>
<html>
  <head>
    <base href="<%=basePath%>">
    <title>My JSP 'treeTest.jsp' starting page</title>
	<link rel="stylesheet" type="text/css" href="js/dijit/themes/claro/claro.css">
	<link rel="stylesheet" type="text/css" href="css/main.css">
  </head>

  <body class="claro">
    <button type="button" id="treeBtn" data-dojo-type="dijit/form/Button">tree测试</button>

     <form data-dojo-type="dijit/form/Form">
	    <div data-dojo-type="dijit/Dialog" class="selectDia" id="selectDia" title="终端划分">
	    	<table>
	    		<tr>
	    			<td>
	    				<fieldset>
	    					<legend>未选中</legend>
		    				<div class="leftTree" id="leftTree"></div>
		    			</fieldset>
		    		</td>
		    		<td>
		    			<button class="toRightBtn" id="toRightBtn" type="button" data-dojo-type="dijit/form/Button">--></button>
		    			<br/>
		    			<br/>
		    			<button class="toLeftBtn" id="toLeftBtn"type="button" data-dojo-type="dijit/form/Button"><--</button>
		    		</td>
		    		<td>
		    			<fieldset>
		    				<legend>已选中</legend>
		    				<div class="rightTree" id="rightTree"></div>
		    			</fieldset>
		    		</td>
		    	</tr>
	    	</table>
	    	<div class="actionBar">
	    		<button type="submit" data-dojo-type="dijit/form/Button">确定</button>
	    		<button type="button" id="cancelBtn" data-dojo-type="dijit/form/Button">取消</button>
	    	</div>
	    </div>
    </form>

    <script type="text/javascript" src="js/dojo/dojo.js" data-dojo-config="parseOnLoad:false"></script>
    <script type="text/javascript">
    	require([
    	         "dojo/parser",
    	         "dijit/registry",
    	         "dojo/on",
    	         "dijit/form/Button",
    	         "dijit/Tree",
    	         "dojo/domReady!"
    	         ], function(parser, registry, on, Button, Tree){
    			parser.parse().then(function(){
    				registry.byId("treeBtn").on("click", function(){
						registry.byId("selectDia").show();
    				});

    				registry.byId("cancelBtn").on("click", function(){
    					registry.byId("selectDia").hide();
    				});

    			});
    	});
    </script>

  </body>
</html>
css代码:
保存为main.css
html,body{
	margin:0 0;
	padding:0 0;
}
.leftTree{
	width:230px;
	height:350px;
	border:1px solid #d3d3d3;
}
.rightTree{
	width:230px;
	height:350px;
	border:1px solid #d3d3d3;
}
.actionBar{
	text-align: right;
	background-color: #efefef;
	border-top: 1px solid #d3d3d3;
    margin: 10px -8px -10px;
    padding: 3px 10px 3px 7px;
}

.clear{
	clear: both;
}


 110
110


 被折叠的 条评论
为什么被折叠?
被折叠的 条评论
为什么被折叠?
 到【灌水乐园】发言


