


所需的所有jar包下载地址:http://download.csdn.net/detail/yolanda_nuonuo/8923529
1.web.xml
<?xml version= "1.0" encoding ="UTF-8"?>
<web-app xmlns:xsi="http://www.w3.org/2001/XMLSchema-instance" xmlns="http://xmlns.jcp.org/xml/ns/javaee" xsi:schemaLocation="http://xmlns.jcp.org/xml/ns/javaee http://xmlns.jcp.org/xml/ns/javaee/web-app_3_1.xsd" id= "WebApp_ID" version ="3.1">
<display-name >cxfTest </display-name>
<context-param >
<param-name> contextConfigLocation</param-name >
<param-value> classpath:applicationContext.xml</param-value >
</context-param >
<listener >
<listener-class> org.springframework.web.context.ContextLoaderListener</listener-class >
</listener >
<listener >
<listener-class> org.springframework.web.util.IntrospectorCleanupListener </listener-class>
</listener >
<!-- WebServices设置 -->
<servlet >
<servlet-name> CxfService</servlet-name >
<servlet-class> org.apache.cxf.transport.servlet.CXFServlet</servlet-class >
<load-on-startup> 1</ load-on-startup>
</servlet >
<servlet-mapping >
<servlet-name> CxfService</servlet-name >
<url-pattern> /*</url-pattern >
</servlet-mapping >
<welcome-file-list >
<welcome-file> index.jsp</welcome-file >
</welcome-file-list >
</web-app>
<?xml version="1.0" encoding="UTF-8" ?>
 <beans xmlns="http://www.springframework.org/schema/beans" xmlns:xsi="http://www.w3.org/2001/XMLSchema-instance" xmlns:p="http://www.springframework.org/schema/p" xmlns:jaxws="http://cxf.apache.org/jaxws" xmlns:cxf="http://cxf.apache.org/core" xsi:schemaLocation="http://www.springframework.org/schema/beans http://www.springframework.org/schema/beans/spring-beans-2.5.xsd http://cxf.apache.org/jaxws http://cxf.apache.org/schemas/jaxws.xsd">
  <import resource="classpath:META-INF/cxf/cxf.xml" />
  <import resource="classpath:META-INF/cxf/cxf-extension-soap.xml" />
  <import resource="classpath:META-INF/cxf/cxf-servlet.xml" />
  <bean id="inter" class="com.yolanda.cxfTest.aImpl" />
  <jaxws:endpoint id="test" implementor="#inter" address="/CxfService" />
</beans>
3.首先创建一个实体类
import javax.xml.bind.annotation.XmlAccessType;
import javax.xml.bind.annotation.XmlAccessorType;
import javax.xml.bind.annotation.XmlRootElement;
import javax.xml.bind.annotation.XmlType;
/**
* 创建实体类
*
*/
@XmlRootElement(name = "info")
@XmlAccessorType(XmlAccessType.FIELD)
@XmlType(propOrder={"name","age"})
public class AEntity {
private String name;
private Integer age;
public AEntity() {
}
public AEntity(String name,Integer age) {
this.name = name;
this.age = age;
}
//get,set方法
public String getName() {
return name;
}
public void setName(String name) {
this.name = name;
}
public Integer getAge() {
return age;
}
public void setAge(Integer age) {
this.age = age;
}
}
4.然后创建一个接口
import java.util.List;
import javax.jws.WebParam;
import javax.jws.WebService;
import org.springframework.web.context.ContextLoaderListener;
/**
* 新建服务接口,面向客户端
*/
@WebService
public interface AInterface {
//加入WebParam注解,以保证xml文件中参数名字的正确性
public void print(@WebParam(name = "a")String s);
public String printAll(List<AEntity> aEntities);
}
5.接着是接口的实现
import java.util.List;
import javax.jws.WebService;
/**
* 实现接口
*/
@WebService (endpointInterface = "com.yolanda.cxfTest.AInterface" )
public class AImpl implements AInterface {
public String print(String s)
{
return "Hello," + s ;
}
public String printAll(List<AEntity> aEntities ) {
String aString = "list:\n" ;
for (AEntity aEntity : aEntities ) {
aString += "name:" + aEntity .getName() + "," +
"age:" + aEntity .getAge() + "\n";
}
return aString ;
};
}
<? xml version= "1.0" encoding = "UTF-8"?>
< beans xmlns= "http://www.springframework.org/schema/beans"
xmlns:xsi= "http://www.w3.org/2001/XMLSchema-instance"
xmlns:p= "http://www.springframework.org/schema/p"
xmlns:jaxws= "http://cxf.apache.org/jaxws"
xmlns:cxf= "http://cxf.apache.org/core"
xsi:schemaLocation= "http://www.springframework.org/schema/beans
http://www.springframework.org/schema/beans/spring-beans-2.5.xsd
http://cxf.apache.org/jaxws
http://cxf.apache.org/schema/jaxws.xsd" >
<import resource= "classpath:META-INF/cxf/cxf.xml" />
<import resource= "classpath:META-INF/cxf/cxf-extension-soap.xml" />
<import resource= "classpath:META-INF/cxf/cxf-servlet.xml" />
<bean id= "client" class= "com.yolanda.client.TestClient" factory-bean ="clientFactory"
factory-method ="create" />
<bean id= "clientFactory" class= "org.apache.cxf.jaxws.JaxWsProxyFactoryBean" >
< property name= "serviceClass" value = "com.yolanda.cxfTest.AInterface" />
< property name= "address" value ="http://localhost:8080/cxfTest/CxfService" />
</bean >
</ beans>
2.客户端测试类的编写
import java.util.ArrayList;
import java.util.List;
import org.springframework.context.ApplicationContext;
import org.springframework.context.support.ClassPathXmlApplicationContext;
/**
* 客户端测试类
*
*/
public class TestClient {
public static void main(String[] args) {
ApplicationContext context = new ClassPathXmlApplicationContext("applicationClient.xml");
AInterface helloService = (AInterface) context.getBean("client");
// String response = helloService.print("haha");
List<AEntity> aEntities = new ArrayList<AEntity>();
aEntities.add(new AEntity("a", 17));
aEntities.add(new AEntity("b", 18));
aEntities.add(new AEntity("c", 19));
String hString = helloService.printAll(aEntities);
System.out.println(hString);
}
}
三、结果
浏览器中输入地址http://localhost:8080/cxfTest/CxfService?wsdl,这个地址在客户端的配置文件中可以查看到,如下图所示。

这个跟服务器端配置文件中的地址相对应,如下图。

浏览器中显示以下页面,说明服务发布成功。

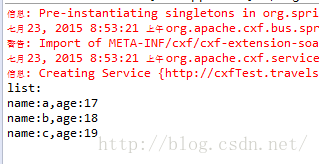
运行客户端测试程序,输出结果如下图。
以上参考了http://blog.csdn.net/hu_shengyang/article/details/38384597
四、总结
在编写程序期间,曾经遇到一个问题,一直提示找不到客户端的配置文件,这是由于我的客户端配置文件applicationClient.xml放置的位置有误,我上网查找了一下有关配置文件存放位置的相关资料,总结如下。
<context-param>
<param-name>contextConfigLocation</param-name>
<param-value>classpath:applicationContext.xml</param-value>
<context-param>
<param-name>contextConfigLocation</param-name>
<param-value>WEB-INF/applicationContext*.xml</param-value>
具体可参看http://www.cnblogs.com/wanggd/archive/2013/05/20/3087972.html
在本项目中它的位置应该是下图所示的位置。
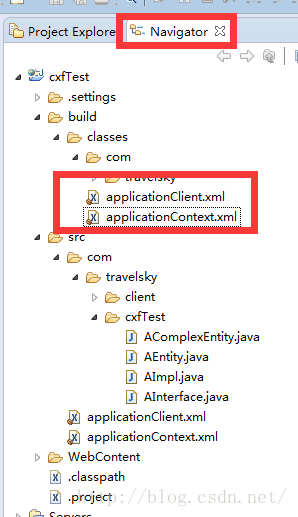
可以在Navigator视图中更清楚的判断配置文件当前的存放位置是否正确。
还有一些环境方面的错误,比如java.lang.ClassNotFoundException: org.springframework.web.context.ContextLoader
这个错误一般是由于jar包的问题,具体可参加我的另一篇博文
http://blog.csdn.net/yolanda_nuonuo/article/details/46930293


 555
555


 被折叠的 条评论
为什么被折叠?
被折叠的 条评论
为什么被折叠?
 到【灌水乐园】发言


