


<span style="font-family: Arial, Helvetica, sans-serif; background-color: rgb(255, 255, 255);">原理图如下</span>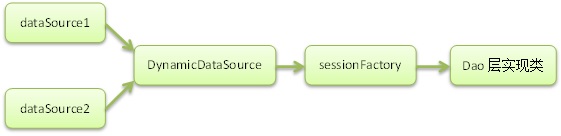
我们通过改变dao的session就可以达到数据库的切换,读写分离,多数据源就方便起来。
以下是主要配置代码
applicationContext.xml
<?xml version="1.0" encoding="UTF-8"?>
<beans xmlns="http://www.springframework.org/schema/beans"
	xmlns:xsi="http://www.w3.org/2001/XMLSchema-instance" xmlns:p="http://www.springframework.org/schema/p"
	xmlns:aop="http://www.springframework.org/schema/aop" xmlns:context="http://www.springframework.org/schema/context"
	xmlns:jee="http://www.springframework.org/schema/jee" xmlns:tx="http://www.springframework.org/schema/tx"
	xsi:schemaLocation="
		http://www.springframework.org/schema/aop http://www.springframework.org/schema/aop/spring-aop-3.0.xsd
		http://www.springframework.org/schema/beans http://www.springframework.org/schema/beans/spring-beans-3.0.xsd
		http://www.springframework.org/schema/context http://www.springframework.org/schema/context/spring-context-3.0.xsd
		http://www.springframework.org/schema/jee http://www.springframework.org/schema/jee/spring-jee-3.0.xsd
		http://www.springframework.org/schema/tx http://www.springframework.org/schema/tx/spring-tx-3.0.xsd">

	<context:annotation-config />
	<context:component-scan base-package="com.test.service" />
	<context:property-placeholder location="classpath*:application.properties" />

	<import resource="classpath:spring/applicationContext-persistence.xml" />
	<import resource="classpath:spring/applicationContext-tx.xml" />

	<bean id="dataSourceInterceptor" class="com.test.db.DataSourceInterceptor"></bean>
	  <aop:config>
      <aop:aspect id="dataSourceAspect" ref="dataSourceInterceptor">
           <aop:pointcut id="daoOne" expression="execution(* com.test.dao.test1.*.*(..))" />
           <aop:pointcut id="daoTwo" expression="execution(* com.test.dao.test2.*.*(..))" />
           <aop:before pointcut-ref="daoOne" method="setdataSourceOne" />
           <aop:before pointcut-ref="daoTwo" method="setdataSourceTwo" />
       </aop:aspect>
    </aop:config>

</beans>
applicationContext-persistence.xml
<?xml version="1.0" encoding="UTF-8"?>
<beans xmlns="http://www.springframework.org/schema/beans"
	xmlns:aop="http://www.springframework.org/schema/aop"
	xmlns:tx="http://www.springframework.org/schema/tx"
	xmlns:xsi="http://www.w3.org/2001/XMLSchema-instance"
	xsi:schemaLocation="http://www.springframework.org/schema/beans
	http://www.springframework.org/schema/beans/spring-beans-3.0.xsd
	http://www.springframework.org/schema/aop http://www.springframework.org/schema/aop/spring-aop-3.0.xsd http://www.springframework.org/schema/tx http://www.springframework.org/schema/tx/spring-tx-3.0.xsd ">

	<bean id="dataSourceOne" class="com.mchange.v2.c3p0.ComboPooledDataSource" destroy-method="close">
		<property name="driverClass" value="${jdbc.driver}" />
		<property name="jdbcUrl" value="${jdbc.url}"/>
		<property name="user" value="${jdbc.username}"/>
		<property name="password" value="${jdbc.password}"/>
		<property name="initialPoolSize" value="${c3p0.initialpoolsize}" />
		<property name="minPoolSize" value="${c3p0.minpoolsize}" />
		<property name="maxPoolSize" value="${c3p0.maxpoolsize}" />
		<property name="maxIdleTime" value="${c3p0.maxidletime}" />
		<property name="preferredTestQuery" value="select 1" />
		<property name="breakAfterAcquireFailure" value="true" />
		<property name="connectionTesterClassName" value="com.mchange.v2.c3p0.impl.DefaultConnectionTester" />
		<property name="acquireIncrement" value="5" />
		<property name="maxIdleTimeExcessConnections" value="600" />

		<!-- 开启重连机制并设置重连次数为10 -->
		<property name="idleConnectionTestPeriod" value="60" />
		<property name="acquireRetryAttempts" value="10" />
		<property name="acquireRetryDelay" value="30000" />

		<property name="testConnectionOnCheckin" value="true" />
		<property name="testConnectionOnCheckout" value="false" />
		<property name="checkoutTimeout" value="5000" />
	</bean>

	<bean id="dataSourceTwo" class="com.mchange.v2.c3p0.ComboPooledDataSource" destroy-method="close">
		<property name="driverClass" value="${jdbc.driver}" />
		<property name="jdbcUrl" value="${jdbc.url2}"/>
		<property name="user" value="${jdbc.username}"/>
		<property name="password" value="${jdbc.password}"/>
		<property name="initialPoolSize" value="${c3p0.initialpoolsize}" />
		<property name="minPoolSize" value="${c3p0.minpoolsize}" />
		<property name="maxPoolSize" value="${c3p0.maxpoolsize}" />
		<property name="maxIdleTime" value="${c3p0.maxidletime}" />
		<property name="preferredTestQuery" value="select 1" />
		<property name="breakAfterAcquireFailure" value="true" />
		<property name="connectionTesterClassName" value="com.mchange.v2.c3p0.impl.DefaultConnectionTester" />
		<property name="acquireIncrement" value="5" />
		<property name="maxIdleTimeExcessConnections" value="600" />

		<!-- 开启重连机制并设置重连次数为10 -->
		<property name="idleConnectionTestPeriod" value="60" />
		<property name="acquireRetryAttempts" value="10" />
		<property name="acquireRetryDelay" value="30000" />

		<property name="testConnectionOnCheckin" value="true" />
		<property name="testConnectionOnCheckout" value="false" />
		<property name="checkoutTimeout" value="5000" />
	</bean>

	<bean id="dynamicDataSource" class="com.test.db.DynamicDataSource">
     <property name="targetDataSources">
           <map key-type="java.lang.String">
             <entry value-ref="dataSourceOne" key="dataSourceOne"></entry>
              <entry value-ref="dataSourceTwo" key="dataSourceTwo"></entry>
          </map>
        </property>
       <property name="defaultTargetDataSource" ref="dataSourceOne">
       </property>
    </bean>

	<bean id="sqlSessionFactory" class="org.mybatis.spring.SqlSessionFactoryBean">
		<property name="dataSource" ref="dynamicDataSource" />
		<property name="configLocation" value="classpath:mybatis-setting.xml"></property>
		<!-- Mybatis SQL配置文件路径 -->
		<property name="mapperLocations">
			<list>
				<!-- 加载当前工程和commons工程中的映射文件 -->
				<value>classpath*:/mybatis/**/*-Mapper.xml</value>
			</list>
		</property>
	</bean>


	<!-- 扫描Dao接口 -->
	<bean class="org.mybatis.spring.mapper.MapperScannerConfigurer">
		<!-- 扫描当前工程和commons工程中的DAO接口 -->
		<property name="basePackage" value="com.test.dao" />
	</bean>

</beans>
applicationContext-tx.xml
<?xml version="1.0" encoding="UTF-8"?>
<beans xmlns="http://www.springframework.org/schema/beans"
	xmlns:aop="http://www.springframework.org/schema/aop"
	xmlns:tx="http://www.springframework.org/schema/tx"
	xmlns:xsi="http://www.w3.org/2001/XMLSchema-instance"
	xsi:schemaLocation="http://www.springframework.org/schema/beans
	http://www.springframework.org/schema/beans/spring-beans-3.0.xsd
	http://www.springframework.org/schema/aop http://www.springframework.org/schema/aop/spring-aop-3.0.xsd http://www.springframework.org/schema/tx http://www.springframework.org/schema/tx/spring-tx-3.0.xsd ">

	<!-- MyBatis依赖于jdbc事务管理 -->
	<bean name="transactionManager" class="org.springframework.jdbc.datasource.DataSourceTransactionManager">
          <property name="dataSource" ref="dataSourceOne" />
    </bean>

    <!-- 事务拦截器配置 -->
    <tx:advice id="txAdvice" transaction-manager="transactionManager">
    	<tx:attributes>
    		<tx:method name="get*" read-only="true" />
        	<tx:method name="find*" read-only="true" />
            <tx:method name="*" propagation="REQUIRED" rollback-for="Exception" />
		</tx:attributes>
  	</tx:advice>

	<aop:config>
		<!--将事务切入到Service层中-->
    	<aop:pointcut id="txAdvicePointcut" expression="execution(* com.joygame.socialservice.service.*.*(..))" />
    	<aop:advisor pointcut-ref="txAdvicePointcut" advice-ref="txAdvice" />
  	</aop:config>

</beans>
db核心代码
DatabaseContextHolder.java
package com.test.db;

public class DatabaseContextHolder {

	private static final ThreadLocal<String> contextHolder = new ThreadLocal<String>();

	public static void setCustomerType(String customerType) {
		contextHolder.set(customerType);
	}

	public static String getCustomerType() {
		return contextHolder.get();
	}

	public static void clearCustomerType() {
		contextHolder.remove();
	}
}
package com.test.db;

import org.aspectj.lang.JoinPoint;
import org.springframework.stereotype.Component;

@Component
public class DataSourceInterceptor {

	public void setdataSourceOne(JoinPoint jp) {
		DatabaseContextHolder.setCustomerType("dataSourceOne");
	}

	public void setdataSourceTwo(JoinPoint jp) {
		DatabaseContextHolder.setCustomerType("dataSourceTwo");
	}
}
package com.test.db;
import org.springframework.jdbc.datasource.lookup.AbstractRoutingDataSource;
public class DynamicDataSource extends AbstractRoutingDataSource{
@Override
protected Object determineCurrentLookupKey() {
return DatabaseContextHolder.getCustomerType();
}
}
测试代码
package com.test.action;

import org.springframework.beans.factory.annotation.Autowired;
import org.springframework.stereotype.Controller;
import org.springframework.web.bind.annotation.RequestMapping;
import org.springframework.web.bind.annotation.RequestMethod;

import com.test.service.TestService;

@Controller
public class TestAction {
   @Autowired
   private TestService testService;

   @RequestMapping(value="/test.do",method={RequestMethod.GET,RequestMethod.POST})
   public void index(){
	   testService.insert();
   }
}
package com.test.service;

public interface TestService {

	void insert();

}
package com.test.service.impl;

import org.springframework.beans.factory.annotation.Autowired;
import org.springframework.stereotype.Service;

import com.test.dao.test1.TestDao;
import com.test.dao.test2.TestDao2;
import com.test.model.Test;
import com.test.service.TestService;

@Service
public class TestServiceImpl implements TestService {

	@Autowired
	private TestDao testDao;

	@Autowired
	private TestDao2 testDao2;

	public void insert() {
//		Test t = new Test();
//		t.setName("hury");
//		testDao.insert(t);
//		testDao2.insert(t);
		System.out.println(testDao.count());
		System.out.println(testDao2.count());
	}

	public TestDao getTestDao() {
		return testDao;
	}

	public TestDao2 getTestDao2() {
		return testDao2;
	}

	public void setTestDao(TestDao testDao) {
		this.testDao = testDao;
	}

	public void setTestDao2(TestDao2 testDao2) {
		this.testDao2 = testDao2;
	}

}
package com.test.model;

public final class Test {
	private int id;
	private String name;

	public int getId() {
		return id;
	}

	public String getName() {
		return name;
	}

	public void setId(int id) {
		this.id = id;
	}

	public void setName(String name) {
		this.name = name;
	}
}
package com.test.dao.test1;

import com.test.model.Test;

public interface TestDao {
	int insert(Test t);
	int count();
}
package com.test.dao.test2;

import com.test.model.Test;

public interface TestDao2 {
	int insert(Test t);
	int count();
}
<?xml version="1.0" encoding="UTF-8" ?>
<!DOCTYPE mapper PUBLIC "-//mybatis.org//DTD Mapper 3.0//EN" "http://mybatis.org/dtd/mybatis-3-mapper.dtd" >
<mapper namespace="com.test.dao.test1.TestDao">
	<insert id="insert">
		insert into test(name)
		values (#{name})
	</insert>
	<select id="count" resultType="int">
		select count(0) from test
	</select>
</mapper>
<?xml version="1.0" encoding="UTF-8" ?>
<!DOCTYPE mapper PUBLIC "-//mybatis.org//DTD Mapper 3.0//EN" "http://mybatis.org/dtd/mybatis-3-mapper.dtd" >
<mapper namespace="com.test.dao.test2.TestDao2">
	<insert id="insert">
		insert into test2(name1)
		values (#{name})
	</insert>
	<select id="count" resultType="int">
		select count(0) from test2
	</select>
</mapper>
经过以上程序;我们访问后结果http://localhost:8080/test/test.do
2
[INFO][com.mchange.v2.c3p0.impl.AbstractPoolBackedDataSource] - <Initializing c3p0 pool... com.mchange.v2.c3p0.ComboPooledDataSource [ acquireIncrement -> 5, acquireRetryAttempts -> 10, acquireRetryDelay -> 30000, autoCommitOnClose -> false, automaticTestTable -> null, breakAfterAcquireFailure -> true, checkoutTimeout -> 5000, connectionCustomizerClassName -> null, connectionTesterClassName -> com.mchange.v2.c3p0.impl.DefaultConnectionTester, dataSourceName -> 1b6171r921ffm2ghcf7zd1|5866ff, debugUnreturnedConnectionStackTraces -> false, description -> null, driverClass -> com.mysql.jdbc.Driver, factoryClassLocation -> null, forceIgnoreUnresolvedTransactions -> false, identityToken -> 1b6171r921ffm2ghcf7zd1|5866ff, idleConnectionTestPeriod -> 60, initialPoolSize -> 1, jdbcUrl -> jdbc:mysql://localhost:3306/test2?createDatabaseIfNotExist=true&useUnicode=true&characterEncoding=UTF-8, maxAdministrativeTaskTime -> 0, maxConnectionAge -> 0, maxIdleTime -> 3600, maxIdleTimeExcessConnections -> 600, maxPoolSize -> 50, maxStatements -> 0, maxStatementsPerConnection -> 0, minPoolSize -> 5, numHelperThreads -> 3, preferredTestQuery -> select 1, properties -> {user=******, password=******}, propertyCycle -> 0, statementCacheNumDeferredCloseThreads -> 0, testConnectionOnCheckin -> true, testConnectionOnCheckout -> false, unreturnedConnectionTimeout -> 0, userOverrides -> {}, usesTraditionalReflectiveProxies -> false ]>
6
如果若要事用务,请将AOP 配置service层, DataSourceTransactionManager 注入的dataSource 就为AbstractRoutingDataSource 获取connection.
public Connection getConnection() throws SQLException {
return determineTargetDataSource().getConnection();
}
---------
protected DataSource determineTargetDataSource() {
Assert.notNull(this.resolvedDataSources, "DataSource router not initialized");
Object lookupKey = determineCurrentLookupKey();
DataSource dataSource = this.resolvedDataSources.get(lookupKey);
if (dataSource == null && (this.lenientFallback || lookupKey == null)) {
dataSource = this.resolvedDefaultDataSource;
}
if (dataSource == null) {
throw new IllegalStateException("Cannot determine target DataSource for lookup key [" + lookupKey + "]");
}
return dataSource;
}
-----------------------------------------
因此可知道,这样事务就可以管理多数据源中获取到的connection, session = connection.getSession(0事务了。
对数据源重点就是通过route算法,获取connection过程


 2万+
2万+


 被折叠的 条评论
为什么被折叠?
被折叠的 条评论
为什么被折叠?
 到【灌水乐园】发言


