


在上一篇讲到了TabActivity和TabHost的结合的分页实现方式一。这里,将讲到方式二。其实,方式一、二大同小异,只是方式二的布局文件可以是独立的。当然,也有些差别,例如点击顶部Tab标签时页面跳转事件响应的实现也不同。具体,看源代码。
二、TabActivity和TabHost的结合实现分页标签--------方式二
细节分析:
1.主类继承TabActivity
public class Pagination extends TabActivity
2.获取当前TabHost对象
TabHost tabHost = getTabHost();
3.添加Tab分页标签
tabHost.addTab(tabHost.newTabSpec("Tab1")
.setIndicator("Tab1", getResources().getDrawable(R.drawable.a1))
.setContent(this));
........
这里,你会疑问,布局文件不用添加吗!确实,要添加,但是动态添加。即点击哪个Tab标签时,动态添加对应的布局文件。
public View createTabContent(String tag){..........}

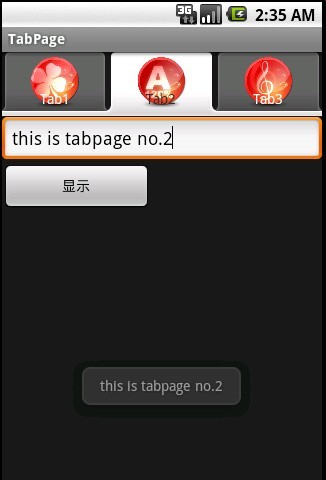
1、布局文件:secondpage.xml
- <?xml version="1.0" encoding="utf-8"?>
- <LinearLayout
- android:id="@+id/widget30"
- android:layout_width="fill_parent"
- android:layout_height="fill_parent"
- xmlns:android="http://schemas.android.com/apk/res/android"
- android:orientation="vertical"
- >
- <EditText
- android:id="@+id/et_text"
- android:layout_width="fill_parent"
- android:layout_height="wrap_content"
- android:text="EditText"
- android:textSize="18sp"
- >
- </EditText>
- <Button
- android:id="@+id/bt_show"
- android:layout_width="149px"
- android:layout_height="wrap_content"
- android:text="显示"
- >
- </Button>
- </LinearLayout>
2、代码文件:
- package com.myandroid.test;
- import android.app.TabActivity;
- import android.os.Bundle;
- import android.util.Log;
- import android.view.LayoutInflater;
- import android.view.View;
- import android.widget.Button;
- import android.widget.EditText;
- import android.widget.TabHost;
- import android.widget.TextView;
- import android.widget.Toast;
- public class TabPage extends TabActivity implements TabHost.TabContentFactory {
- @Override
- protected void onCreate(Bundle savedInstanceState) {
- super.onCreate(savedInstanceState);
- //setContentView(R.layout.main); 这里不需要加载主页面
- final TabHost tabHost = getTabHost(); //tab控制对象
- tabHost.addTab(tabHost.newTabSpec("Tab1") //添加顶部的分页符
- .setIndicator("Tab1", getResources().getDrawable(R.drawable.a1))
- .setContent(this));
- tabHost.addTab(tabHost.newTabSpec("Tab2")
- .setIndicator("Tab2", getResources().getDrawable(R.drawable.a2))
- .setContent(this));
- tabHost.addTab(tabHost.newTabSpec("Tab3")
- .setIndicator("Tab3", getResources().getDrawable(R.drawable.a3))
- .setContent(this));
- }
- /**
- * 点击Tab,跳转页面时激发的事件处理
- */
- public View createTabContent(String tag) {
- Log.e("tag", tag); //这里的tag字符串是tabHost.newTabSpec("Tab1") 定义的字符串
- int tabPage = Integer.parseInt(tag.substring(tag.length()-1)); //获取最后面的数字
- final TextView tv = new TextView(this); //要用final修饰,否则报错
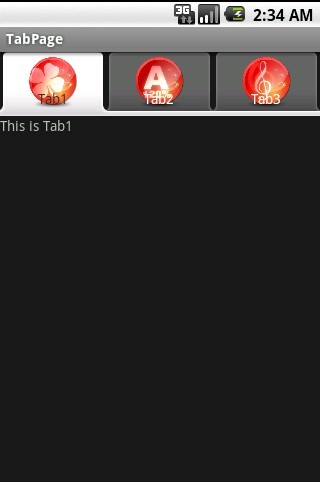
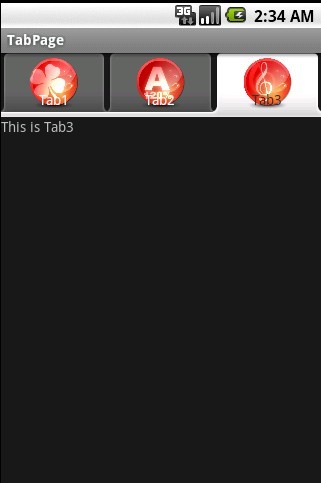
- tv.setText("This is " + tag);
- switch(tabPage) {
- case 1: //分页一
- break;
- case 2: //分页二
- final LayoutInflater layout = LayoutInflater.from(TabPage.this); //用于加载XML的对象,要使用final修饰
- final View customView = layout.inflate(R.layout.secondpage, null); //创建自定义的View,要使用final修饰
- final Button bt_show = (Button)customView.findViewById(R.id.bt_show);
- final EditText et_text = (EditText)customView.findViewById(R.id.et_text);
- bt_show.setOnClickListener(new Button.OnClickListener() {
- @Override
- public void onClick(View v) {
- // TODO Auto-generated method stub
- Toast.makeText(TabPage.this, et_text.getText(), Toast.LENGTH_SHORT).show();
- }
- });
- return customView;
- case 3: //分页三
- break;
- default:
- break;
- }
- //不可以返回null
- return tv;
- }
- }
在下一篇,将继续讲到TabActivity和TabHost的结合实现分页标签--------方式三,也是较前两种方式好很多。


 1662
1662

 被折叠的 条评论
为什么被折叠?
被折叠的 条评论
为什么被折叠?
 到【灌水乐园】发言


