


正式整合Spring、Struts2之前,咱们先来聊聊看看它俩框架有哪些差异,差异肯定就是决定解决手段的,所以有必要了解它们俩的差异;
众所周知,Struts2可以看作是MVC设计模式中C角色一个比较好的实现类,当访问某个Action的请求过来后,Struts2的xwork2包中有个ObjectFactory实现类,用来创建Action对象,然后用来处理对应请求和返回响应的逻辑视图名称;同样,Spring的一大特性IOC,主要解决地就是如何创建对象并且给创建的对象装配属性,然后管理对象等,说到这里,问题开始明了起来,既然双方都能创建对象,那么Spring整合Struts2所需要注意的问题都会围绕以下三个方面展开:
1、到底由谁来创建这个Action对象?
2、如果由Spring侧来创建,那么Struts2如何能够承认这个对象?
3、如果由Struts2侧来创建,那么Spring如何来对它进行属性装配?
好的,既然问题清楚了,还需要额外科普一下,Struts2框架里面提供了完善的插件机制,即当你需要某个功能的时候,把对应的Jar包放置到lib下,就具有了相应的功能,当你不需要的时候,不用添加即可;在此需要引入一个新的插件包:struts2-spring-plugin-2.3.29.jar ,从这个名称可以看出这个jar是为Struts2和Spring整合而服务的,一般来说只要是想要整合Struts2和Spring就需要用到这个jar,本次整合采用2.3.29版本的,好的,下面分别从Spring侧和Struts2侧创建Action对象开始整合;
(一)Spring侧创建Action对象
a)将struts2-spring-plugin-2.3.29.jar文件放入Web项目中;
b)新建一个Web项目,项目基本结构如下:
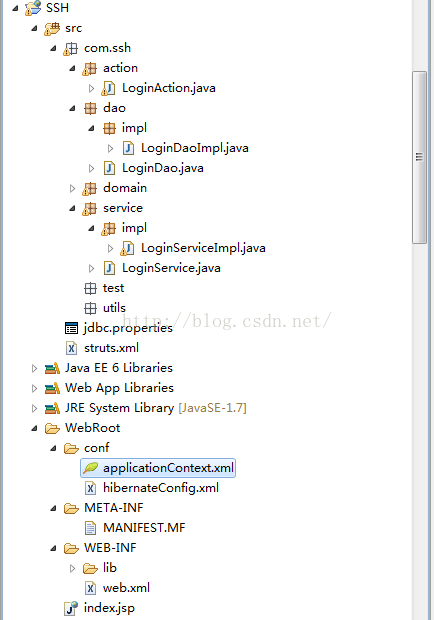
c)由于本次整合采用注解的方式,所以需要给action、service.impl、dao.impl包里面的类名分别添加@Controller,@Service,@Repository注解,然后在WebRoot/conf/applicationContext.xml文件,配置过后如下所示:
package com.ssh.action;

import org.springframework.beans.factory.annotation.Autowired;
import org.springframework.stereotype.Controller;

import com.opensymphony.xwork2.ActionSupport;
import com.ssh.service.LoginService;

@Controller("loginAction")
public class LoginAction extends ActionSupport {

	private String username;

	private String password;

	@Autowired
	LoginService loginService;

	@Override
	public String execute() throws Exception {

		if(loginService.valid(username,password)){
			return SUCCESS;
		}
		return LOGIN;
	}

	public String getUsername() {
		return username;
	}

	public void setUsername(String username) {
		this.username = username;
	}

	public String getPassword() {
		return password;
	}

	public void setPassword(String password) {
		this.password = password;
	}

	public LoginService getLoginService() {
		return loginService;
	}

	public void setLoginService(LoginService loginService) {
		this.loginService = loginService;
	}
}


package com.ssh.service.impl;

import org.springframework.beans.factory.annotation.Autowired;
import org.springframework.stereotype.Service;
import org.springframework.transaction.annotation.Transactional;

import com.ssh.dao.LoginDao;
import com.ssh.service.LoginService;

@Service
public class LoginServiceImpl implements LoginService {
	@Autowired
	private LoginDao loginDao;

	@Override
	public boolean valid(String username,String password) {

		loginDao.save();
		return loginDao.vaild(username, password);
	}

}

package com.ssh.dao.impl;

import org.springframework.beans.factory.annotation.Autowired;
import org.springframework.beans.factory.annotation.Qualifier;
import org.springframework.orm.hibernate4.HibernateTemplate;
import org.springframework.stereotype.Repository;
import org.springframework.transaction.annotation.Transactional;

import com.ssh.dao.LoginDao;
import com.ssh.domain.SlCompany;

@Repository
public class LoginDaoImpl implements LoginDao {

	@Autowired
	@Qualifier("hibernateTemplate")
	private HibernateTemplate hibernateTemplate;

	@Override
	@Transactional
	public boolean vaild(String username, String password) {

		// 此处模拟从数据库查询数据
		if ("hello".equals(username) && "world".equals(password)) {
			return true;
		}
		return false;
	}

}
<!-- 这里基本把Spring用到的所有的验证Schema给列出来,以便大家使用 --><?xml version="1.0" encoding="UTF-8"?>
<beans xmlns="http://www.springframework.org/schema/beans"
xmlns:xsi="http://www.w3.org/2001/XMLSchema-instance" xmlns:context="http://www.springframework.org/schema/context"
xmlns:aop="http://www.springframework.org/schema/aop" xmlns:tx="http://www.springframework.org/schema/tx"
xmlns:p="http://www.springframework.org/schema/p" xmlns:util="http://www.springframework.org/schema/util"
xmlns:jdbc="http://www.springframework.org/schema/jdbc" xmlns:cache="http://www.springframework.org/schema/cache"
xsi:schemaLocation="http://www.springframework.org/schema/beans
http://www.springframework.org/schema/beans/spring-beans-3.0.xsd
http://www.springframework.org/schema/context
http://www.springframework.org/schema/context/spring-context-3.0.xsd
http://www.springframework.org/schema/aop
http://www.springframework.org/schema/aop/spring-aop.xsd
http://www.springframework.org/schema/tx
http://www.springframework.org/schema/tx/spring-tx.xsd
http://www.springframework.org/schema/util
http://www.springframework.org/schema/util/spring-util.xsd
http://www.springframework.org/schema/jdbc
http://www.springframework.org/schema/jdbc/spring-jdbc-3.1.xsd
http://www.springframework.org/schema/cache
http://www.springframework.org/schema/cache/spring-cache-3.1.xsd
">
<!-- 配置Spring自动扫描com.ssh包以及子包下面的所有用注解标识的类 -->
<context:component-scan base-package="com.ssh"/>
</beans>d)找到项目的web.xml,添加如下内容,使得Spring容器在服务器启动的时候,开始初始化容器
  <!-- 配置全局变量 -->
  <context-param>
  	<param-name>contextConfigLocation</param-name>
  	<param-value>conf/applicationContext.xml</param-value>
  </context-param>

  <!-- 在服务器启动的时候初始化Spring容器对象 -->
  <listener>
  	<listener-class>org.springframework.web.context.ContextLoaderListener</listener-class>
  </listener>
</pre><pre name="code" class="html" style="font-size:18px; font-family: 'Microsoft YaHei';"><!-- 通过下述过滤器使得Struts2框架接管所用的请求处理 -->
<!-- 通过下述过滤器使得Struts2框架接管所用的请求处理 -->
	<filter>
		<filter-name>struts2</filter-name>
		<filter-class>org.apache.struts2.dispatcher.ng.filter.StrutsPrepareAndExecuteFilter</filter-class>
	</filter>
	<filter-mapping>
		<filter-name>struts2</filter-name>
		<url-pattern>/*</url-pattern>
	</filter-mapping>
e)找到类路径下面的struts.xml文件,添加如下片段,记住:action标签的class属性是一个伪类,这里的值与@Controller括号里面的内容一致
<struts>
    <constant name="struts.i18n.encoding" value="UTF-8"/>
    <constant name="struts.devMode" value="true"/>
    <constant name="struts.objectFactory" value="spring"/>
    <package name="default" extends="struts-default">
    	<action name="doLogin" class="loginAction">
    	</action>
    </package>
</struts>
<span style="font-family:Microsoft YaHei;font-size:18px;">好了,第一种由Spring侧产生Action对象的方法到此结束,需要注意红字部分内容就可以,结果在这里就不演示了;</span><span style="font-family:Microsoft YaHei;font-size:18px;">
</span><span style="font-family:Microsoft YaHei;font-size:18px;">(二)开始介绍Struts2侧的创建Action对象方法,这种方式相比于上述方法要简单很多,不需要让Spring容器管理创建Action对象,充分利用Struts2-Spring-Plugin插件自动创建初始化Action对象,如图:</span>
此时Struts2里面的Action配置跟以前没有整合Spring配置那样,不做任何改变,业务类在Spring容器中配置,注意:此种配置方式Action类对象是由 Struts2-Spring-Plugin插件创建的,同时该插件还会使用bean的自动装配将由Spring容器产生的业务类对象注入进来。
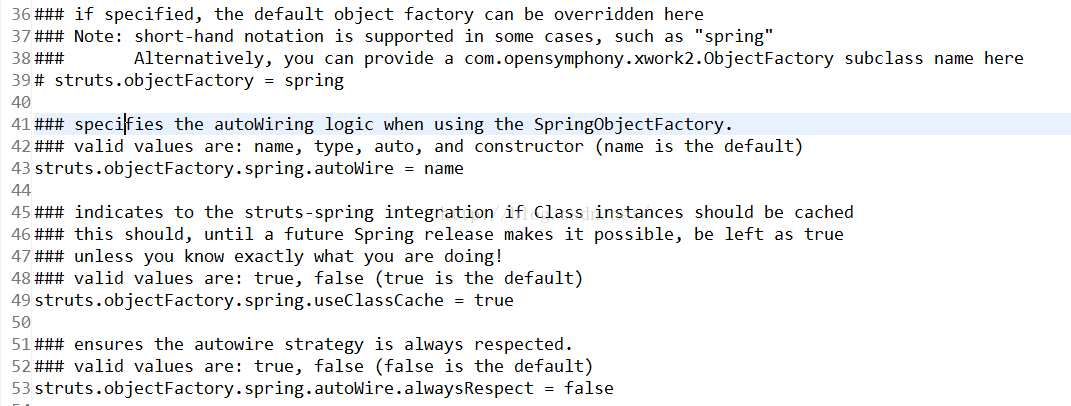
可以在struts2-core.jar包的default.properties文件里面找到关于Spring整合的如下配置:
同时在struts2-spring-plugin.jar包的struts-plugin.xml
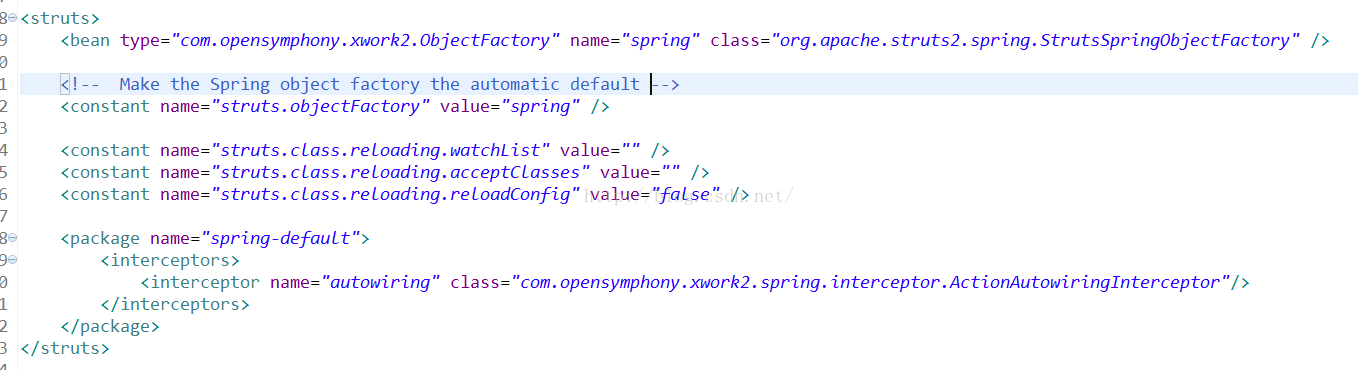
会发现原来将struts.objectFactory设置为spring值得是将Struts2创建Action对象的权利交接给了struts2-spring-plugin插件来创建管理,所以一切由struts2-spring-plugin插件来创建Action对象,并协调Spring容器,注入业务Bean等操作!
综合上述两种整合方式,不难发现整合的关键在于处理Spring和Struts2的矛盾点,且struts2-spring-plugin在其中起到了解决矛盾的作用,下篇博客会讲述如何整合Spring和Hibernate,以及一些事务管理等相关知识!


 1306
1306


 被折叠的 条评论
为什么被折叠?
被折叠的 条评论
为什么被折叠?
 到【灌水乐园】发言


