


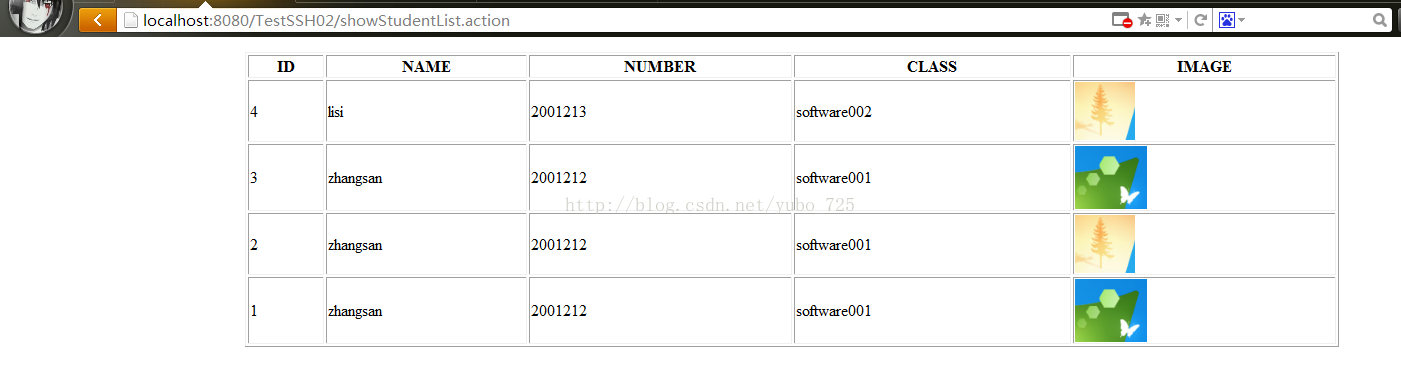
今天我要记录的是SSH框架的综合应用,程序运行的效果如下图所示:
下面从开始创建工程说起,一步一步完成这个项目:
1、新建工程,这里我取名为TestSSH02
2、添加SSH的支持,这里我的添加顺序是:Struts2、Spring、Hibernate,添加顺序没有特别要求,只要能添加成功程序没问题就行了
①添加Struts2支持,这里我们先在lib目录下导入Struts2需要的jar包,有如下几个:
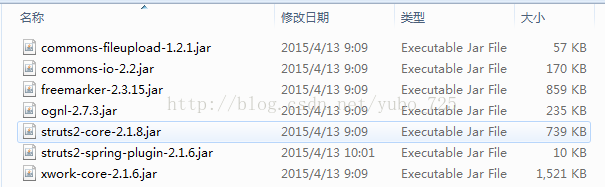
除了上图中的jar包外,我们还需要手动添加3个jar包,分别是MySQL驱动jar包,和commons-dbcp-1.4.jar、commons-pool-1.6.jar
配置web.xml文件,这里的web.xml文件内容如下:
<?xml version="1.0" encoding="UTF-8"?>
<web-app version="3.0" xmlns="http://java.sun.com/xml/ns/javaee"
	xmlns:xsi="http://www.w3.org/2001/XMLSchema-instance"
	xsi:schemaLocation="http://java.sun.com/xml/ns/javaee
	http://java.sun.com/xml/ns/javaee/web-app_3_0.xsd">
	<display-name></display-name>
	<welcome-file-list>
		<welcome-file>index.jsp</welcome-file>
	</welcome-file-list>
	<filter>
		<filter-name>struts2</filter-name>
		<filter-class>org.apache.struts2.dispatcher.ng.filter.StrutsPrepareAndExecuteFilter</filter-class>
	</filter>

	<filter-mapping>
		<filter-name>struts2</filter-name>
		<url-pattern>/*</url-pattern>
	</filter-mapping>

	<listener>
		<listener-class>
			org.springframework.web.context.ContextLoaderListener
		</listener-class>
	</listener>
</web-app>
<?xml version="1.0" encoding="UTF-8"?>
<!DOCTYPE struts PUBLIC
"-//Apache Software Foundation//DTD Struts Configuration 2.0//EN"
"http://struts.apache.org/dtds/struts-2.0.dtd" >

<struts>
	<package name="TestSSH02" extends="struts-default">
	</package>
</struts>到这里,struts2的添加完成。
②添加Spring支持,在工程上右键--->MyEclipse--->Add Spring Capabilities...如下图所示的步骤:
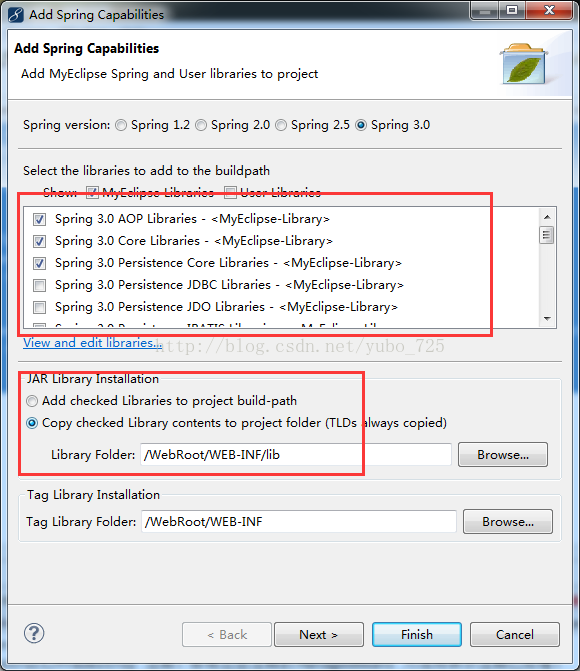
选择next...如下图所示:
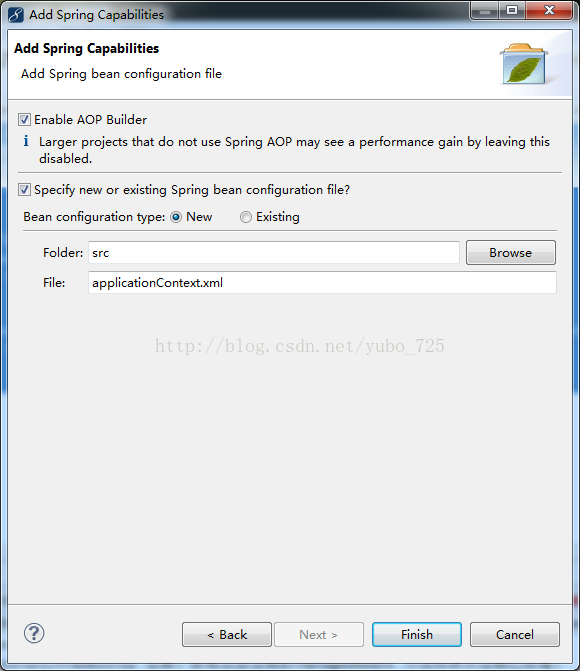
点击finish,Spring的添加就完成了
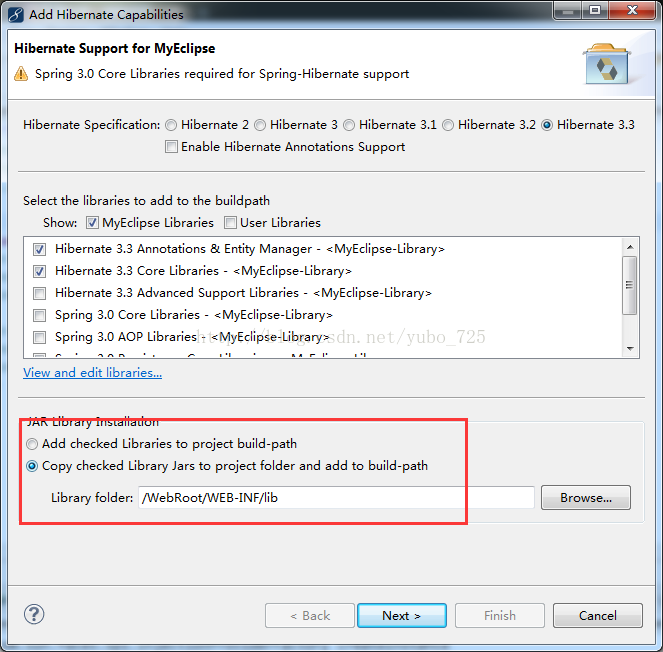
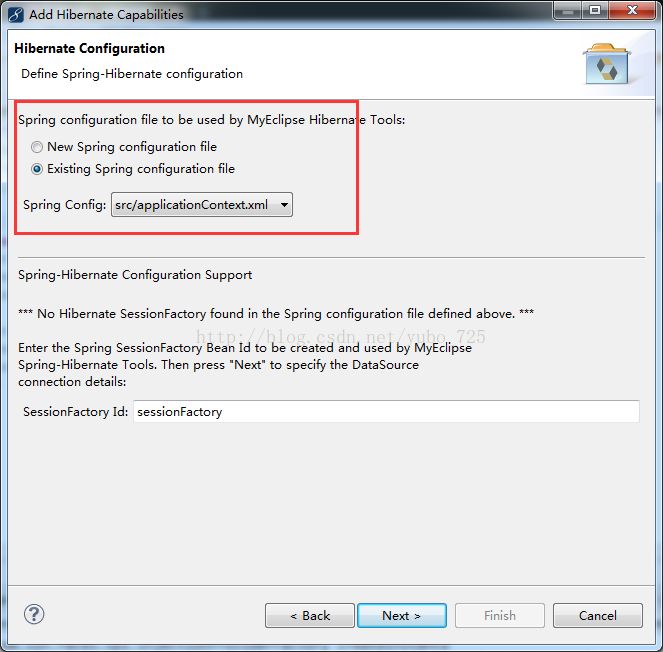
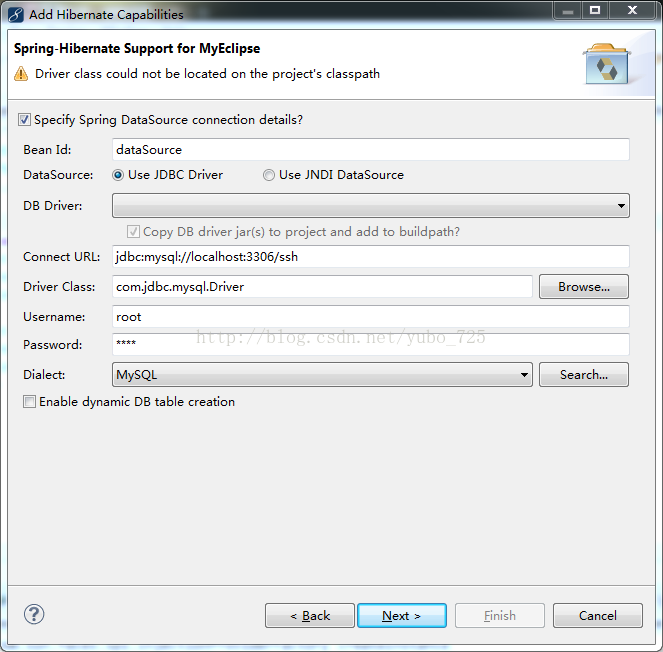
③添加Hibernate支持,在工程上右键--->MyEclipse--->Add Hibernate Capabilities...如下图所示:


到这里,SSH框架的支持已经全部添加到工程里了。
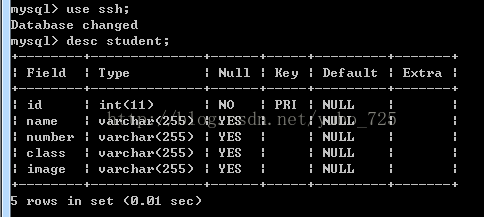
3、建立数据库,我给这个项目的数据库起名为ssh,其中的Student表结构如下:
下面到了编写代码的时候了。
4、编写代码
①编写Student类,该类是一个标准的Java bean,放在com.test.bean包下,代码如下:
package com.test.bean;

public class Student {

	private int id;
	private String name;
	private String number;
	private String cls;
	private String sex;
	private String image;

	public int getId() {
		return id;
	}

	public void setId(int id) {
		this.id = id;
	}

	public String getName() {
		return name;
	}

	public void setName(String name) {
		this.name = name;
	}

	public String getNumber() {
		return number;
	}

	public void setNumber(String number) {
		this.number = number;
	}

	public String getCls() {
		return cls;
	}

	public void setCls(String cls) {
		this.cls = cls;
	}

	public String getSex() {
		return sex;
	}

	public void setSex(String sex) {
		this.sex = sex;
	}

	public String getImage() {
		return image;
	}

	public void setImage(String image) {
		this.image = image;
	}

}
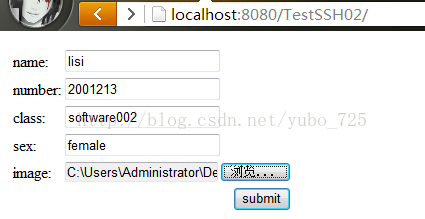
②编写index.jsp页面,该页面用于向数据库中插入一条学生数据,如下图所示:
index.jsp的代码如下:
<%@ page language="java" import="java.util.*" pageEncoding="UTF-8"%>
<%@ taglib uri="/struts-tags" prefix="s" %>
<%
String path = request.getContextPath();
String basePath = request.getScheme()+"://"+request.getServerName()+":"+request.getServerPort()+path+"/";
%>

<!DOCTYPE HTML PUBLIC "-//W3C//DTD HTML 4.01 Transitional//EN">
<html>
  <head>
    <base href="<%=basePath%>">

    <title>My JSP 'index.jsp' starting page</title>
	<meta http-equiv="pragma" content="no-cache">
	<meta http-equiv="cache-control" content="no-cache">
	<meta http-equiv="expires" content="0">
	<meta http-equiv="keywords" content="keyword1,keyword2,keyword3">
	<meta http-equiv="description" content="This is my page">
	<!--
	<link rel="stylesheet" type="text/css" href="styles.css">
	-->
  </head>

  <body>
    <s:form action="register" method="post" enctype="multipart/form-data">
    	<s:textfield name="student.name" label="name"></s:textfield>
    	<s:textfield name="student.number" label="number"></s:textfield>
    	<s:textfield name="student.cls" label="class"></s:textfield>
    	<s:textfield name="student.sex" label="sex"></s:textfield>
    	<s:file name="image" label="image"></s:file>
    	<s:submit value="submit"></s:submit>
    </s:form>
  </body>
</html>
③为表单编写Action,这里的Action我取名为RegisterAction,放在com.test.action包下,代码如下:
package com.test.action;

import java.io.File;

import com.opensymphony.xwork2.ActionSupport;
import com.test.bean.Student;
import com.test.service.StudentService;

public class RegisterAction extends ActionSupport {

	private Student student;
	private File image;
	private String imageFileName;

	private StudentService studentService;

	public StudentService getStudentService() {
		return studentService;
	}

	public void setStudentService(StudentService studentService) {
		this.studentService = studentService;
	}

	public Student getStudent() {
		return student;
	}

	public void setStudent(Student student) {
		this.student = student;
	}

	public File getImage() {
		return image;
	}

	public void setImage(File image) {
		this.image = image;
	}

	public String getImageFileName() {
		return imageFileName;
	}

	public void setImageFileName(String imageFileName) {
		this.imageFileName = imageFileName;
	}

	public String register() throws Exception{
		//上传图片并返回URL
		String url = studentService.uploadFile(image, imageFileName);
		//设置student对象的图片URL
		student.setImage(url);
		//将student保存到数据库
		studentService.register(student);
		return SUCCESS;
	}

}
package com.test.service;

import java.io.File;
import java.util.List;

import com.test.bean.Student;

public interface StudentService {

	/**注册学生信息,将学生信息写入数据库*/
	void register(Student student);

	/**接收上传的文件,保存文件到服务器并返回文件的URL*/
	String uploadFile(File f, String fileName);

	/**获取数据库中的所有学生信息*/
	List<Student> getStudentList();
}
package com.test.service.impl;

import java.io.File;
import java.io.FileInputStream;
import java.io.FileNotFoundException;
import java.io.FileOutputStream;
import java.util.List;

import org.apache.struts2.ServletActionContext;

import com.test.bean.Student;
import com.test.dao.StudentDao;
import com.test.service.StudentService;

public class StudentServiceImpl implements StudentService {
	/**图片的基础URL地址*/
	private static final String BASE_URL = "http://localhost:8080/TestSSH02/images/";

	private StudentDao studentDao;

	public StudentDao getStudentDao() {
		return studentDao;
	}

	public void setStudentDao(StudentDao studentDao) {
		this.studentDao = studentDao;
	}

	@Override
	public void register(Student student) {
		studentDao.register(student);
	}

	@Override
	public String uploadFile(File f, String fileName) {
		String imagePath = createImagePath();
		System.out.println("imagePath = " + imagePath);
		File newFile = new File(imagePath + File.separator + System.currentTimeMillis() + "." + getSuffix(fileName));
		try {
			FileInputStream fis = new FileInputStream(f);
			FileOutputStream fos = new FileOutputStream(newFile);
			int hasRead = 0;
			byte[] buf = new byte[1024];
			while((hasRead = fis.read(buf)) > 0){
				fos.write(buf, 0, hasRead);
			}
			fos.close();
			fis.close();
			return BASE_URL + newFile.getName();
		} catch (Exception e) {
			e.printStackTrace();
		}
		return null;
	}

	/**获取文件名的后缀*/
	private String getSuffix(String fileName){
		return fileName.substring(fileName.lastIndexOf(".") + 1);
	}

	/**创建保存图片文件的路径*/
	private String createImagePath(){
		String path = ServletActionContext.getServletContext().getRealPath("/images");
		File f = new File(path);
		if(!f.exists()){
			f.mkdirs();
		}
		return f.getAbsolutePath();
	}

	@Override
	public List<Student> getStudentList() {
		return studentDao.getStudentList();
	}

}
package com.test.dao;

import java.util.List;

import com.test.bean.Student;

public interface StudentDao {
	void register(Student student);

	List<Student> getStudentList();
}
package com.test.dao.impl;

import java.util.List;

import org.springframework.orm.hibernate3.support.HibernateDaoSupport;

import com.test.bean.Student;
import com.test.dao.StudentDao;

public class StudentDaoImpl extends HibernateDaoSupport implements StudentDao {

	@Override
	public void register(Student student) {
		this.getHibernateTemplate().save(student);
	}

	@SuppressWarnings("unchecked")
	@Override
	public List<Student> getStudentList() {
		return this.getHibernateTemplate().find("from Student order by id desc");
	}

}
<?xml version="1.0" encoding="UTF-8"?>
<!DOCTYPE struts PUBLIC
"-//Apache Software Foundation//DTD Struts Configuration 2.0//EN"
"http://struts.apache.org/dtds/struts-2.0.dtd" >

<struts>
	<package name="TestSSH02" extends="struts-default">
		<action name="register" class="registerAction" method="register">
			<result name="success" type="redirectAction">showStudentList</result>
		</action>

		<action name="showStudentList" class="showStudentListAction" method="showStudentList">
			<result name="success">/show_student_list.jsp</result>
		</action>
	</package>
</struts>package com.test.action;
import java.util.List;
import org.apache.struts2.ServletActionContext;
import com.opensymphony.xwork2.ActionSupport;
import com.test.bean.Student;
import com.test.service.StudentService;
public class ShowStudentListAction extends ActionSupport {
private StudentService studentService;
public StudentService getStudentService() {
return studentService;
}
public void setStudentService(StudentService studentService) {
this.studentService = studentService;
}
public String showStudentList() throws Exception{
List<Student> list = studentService.getStudentList();
ServletActionContext.getRequest().setAttribute("list", list);
return SUCCESS;
}
}
<%@ page language="java" import="java.util.*" pageEncoding="UTF-8"%>
<%@ taglib uri="/struts-tags" prefix="s" %>
<%
String path = request.getContextPath();
String basePath = request.getScheme()+"://"+request.getServerName()+":"+request.getServerPort()+path+"/";
%>

<!DOCTYPE HTML PUBLIC "-//W3C//DTD HTML 4.01 Transitional//EN">
<html>
  <head>
    <base href="<%=basePath%>">

    <title>My JSP 'show_student_list.jsp' starting page</title>

	<meta http-equiv="pragma" content="no-cache">
	<meta http-equiv="cache-control" content="no-cache">
	<meta http-equiv="expires" content="0">
	<meta http-equiv="keywords" content="keyword1,keyword2,keyword3">
	<meta http-equiv="description" content="This is my page">
	<!--
	<link rel="stylesheet" type="text/css" href="styles.css">
	-->

  </head>

  <body>
    <table border="1" width="70%" align="center">
    	<tr>
    		<th>ID</th>
    		<th>NAME</th>
    		<th>NUMBER</th>
    		<th>CLASS</th>
    		<th>IMAGE</th>
    	</tr>
    	<s:iterator value="#request.list" id="student">
    		<tr>
	    		<td><s:property value="id"/></td>
	    		<td><s:property value="name"/></td>
	    		<td><s:property value="number"/></td>
	    		<td><s:property value="cls"/></td>
	    		<td><img src=<s:property value="image"/>></td>
    		</tr>
    	</s:iterator>
    </table>
  </body>
</html>
<?xml version="1.0" encoding="UTF-8"?>
<beans xmlns="http://www.springframework.org/schema/beans"
	xmlns:xsi="http://www.w3.org/2001/XMLSchema-instance" xmlns:p="http://www.springframework.org/schema/p"
	xsi:schemaLocation="http://www.springframework.org/schema/beans http://www.springframework.org/schema/beans/spring-beans-3.0.xsd">

	<bean id="dataSource" class="org.apache.commons.dbcp.BasicDataSource">
		<property name="driverClassName" value="com.mysql.jdbc.Driver">
		</property>
		<property name="url" value="jdbc:mysql://localhost:3306/ssh"></property>
		<property name="username" value="root"></property>
		<property name="password" value="root"></property>
	</bean>

	<bean id="sessionFactory"
		class="org.springframework.orm.hibernate3.LocalSessionFactoryBean">
		<property name="dataSource">
			<ref bean="dataSource" />
		</property>
		<property name="hibernateProperties">
			<props>
				<prop key="hibernate.dialect">
					org.hibernate.dialect.MySQLDialect
				</prop>
				<prop key="hibernate.show_sql">true</prop>
			</props>
		</property>
		<property name="mappingResources">
			<list>
				<value>com/test/bean/Student.hbm.xml</value>
			</list>
		</property>
	</bean>

	<bean id="studentDao" class="com.test.dao.impl.StudentDaoImpl">
		<property name="sessionFactory" ref="sessionFactory"></property>
	</bean>

	<bean id="studentService" class="com.test.service.impl.StudentServiceImpl">
		<property name="studentDao" ref="studentDao"></property>
	</bean>

	<bean id="registerAction" class="com.test.action.RegisterAction">
		<property name="studentService" ref="studentService"></property>
	</bean>

	<bean id="showStudentListAction" class="com.test.action.ShowStudentListAction">
		<property name="studentService" ref="studentService"></property>
	</bean>

</beans>下面总结一下我在做这个项目的过程中出现的问题:
第一,我写完了代码之后,忘了配applicationContext.xml文件,结果在浏览器中访问报错,这里要注意,没有给Action注入对应的属性,肯定要报错
第二,在struts.xml文件的action标签中,class属性可以指定类的全路径,也可以指定applicationContext.xml中配置的id值,我测试是都可以的,程序运行没有报错
源代码由于lib包中的jar文件太多太大,所以我给删除了,源代码中只有代码,没有lib目录:
源代码下载


 255
255


 被折叠的 条评论
为什么被折叠?
被折叠的 条评论
为什么被折叠?
 到【灌水乐园】发言


