


今天有空复习了一下Android中AIDL的使用,由于平时开发中使用得不多,所以对AIDL的使用有些遗忘了,今天记录下来方便以后查看,并且记录一下AIDL使用过程中可能会遇到的一些问题。
一、什么是AIDL。
AIDL的全称是Android Interface Definition Language,主要用于应用之间的跨进程通信。
二、AIDL的使用。
Android中使用AIDL需要遵循一套规范,最关键的就是定义AIDL文件,下面以AndroidStudio为例一步步说明AIDL的使用。
由于要测试Android的跨进程通信,所以这里我们需要建立两个项目,一个项目调用另外一个项目的服务。
(1)新建远程服务项目,取名为MyRemoteService,该项目主要用于开放接口,提供服务给调用者使用。
(2)为MyRemoteService项目编写AIDL文件。AIDL文件声明了可以被跨进程调用的函数接口,AIDL文件的语法跟声明Java接口很类似,但又稍有区别,下面是本例子中MyRemoteService项目的AIDL文件代码:
// IService.aidl
package com.test.myremoteservice;

// Declare any non-default types here with import statements

interface IService {
    /**
     * Demonstrates some basic types that you can use as parameters
     * and return values in AIDL.
     */
    void basicTypes(int anInt, long aLong, boolean aBoolean, float aFloat,
            double aDouble, String aString);

    int add(int a, int b);
}
需要注意的是,AIDL文件中有和Java一样的包名,但是接口和接口中的方法声明都不需要访问修饰符(public,protected等)。
在AndroidStudio中为项目添加AIDL文件的方法如下:
在和main同级的目录下,创建AIDL目录,然后新建AIDL文件,如下图所示:
通过AndroidStudio提供的添加AIDL Folder功能,即可给项目添加AIDL目录,这时候在build.gradle文件中,会多出来一行:

sourceSets { main { aidl.srcDirs = ['src/main/aidl', 'src/main/aidl/'] } }在上面的AIDL文件中,声明了IService接口,接口中有两个方法,其中basicTypes是AndroidStudio自动生成的,add方法是我们手动编写的,该方法就是用来让调用者调用的,返回两个整型值的和。
下面要为MyRemoteService项目编写Service,调用者通过绑定这个Service,即可跨进程调用我们在接口中定义的方法。
这里新建一个名为MyService的Service,代码如下:
package com.test.myremoteservice;

import android.app.Service;
import android.content.Intent;
import android.os.Binder;
import android.os.IBinder;
import android.os.RemoteException;

public class MyService extends Service {
    public MyService() {
    }

    @Override
    public IBinder onBind(Intent intent) {
        return new MyBinder();
    }

    class MyBinder extends IService.Stub {

        @Override
        public void basicTypes(int anInt, long aLong, boolean aBoolean, float aFloat, double aDouble, String aString) throws RemoteException {

        }

        @Override
        public int add(int a, int b) throws RemoteException {
            return a + b;
        }
    }

}
主要代码在MyBinder类和onBind方法,onBind方法返回了一个MyBinder类的对象,而MyBinder类又继承了IService.Stub类,这个IService.Stub类,就是AndroidStudio根据我们编写的IService.aidl文件自动生成的Java类,如果在编写代码时找不到该类,可以在AndroidStudio的Build菜单中rebuild project一下。
MyBinder类由于继承了IService.Stub类,所以需要实现我们在AIDL文件中定义的接口中的方法,这里我们主要实现add方法,返回两个数的和。到这里基本上就完成了MyRemoteService项目的代码编写,下面还要新建一个项目TestAIDL,该项目是远程服务的调用者,会在里面调用MyRemoteService项目中的add方法。
TestAIDL项目中同样需要定义AIDL文件,和上面的MyRemoteService项目中定义AIDL文件的方式一样,需要注意的是,这两个项目中的AIDL文件的包名和接口定义,需要保持一致,这里就不赘述AIDL文件的编写了。
TestAIDL项目中主要就是一个MainActivity界面,有两个按钮,一个按钮用于绑定MyRemoteService项目中的MyService,一个按钮用于调用远程服务中的add方法,下面是MainActivity.java的代码:
package com.test.testaidl;

import android.content.ComponentName;
import android.content.Context;
import android.content.Intent;
import android.content.ServiceConnection;
import android.content.pm.PackageManager;
import android.content.pm.ResolveInfo;
import android.os.IBinder;
import android.os.RemoteException;
import android.support.v7.app.AppCompatActivity;
import android.os.Bundle;
import android.view.View;
import android.widget.Toast;

import com.test.myremoteservice.IService;

import java.util.List;

public class MainActivity extends AppCompatActivity {

    private IService iService; //声明IService接口,用于调用远程服务中的add方法
    private boolean serviceBinded = false; //标记服务是否成功被绑定

    @Override
    protected void onCreate(Bundle savedInstanceState) {
        super.onCreate(savedInstanceState);
        setContentView(R.layout.activity_main);
    }

    //绑定服务
    public void bindService(View view) {
        if(serviceBinded) {
            return ;
        }
        Intent intent = new Intent();
        intent.setAction("com.test.myremoteservice");
        Intent newIntent = createExplicitFromImplicitIntent(this, intent);
        startService(newIntent);
        boolean b = bindService(newIntent, new MyServiceConnect(), BIND_AUTO_CREATE);
        showToast("bind service result: " + b);
    }

    //调用远程服务中的方法
    public void callRemoteMethod(View view) {
        if(iService != null) {
            try {
                showToast("3 + 2 = " + iService.add(3, 2));
            } catch (RemoteException e) {
                e.printStackTrace();
                showToast("error call remote method!");
            }
        }else {
            showToast("service not binded!");
        }
    }

    //从隐式声明的Intent中创建一个显式声明的Intent(在Android5.0及以上系统中需要显式声明Intent才能启动Service)
    public Intent createExplicitFromImplicitIntent(Context context, Intent implicitIntent) {
        // Retrieve all services that can match the given intent
        PackageManager pm = context.getPackageManager();
        List<ResolveInfo> resolveInfo = pm.queryIntentServices(implicitIntent, 0);

        // Make sure only one match was found
        if (resolveInfo == null || resolveInfo.size() != 1) {
            return null;
        }

        // Get component info and create ComponentName
        ResolveInfo serviceInfo = resolveInfo.get(0);
        String packageName = serviceInfo.serviceInfo.packageName;
        String className = serviceInfo.serviceInfo.name;
        ComponentName component = new ComponentName(packageName, className);

        // Create a new intent. Use the old one for extras and such reuse
        Intent explicitIntent = new Intent(implicitIntent);

        // Set the component to be explicit
        explicitIntent.setComponent(component);

        return explicitIntent;
    }

    //服务绑定后这里的方法会被回调
    private class MyServiceConnect implements ServiceConnection {

        @Override
        public void onServiceConnected(ComponentName name, IBinder service) {
            showToast("service connected!");
            serviceBinded = true;
            iService = IService.Stub.asInterface(service);
        }

        @Override
        public void onServiceDisconnected(ComponentName name) {
            showToast("service disconnected!");
            serviceBinded = false;
        }
    }

    private void showToast(String msg) {
        Toast.makeText(this, msg, Toast.LENGTH_SHORT).show();
    }
}
布局文件的代码就是两个按钮:
<?xml version="1.0" encoding="utf-8"?>
<LinearLayout xmlns:android="http://schemas.android.com/apk/res/android"
    xmlns:tools="http://schemas.android.com/tools"
    android:orientation="vertical"
    android:layout_width="match_parent"
    android:layout_height="match_parent"
    android:padding="15dp"
    tools:context="com.test.testaidl.MainActivity">

    <Button
        android:onClick="bindService"
        android:layout_width="match_parent"
        android:layout_height="wrap_content"
        android:text="bind service" />

    <Button
        android:layout_marginTop="20dp"
        android:onClick="callRemoteMethod"
        android:layout_width="match_parent"
        android:layout_height="wrap_content"
        android:text="call remote method" />
</LinearLayout>
下面主要说一下MainActivity中的代码:
点击"bind service"按钮后会调用bindService方法,该方法会新建一个Intent并通过bindService方法去绑定到MyRemoteService项目中的MyService,由于Android5.0+系统的问题,绑定服务(获取通过startService启动服务)不能像以前那样隐式调用了(隐式调用即在Intent中不指定要启动哪个Service,而是通过设置Action来启动),必须显式指定Intent才能启动服务,所以这里通过createExplicitFromImplicitIntent方法来将隐式的Intent转成显式的Intent了,这样才能保证Service被启动,否则在Android5.0+的系统上会报错Java.lang.IllegalArgumentException: Service Intent must be explicit。
隐式调用需要在AndroidManifest.xml文件中配置Service的intent-filter。
然后是MyServiceConnection类,该类实现了ServiceConnection接口,并实现了接口中的onServiceConnected和onServiceDisconnected方法,bindService方法中需要传一个MyServiceConnection类的对象,当服务绑定成功,就会回调onServiceConnected方法,当服务解绑,就会回调onServiceDisconnected。
在onServiceConnected方法中,通过IService.Stub.asInterface(service)这句代码将一个IBinder对象转化成IService对象,通过这个IService对象,我们就能调用add方法了。
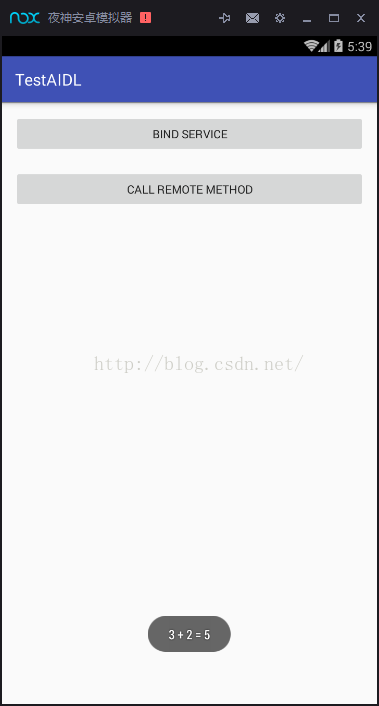
点击"call remote method"按钮后,MainActivity中的callRemoteMethod方法会被调用,如果IService对象不为空,则调用add方法获取返回值并用Toast显示出来。下面是在模拟器中执行的图片:

这里我发现一个问题:
在Android4.4系统上,我们不需要启动MyRemoteService这个项目,即可在TestAIDL中成功绑定服务并调用服务中的方法,但是在Android5.0中,如果不先启动MyRemoteService这个项目,则绑定服务就会失败,bindService方法的返回值一直是false,只有启动了MyRemoteService项目后才能成功绑定服务。不知道这是系统的限制,还是我的代码的问题,如果有读者知道,希望能给我解答一下。


 2万+
2万+


 被折叠的 条评论
为什么被折叠?
被折叠的 条评论
为什么被折叠?
 到【灌水乐园】发言


