


使用DrawerLayout实现抽屉导航效果代替以前的滑动侧边栏,这是google建议的使用方式,相对以前的方式也简单许多。有点像是侧边栏,不过跟侧边栏还是有点不同的,它是在显示在actionbar的下面的,而侧边栏显然是用另外一个视图来遮盖当前的视图。当然,因为是13 google才更新的support库支持的组件,你需要把最低版本写到高点的版本,不能写成2.x的版本。
布局其实很简单就可以了:
<android.support.v4.widget.DrawerLayout xmlns:android="http://schemas.android.com/apk/res/android"
    android:id="@+id/drawer_layout"
    android:layout_width="match_parent"
    android:layout_height="match_parent" >

    <FrameLayout
        android:id="@+id/content_frame"
        android:layout_width="match_parent"
        android:layout_height="match_parent" />

    <ListView
        android:id="@+id/left_drawer"
        android:layout_width="240dp"
        android:layout_height="match_parent"
        android:layout_gravity="start"
        android:background="#123456"
        android:choiceMode="singleChoice"
        android:dividerHeight="1dp" />

</android.support.v4.widget.DrawerLayout>
下面是核心的代码:
public void init() {
manager = getFragmentManager();
drawerLayer = (DrawerLayout) findViewById(R.id.drawer_layout);
listView = (ListView) findViewById(R.id.left_drawer);
// 设置一个简单的左边或者右边的影子
drawerLayer.setDrawerShadow(R.drawable.drawer_shadow,
GravityCompat.START);
// 设置遮盖主要内容的布颜色
drawerLayer.setScrimColor(Color.TRANSPARENT);
ArrayAdapter<String> adapter = new ArrayAdapter<String>(this,
R.layout.tv_txt, arr);
listView.setAdapter(adapter);
listView.setOnItemClickListener(new OnItemClickListener() {
@Override
public void onItemClick(AdapterView<?> arg0, View arg1,
int position, long arg3) {
// TODO Auto-generated method stub
setClickItem(position);
}
});
}
/**
* 替换碎片
*/
public void setClickItem(int position) {
TestFragment fragment = new TestFragment();
// 传值
Bundle bundle = new Bundle();
bundle.putString("color", arr[position]);
fragment.setArguments(bundle);
manager.beginTransaction().replace(R.id.content_frame, fragment)
.commit();
// 关闭侧边列表
drawerLayer.closeDrawer(listView);
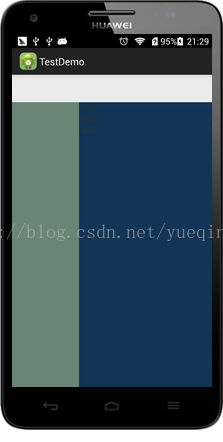
}效果:
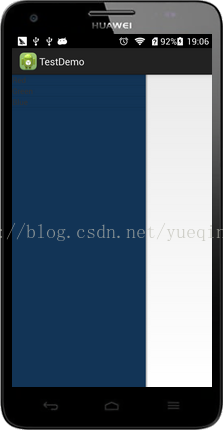
效果做的很简单,大概能看清嘛。
一张简单的布局看清抽屉的原理:
<RelativeLayout xmlns:android="http://schemas.android.com/apk/res/android"
    android:layout_width="match_parent"
    android:layout_height="match_parent" >

    <android.support.v4.widget.DrawerLayout
        android:id="@+id/drawer_layout"
        android:layout_marginTop="50dp"
        android:layout_width="match_parent"
        android:layout_height="match_parent" >

        <FrameLayout
            android:id="@+id/content_frame"
            android:background="#698574"
            android:layout_width="match_parent"
            android:layout_height="match_parent" />

        <ListView
            android:id="@+id/left_drawer"
            android:layout_width="240dp"
            android:layout_height="match_parent"
            android:layout_gravity="start"
            android:background="#123456"
            android:choiceMode="singleChoice"
            android:dividerHeight="1dp" />
    </android.support.v4.widget.DrawerLayout>

</RelativeLayout>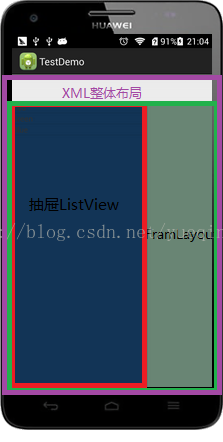
抽屉效果,一层为显示ListView,一层显示FramLayout。把他们整体看为一个组件使用就很好理解了。
menu控件:
<menu xmlns:android="http://schemas.android.com/apk/res/android" >

    <item
        android:id="@+id/action_websearch2"
        android:icon="@drawable/ic_drawer"
        android:showAsAction="ifRoom|withText"
        android:title="@string/action_websearch"/>

</menu>
只有一个点击的按钮。
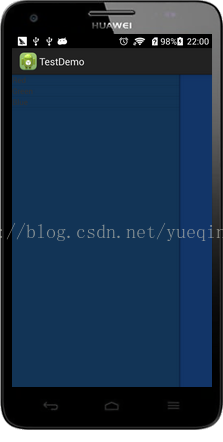
右边滑出的效果:
如果你想使用的是左边侧滑出来的效果的话,很简单:
在布局中:
android:layout_gravity="start"if (item.getItemId() == R.id.action_websearch2) {
if (mDrawerLayout.isDrawerOpen(mRightLayout)) {
mDrawerLayout.closeDrawer(Gravity.START);
} else {
mDrawerLayout.openDrawer(Gravity.START);
}
}左边侧滑出的效果:
左右同时有抽屉:
<RelativeLayout xmlns:android="http://schemas.android.com/apk/res/android"
    android:layout_width="match_parent"
    android:layout_height="match_parent" >

    <android.support.v4.widget.DrawerLayout
        android:id="@+id/drawer_layout"
        android:layout_width="match_parent"
        android:layout_height="match_parent"
        android:layout_marginTop="50dp" >

        <FrameLayout
            android:id="@+id/content_frame"
            android:layout_width="match_parent"
            android:layout_height="match_parent"
            android:background="#698574" />


        <ListView
            android:id="@+id/left_drawer"
            android:layout_width="240dp"
            android:layout_height="match_parent"
            android:layout_gravity="start"
            android:background="#123456"
            android:choiceMode="singleChoice"
            android:dividerHeight="1dp" />

        <ListView
            android:id="@+id/right_drawer"
            android:layout_width="240dp"
            android:layout_height="match_parent"
            android:layout_gravity="right"
            android:background="#123456"
            android:choiceMode="singleChoice"
            android:dividerHeight="1dp" />
    </android.support.v4.widget.DrawerLayout>

</RelativeLayout>
其实更建议使用这样的书写方式:
<RelativeLayout xmlns:android="http://schemas.android.com/apk/res/android"
    android:layout_width="match_parent"
    android:layout_height="match_parent" >

    <android.support.v4.widget.DrawerLayout
        android:id="@+id/drawer_layout"
        android:layout_width="match_parent"
        android:layout_height="match_parent" >

        <FrameLayout
            android:id="@+id/content_frame"
            android:layout_width="match_parent"
            android:layout_height="match_parent"
            android:background="#698574" />

        <RelativeLayout
            android:id="@+id/menu_layout_left"
            android:layout_width="300dp"
            android:layout_height="match_parent"
            android:layout_gravity="left" >

            <ListView
                android:id="@+id/left_drawer"
                android:layout_width="match_parent"
                android:layout_height="match_parent"
                android:background="#123456"
                android:choiceMode="singleChoice"
                android:dividerHeight="1dp" />
        </RelativeLayout>

        <RelativeLayout
            android:id="@+id/menu_layout_left"
            android:layout_width="300dp"
            android:layout_height="match_parent"
            android:layout_gravity="right" >

            <ListView
                android:id="@+id/right_drawer"
                android:layout_width="match_parent"
                android:layout_height="match_parent"
                android:background="#123456"
                android:choiceMode="singleChoice"
                android:dividerHeight="1dp" />
        </RelativeLayout>
    </android.support.v4.widget.DrawerLayout>

</RelativeLayout><RelativeLayout xmlns:android="http://schemas.android.com/apk/res/android"
android:layout_width="match_parent"
android:layout_height="match_parent" >
<android.support.v4.widget.DrawerLayout
android:id="@+id/drawer_layout"
android:layout_width="match_parent"
android:layout_height="match_parent" >
<RelativeLayout
android:layout_width="match_parent"
android:layout_height="match_parent" >
<ImageView
android:layout_width="match_parent"
android:layout_height="match_parent"
android:background="#123568" />
<Button
android:id="@+id/button1"
style="?android:attr/buttonStyleSmall"
android:layout_width="wrap_content"
android:layout_height="wrap_content"
android:layout_alignParentLeft="true"
android:layout_centerVertical="true"
android:layout_marginLeft="81dp"
android:text="Button1" />
</RelativeLayout>
<RelativeLayout
android:id="@+id/menu_layout_left"
android:layout_width="300dp"
android:layout_height="match_parent"
android:layout_gravity="left" >
<ListView
android:id="@+id/left_drawer"
android:layout_width="match_parent"
android:layout_height="match_parent"
android:background="#123456"
android:choiceMode="singleChoice"
android:dividerHeight="1dp" />
</RelativeLayout>
</android.support.v4.widget.DrawerLayout>
</RelativeLayout>效果:
注意:
1.显示界面主要内容的View(FragmentLayout)必须为DrawerLayout的第一个子View,原因是在于XML布局文件中的View顺序为android系统中的z-ordering顺序,而抽屉必须出现在内容上。
2.在抽屉ListView中 android:layout_gravity="right/left/start",必须要设置。
3.按back键,类型转换异常:
@Override
	public boolean onKeyDown(int keyCode, KeyEvent event) {
		// TODO Auto-generated method stub
		// 打开侧边栏
		if (keyCode == KeyEvent.KEYCODE_BACK && listView.isShown()) {
			drawerLayer.closeDrawer(listView);
			return true;
		}
		// 关闭侧边栏
		else if (keyCode == KeyEvent.KEYCODE_MENU) {
			drawerLayer.openDrawer(listView);
			return true;
		}
		return super.onKeyDown(keyCode, event);
	}


 2092
2092


 被折叠的 条评论
为什么被折叠?
被折叠的 条评论
为什么被折叠?
 到【灌水乐园】发言


