


注:本学习笔记内容有来自网络社区,论坛,书籍,是我在学习的过程中总结的有用知识点,我不会用来获取任何利益,如果我侵犯了您的利益请联系我
Intent 用法
显式 Intent
Intent intent = new Intent(MainActivity.this,OtherActivity.class);
startActivity(intent);
隐式 Intent
1.打开本机浏览器跳转到目标网址
Intent intent = new Intent(Intent.ACTION_VIEW);
intent.setDate(Uri.parse("http://www.sina.com"));
startActivity(intent);
2.调用本机拨号器拨打电话
Intent intent = new Intent(Intent.ACTION_DIAL);
intent.setDate(Uri.parse("tel:12306"));
startActivity(intent);
上面的setDate数据主要是在哪里设置和区分的呢,在一个activity的 intent-filter中的date选项中,其中android:scheme 指定的就是上面的tel和http
        <activity
            android:name=".MainActivity"
            android:label="@string/app_name" >
            <intent-filter>
                <action android:name="android.intent.action.MAIN" />

                <category android:name="android.intent.category.LAUNCHER" />
                <date android:scheme="http">
            </intent-filter>
        </activity>
data标签中主要可以配置的内容
android:scheme
用于指定数据的协议部分,比如上面的http和tel
android:host
用于指定数据的主机名部分,比如上面的 www.sina.com
android:port
用于指定数据的端口部分,一般紧随在主机名之后
android:path
用于指定主机名和端口之后的部分,如一段网址中跟在域名之后的内容
android:mimeType
用于指定可以处理的数据类型,允许使用通配符的方式进行指定
启动活动的令一种方法 startActivityForResult(); 可以用来接收打开的activity返回来的数据。
startActivityForResult(intent,1); //第一个参数intent 实例,第二个参数识别码
此识别码用来标识跳转到的activity,具体用法如下:
	@Override
	protected void onActivityResult(int requestCode, int resultCode, Intent data) {
		// TODO Auto-generated method stub
		super.onActivityResult(requestCode, resultCode, data);
		switch(requestCode){
		case 1:  //这个1就是我们上面定义的识别码
			if(resultCode == RESULT_OK){
				//你要做的事情
			}
			break;
			default:
			break;
		}
	}
那么在打开的activity怎么返回数据呢
Intent intnet = new Intent();
setResult(RESULT_OK,intent);
finish();
RESULT_OK为返回的结果码
在activity中监听返回键点击处理函数
	@Override
	public void onBackPressed() {
		// TODO Auto-generated method stub
		super.onBackPressed();
		Toast.makeText(getApplicationContext(), "点击了返回键", Toast.LENGTH_SHORT).show();
	}
EditText一个知识点
    <EditText
        android:id="@+id/et_text"
        android:layout_width="wrap_content"
        android:layout_height="wrap_content" />
    <EditText
        android:layout_width="wrap_content"
        android:layout_height="wrap_content" />
上面一个EditText一个有id,一个没有id,当旋转屏幕的时候,有id的EditText会自动保存已经键入的内容,没有id的EditText则会清空
防止EditText自动获取焦点
android:focusable ="true"
android:focusableIntouchMode = "true"
有时候可能想让Edittext自动获取焦点,但是不想让软件输入法自动显示,可以在
AndroidManifest.xml中的
<activity
android:windowSoftInputMode = "stateHidden">
Button一个知识点
button.setEnabled(flase); 设置此属性后按钮虽然设置了监听但是也不能点击
隐藏软键盘
第一种方法
    InputMethodManager inputMethodManager = (InputMethodManager)currFragAct.getSystemService(currFragAct.INPUT_METHOD_SERVICE);
    private boolean hideKeyboard(){
        if(inputMethodManager.isActive(userText) || inputMethodManager.isActive(pswText)){
        //因为是在fragment下,所以用了getView()获取view,也可以用findViewById()来获取父控件
            loginButton.requestFocus();//强制获取焦点,不然getActivity().getCurrentFocus().getWindowToken()会报错
            inputMethodManager.hideSoftInputFromWindow(currFragAct.getCurrentFocus().getWindowToken(), InputMethodManager.HIDE_NOT_ALWAYS);
            inputMethodManager.restartInput(userText);
            inputMethodManager.restartInput(pswText);
            return true;
        }
        return false;
    }
第二种方法
    /**
     * 当使用自定义的键盘时,需要隐藏系统弹出的软键盘,但是光标需要保留
     */
    private void editFocusControl() {

    	//获取系统版本号
    	int sdkInt = Build.VERSION.SDK_INT;
    	//如果是android 3.0以上版本,用下面的方法隐藏软键盘
    	if(sdkInt >= 11) {
    			 getWindow().setSoftInputMode(
                         WindowManager.LayoutParams.SOFT_INPUT_STATE_ALWAYS_HIDDEN);
                 try {
                     Class<EditText> cls = EditText.class;
                     Method setSoftInputShownOnFocus;
                     setSoftInputShownOnFocus = cls.getMethod("setSoftInputShownOnFocus",
                             boolean.class);
                     setSoftInputShownOnFocus.setAccessible(false);
                     setSoftInputShownOnFocus.invoke(mDialNumEdit, false);
                 } catch (Exception e) {
                     e.printStackTrace();
                 }
    	}else {
    		//关闭软键盘,让手机始终不弹出软键盘
    		mDialNumEdit.setInputType(InputType.TYPE_NULL);
    	}
    }
第三种方法
 View view = currFragAct.getWindow().peekDecorView();
	if (view != null) {
 		InputMethodManager inputmanger = (InputMethodManager)currFragAct.getSystemService(Context.INPUT_METHOD_SERVICE);
 	  inputmanger.hideSoftInputFromWindow(view.getWindowToken(), 0);
	}
ScrollView中元素不能充满ScrollView的问题
ScrollView里只能放一个元素.
当ScrollView里的元素想填满ScrollView时,使用"fill_parent"是不管用的,必需为ScrollView设置:android:fillViewport=“true”。
我猜 当ScrollView没有fillVeewport=“true”时, 里面的元素(比如LinearLayout)会按照wrap_content来计算(不论它是否设了"fill_parent"),
而如果LinearLayout的元素设置了fill_parent,那么也是不管用的,因为LinearLayout依赖里面的元素,而里面的元素又依赖LinearLayout,
这样自相矛盾.所以里面元素设置了fill_parent,也会当做wrap_content来计算.
禁止gridview上下滚动
设置gridview 的touch事件,是ACTION_MOVE 的话返回true

mDragGrid.setOnTouchListener(new OnTouchListener() {

               @Override
               public boolean onTouch(View v, MotionEvent event) {
                    return MotionEvent.ACTION_MOVE == event.getAction() ? true
                              : false;
               }
          });
TextView两个有用的属性
    <TextView
        android:layout_width="wrap_content"
        android:layout_height="wrap_content"
        android:text="@string/hello_world"
        android:singleLine="true"										//	只显示一行
        android:textSize="28sp"
        android:ellipsize="end"/>									//当文本超出屏幕空间,文本缩进方式
防止页面下面的功能按钮被输入法顶起来
        <activity
            android:name=".HomeFragActivity"
            android:windowSoftInputMode="adjustPan|stateHidden"/>
消除圆锯齿
		 paint.setAntiAlias(true);
		 paint.setDither(true);
		 //画圆
		 canvas.setDrawFilter(new PaintFlagsDrawFilter(0, Paint.ANTI_ALIAS_FLAG|
				 Paint.FILTER_BITMAP_FLAG));

		canvas.drawCircle(this.l / 2, this.m / 2, this.j, this.b);
两个fragment之间传递参数
               在当前fragment里面 sf为要跳转的fragment
                SearchProjectFragment sf = new SearchProjectFragment();
                Bundle bundle = new Bundle();
                bundle.putString("key", Projsid);
                sf.setArguments(bundle);
在sf中获取参数
String string = getArguments().getString("key");
android.textiview.settextcolor失效的问题
使用textview.setColor(getResources().getColor(R.color.xxx))不要使用textview.setColor(R.color.xxx)
activity 中 onNewIntent(Intent intent)方法
大家遇到一个应用的Activity供多种方式调用启动的情况,多个调用希望只有一个Activity的实例存在,这就需要Activity的onNewIntent(Intent intent)方法了。只要在Activity中加入自己的onNewIntent(intent)的实现加上Manifest中对Activity设置lanuchMode=“singleTask”就可以。
onNewIntent()非常好用,Activity第一启动的时候执行onCreate()---->onStart()---->onResume()等后续生命周期函数,也就时说第一次启动Activity并不会执行到onNewIntent(). 而后面如果再有想启动Activity的时候,那就是执行onNewIntent()---->onResart()------>onStart()----->onResume(). 如果android系统由于内存不足把已存在Activity释放掉了,那么再次调用的时候会重新启动Activity即执行onCreate()---->onStart()---->onResume()等。
不要忘记,系统可能会随时杀掉后台运行的Activity,如果这一切发生,那么系统就会调用onCreate方法,而不调用onNewIntent方法,一个好的解决方法就是在onCreate和onNewIntent方法中调用同一个处理数据的方法
当调用到onNewIntent(intent)的时候,需要在onNewIntent() 中使用setIntent(intent)赋值给Activity的Intent.否则,后续的getIntent()都是得到老的Intent。
设置RadioGroup 中radioButton 间距
方法一:
			RadioGroup inputMethodGroup;
			RadioGroup.LayoutParams params = new RadioGroup.LayoutParams(RadioGroup.LayoutParams.WRAP_CONTENT,RadioGroup.LayoutParams.WRAP_CONTENT);
			params.setMargins(0, 0, 70, 0);
			RadioButton radioButton = new RadioButton(mContext);
			radioButton.setText(imeLabel);
			radioButton.setButtonDrawable(R.drawable.radiobutton_selector);
			radioButton.setPadding(60, 0, 0, 0);
			radioButton.setTextSize(24);
			inputMethodGroup.addView(radioButton,params);
方法二:
感觉有点投机取巧了,看到 radioButton.setText(imeLabel) 了吧,这个是设置radioButton名字,下一个view还是radioButton ,我们可以在 radioButton.setText(imeLabel+" ") 中多加入些空格,就自动隔开了下一个radioButon;神马参数设置都是浮云,哈哈哈哈。
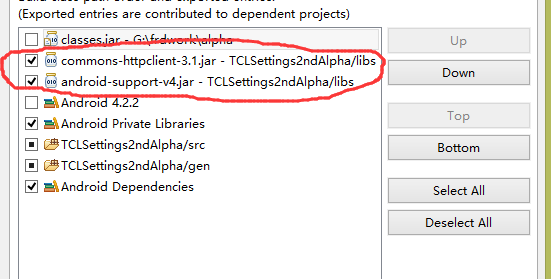
VerifiError问题
在运行项目到一个网络请求的时候总是报这个错误,大致错误截图如下

看了一下上面的报错信息,截图中没有截出来,大致是找不到org下面的HttpClient,这个类,网上也查了下VerifiError都说是jar包问题,看了自己的build 库 确实是没有引,引入这两个包就好了
添加Fragment到返回栈,点击返回键可以返回上一个fragment
FragmentTransaction ft2 = getFragmentManager().beginTransaction();
ft2.replace(R.id.searoot_frame, new FragmentSeaGateStoryBookView());
ft2.setTransition(FragmentTransaction.TRANSIT_FRAGMENT_OPEN);
ft2.addToBackStack(null);
ft2.commit();
模拟back键代码,返回到上一个fragment
getSupportFragmentManager().popBackStack();//suport.v4包
或getFragmentManager().popBackStack();
App因内容过多导致的启动延迟,白屏
在主Activity的theme中设置一下内容,自己设置个颜色或者放一张图片都可以,就像QQ的那个启动图
        <activity
            android:name="com.tcl.userguide.MainActivity"
            android:label="@string/app_name" >
            <intent-filter>
                <action android:name="android.intent.action.MAIN" />

                <category android:name="android.intent.category.LAUNCHER" />
            </intent-filter>
        </activity>
    <style name="AppTheme" parent="AppBaseTheme">
        <!-- All customizations that are NOT specific to a particular API-level can go here. -->
    <item name="android:windowNoTitle">true</item>
    <item name="android:windowBackground">@drawable/logo</item>
    </style>
得到Activities栈顶的Activity类名,包名,类全路径
具体 步骤如下:
1、 得到当前运行环境(context)的Activity管理器;
2. 通过Activity管理器得到当前的任务栈信息;
3. 从任务栈中获得栈顶的Activity的名称。
具体读者可以参看下面的代码和Android帮助文档。
代码举例 :
String getTopActivity(Activity context)
{
ActivityManager manager = (ActivityManager)context.getSystemService(ACTIVITY_SERVICE) ;
List<RunningTaskInfo> runningTaskInfos = manager.getRunningTasks(1) ;
if(runningTaskInfos != null)
return (runningTaskInfos.get(0).topActivity).toString() ;
else
return null ;
}
最后不要忘记在AndroidManifest.xml中增加权限:
<uses-permission android:name = “android.permission.GET_TASKS”/>


ActivityManager manager = (ActivityManager) getSystemService(Context.ACTIVITY_SERVICE);
RunningTaskInfo info = manager.getRunningTasks(1).get(0);
String shortClassName = info.topActivity.getShortClassName(); //类名
String className = info.topActivity.getClassName(); //完整类名
String packageName = info.topActivity.getPackageName(); //包名
判断横竖屏
WindowManager wm = getWindowManager();
Display d = wm.getDefaultDisplay();
if(d.getWidth() > d.getHeight()){
	//横屏模式
}else{
	//竖屏模式
}
代码设置屏幕方向
setRequestdOrientation(ActivityInfo.SCREEN_ORIENTATION_LANDSCAPE) //横屏

setRequestdOrientation(ActivityInfo.SCREEN_ORIENTATION_PORTRAIT) //竖屏
跳转activity并清除活动
Intent i = new Intent(this,MyActivity.class);
i.addFlags(Intent.FLAG_ACTIVITY_CLEAR_TOP);
startActivity(i);
onKeyDown()方法返回一个boolean类型的结果。当想告诉系统您已经处理完成事件并且系统不要再做进一步处理时,应当返回true。
修改checkbox样式
<checkbox android:id="@+id/start"
 style="?android:attr/startStyle" //使用系统的样式
 android:layout_width="wrap_content"
 android:layout_height="wrap_content"/>
style属性的值格式如下
? [package:] [type:]name
横向的progressBar
<ProgressBar android:id="@+id/progressbar"
		android:layout_width="wrap_content"
		android:layout_height="wrap_content"
		style="@android:style/Widget.ProgressBar.Horizontal">


 376
376

 被折叠的 条评论
为什么被折叠?
被折叠的 条评论
为什么被折叠?
 到【灌水乐园】发言


