iOS 中快速简单高效的实现自定义tableViewCell 的方法-亲测实战版本-精华版


IOS7学习之路一(新UI之自定义UITableViewCell)

分类: IOS   5167人阅读  评论(5)  收藏  举报

ios7 新升级之后界面有了很大的变化,xcode模拟器去掉了手机边框和home键,如果想回到主页面,可以按住shift+comment+r键。废话少说先展示一下新UI下UItableView设置为Group后的效果:


整体界面显得更加简洁,而且UITableViewCell的宽度默认为满屛,也取消了圆角。

下面说下自定义UITableView的过程:

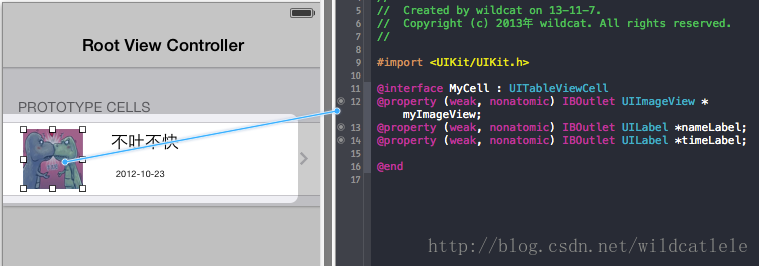
首先在storyboard中给cell拖过来一个UIimageView和两个label 


然后新建一个MyCell类继承自UITableViewCell。

MyCell代码:

[objc]  view plain copy print ? 在CODE上查看代码片 派生到我的代码片
  1. //  MyCell.h  
  2. //  XcodeTest  
  3. //  
  4. //  Created by wildcat on 13-11-7.  
  5. //  Copyright (c) 2013年 wildcat. All rights reserved.  
  6. //  
  7.   
  8. #import <UIKit/UIKit.h>  
  9.   
  10. @interface MyCell : UITableViewCell  
  11. @property (weak, nonatomic) IBOutlet UIImageView *myImageView;  
  12. @property (weak, nonatomic) IBOutlet UILabel *nameLabel;  
  13. @property (weak, nonatomic) IBOutlet UILabel *timeLabel;  
  14.   
  15. @end  

[objc]  view plain copy print ? 在CODE上查看代码片 派生到我的代码片
  1. //  MyCell.m  
  2. //  XcodeTest  
  3. //  
  4. //  Created by wildcat on 13-11-7.  
  5. //  Copyright (c) 2013年 wildcat. All rights reserved.  
  6. //  
  7.   
  8. #import "MyCell.h"  
  9.   
  10. @implementation MyCell  
  11.   
  12. - (id)initWithStyle:(UITableViewCellStyle)style reuseIdentifier:(NSString *)reuseIdentifier  
  13. {  
  14.     self = [super initWithStyle:style reuseIdentifier:reuseIdentifier];  
  15.     if (self) {  
  16.         // Initialization code  
  17.     }  
  18.     return self;  
  19. }  
  20.   
  21. - (void)setSelected:(BOOL)selected animated:(BOOL)animated  
  22. {  
  23.     [super setSelected:selected animated:animated];  
  24.   
  25.     // Configure the view for the selected state  
  26. }  
  27. #pragma mark 设置Cell的边框宽度  
  28. - (void)setFrame:(CGRect)frame {  
  29.     frame.origin.x += 10;  
  30.     frame.size.width -= 22 * 10;  
  31.     [super setFrame:frame];  
  32. }  
  33.   
  34. @end  


使用:

在UITableViewController中使用,代码如下:


[objc]  view plain copy print ? 在CODE上查看代码片 派生到我的代码片
  1. //  
  2. //  RootViewController.m  
  3. //  XcodeTest  
  4. //  
  5. //  Created by wildcat on 13-11-7.  
  6. //  Copyright (c) 2013年 wildcat. All rights reserved.  
  7. //  
  8.   
  9. #import "RootViewController.h"  
  10. #import "MyCell.h"  
  11. @interface RootViewController ()  
  12.   
  13. @end  
  14.   
  15. @implementation RootViewController  
  16.   
  17. - (id)initWithStyle:(UITableViewStyle)style  
  18. {  
  19.     self = [super initWithStyle:style];  
  20.     if (self) {  
  21.         // Custom initialization  
  22.     }  
  23.     return self;  
  24. }  
  25.   
  26. - (void)viewDidLoad  
  27. {  
  28.     [super viewDidLoad];  
  29.       
  30.   
  31. }  
  32.   
  33. - (void)didReceiveMemoryWarning  
  34. {  
  35.     [super didReceiveMemoryWarning];  
  36.     // Dispose of any resources that can be recreated.  
  37. }  
  38.   
  39. #pragma mark - Table view data source  
  40.   
  41. - (NSInteger)numberOfSectionsInTableView:(UITableView *)tableView  
  42. {  
  43.     return 2;  
  44. }  
  45.   
  46. - (NSInteger)tableView:(UITableView *)tableView numberOfRowsInSection:(NSInteger)section  
  47. {  
  48.     return 3;  
  49. }  
  50.   
  51. - (UITableViewCell *)tableView:(UITableView *)tableView cellForRowAtIndexPath:(NSIndexPath *)indexPath  
  52. {  
  53.     static NSString *CellIdentifier = @"Cell";  
  54.     MyCell *cell = [tableView dequeueReusableCellWithIdentifier:CellIdentifier forIndexPath:indexPath];  
  55.       
  56.     if (cell==nil) {  
  57.         cell=[[MyCell alloc] initWithStyle:UITableViewCellStyleDefault reuseIdentifier:CellIdentifier];  
  58.     }  
  59.       
  60.     cell.nameLabel.text=@"WildCat";  
  61.     cell.timeLabel.text=@"2013-11-7";  
  62.     return cell;  
  63. }  
  64.   
  65. -(CGFloat)tableView:(UITableView *)tableView heightForRowAtIndexPath:(NSIndexPath *)indexPath{  
  66.   
  67.     return  75.f;  
  68. }  
  69.   
  70.   
  71. @end  

修改后的效果:


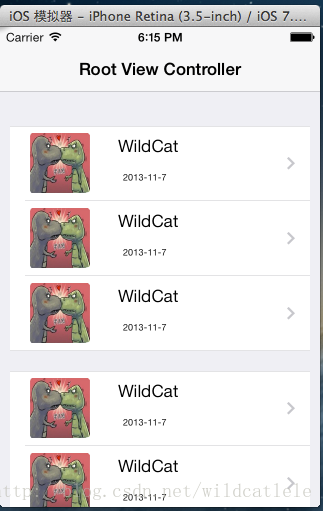
当然如果你喜欢cell满屏的效果,你完全可以不设cell的宽度。。。

转载请注明:版权所有http://1.wildcat.sinaapp.com/


  • 0
    点赞
  • 0
    收藏
    觉得还不错? 一键收藏
  • 0
    评论
首先,在CreateOutboundViewController,你需要在点击删除按钮的时候弹出CreateOutboundDeletePopupView弹窗。可以通过在按钮的点击事件创建弹窗视图并将其添加到当前视图上来实现: ```objc - (IBAction)deleteButtonTapped:(id)sender { CreateOutboundDeletePopupView *deletePopupView = [[CreateOutboundDeletePopupView alloc] initWithFrame:self.view.frame]; deletePopupView.delegate = self; [self.view addSubview:deletePopupView]; } ``` 接下来,你需要在CreateOutboundDeletePopupView添加一个确定按钮,并在点击确定按钮时触发向后台请求数据的操作。可以通过在确定按钮的点击事件调用代理方法实现: ```objc - (IBAction)confirmButtonTapped:(id)sender { // 向后台请求数据并删除 // ... // 关闭弹窗 [self removeFromSuperview]; // 调用代理方法,通知CreateOutboundViewController删除成功 if ([self.delegate respondsToSelector:@selector(deleteSuccessful)]) { [self.delegate deleteSuccessful]; } } ``` 在CreateOutboundViewController,需要实现代理方法deleteSuccessful,该方法将在CreateOutboundDeletePopupView的确定按钮被点击后被调用。在该方法,你需要更新tableviewcell,将删除后的cell的button按钮显示出来。可以通过刷新tableview实现: ```objc - (void)deleteSuccessful { // 更新tableview [self.tableView reloadData]; } ``` 在tableviewcell,你需要根据cell的状态来判断是否显示button按钮。可以通过在cellForRowAtIndexPath代理方法设置cell的状态来实现: ```objc - (UITableViewCell *)tableView:(UITableView *)tableView cellForRowAtIndexPath:(NSIndexPath *)indexPath { UITableViewCell *cell = [tableView dequeueReusableCellWithIdentifier:@"Cell" forIndexPath:indexPath]; // 根据cell的状态来设置button按钮是否显示 if (cell.isSelected) { cell.button.hidden = NO; cell.userInteractionEnabled = YES; } else { cell.button.hidden = YES; cell.userInteractionEnabled = NO; } return cell; } ``` 最后,你需要在CreateOutboundDeletePopupView添加一个代理属性,并在CreateOutboundViewController实现该代理协议: ```objc @protocol CreateOutboundDeletePopupViewDelegate <NSObject> - (void)deleteSuccessful; @end @interface CreateOutboundDeletePopupView : UIView @property (nonatomic, weak) id<CreateOutboundDeletePopupViewDelegate> delegate; @end ``` 这样,当你在CreateOutboundDeletePopupView的确定按钮被点击后,就可以调用代理方法通知CreateOutboundViewController删除成功,然后更新tableviewcell,将删除后的cell的button按钮显示出来。

“相关推荐”对你有帮助么?

  • 非常没帮助
  • 没帮助
  • 一般
  • 有帮助
  • 非常有帮助
提交
评论
添加红包

请填写红包祝福语或标题

红包个数最小为10个

红包金额最低5元

当前余额3.43前往充值 >
需支付:10.00
成就一亿技术人!
领取后你会自动成为博主和红包主的粉丝 规则
hope_wisdom
发出的红包
实付
使用余额支付
点击重新获取
扫码支付
钱包余额 0

抵扣说明:

1.余额是钱包充值的虚拟货币,按照1:1的比例进行支付金额的抵扣。
2.余额无法直接购买下载,可以购买VIP、付费专栏及课程。

余额充值