


应用程序管理服务PackageManagerService安装应用程序的过程,其实就是解析析应用程序配置文件AndroidManifest.xml的过程,并从里面得到得到应用程序的相关信息,例如得到应用程序的组件Activity、Service、Broadcast Receiver和Content Provider等信息,有了这些信息后,通过ActivityManagerService这个服务,我们就可以在系统中正常地使用这些应用程序了。
应用程序管理服务PackageManagerService是系统启动的时候由SystemServer组件启动的,启后它就会执行应用程序安装的过程,因此,本文将从SystemServer启动PackageManagerService服务的过程开始分析系统中的应用程序安装的过程。
应用程序管理服务PackageManagerService从启动到安装应用程序的过程如下图所示:
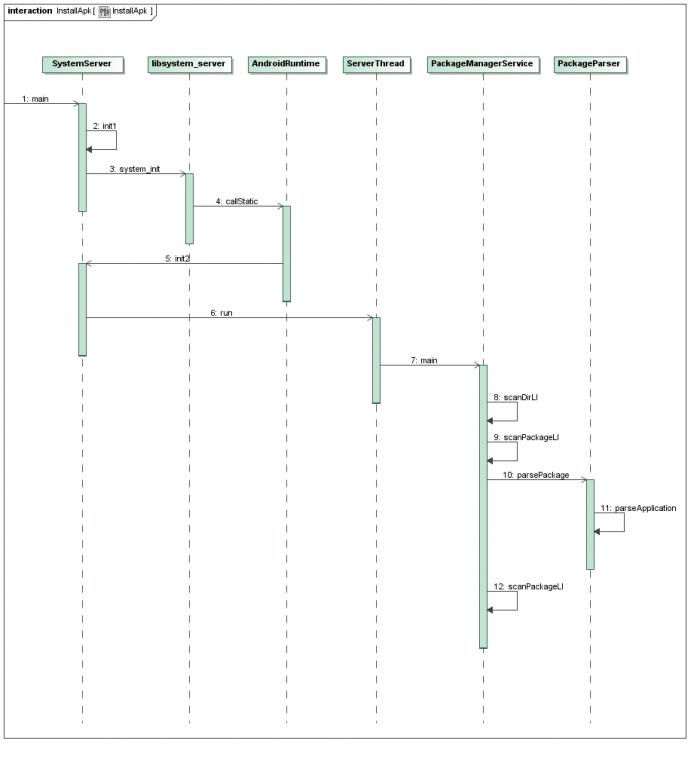
下面我们具体分析每一个步骤。
Step 1. SystemServer.main
这个函数定义在frameworks/base/services/java/com/android/server/SystemServer.java文件中:
- public class SystemServer
- {
- ......
- native public static void init1(String[] args);
- ......
- public static void main(String[] args) {
- ......
- init1(args);
- ......
- }
- ......
- }
Step 2. SystemServer.init1
这个函数是一个JNI方法,实现在 frameworks/base/services/jni/com_android_server_SystemServer.cpp文件中:
- namespace android {
- extern "C" int system_init();
- static void android_server_SystemServer_init1(JNIEnv* env, jobject clazz)
- {
- system_init();
- }
- /*
- * JNI registration.
- */
- static JNINativeMethod gMethods[] = {
- /* name, signature, funcPtr */
- { "init1", "([Ljava/lang/String;)V", (void*) android_server_SystemServer_init1 },
- };
- int register_android_server_SystemServer(JNIEnv* env)
- {
- return jniRegisterNativeMethods(env, "com/android/server/SystemServer",
- gMethods, NELEM(gMethods));
- }
- }; // namespace android
Step 3. libsystem_server.system_init
函数system_init实现在libsystem_server库中,源代码位于frameworks/base/cmds/system_server/library/system_init.cpp文件中:
- extern "C" status_t system_init()
- {
- LOGI("Entered system_init()");
- sp<ProcessState> proc(ProcessState::self());
- sp<IServiceManager> sm = defaultServiceManager();
- LOGI("ServiceManager: %p\n", sm.get());
- sp<GrimReaper> grim = new GrimReaper();
- sm->asBinder()->linkToDeath(grim, grim.get(), 0);
- char propBuf[PROPERTY_VALUE_MAX];
- property_get("system_init.startsurfaceflinger", propBuf, "1");
- if (strcmp(propBuf, "1") == 0) {
- // Start the SurfaceFlinger
- SurfaceFlinger::instantiate();
- }
- // Start the sensor service
- SensorService::instantiate();
- // On the simulator, audioflinger et al don't get started the
- // same way as on the device, and we need to start them here
- if (!proc->supportsProcesses()) {
- // Start the AudioFlinger
- AudioFlinger::instantiate();
- // Start the media playback service
- MediaPlayerService::instantiate();
- // Start the camera service
- CameraService::instantiate();
- // Start the audio policy service
- AudioPolicyService::instantiate();
- }
- // And now start the Android runtime. We have to do this bit
- // of nastiness because the Android runtime initialization requires
- // some of the core system services to already be started.
- // All other servers should just start the Android runtime at
- // the beginning of their processes's main(), before calling
- // the init function.
- LOGI("System server: starting Android runtime.\n");
- AndroidRuntime* runtime = AndroidRuntime::getRuntime();
- LOGI("System server: starting Android services.\n");
- runtime->callStatic("com/android/server/SystemServer", "init2");
- // If running in our own process, just go into the thread
- // pool. Otherwise, call the initialization finished
- // func to let this process continue its initilization.
- if (proc->supportsProcesses()) {
- LOGI("System server: entering thread pool.\n");
- ProcessState::self()->startThreadPool();
- IPCThreadState::self()->joinThreadPool();
- LOGI("System server: exiting thread pool.\n");
- }
- return NO_ERROR;
- }
Step 4. AndroidRuntime.callStatic
这个函数定义在frameworks/base/core/jni/AndroidRuntime.cpp文件中:
- /*
- * Call a static Java Programming Language function that takes no arguments and returns void.
- */
- status_t AndroidRuntime::callStatic(const char* className, const char* methodName)
- {
- JNIEnv* env;
- jclass clazz;
- jmethodID methodId;
- env = getJNIEnv();
- if (env == NULL)
- return UNKNOWN_ERROR;
- clazz = findClass(env, className);
- if (clazz == NULL) {
- LOGE("ERROR: could not find class '%s'\n", className);
- return UNKNOWN_ERROR;
- }
- methodId = env->GetStaticMethodID(clazz, methodName, "()V");
- if (methodId == NULL) {
- LOGE("ERROR: could not find method %s.%s\n", className, methodName);
- return UNKNOWN_ERROR;
- }
- env->CallStaticVoidMethod(clazz, methodId);
- return NO_ERROR;
- }
Step 5. SystemServer.init2
这个函数定义在frameworks/base/services/java/com/android/server/SystemServer.java文件中:
- public class SystemServer
- {
- ......
- public static final void init2() {
- Slog.i(TAG, "Entered the Android system server!");
- Thread thr = new ServerThread();
- thr.setName("android.server.ServerThread");
- thr.start();
- }
- }
Step 6. ServerThread.run
这个函数定义在frameworks/base/services/java/com/android/server/SystemServer.java文件中:
- class ServerThread extends Thread {
- ......
- @Override
- public void run() {
- ......
- IPackageManager pm = null;
- ......
- // Critical services...
- try {
- ......
- Slog.i(TAG, "Package Manager");
- pm = PackageManagerService.main(context,
- factoryTest != SystemServer.FACTORY_TEST_OFF);
- ......
- } catch (RuntimeException e) {
- Slog.e("System", "Failure starting core service", e);
- }
- ......
- }
- ......
- }
Step 7. PackageManagerService.main
这个函数定义在frameworks/base/services/java/com/android/server/PackageManagerService.java文件中:
- class PackageManagerService extends IPackageManager.Stub {
- ......
- public static final IPackageManager main(Context context, boolean factoryTest) {
- PackageManagerService m = new PackageManagerService(context, factoryTest);
- ServiceManager.addService("package", m);
- return m;
- }
- ......
- }
在创建这个PackageManagerService服务实例时,会在PackageManagerService类的构造函数中开始执行安装应用程序的过程:
- class PackageManagerService extends IPackageManager.Stub {
- ......
- public PackageManagerService(Context context, boolean factoryTest) {
- ......
- synchronized (mInstallLock) {
- synchronized (mPackages) {
- ......
- File dataDir = Environment.getDataDirectory();
- mAppDataDir = new File(dataDir, "data");
- mSecureAppDataDir = new File(dataDir, "secure/data");
- mDrmAppPrivateInstallDir = new File(dataDir, "app-private");
- ......
- mFrameworkDir = new File(Environment.getRootDirectory(), "framework");
- mDalvikCacheDir = new File(dataDir, "dalvik-cache");
- ......
- // Find base frameworks (resource packages without code).
- mFrameworkInstallObserver = new AppDirObserver(
- mFrameworkDir.getPath(), OBSERVER_EVENTS, true);
- mFrameworkInstallObserver.startWatching();
- scanDirLI(mFrameworkDir, PackageParser.PARSE_IS_SYSTEM
- | PackageParser.PARSE_IS_SYSTEM_DIR,
- scanMode | SCAN_NO_DEX, 0);
- // Collect all system packages.
- mSystemAppDir = new File(Environment.getRootDirectory(), "app");
- mSystemInstallObserver = new AppDirObserver(
- mSystemAppDir.getPath(), OBSERVER_EVENTS, true);
- mSystemInstallObserver.startWatching();
- scanDirLI(mSystemAppDir, PackageParser.PARSE_IS_SYSTEM
- | PackageParser.PARSE_IS_SYSTEM_DIR, scanMode, 0);
- // Collect all vendor packages.
- mVendorAppDir = new File("/vendor/app");
- mVendorInstallObserver = new AppDirObserver(
- mVendorAppDir.getPath(), OBSERVER_EVENTS, true);
- mVendorInstallObserver.startWatching();
- scanDirLI(mVendorAppDir, PackageParser.PARSE_IS_SYSTEM
- | PackageParser.PARSE_IS_SYSTEM_DIR, scanMode, 0);
- mAppInstallObserver = new AppDirObserver(
- mAppInstallDir.getPath(), OBSERVER_EVENTS, false);
- mAppInstallObserver.startWatching();
- scanDirLI(mAppInstallDir, 0, scanMode, 0);
- mDrmAppInstallObserver = new AppDirObserver(
- mDrmAppPrivateInstallDir.getPath(), OBSERVER_EVENTS, false);
- mDrmAppInstallObserver.startWatching();
- scanDirLI(mDrmAppPrivateInstallDir, PackageParser.PARSE_FORWARD_LOCK,
- scanMode, 0);
- ......
- }
- }
- }
- ......
- }
/system/framework
/system/app
/vendor/app
/data/app
/data/app-private
Step 8. PackageManagerService.scanDirLI
这个函数定义在frameworks/base/services/java/com/android/server/PackageManagerService.java文件中:
- class PackageManagerService extends IPackageManager.Stub {
- ......
- private void scanDirLI(File dir, int flags, int scanMode, long currentTime) {
- String[] files = dir.list();
- ......
- int i;
- for (i=0; i<files.length; i++) {
- File file = new File(dir, files[i]);
- if (!isPackageFilename(files[i])) {
- // Ignore entries which are not apk's
- continue;
- }
- PackageParser.Package pkg = scanPackageLI(file,
- flags|PackageParser.PARSE_MUST_BE_APK, scanMode, currentTime);
- // Don't mess around with apps in system partition.
- if (pkg == null && (flags & PackageParser.PARSE_IS_SYSTEM) == 0 &&
- mLastScanError == PackageManager.INSTALL_FAILED_INVALID_APK) {
- // Delete the apk
- Slog.w(TAG, "Cleaning up failed install of " + file);
- file.delete();
- }
- }
- }
- ......
- }
Step 9. PackageManagerService.scanPackageLI
这个函数定义在frameworks/base/services/java/com/android/server/PackageManagerService.java文件中:
- class PackageManagerService extends IPackageManager.Stub {
- ......
- private PackageParser.Package scanPackageLI(File scanFile,
- int parseFlags, int scanMode, long currentTime) {
- ......
- String scanPath = scanFile.getPath();
- parseFlags |= mDefParseFlags;
- PackageParser pp = new PackageParser(scanPath);
- ......
- final PackageParser.Package pkg = pp.parsePackage(scanFile,
- scanPath, mMetrics, parseFlags);
- ......
- return scanPackageLI(pkg, parseFlags, scanMode | SCAN_UPDATE_SIGNATURE, currentTime);
- }
- ......
- }
Step 10. PackageParser.parsePackage
这个函数定义在frameworks/base/core/java/android/content/pm/PackageParser.java文件中:
- public class PackageParser {
- ......
- public Package parsePackage(File sourceFile, String destCodePath,
- DisplayMetrics metrics, int flags) {
- ......
- mArchiveSourcePath = sourceFile.getPath();
- ......
- XmlResourceParser parser = null;
- AssetManager assmgr = null;
- boolean assetError = true;
- try {
- assmgr = new AssetManager();
- int cookie = assmgr.addAssetPath(mArchiveSourcePath);
- if(cookie != 0) {
- parser = assmgr.openXmlResourceParser(cookie, "AndroidManifest.xml");
- assetError = false;
- } else {
- ......
- }
- } catch (Exception e) {
- ......
- }
- ......
- String[] errorText = new String[1];
- Package pkg = null;
- Exception errorException = null;
- try {
- // XXXX todo: need to figure out correct configuration.
- Resources res = new Resources(assmgr, metrics, null);
- pkg = parsePackage(res, parser, flags, errorText);
- } catch (Exception e) {
- ......
- }
- ......
- parser.close();
- assmgr.close();
- // Set code and resource paths
- pkg.mPath = destCodePath;
- pkg.mScanPath = mArchiveSourcePath;
- //pkg.applicationInfo.sourceDir = destCodePath;
- //pkg.applicationInfo.publicSourceDir = destRes;
- pkg.mSignatures = null;
- return pkg;
- }
- ......
- }
- public class PackageParser {
- ......
- private Package parsePackage(
- Resources res, XmlResourceParser parser, int flags, String[] outError)
- throws XmlPullParserException, IOException {
- ......
- String pkgName = parsePackageName(parser, attrs, flags, outError);
- ......
- final Package pkg = new Package(pkgName);
- ......
- int type;
- ......
- TypedArray sa = res.obtainAttributes(attrs,
- com.android.internal.R.styleable.AndroidManifest);
- ......
- while ((type=parser.next()) != parser.END_DOCUMENT
- && (type != parser.END_TAG || parser.getDepth() > outerDepth)) {
- if (type == parser.END_TAG || type == parser.TEXT) {
- continue;
- }
- String tagName = parser.getName();
- if (tagName.equals("application")) {
- ......
- if (!parseApplication(pkg, res, parser, attrs, flags, outError)) {
- return null;
- }
- } else if (tagName.equals("permission-group")) {
- ......
- } else if (tagName.equals("permission")) {
- ......
- } else if (tagName.equals("permission-tree")) {
- ......
- } else if (tagName.equals("uses-permission")) {
- ......
- } else if (tagName.equals("uses-configuration")) {
- ......
- } else if (tagName.equals("uses-feature")) {
- ......
- } else if (tagName.equals("uses-sdk")) {
- ......
- } else if (tagName.equals("supports-screens")) {
- ......
- } else if (tagName.equals("protected-broadcast")) {
- ......
- } else if (tagName.equals("instrumentation")) {
- ......
- } else if (tagName.equals("original-package")) {
- ......
- } else if (tagName.equals("adopt-permissions")) {
- ......
- } else if (tagName.equals("uses-gl-texture")) {
- ......
- } else if (tagName.equals("compatible-screens")) {
- ......
- } else if (tagName.equals("eat-comment")) {
- ......
- } else if (RIGID_PARSER) {
- ......
- } else {
- ......
- }
- }
- ......
- return pkg;
- }
- ......
- }
Step 11. PackageParser.parseApplication
这个函数定义在frameworks/base/core/java/android/content/pm/PackageParser.java文件中:
- public class PackageParser {
- ......
- private boolean parseApplication(Package owner, Resources res,
- XmlPullParser parser, AttributeSet attrs, int flags, String[] outError)
- throws XmlPullParserException, IOException {
- final ApplicationInfo ai = owner.applicationInfo;
- final String pkgName = owner.applicationInfo.packageName;
- TypedArray sa = res.obtainAttributes(attrs,
- com.android.internal.R.styleable.AndroidManifestApplication);
- ......
- int type;
- while ((type=parser.next()) != parser.END_DOCUMENT
- && (type != parser.END_TAG || parser.getDepth() > innerDepth)) {
- if (type == parser.END_TAG || type == parser.TEXT) {
- continue;
- }
- String tagName = parser.getName();
- if (tagName.equals("activity")) {
- Activity a = parseActivity(owner, res, parser, attrs, flags, outError, false);
- ......
- owner.activities.add(a);
- } else if (tagName.equals("receiver")) {
- Activity a = parseActivity(owner, res, parser, attrs, flags, outError, true);
- ......
- owner.receivers.add(a);
- } else if (tagName.equals("service")) {
- Service s = parseService(owner, res, parser, attrs, flags, outError);
- ......
- owner.services.add(s);
- } else if (tagName.equals("provider")) {
- Provider p = parseProvider(owner, res, parser, attrs, flags, outError);
- ......
- owner.providers.add(p);
- } else if (tagName.equals("activity-alias")) {
- Activity a = parseActivityAlias(owner, res, parser, attrs, flags, outError);
- ......
- owner.activities.add(a);
- } else if (parser.getName().equals("meta-data")) {
- ......
- } else if (tagName.equals("uses-library")) {
- ......
- } else if (tagName.equals("uses-package")) {
- ......
- } else {
- ......
- }
- }
- return true;
- }
- ......
- }
这里解析完成后,一层层返回到Step 9中,调用另一个版本的scanPackageLI函数把来解析后得到的应用程序信息保存下来。
Step 12. PackageManagerService.scanPackageLI
这个函数定义在frameworks/base/services/java/com/android/server/PackageManagerService.java文件中:
- class PackageManagerService extends IPackageManager.Stub {
- ......
- // Keys are String (package name), values are Package. This also serves
- // as the lock for the global state. Methods that must be called with
- // this lock held have the prefix "LP".
- final HashMap<String, PackageParser.Package> mPackages =
- new HashMap<String, PackageParser.Package>();
- ......
- // All available activities, for your resolving pleasure.
- final ActivityIntentResolver mActivities =
- new ActivityIntentResolver();
- // All available receivers, for your resolving pleasure.
- final ActivityIntentResolver mReceivers =
- new ActivityIntentResolver();
- // All available services, for your resolving pleasure.
- final ServiceIntentResolver mServices = new ServiceIntentResolver();
- // Keys are String (provider class name), values are Provider.
- final HashMap<ComponentName, PackageParser.Provider> mProvidersByComponent =
- new HashMap<ComponentName, PackageParser.Provider>();
- ......
- private PackageParser.Package scanPackageLI(PackageParser.Package pkg,
- int parseFlags, int scanMode, long currentTime) {
- ......
- synchronized (mPackages) {
- ......
- // Add the new setting to mPackages
- mPackages.put(pkg.applicationInfo.packageName, pkg);
- ......
- int N = pkg.providers.size();
- int i;
- for (i=0; i<N; i++) {
- PackageParser.Provider p = pkg.providers.get(i);
- p.info.processName = fixProcessName(pkg.applicationInfo.processName,
- p.info.processName, pkg.applicationInfo.uid);
- mProvidersByComponent.put(new ComponentName(p.info.packageName,
- p.info.name), p);
- ......
- }
- N = pkg.services.size();
- for (i=0; i<N; i++) {
- PackageParser.Service s = pkg.services.get(i);
- s.info.processName = fixProcessName(pkg.applicationInfo.processName,
- s.info.processName, pkg.applicationInfo.uid);
- mServices.addService(s);
- ......
- }
- N = pkg.receivers.size();
- r = null;
- for (i=0; i<N; i++) {
- PackageParser.Activity a = pkg.receivers.get(i);
- a.info.processName = fixProcessName(pkg.applicationInfo.processName,
- a.info.processName, pkg.applicationInfo.uid);
- mReceivers.addActivity(a, "receiver");
- ......
- }
- N = pkg.activities.size();
- for (i=0; i<N; i++) {
- PackageParser.Activity a = pkg.activities.get(i);
- a.info.processName = fixProcessName(pkg.applicationInfo.processName,
- a.info.processName, pkg.applicationInfo.uid);
- mActivities.addActivity(a, "activity");
- ......
- }
- ......
- }
- ......
- return pkg;
- }
- ......
- }
这个函数主要就是把前面解析应用程序得到的package、provider、service、receiver和activity等信息保存在PackageManagerService服务中了。
这样,在Android系统启动的时候安装应用程序的过程就介绍完了,但是,这些应用程序只是相当于在PackageManagerService服务注册好了,如果我们想要在Android桌面上看到这些应用程序,还需要有一个Home应用程序,负责从PackageManagerService服务中把这些安装好的应用程序取出来,并以友好的方式在桌面上展现出来,例如以快捷图标的形式。在Android系统中,负责把系统中已经安装的应用程序在桌面中展现出来的Home应用程序就是Launcher了,在下一篇文章中,我们将介绍Launcher是如何启动的以及它是如何从PackageManagerService服务中把系统中已经安装好的应用程序展现出来的,敬请期待。


 94
94


 被折叠的 条评论
为什么被折叠?
被折叠的 条评论
为什么被折叠?
 到【灌水乐园】发言


